iOS 静态度制作方法详细
2016-01-06 10:48
344 查看
按照步骤和我一起来:
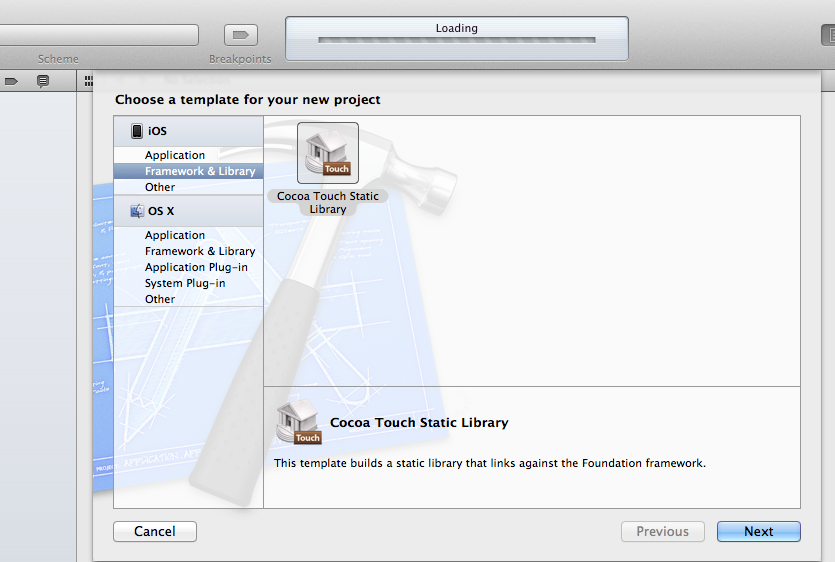
第一步:创建一个新的工程,选择Framework,然后选择cocoa Touch Static Libarary ,添加你自己想要的名字ok,这里我取为“myLibrary”
第二步:在myLibrary.h中添加并改为
[html] view
plaincopy
#import <Foundation/Foundation.h>
#import <UIKit/UIKit.h>
@interface myLibrary : NSObject
-(void)testFunction;
@end
第三步:在myLibrary.m中改为
[html] view
plaincopy
#import "myLibrary.h"
@implementation myLibrary
-(void)testFunction{
UIAlertView *myAlert=[[UIAlertView alloc] initWithTitle:@"哈哈,这个是静态库!"
message:@"成功了!"
delegate:self
cancelButtonTitle:@"取消"
otherButtonTitles:nil, nil];
[myAlert show];
[myAlert release];
}
@end
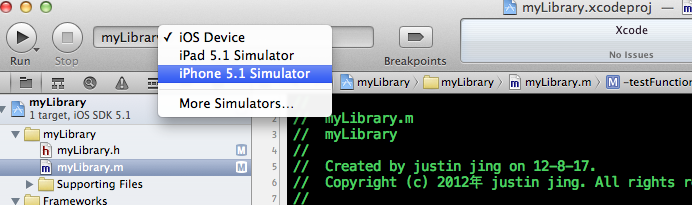
第四步:在左上角选择中改为iphone simulator
第五步:Bulid & Run ,会在Bulid文件夹里面有个libmyLibrary.a的文件
第六步:新建工程testLibrary
第七步:导入生成的libmyLibrary.a静态库和头文件,可以直接拖入到工程

第八步:在testLibrary 工程的
“ViewController.m”文件的viewDidLoad方法中添加
[html] view
plaincopy
#import "ViewController.h"
#import "myLibrary.h"
@interface ViewController ()
@end
@implementation ViewController
- (void)viewDidLoad
{
[super viewDidLoad];
// Do any additional setup after loading the view, typically from a nib.
myLibrary* pp=[[myLibrary alloc] init];
[pp testFunction];
[pp release];
}
第九步:Bulid & Run 我们的testLibrary 工程 然后九看到效果了

最后还有就是这个libmyLibrary.a静态库分为模拟器和真机的,切换也很方便就在

在这个地方切换为真机就ok了!
第一步:创建一个新的工程,选择Framework,然后选择cocoa Touch Static Libarary ,添加你自己想要的名字ok,这里我取为“myLibrary”
第二步:在myLibrary.h中添加并改为
[html] view
plaincopy
#import <Foundation/Foundation.h>
#import <UIKit/UIKit.h>
@interface myLibrary : NSObject
-(void)testFunction;
@end
第三步:在myLibrary.m中改为
[html] view
plaincopy
#import "myLibrary.h"
@implementation myLibrary
-(void)testFunction{
UIAlertView *myAlert=[[UIAlertView alloc] initWithTitle:@"哈哈,这个是静态库!"
message:@"成功了!"
delegate:self
cancelButtonTitle:@"取消"
otherButtonTitles:nil, nil];
[myAlert show];
[myAlert release];
}
@end
第四步:在左上角选择中改为iphone simulator
第五步:Bulid & Run ,会在Bulid文件夹里面有个libmyLibrary.a的文件
第六步:新建工程testLibrary
第七步:导入生成的libmyLibrary.a静态库和头文件,可以直接拖入到工程
第八步:在testLibrary 工程的
“ViewController.m”文件的viewDidLoad方法中添加
[html] view
plaincopy
#import "ViewController.h"
#import "myLibrary.h"
@interface ViewController ()
@end
@implementation ViewController
- (void)viewDidLoad
{
[super viewDidLoad];
// Do any additional setup after loading the view, typically from a nib.
myLibrary* pp=[[myLibrary alloc] init];
[pp testFunction];
[pp release];
}
第九步:Bulid & Run 我们的testLibrary 工程 然后九看到效果了
最后还有就是这个libmyLibrary.a静态库分为模拟器和真机的,切换也很方便就在
在这个地方切换为真机就ok了!

相关文章推荐
- IOS实现BLE后台通信
- IOS截屏,View截图的基本方法
- iOS正则表达式检验手机号,邮箱等
- iOS 手机号正则表达式
- iOS 隐藏/去掉 导航栏返回按钮中的文字
- 密码中有特殊的字符IOS如何处理 IOS中URL包含中文参数的问题
- iOS - 学习路径图
- ios 上拉加载更多tableview MJRefresh
- 不让苹果开发者账号折磨我
- libxml/tree.h‘file not found
- 【iOS开发-图层】自己定义图层的两种方式
- iOS开发-常用第三方开源框架介绍
- iOS 处理图片的一些小 Tip
- iOS 延时执行的四种方法
- IOS中延时执行的几种方式的比较和汇总
- iOS性能分析工具
- 关于iOS购物车的初学写法思路
- IOS整体项目层级构建
- iOS 正则表达式应用于理解
- 蜂窝教育iOS培训 助我实现梦想