springBoot jpa 多数据源的动态切换
2015-12-27 15:34
696 查看
这周笨小葱一直在研究如何使用springBoot的多数据源配置。
看了3天的网上的博客,发现大多数都是多数据源的配置,并没有很详细的关于使用springBoot的多数据源动态切换的配置。前者整体配置过程是在springBoot的原有的jpa实体管理工厂(entityManagerFactory)的基础上(这里,entityManagerFactory会绑定一个数据源,而transactionManager只需将entityManagerFactory注入就可以绑定数据源了)再次创建一个实体类管理工厂,然后绑定另外一个数据源,但是各自entityManagerFactory都需要绑定各自的repository。这种配置适合一个用户操作不同的数据库。而如果要不同的用户操作不同的数据源,同时对应同一个repository。那么就不能够实现啦。所以需要实现数据源的动态切换。
这里第一种配置,笨小葱就不详解了,网上有很多资料。
详细说一下,关于springBoot jpa的多数据源动态切换。
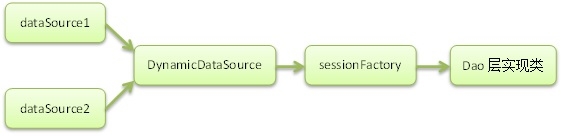
这里我们配置2个数据源,通过动态数据源来切换,对应一个entityManagerFactory,一个repository。主要功能是不同的用户操作不同的数据库,但是他们的数据库结构是一样的,所调用的controller方法也是一样的。
实现原理:
1、扩展Spring的AbstractRoutingDataSource抽象类(该类充当了DataSource的路由中介, 能有在运行时, 根据某种key值来动态切换到真正的DataSource上。)
从AbstractRoutingDataSource的源码中:
我们可以看到,它继承了AbstractDataSource,而AbstractDataSource不就是javax.sql.DataSource的子类,So我们可以分析下它的getConnection方法:
获取连接的方法中,重点是determineTargetDataSource()方法,看源码:
上面这段源码的重点在于determineCurrentLookupKey()方法,这是AbstractRoutingDataSource类中的一个抽象方法,而它的返回值是你所要用的数据源dataSource的key值,有了这个key值,resolvedDataSource(这是个map,由配置文件中设置好后存入的)就从中取出对应的DataSource,如果找不到,就用配置默认的数据源。
看完源码,应该有点启发了吧,没错!你要扩展AbstractRoutingDataSource类,并重写其中的determineCurrentLookupKey()方法,来实现数据源的切换:
DataSourceHolder这个类则是我们自己封装的对数据源进行操作的类:
创建完这2个类之后,只需要在调用controller的方法之前调用对应的数据源就可以了。调用数据源即:
这样在执行controller方法之前就完成了当前线程(http请求)的数据源切换。
这个方法也是参考的网上的。但是如何将其整合入springBoot中,还需要自己调试一下。笨小葱花了2天时间,终于配置调试好了。下面配上springBoot的各个文件。
首先:创建上面的2个类。
DynamicDataSource.java :
DataSourceHolder.java :
然后是多数据源与动态数据源的配置,以及entityManagerFactory和transactionManager的配置文件
application-data.xml:
配置完成后,需要让springBoot在启动时候,创建application上下文对象的时候加载这个xml文档,创建数据源bean
下面需要在调用controller中的方法之前,添加一个aop切面。用于根据需求修改数据源。
下面附上controller,domain和repository的代码
UserInfoController.java:
User.java:
UserRepository.java:
ok,搞定了。后面我会传上项目源码。项目源码:http://download.csdn.net/detail/sunshine920103/9379127
看了3天的网上的博客,发现大多数都是多数据源的配置,并没有很详细的关于使用springBoot的多数据源动态切换的配置。前者整体配置过程是在springBoot的原有的jpa实体管理工厂(entityManagerFactory)的基础上(这里,entityManagerFactory会绑定一个数据源,而transactionManager只需将entityManagerFactory注入就可以绑定数据源了)再次创建一个实体类管理工厂,然后绑定另外一个数据源,但是各自entityManagerFactory都需要绑定各自的repository。这种配置适合一个用户操作不同的数据库。而如果要不同的用户操作不同的数据源,同时对应同一个repository。那么就不能够实现啦。所以需要实现数据源的动态切换。
这里第一种配置,笨小葱就不详解了,网上有很多资料。
详细说一下,关于springBoot jpa的多数据源动态切换。
这里我们配置2个数据源,通过动态数据源来切换,对应一个entityManagerFactory,一个repository。主要功能是不同的用户操作不同的数据库,但是他们的数据库结构是一样的,所调用的controller方法也是一样的。
实现原理:
1、扩展Spring的AbstractRoutingDataSource抽象类(该类充当了DataSource的路由中介, 能有在运行时, 根据某种key值来动态切换到真正的DataSource上。)
从AbstractRoutingDataSource的源码中:
public abstract class AbstractRoutingDataSource extends AbstractDataSource implements InitializingBean
我们可以看到,它继承了AbstractDataSource,而AbstractDataSource不就是javax.sql.DataSource的子类,So我们可以分析下它的getConnection方法:
public Connection getConnection() throws SQLException {
return determineTargetDataSource().getConnection();
}

public Connection getConnection(String username, String password) throws SQLException {
return determineTargetDataSource().getConnection(username, password);
}
获取连接的方法中,重点是determineTargetDataSource()方法,看源码:
/**
* Retrieve the current target DataSource. Determines the
* {@link #determineCurrentLookupKey() current lookup key}, performs
* a lookup in the {@link #setTargetDataSources targetDataSources} map,
* falls back to the specified
* {@link #setDefaultTargetDataSource default target DataSource} if necessary.
* @see #determineCurrentLookupKey()
*/
protected DataSource determineTargetDataSource() {
Assert.notNull(this.resolvedDataSources, "DataSource router not initialized");
Object lookupKey = determineCurrentLookupKey();
DataSource dataSource = this.resolvedDataSources.get(lookupKey);
if (dataSource == null && (this.lenientFallback || lookupKey == null)) {
dataSource = this.resolvedDefaultDataSource;
}
if (dataSource == null) {
throw new IllegalStateException("Cannot determine target DataSource for lookup key [" + lookupKey + "]");
}
return dataSource;
}
上面这段源码的重点在于determineCurrentLookupKey()方法,这是AbstractRoutingDataSource类中的一个抽象方法,而它的返回值是你所要用的数据源dataSource的key值,有了这个key值,resolvedDataSource(这是个map,由配置文件中设置好后存入的)就从中取出对应的DataSource,如果找不到,就用配置默认的数据源。
看完源码,应该有点启发了吧,没错!你要扩展AbstractRoutingDataSource类,并重写其中的determineCurrentLookupKey()方法,来实现数据源的切换:
package com.datasource.test.util.database;

import org.springframework.jdbc.datasource.lookup.AbstractRoutingDataSource;

/**
* 获取数据源(依赖于spring)
* @author linhy
*/
public class DynamicDataSource extends AbstractRoutingDataSource{
@Override
protected Object determineCurrentLookupKey() {
return DataSourceHolder.getDataSource();
}
}
DataSourceHolder这个类则是我们自己封装的对数据源进行操作的类:
package com.datasource.test.util.database;

/**
* 数据源操作
* @author linhy
*/
public class DataSourceHolder {
//线程本地环境
private static final ThreadLocal<String> dataSources = new ThreadLocal<String>();
//设置数据源
public static void setDataSource(String customerType) {
dataSources.set(customerType);
}
//获取数据源
public static String getDataSource() {
return (String) dataSources.get();
}
//清除数据源
public static void clearDataSource() {
dataSources.remove();
}

}
创建完这2个类之后,只需要在调用controller的方法之前调用对应的数据源就可以了。调用数据源即:
DataSourceHolder.setDataSource (xxxx);
这样在执行controller方法之前就完成了当前线程(http请求)的数据源切换。
这个方法也是参考的网上的。但是如何将其整合入springBoot中,还需要自己调试一下。笨小葱花了2天时间,终于配置调试好了。下面配上springBoot的各个文件。
首先:创建上面的2个类。
DynamicDataSource.java :
package cc.study.springboot.domain;

import org.springframework.jdbc.datasource.lookup.AbstractRoutingDataSource;

/**
 * Created by Administrator on 2015/11/25.
 */
public class DynamicDataSource extends AbstractRoutingDataSource {
    @Override
    protected Object determineCurrentLookupKey() {

        return DataSourceHolder.getDataSource();
    }
}
DataSourceHolder.java :
package cc.study.springboot.domain;

/**
* Created by Administrator on 2015/11/25.
*/
public class DataSourceHolder {

//线程本地环境
private static final ThreadLocal<String> dataSources = new ThreadLocal<String>();
//设置数据源
public static void setDataSource(String customerType) {
dataSources.set(customerType);
}
//获取数据源
public static String getDataSource() {
return (String) dataSources.get();
}
//清除数据源
public static void clearDataSource() {
dataSources.remove();
}
}
然后是多数据源与动态数据源的配置,以及entityManagerFactory和transactionManager的配置文件
application-data.xml:
<?xml version="1.0" encoding="UTF-8"?>
<beans xmlns="http://www.springframework.org/schema/beans"
xmlns:xsi="http://www.w3.org/2001/XMLSchema-instance" xmlns:tx="http://www.springframework.org/schema/tx"
xsi:schemaLocation="http://www.springframework.org/schema/beans http://www.springframework.org/schema/beans/spring-beans.xsd http://www.springframework.org/schema/tx http://www.springframework.org/schema/tx/spring-tx.xsd" >

<bean id="ds1" name="ds1"
class="org.springframework.jdbc.datasource.DriverManagerDataSource" primary="true">  //这里多数据源,springBoot启动时需要指定一个默认的数据源,所以需要加primary="true",否则会出现数据源bean匹配失败错误
<property name="driverClassName" value="com.microsoft.sqlserver.jdbc.SQLServerDriver"/>
<property name="url" value="jdbc:sqlserver://127.0.0.1:1433;databaseName=xxx"/>
<property name="username" value="test"/>
<property name="password" value="xxx"/>
</bean>

<bean id="ds2" name="ds2"
class="org.springframework.jdbc.datasource.DriverManagerDataSource" >
<property name="driverClassName" value="com.microsoft.sqlserver.jdbc.SQLServerDriver"/>
<property name="url" value="jdbc:sqlserver://127.0.0.1:1433;databaseName=cc"/>
<property name="username" value="test"/>
<property name="password" value="xxx"/>
</bean>

<!--动态选择数据源-->
<bean id="dataSource" class="cc.study.springboot.domain.DynamicDataSource" >
<property name="targetDataSources">
<map key-type="java.lang.String">
<entry key="1" value-ref="ds1"/>
<entry key="2" value-ref="ds2"/>
</map>
</property>
<property name="defaultTargetDataSource" ref="ds1"/> //不可少
</bean>

<bean id="entityManagerFactory"
class="org.springframework.orm.jpa.LocalContainerEntityManagerFactoryBean"
destroy-method="destroy" >
<property name="dataSource" ref="dataSource" />     //这里将动态数据源bean注入
<property name="jpaVendorAdapter">
<bean
class="org.springframework.orm.jpa.vendor.HibernateJpaVendorAdapter">
<property name="databasePlatform" value="org.hibernate.dialect.SQLServer2008Dialect"/>
<property name="showSql" value="true"/>
</bean>
</property>
<property name="packagesToScan" value="cc.study.springboot.domain"/>
<property name="jpaPropertyMap">
<map>
<entry key="javax.persistence.schema-generation.database.action" value="none"/>
</map>
</property>
</bean>

<bean id="transactionManager"
class="org.springframework.orm.jpa.JpaTransactionManager">

<property name="entityManagerFactory"
ref="entityManagerFactory"/>
</bean>

<tx:annotation-driven transaction-manager="transactionManager"/>

</beans>
配置完成后,需要让springBoot在启动时候,创建application上下文对象的时候加载这个xml文档,创建数据源bean
package cc.study.springboot;

import org.springframework.beans.factory.annotation.Autowire;
import org.springframework.beans.factory.annotation.Configurable;
import org.springframework.boot.SpringApplication;
import org.springframework.boot.autoconfigure.EnableAutoConfiguration;
import org.springframework.context.ApplicationContext;
import org.springframework.context.annotation.ComponentScan;
import org.springframework.context.annotation.Configuration;
import org.springframework.context.annotation.ImportResource;

/*@SpringBootApplication is a convenience annotation that adds all of the following:
@Configuration tags the class as a source of bean definitions for the application context.
@EnableAutoConfiguration. This annotation tells Spring Boot to “guess” how you will want to configure Spring,
based on the jar dependencies that you have added. Since spring-boot-starter-web added Tomcat and Spring MVC,
the auto-configuration will assume that you are developing a web application and setup Spring accordingly.
This flags the application as a web application and activates key behaviors such as setting up a DispatcherServlet.
@ComponentScan tells Spring to look for other components, configurations, and services in the the hello package, allowing it to find the HelloController.*/ </span><span style="white-space:pre">
@Configuration
@Configurable(autowire = Autowire.BY_NAME)    //定义bean的注入方式
@EnableAutoConfiguration
@ComponentScan
@ImportResource("classpath:application-data.xml")
class Application {

public static void main(String[] args) {
ApplicationContext ctx = SpringApplication.run(Application.class, args);

}
}
下面需要在调用controller中的方法之前,添加一个aop切面。用于根据需求修改数据源。
package cc.study.springboot.service;

import cc.study.springboot.domain.DataSourceHolder;
import org.aspectj.lang.annotation.Aspect;
import org.aspectj.lang.annotation.Before;
import org.aspectj.lang.annotation.Pointcut;
import org.springframework.context.annotation.Configuration;

/**
* Created by Administrator on 2015/12/16.
*/
@Aspect     //注解的方式配置aop
@Configuration
public class dataSourceAspect {
@Pointcut("execution(* cc.study.springboot.controller..*.*(..))")
private void anyMethod(){}//定义一个切入点

@Before("anyMethod()")
public void dataSourceChange()
{
System.out.print("更改数据源为cc");
DataSourceHolder.setDataSource("2");
/*这里根据用户的类型来更改对应的数据源*/
}
}
下面附上controller,domain和repository的代码
UserInfoController.java:
package cc.study.springboot.controller;

import cc.study.springboot.domain.DataSourceHolder;
import cc.study.springboot.domain.User;
import cc.study.springboot.repository.UserRepository;
import org.springframework.beans.factory.annotation.Value;
import org.springframework.http.HttpStatus;
import org.springframework.http.ResponseEntity;
import org.springframework.web.bind.annotation.PathVariable;
import org.springframework.web.bind.annotation.RequestMapping;
import org.springframework.web.bind.annotation.RequestMethod;
import org.springframework.web.bind.annotation.RestController;

import javax.inject.Inject;
import javax.servlet.http.HttpServletRequest;

@RestController
public class UserInfoController {

@Inject
private UserRepository repo;

@Value("${datasource.secondary.url}")
private String url;

@RequestMapping(value = "/userInfo/{id}", method = RequestMethod.GET)

public ResponseEntity<?> getUser(@PathVariable("id") String id,HttpServletRequest request) {

/*  WebApplicationContext wct= WebApplicationContextUtils.getWebApplicationContext(request.getSession().getServletContext());
ComboPooledDataSource ds= (ComboPooledDataSource) wct.getBean("dataSource");
ds.setJdbcUrl(url);
*/
User u = repo.findByUsername(id);

return new ResponseEntity<Object>(u, HttpStatus.OK);
}

@RequestMapping(value = "/user", method = RequestMethod.GET)

public ResponseEntity<?> userLogin() {

DataSourceHolder.setDataSource("2");
User u = repo.findByUsername("80045");
return new ResponseEntity<Object>(u, HttpStatus.OK);
/* try {

if("0".equals(loginPost("http://192.168.0.69/SITApps/SITPortal/PortalPage/VerificationUser.aspx", "username=" + username + "&password=" + password)))
{
return new ResponseEntity<>( HttpStatus.OK);
}
} catch (Exception e) {
e.printStackTrace();
}
return new ResponseEntity<Object>(HttpStatus.BAD_REQUEST);*/

}

}
User.java:
package cc.study.springboot.domain;

import com.fasterxml.jackson.annotation.JsonIgnore;

import javax.persistence.*;

@Entity
@Table(name = "t_mobile_person")
public class User {
private String username;
private String password;
private String factoryCode;
private String departmentCode;
private String permissionSys;
private String permissionMonitor;
private String realname;

@Id
@Column(name = "person_id")
public String getUsername() {
return username;
}

public void setUsername(String username) {
this.username = username;
}

@Column(name = "password")
@JsonIgnore
public String getPassword() {
return password;
}

public void setPassword(String password) {
this.password = password;
}

@Column(name = "factory_code")
public String getFactoryCode() {
return factoryCode;
}

public void setFactoryCode(String factoryCode) {
this.factoryCode = factoryCode;
}

@Column(name = "department_code")
public String getDepartmentCode() {
return departmentCode;
}

public void setDepartmentCode(String departmentCode) {
this.departmentCode = departmentCode;
}

@Column(name = "permission_sys")
@JsonIgnore
public String getPermissionSys() {
return permissionSys;
}

public void setPermissionSys(String permissionSys) {
this.permissionSys = permissionSys;
}

@Column(name = "permission_monitor")
@JsonIgnore
public String getPermissionMonitor() {
return permissionMonitor;
}

public void setPermissionMonitor(String permissionMonitor) {
this.permissionMonitor = permissionMonitor;
}

@Column(name = "REALNAME")
public String getRealname() {
return realname;
}

public void setRealname(String realname) {
this.realname = realname;
}

}
UserRepository.java:
package cc.study.springboot.repository;

import cc.study.springboot.domain.User;
import org.springframework.data.repository.CrudRepository;
import org.springframework.stereotype.Repository;
import org.springframework.transaction.annotation.Transactional;

@Repository
@Transactional
public interface UserRepository extends CrudRepository<User, String> {
User findByUsername(String id);
}
ok,搞定了。后面我会传上项目源码。项目源码:http://download.csdn.net/detail/sunshine920103/9379127

相关文章推荐
- 【Java并发编程实战】----- AQS(三):阻塞、唤醒:LockSupport
- JavaHL(JNI) Not Available
- jdbc中java与mysql数据类型的映射
- eclipse推荐的插件
- Java多线程之CountDownLatch
- JAVA IO的那些事
- java web基础 --- session
- Java NIO2:缓冲区
- Spring Security 4学习
- 利用泛型抽取Dao层,加事务注解问题(java.lang.Class cannot be cast to java.lang.reflect.ParameterizedType)
- Spring MVC的路径匹配
- myeclipse 开发最常用实用快捷键
- 设置NetBeans的编辑器字体为抗锯齿
- JAVA异常处理
- 《Spring Boot Cook Book》阅读笔记
- Java多线程中同步Boolean问题
- Java中数组赋值的三种方式
- SpringMVC 自定义参数绑定实现日期类型绑定
- 初步封装jdbc
- 字符串转换为合法IP地址