使用注解和自定义验证实现Spring MVC表单验证(翻译)
2015-12-17 14:08
1261 查看
原文地址:http://www.journaldev.com/2668/spring-mvc-form-validation-example-using-annotation-and-custom-validator-implementation
在web应用中,当我们接收客户端输入时都需要进行验证。我们可以用JavaScript进行前台验证,但也需要在服务器端进行后台验证,以保证在浏览器禁用了JavaScript或者用其它方式绕过前端验证的情况下,任然能保证处理的数据是合法的。
Spring MVC框架支持JSR-303规范,在Spring MVC应用中,默认情况下我们只需要增加JSR-303和他的依赖实现。Spring还提供了@Validator注解和BindingResult类。它们作为Controller的方法中的参数使用,其中@Validator注解表示对哪个实体进行验证,而验证的错误信息可以在BindingResult里面找到。
我们创建自定义验证有两种方式:第一种方法是创建符合JSR-303规范的注解;第二种方式是实现org.springframework.validation.Validator接口,并且在使用验证时要用@InitBinder注解来指定使用哪个Validator接口的实现类来验证。
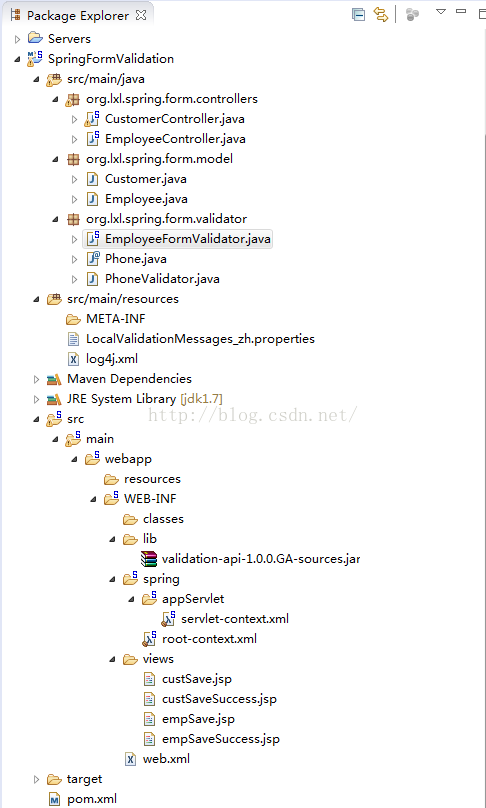
下面我们用Spring Tool Suite工具来创建一个简单的Spring MVC Project,需要使用符合JR-303规范的hibernate-validator.jar包。我们将使用注解和符合JSR-303规范的自定义验证来进行表单验证。我们还要在一个Controller中使用自定义Validator接口的实现类来进行验证。最后的项目结构如下图所示(这是我按照原文写的一个项目,其中LocalValidationMessages_zh.properties在原文中名为message_en.properties,因为我觉得这个名字太含糊了,不能表示是中文本地验证信息配置文件这层含义,而且在hibernate-validate中的配置文件名都是ValidateionMessages_zh_CN.properties这种样子的,所以就改了;原文中没有lib目录的,因为我要看validation-api的源码,而项目中使用的1.1.0版本没有源码包,所以就用了1.0.0版本的资源包临时扔到项目里用一下;还有不同的就是spring文件的名称、位置,这个无所谓的啦)。
下面我们一个一个来看这些组件。
Spring MVC,JSR-303 和Hibernate Validator的依赖
我们最终的pom.xml文件如下图所示。
<?xml version="1.0" encoding="UTF-8"?>
<project xmlns="http://maven.apache.org/POM/4.0.0" xmlns:xsi="http://www.w3.org/2001/XMLSchema-instance"
xsi:schemaLocation="http://maven.apache.org/POM/4.0.0 http://maven.apache.org/maven-v4_0_0.xsd">
<modelVersion>4.0.0</modelVersion>
<groupId>org.lxl</groupId>
<artifactId>spring</artifactId>
<name>SpringFormValidation</name>
<packaging>war</packaging>
<version>1.0.0-BUILD-SNAPSHOT</version>
<properties>
<java-version>1.7</java-version>
<org.springframework-version>4.0.9.RELEASE</org.springframework-version>
<org.aspectj-version>1.7.4</org.aspectj-version>
<org.slf4j-version>1.7.5</org.slf4j-version>
</properties>
<dependencies>
<!-- Form Validation using Annotations -->
<!-- 这里要用5.0.1.Final,原文中用4.1.0.Final会报错的 -->
<dependency>
<groupId>javax.validation</groupId>
<artifactId>validation-api</artifactId>
<version>1.1.0.Final</version>
</dependency>
<dependency>
<groupId>org.hibernate</groupId>
<artifactId>hibernate-validator</artifactId>
<version>5.0.1.Final</version>
</dependency>
<!-- Spring -->
<dependency>
<groupId>org.springframework</groupId>
<artifactId>spring-context</artifactId>
<version>${org.springframework-version}</version>
<exclusions>
<!-- Exclude Commons Logging in favor of SLF4j -->
<exclusion>
<groupId>commons-logging</groupId>
<artifactId>commons-logging</artifactId>
</exclusion>
</exclusions>
</dependency>
<dependency>
<groupId>org.springframework</groupId>
<artifactId>spring-webmvc</artifactId>
<version>${org.springframework-version}</version>
</dependency>
<!-- AspectJ -->
<dependency>
<groupId>org.aspectj</groupId>
<artifactId>aspectjrt</artifactId>
<version>${org.aspectj-version}</version>
</dependency>
<!-- Logging -->
<dependency>
<groupId>org.slf4j</groupId>
<artifactId>slf4j-api</artifactId>
<version>${org.slf4j-version}</version>
</dependency>
<dependency>
<groupId>org.slf4j</groupId>
<artifactId>jcl-over-slf4j</artifactId>
<version>${org.slf4j-version}</version>
<scope>runtime</scope>
</dependency>
<dependency>
<groupId>org.slf4j</groupId>
<artifactId>slf4j-log4j12</artifactId>
<version>${org.slf4j-version}</version>
<scope>runtime</scope>
</dependency>
<dependency>
<groupId>log4j</groupId>
<artifactId>log4j</artifactId>
<version>1.2.15</version>
<exclusions>
<exclusion>
<groupId>javax.mail</groupId>
<artifactId>mail</artifactId>
</exclusion>
<exclusion>
<groupId>javax.jms</groupId>
<artifactId>jms</artifactId>
</exclusion>
<exclusion>
<groupId>com.sun.jdmk</groupId>
<artifactId>jmxtools</artifactId>
</exclusion>
<exclusion>
<groupId>com.sun.jmx</groupId>
<artifactId>jmxri</artifactId>
</exclusion>
</exclusions>
<scope>runtime</scope>
</dependency>
<!-- @Inject -->
<dependency>
<groupId>javax.inject</groupId>
<artifactId>javax.inject</artifactId>
<version>1</version>
</dependency>
<!-- Servlet -->
<dependency>
<groupId>javax.servlet</groupId>
<artifactId>servlet-api</artifactId>
<version>2.5</version>
<scope>provided</scope>
</dependency>
<dependency>
<groupId>javax.servlet.jsp</groupId>
<artifactId>jsp-api</artifactId>
<version>2.1</version>
<scope>provided</scope>
</dependency>
<dependency>
<groupId>javax.servlet</groupId>
<artifactId>jstl</artifactId>
<version>1.2</version>
</dependency>
<!-- Test -->
<dependency>
<groupId>junit</groupId>
<artifactId>junit</artifactId>
<version>4.7</version>
<scope>test</scope>
</dependency>
</dependencies>
<build>
<plugins>
<plugin>
<artifactId>maven-eclipse-plugin</artifactId>
<version>2.9</version>
<configuration>
<additionalProjectnatures>
<projectnature>org.springframework.ide.eclipse.core.springnature</projectnature>
</additionalProjectnatures>
<additionalBuildcommands>
<buildcommand>org.springframework.ide.eclipse.core.springbuilder</buildcommand>
</additionalBuildcommands>
<downloadSources>true</downloadSources>
<downloadJavadocs>true</downloadJavadocs>
</configuration>
</plugin>
<plugin>
<groupId>org.apache.maven.plugins</groupId>
<artifactId>maven-compiler-plugin</artifactId>
<version>2.5.1</version>
<configuration>
<source>1.6</source>
<target>1.6</target>
<compilerArgument>-Xlint:all</compilerArgument>
<showWarnings>true</showWarnings>
<showDeprecation>true</showDeprecation>
</configuration>
</plugin>
<plugin>
<groupId>org.codehaus.mojo</groupId>
<artifactId>exec-maven-plugin</artifactId>
<version>1.2.1</version>
<configuration>
<mainClass>org.test.int1.Main</mainClass>
</configuration>
</plugin>
</plugins>
</build>
</project>
除了标准的Srping MVC的工件外,我们还有在项目中加入validation-api和hibernate-validator。
配置文件
在用STS创建SpringMVC项目时,会有三个配置文件:web.xml、root-context.xml(Spring主配置文件)、servlet-context.xml(Spring MVC配置文件)。
web.xml
<?xml version="1.0" encoding="UTF-8"?>
<web-app version="2.5" xmlns="http://java.sun.com/xml/ns/javaee"
xmlns:xsi="http://www.w3.org/2001/XMLSchema-instance"
xsi:schemaLocation="http://java.sun.com/xml/ns/javaee http://java.sun.com/xml/ns/javaee/web-app_2_5.xsd">
<!-- The definition of the Root Spring Container shared by all Servlets and Filters -->
<context-param>
<param-name>contextConfigLocation</param-name>
<param-value>/WEB-INF/spring/root-context.xml</param-value>
</context-param>
<!-- Creates the Spring Container shared by all Servlets and Filters -->
<listener>
<listener-class>org.springframework.web.context.ContextLoaderListener</listener-class>
</listener>
<!-- Processes application requests -->
<servlet>
<servlet-name>appServlet</servlet-name>
<servlet-class>org.springframework.web.servlet.DispatcherServlet</servlet-class>
<init-param>
<param-name>contextConfigLocation</param-name>
<param-value>/WEB-INF/spring/appServlet/servlet-context.xml</param-value>
</init-param>
<load-on-startup>1</load-on-startup>
</servlet>
<servlet-mapping>
<servlet-name>appServlet</servlet-name>
<url-pattern>/</url-pattern>
</servlet-mapping>
</web-app>
root-context.xml
<?xml version="1.0" encoding="UTF-8"?>
<beans xmlns="http://www.springframework.org/schema/beans"
xmlns:xsi="http://www.w3.org/2001/XMLSchema-instance"
xsi:schemaLocation="http://www.springframework.org/schema/beans
http://www.springframework.org/schema/beans/spring-beans.xsd">
<!-- Root Context: defines shared resources visible to all other web components -->
</beans>
servlet-context.xml
<?xml version="1.0" encoding="UTF-8"?>
<beans:beans xmlns="http://www.springframework.org/schema/mvc"
xmlns:xsi="http://www.w3.org/2001/XMLSchema-instance"
xmlns:beans="http://www.springframework.org/schema/beans"
xmlns:context="http://www.springframework.org/schema/context"
xsi:schemaLocation="http://www.springframework.org/schema/mvc http://www.springframework.org/schema/mvc/spring-mvc.xsd
http://www.springframework.org/schema/beans http://www.springframework.org/schema/beans/spring-beans.xsd http://www.springframework.org/schema/context http://www.springframework.org/schema/context/spring-context.xsd">
<!-- DispatcherServlet Context: defines this servlet's request-processing infrastructure -->
<!-- Enables the Spring MVC @Controller programming model -->
<annotation-driven />
<!--
Handles HTTP GET requests for /resources/** by efficiently serving up static resources in the ${webappRoot}/resources directory
-->
<resources mapping="/resources/**" location="/resources/" />
<!-- Resolves views selected for rendering by @Controllers to .jsp resources in the /WEB-INF/views directory -->
<beans:bean class="org.springframework.web.servlet.view.InternalResourceViewResolver">
<beans:property name="prefix" value="/WEB-INF/views/" />
<beans:property name="suffix" value=".jsp" />
</beans:bean>
<beans:bean id="employeeValidator" class="org.lxl.spring.form.validator.EmployeeFormValidator"/>
<beans:bean id="messageSource"
class="org.springframework.context.support.ReloadableResourceBundleMessageSource">
<beans:property name="basename" value="classpath:LocalValidationMessages_zh"/>
<beans:property name="defaultEncoding" value="UTF-8"/>
</beans:bean>
<context:component-scan base-package="org.lxl.spring" />
</beans:beans>
唯一重要的一点需要注意的是 employeeValidator 要注入到一个Controller,messageSource指定了本地验证配置文件的位置。剩下的部分就是支持注解、寻找视图等spring MVC基本配置了。
模型类
Customer.java
package org.lxl.spring.form.model;
import java.util.Date;
import javax.validation.constraints.Max;
import javax.validation.constraints.Min;
import javax.validation.constraints.NotNull;
import javax.validation.constraints.Past;
import javax.validation.constraints.Size;
import org.hibernate.validator.constraints.Email;
import org.hibernate.validator.constraints.NotEmpty;
import org.springframework.format.annotation.DateTimeFormat;
import org.lxl.spring.form.validator.Phone;
public class Customer {
@Size(min=2,max=30)
private String name;
@NotEmpty @Email
private String email;
@NotNull @Min(18) @Max(100)
private Integer age;
@NotNull
private Gender gender;
@DateTimeFormat(pattern="yyyy-MM-dd")
@NotNull @Past
private Date birthday;
@Phone
private String phone;
public enum Gender{
MALE,FEMALE
}
public String getName(){
return name;
}
public void setName(String name) {
this.name = name;
}
public String getEmail() {
return email;
}
public void setEmail(String email) {
this.email = email;
}
public Integer getAge() {
return age;
}
public void setAge(Integer age) {
this.age = age;
}
public Gender getGender() {
return gender;
}
public void setGender(Gender gender) {
this.gender = gender;
}
public Date getBirthday() {
return birthday;
}
public void setBirthday(Date birthday) {
this.birthday = birthday;
}
public String getPhone() {
return phone;
}
public void setPhone(String phone) {
this.phone = phone;
}
}
注意:我们使用的@Email,@NotEmpty是hibernate-validator提供的;@DateTimeFormat是spring-context提供的;@Size,@NotNull等是validation-api提供的。
@Phone是我们基于JSR-303规范自定义的注解,在后面我们会看到这个注解是如何创建的
Employee.java
package org.lxl.spring.form.model;
public class Employee {
private int id;
private String name;
private String role;
public int getId() {
return id;
}
public void setId(int id) {
this.id = id;
}
public String getName() {
return name;
}
public void setName(String name) {
this.name = name;
}
public String getRole() {
return role;
}
public void setRole(String role) {
this.role = role;
}
}
Employee是一个标准的java bean,我们使用Validate接口的实现类来验证这个类。
自定义验证实现
Phone.java
package org.lxl.spring.form.validator;
import java.lang.annotation.Documented;
import java.lang.annotation.Retention;
import java.lang.annotation.Target;
import java.lang.annotation.ElementType;
import java.lang.annotation.RetentionPolicy;
import javax.validation.Constraint;
import javax.validation.Payload;
@Documented
@Constraint(validatedBy = PhoneValidator.class)
@Target({ElementType.METHOD,ElementType.FIELD})
@Retention(RetentionPolicy.RUNTIME)
public @interface Phone {
String message() default "{Phone}";
Class<?>[] groups() default {};
Class<? extends Payload>[] payload() default {};
}
大多数的部分是样板式代码与jsr - 303规范确认。最重要的部分是@Constraint注释,我们提供的类即PhoneValidator将用于验证。
PhoneValidator.java
package org.lxl.spring.form.validator;
import javax.validation.ConstraintValidator;
import javax.validation.ConstraintValidatorContext;
public class PhoneValidator implements ConstraintValidator<Phone,String> {
@Override
public void initialize(Phone paramA) {
}
@Override
public boolean isValid(String phoneNo, ConstraintValidatorContext ctx) {
if(phoneNo == null){
return false;
}
//validate phone numbers of format "1234567890"
if(phoneNo.matches("\\d{10}")) return true;
//validate phone number with -, . or spaces
else if(phoneNo.matches("\\d{3}[-\\.\\s]\\d{3}[-\\.\\s]\\d{4}}")) return true;
//validating phone number with extension length from 3 to 5
else if(phoneNo.matches("\\d{3}-\\d{3}-\\d{4}\\s(x|(ext))\\d{3,5}")) return true;
//validating phone number where area code is in braces()
else if(phoneNo.matches("\\(\\d{3}\\)-\\d{3}-\\d{4}")) return true;
//return false if nothing matches the input
else return false;
}
}
我们应该实现javax.validation.ConstraintValidatorinterface jsr - 303规范验证器实现。如果我们使用数据源等一些资源,我们可以在initialize()方法初始化它们。验证方法是isValid和其他它返回true,如果数据是有效的它应该返回false。
EmployeeFormValidator.java
package org.lxl.spring.form.validator;
import org.springframework.validation.Errors;
import org.springframework.validation.ValidationUtils;
import org.springframework.validation.Validator;
import org.lxl.spring.form.model.Employee;
public class EmployeeFormValidator implements Validator{
//which objects can be validated by this validator
@Override
public boolean supports(Class<?> paramClass) {
return Employee.class.equals(paramClass);
}
@Override
public void validate(Object obj, Errors errors) {
ValidationUtils.rejectIfEmptyOrWhitespace(errors, "id", "id.required");
Employee emp = (Employee) obj;
if(emp.getId() <=0){
errors.rejectValue("id", "negativeValue",new Object[]{"'id'"},"id can't be negative");
}
ValidationUtils.rejectIfEmptyOrWhitespace(errors, "name", "name.required");
ValidationUtils.rejectIfEmptyOrWhitespace(errors, "role", "role.required");
}
}
EmployeeFormValidator是自定义验证实现类。support()方法是validator接口中规定的方法,告诉Spring框架,哪个类能使用这个验证。
注意:validationUtils.rejectIfEmptyOrWhitespace()方法最后一个参数是本地验证信息配置文件中的名称(LocalValidationMessages_zh.properties),这样我们能够提供本地错误信息给用户。
Controller类
我们有两个Controller类,一个是基于注解的,另一个使用自定义验证实现类。
CustomerController.java
package org.lxl.spring.form.controllers;
import java.sql.Date;
import java.text.SimpleDateFormat;
import java.util.HashMap;
import java.util.Map;
import javax.validation.Valid;
import org.lxl.spring.form.model.Customer;
import org.slf4j.Logger;
import org.slf4j.LoggerFactory;
import org.springframework.stereotype.Controller;
import org.springframework.ui.Model;
import org.springframework.validation.BindingResult;
import org.springframework.web.bind.annotation.RequestMapping;
import org.springframework.web.bind.annotation.RequestMethod;
@Controller
public class CustomerController{
private static final Logger logger = LoggerFactory
.getLogger(CustomerController.class);
private Map<String,Customer> customers = null;
public CustomerController(){
customers = new HashMap<String,Customer>();
}
@RequestMapping(value = "/cust/save", method = RequestMethod.GET)
public String saveCustomerPage(Model model){
logger.info("Returning custSave.jsp page");
model.addAttribute("customer",new Customer());
return "custSave";
}
@RequestMapping(value = "/cust/save.do",method = RequestMethod.POST)
public String saveCustomerAction(
@Valid Customer customer,
BindingResult bindingResult,Model model){
if(bindingResult.hasErrors()){
logger.info("Returning custSave.jsp page");
return "custSave";
}
logger.info("Returning custSaveSuccess.jsp page");
model.addAttribute("customer", customer);
customers.put(customer.getEmail(), customer);
return "custSaveSuccess";
}
}
当我们使用注解来验证时,只需要小小的修改就能实现。
首先我们需要用@Valid注解来修饰模型类。然后方法中要加入BindingResult参数,传来错误信息。这个控制器方法非常简单,如过有错误则跳转到custsave.jsp,没错误就跳转到custSaveSuccess.jsp。
另一个关键点是我们在model中加入了customer属性,这个是非常必要的,在跳转后的jsp中我们才能使用customer对象的属性。
EmployeeController.java
package org.lxl.spring.form.controllers;
import java.util.HashMap;
import java.util.Map;
import org.slf4j.Logger;
import org.slf4j.LoggerFactory;
import org.springframework.beans.factory.annotation.Autowired;
import org.springframework.beans.factory.annotation.Qualifier;
import org.springframework.stereotype.Controller;
import org.springframework.ui.Model;
import org.springframework.validation.BindingResult;
import org.springframework.validation.Validator;
import org.springframework.validation.annotation.Validated;
import org.springframework.web.bind.WebDataBinder;
import org.springframework.web.bind.annotation.InitBinder;
import org.springframework.web.bind.annotation.ModelAttribute;
import org.springframework.web.bind.annotation.RequestMapping;
import org.springframework.web.bind.annotation.RequestMethod;
import org.lxl.spring.form.model.Employee;
@Controller
public class EmployeeController {
private static final Logger logger = LoggerFactory
.getLogger(EmployeeController.class);
private Map<Integer,Employee> emps = null;
@Autowired
@Qualifier("employeeValidator")
private Validator validator;
@InitBinder
private void initBinder(WebDataBinder binder){
binder.setValidator(validator);
}
public EmployeeController(){
emps = new HashMap<Integer,Employee>();
}
@ModelAttribute("employee")
public Employee createEmployeeModel(){
// ModelAttribute value should be same as used in the empSave.jsp
return new Employee();
}
@RequestMapping(value="/emp/save",method = RequestMethod.GET)
public String saveEmployeePage(Model model){
logger.info("Returing empSave.jsp page");
return "empSave";
}
@RequestMapping(value="/emp/save.do",method = RequestMethod.POST)
public String saveEmployeeAction(
@ModelAttribute("employee") @Validated Employee employee,
BindingResult bindingResult,Model model){
if(bindingResult.hasErrors()){
logger.info("Returning empSave.jsp pagte");
return "empSave";
}
logger.info("Returning empSaveSuccess.jsp page");
model.addAttribute("emp", employee);
emps.put(employee.getId(), employee);
return "empSaveSuccess";
}
}
使用自定义验证,首先我们需要注入validate。我们使用@Autowired和@Qualifier注解。
接下来我们需要一个方法,用WebDataBinder作为参数,让自定义验证生效。这个方法需要使用@InitBinder注解。
使用@ModelAttribute注解是另一种添加模型对象的方法。剩下的代码类似于通常的Controller方法的写法。
表单验证错误消息资源包
LocalValidationMessages_zh.properties
#application defined error messages
id.required=Employee ID is required
name.required=Employee Name is required
role.required=Employee Role is required
negativeValue={0} can't be negative or zero
#Spring framework error messages to be used when conversion from form data to bean fails
typeMismatch.int={0} Value must be an integer
typeMismatch.java.lang.Integer={0} must be an integer
typeMismatch={0} is of invalid format
#application messages for annotations, {ValidationClass}.{modelObjectName}.{field}
#the {0} is field name,other fields are in alphabatical order,max and then min
Size.customer.email=Email is a required field
NotNull.customer.age=Customer {0} should be in years
#Generic annotation class messages
Email=Email address is not valid
NotNull=This is a required field
NotEmpty=This is a required field
Past=Date should be Past
#Custom validation annotation
Phone=Invalid format,valid formats are 123467890,123-456-7890 x1234
带有表单和错误提示信息的页面
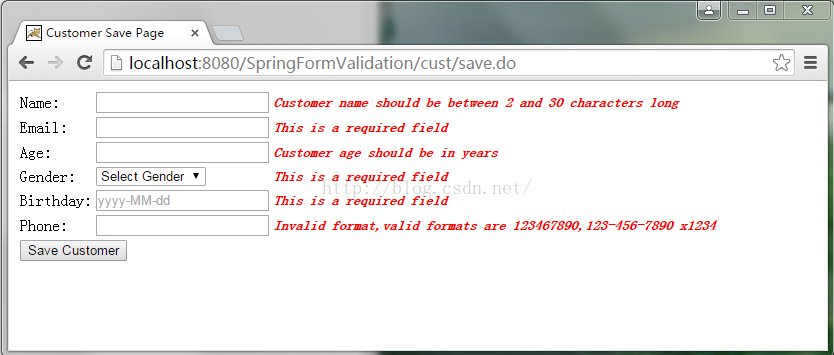
使用Spring验证框架,需要使用Spring表单标签去显示错误信息并且设置表单元素的名称要与模板对象名称对应。
custSave.jsp
<%@ page language="java" contentType="text/html; charset=UTF-8"
pageEncoding="UTF-8"%>
<!DOCTYPE html PUBLIC "-//W3C//DTD HTML 4.01 Transitional//EN" "http://www.w3.org/TR/html4/loose.dtd">
<%@ taglib uri="http://www.springframework.org/tags/form"
prefix="springForm" %>
<html>
<head>
<meta http-equiv="Content-Type" content="text/html; charset=UTF-8">
<title>Customer Save Page</title>
<style type="text/css">
.error{
color:#ff0000;
font-style:italic;
font-weight:bold;
font-size:14px;
font-family:幼圆;
}
</style>
</head>
<body>
<springForm:form method="POST" commandName="customer"
action="save.do">
<table>
<tr>
<td>Name:</td>
<td><springForm:input path="name"/></td>
<td><springForm:errors path="name" cssClass="error"/></td>
</tr>
<tr>
<td>Email:</td>
<td><springForm:input path="email"/></td>
<td><springForm:errors path="email" cssClass="error"/></td>
</tr>
<tr>
<td>Age:</td>
<td><springForm:input path="age"/></td>
<td><springForm:errors path="age" cssClass="error"/></td>
</tr>
<tr>
<td>Gender:</td>
<td><springForm:select path="gender">
<springForm:option value="" label="Select Gender"/>
<springForm:option value="MALE" label="Male"/>
<springForm:option value="FEMALE" label="Female"/>
</springForm:select></td>
<td><springForm:errors path="gender" cssClass="error"/></td>
</tr>
<tr>
<td>Birthday:</td>
<td><springForm:input path="birthday" placeholder="yyyy-MM-dd"/></td>
<td><springForm:errors path="birthday" cssClass="error"/></td>
</tr>
<tr>
<td>Phone:</td>
<td><springForm:input path="phone"/></td>
<td><springForm:errors path="phone" cssClass="error"/></td>
</tr>
<tr>
<td colspan="3"><input type="submit" value="Save Customer"></td>
</tr>
</table>
</springForm:form>
</body>
</html>
commandName=”customer”用来设置对应的模型类名称。
springForm:errors用来展示错误信息。
path属性与模型类属性对应,给模型属性提供数据。
其他代码是标准的HTML+css代码。
custSaveSuccess.jsp
<%@ page language="java" contentType="text/html; charset=UTF-8"
pageEncoding="UTF-8"%>
<%@ taglib uri="http://java.sun.com/jsp/jstl/core" prefix="c" %>
<%@ taglib prefix="fmt" uri="http://java.sun.com/jsp/jstl/fmt" %>
<%@ page session="false" %>
<!DOCTYPE html PUBLIC "-//W3C//DTD HTML 4.01 Transitional//EN" "http://www.w3.org/TR/html4/loose.dtd">
<html>
<head>
<meta http-equiv="Content-Type" content="text/html; charset=UTF-8">
<title>Customer Saved Successfully</title>
</head>
<body>
<h3>
Customer Saved Successfully.
</h3>
<strong>Customer Name:${customer.name }</strong><br>
<strong>Customer Email:${customer.email }</strong><br>
<strong>Customer Age:${customer.age }</strong><br>
<strong>Customer Gender:${customer.gender }</strong><br>
<strong>Customer Birthday:<fmt:formatDate value="${customer.birthday }" type="date"/></strong><br>
</body>
</html>
如果通过验证,显示的JSP页面,简单的展示了客户端输入的数据。
empSave.jsp
<%@ page language="java" contentType="text/html; charset=UTF-8"
pageEncoding="UTF-8"%>
<!DOCTYPE html PUBLIC "-//W3C//DTD HTML 4.01 Transitional//EN" "http://www.w3.org/TR/html4/loose.dtd">
<%@ taglib uri="http://www.springframework.org/tags/form"
prefix="springForm" %>
<html>
<head>
<meta http-equiv="Content-Type" content="text/html; charset=UTF-8">
<title>Insert title here</title>
<style type="text/css">
.error{
color:#ff0000;
font-style:italic;
font-weight:bold;
font-size:14px;
font-family:幼圆;
}
</style>
</head>
<body>
<springForm:form method="POST" commandName="employee"
action="save.do">
<table>
<tr>
<td>Employee ID:</td>
<td><springForm:input path="id"/></td>
<td><springForm:errors path="id" cssClass="error"/></td>
</tr>
<tr>
<td>Employee Name:</td>
<td><springForm:input path="name"/></td>
<td><springForm:errors path="name" cssClass="error"/></td>
</tr>
<tr>
<td>Employee Role:</td>
<td><springForm:select path="role">
<springForm:option value="" label="Select Role"/>
<springForm:option value="ceo" label="CEO"/>
<springForm:option value="developer" label="Developer"/>
<springForm:option value="manager" label="Manager"/>
</springForm:select></td>
<td><springForm:errors path="role" cssClass="error"/></td>
</tr>
<tr>
<td colspan="3"><input type="submit" value="Save"></td>
</tr>
</table>
</springForm:form>
</body>
</html>
empSaveSuccess.jsp
<%@ page language="java" contentType="text/html; charset=UTF-8"
pageEncoding="UTF-8"%>
<%@ taglib uri="http://java.sun.com/jsp/jstl/core" prefix="c" %>
<%@ page session="false" %>
<!DOCTYPE html PUBLIC "-//W3C//DTD HTML 4.01 Transitional//EN" "http://www.w3.org/TR/html4/loose.dtd">
<html>
<head>
<meta http-equiv="Content-Type" content="text/html; charset=UTF-8">
<title>Employee Saved Successfully</title>
</head>
<body>
<h3>
Employee Saved Successfully.
</h3>
<strong>Employee ID:${emp.id }</strong>
<strong>Employee Name:${emp.name }</strong>
<strong>Employee Role:${emp.role }</strong>
</body>
</html>
测试

在web应用中,当我们接收客户端输入时都需要进行验证。我们可以用JavaScript进行前台验证,但也需要在服务器端进行后台验证,以保证在浏览器禁用了JavaScript或者用其它方式绕过前端验证的情况下,任然能保证处理的数据是合法的。
Spring MVC框架支持JSR-303规范,在Spring MVC应用中,默认情况下我们只需要增加JSR-303和他的依赖实现。Spring还提供了@Validator注解和BindingResult类。它们作为Controller的方法中的参数使用,其中@Validator注解表示对哪个实体进行验证,而验证的错误信息可以在BindingResult里面找到。
我们创建自定义验证有两种方式:第一种方法是创建符合JSR-303规范的注解;第二种方式是实现org.springframework.validation.Validator接口,并且在使用验证时要用@InitBinder注解来指定使用哪个Validator接口的实现类来验证。
下面我们用Spring Tool Suite工具来创建一个简单的Spring MVC Project,需要使用符合JR-303规范的hibernate-validator.jar包。我们将使用注解和符合JSR-303规范的自定义验证来进行表单验证。我们还要在一个Controller中使用自定义Validator接口的实现类来进行验证。最后的项目结构如下图所示(这是我按照原文写的一个项目,其中LocalValidationMessages_zh.properties在原文中名为message_en.properties,因为我觉得这个名字太含糊了,不能表示是中文本地验证信息配置文件这层含义,而且在hibernate-validate中的配置文件名都是ValidateionMessages_zh_CN.properties这种样子的,所以就改了;原文中没有lib目录的,因为我要看validation-api的源码,而项目中使用的1.1.0版本没有源码包,所以就用了1.0.0版本的资源包临时扔到项目里用一下;还有不同的就是spring文件的名称、位置,这个无所谓的啦)。
下面我们一个一个来看这些组件。
Spring MVC,JSR-303 和Hibernate Validator的依赖
我们最终的pom.xml文件如下图所示。
<?xml version="1.0" encoding="UTF-8"?>
<project xmlns="http://maven.apache.org/POM/4.0.0" xmlns:xsi="http://www.w3.org/2001/XMLSchema-instance"
xsi:schemaLocation="http://maven.apache.org/POM/4.0.0 http://maven.apache.org/maven-v4_0_0.xsd">
<modelVersion>4.0.0</modelVersion>
<groupId>org.lxl</groupId>
<artifactId>spring</artifactId>
<name>SpringFormValidation</name>
<packaging>war</packaging>
<version>1.0.0-BUILD-SNAPSHOT</version>
<properties>
<java-version>1.7</java-version>
<org.springframework-version>4.0.9.RELEASE</org.springframework-version>
<org.aspectj-version>1.7.4</org.aspectj-version>
<org.slf4j-version>1.7.5</org.slf4j-version>
</properties>
<dependencies>
<!-- Form Validation using Annotations -->
<!-- 这里要用5.0.1.Final,原文中用4.1.0.Final会报错的 -->
<dependency>
<groupId>javax.validation</groupId>
<artifactId>validation-api</artifactId>
<version>1.1.0.Final</version>
</dependency>
<dependency>
<groupId>org.hibernate</groupId>
<artifactId>hibernate-validator</artifactId>
<version>5.0.1.Final</version>
</dependency>
<!-- Spring -->
<dependency>
<groupId>org.springframework</groupId>
<artifactId>spring-context</artifactId>
<version>${org.springframework-version}</version>
<exclusions>
<!-- Exclude Commons Logging in favor of SLF4j -->
<exclusion>
<groupId>commons-logging</groupId>
<artifactId>commons-logging</artifactId>
</exclusion>
</exclusions>
</dependency>
<dependency>
<groupId>org.springframework</groupId>
<artifactId>spring-webmvc</artifactId>
<version>${org.springframework-version}</version>
</dependency>
<!-- AspectJ -->
<dependency>
<groupId>org.aspectj</groupId>
<artifactId>aspectjrt</artifactId>
<version>${org.aspectj-version}</version>
</dependency>
<!-- Logging -->
<dependency>
<groupId>org.slf4j</groupId>
<artifactId>slf4j-api</artifactId>
<version>${org.slf4j-version}</version>
</dependency>
<dependency>
<groupId>org.slf4j</groupId>
<artifactId>jcl-over-slf4j</artifactId>
<version>${org.slf4j-version}</version>
<scope>runtime</scope>
</dependency>
<dependency>
<groupId>org.slf4j</groupId>
<artifactId>slf4j-log4j12</artifactId>
<version>${org.slf4j-version}</version>
<scope>runtime</scope>
</dependency>
<dependency>
<groupId>log4j</groupId>
<artifactId>log4j</artifactId>
<version>1.2.15</version>
<exclusions>
<exclusion>
<groupId>javax.mail</groupId>
<artifactId>mail</artifactId>
</exclusion>
<exclusion>
<groupId>javax.jms</groupId>
<artifactId>jms</artifactId>
</exclusion>
<exclusion>
<groupId>com.sun.jdmk</groupId>
<artifactId>jmxtools</artifactId>
</exclusion>
<exclusion>
<groupId>com.sun.jmx</groupId>
<artifactId>jmxri</artifactId>
</exclusion>
</exclusions>
<scope>runtime</scope>
</dependency>
<!-- @Inject -->
<dependency>
<groupId>javax.inject</groupId>
<artifactId>javax.inject</artifactId>
<version>1</version>
</dependency>
<!-- Servlet -->
<dependency>
<groupId>javax.servlet</groupId>
<artifactId>servlet-api</artifactId>
<version>2.5</version>
<scope>provided</scope>
</dependency>
<dependency>
<groupId>javax.servlet.jsp</groupId>
<artifactId>jsp-api</artifactId>
<version>2.1</version>
<scope>provided</scope>
</dependency>
<dependency>
<groupId>javax.servlet</groupId>
<artifactId>jstl</artifactId>
<version>1.2</version>
</dependency>
<!-- Test -->
<dependency>
<groupId>junit</groupId>
<artifactId>junit</artifactId>
<version>4.7</version>
<scope>test</scope>
</dependency>
</dependencies>
<build>
<plugins>
<plugin>
<artifactId>maven-eclipse-plugin</artifactId>
<version>2.9</version>
<configuration>
<additionalProjectnatures>
<projectnature>org.springframework.ide.eclipse.core.springnature</projectnature>
</additionalProjectnatures>
<additionalBuildcommands>
<buildcommand>org.springframework.ide.eclipse.core.springbuilder</buildcommand>
</additionalBuildcommands>
<downloadSources>true</downloadSources>
<downloadJavadocs>true</downloadJavadocs>
</configuration>
</plugin>
<plugin>
<groupId>org.apache.maven.plugins</groupId>
<artifactId>maven-compiler-plugin</artifactId>
<version>2.5.1</version>
<configuration>
<source>1.6</source>
<target>1.6</target>
<compilerArgument>-Xlint:all</compilerArgument>
<showWarnings>true</showWarnings>
<showDeprecation>true</showDeprecation>
</configuration>
</plugin>
<plugin>
<groupId>org.codehaus.mojo</groupId>
<artifactId>exec-maven-plugin</artifactId>
<version>1.2.1</version>
<configuration>
<mainClass>org.test.int1.Main</mainClass>
</configuration>
</plugin>
</plugins>
</build>
</project>
除了标准的Srping MVC的工件外,我们还有在项目中加入validation-api和hibernate-validator。
配置文件
在用STS创建SpringMVC项目时,会有三个配置文件:web.xml、root-context.xml(Spring主配置文件)、servlet-context.xml(Spring MVC配置文件)。
web.xml
<?xml version="1.0" encoding="UTF-8"?>
<web-app version="2.5" xmlns="http://java.sun.com/xml/ns/javaee"
xmlns:xsi="http://www.w3.org/2001/XMLSchema-instance"
xsi:schemaLocation="http://java.sun.com/xml/ns/javaee http://java.sun.com/xml/ns/javaee/web-app_2_5.xsd">
<!-- The definition of the Root Spring Container shared by all Servlets and Filters -->
<context-param>
<param-name>contextConfigLocation</param-name>
<param-value>/WEB-INF/spring/root-context.xml</param-value>
</context-param>
<!-- Creates the Spring Container shared by all Servlets and Filters -->
<listener>
<listener-class>org.springframework.web.context.ContextLoaderListener</listener-class>
</listener>
<!-- Processes application requests -->
<servlet>
<servlet-name>appServlet</servlet-name>
<servlet-class>org.springframework.web.servlet.DispatcherServlet</servlet-class>
<init-param>
<param-name>contextConfigLocation</param-name>
<param-value>/WEB-INF/spring/appServlet/servlet-context.xml</param-value>
</init-param>
<load-on-startup>1</load-on-startup>
</servlet>
<servlet-mapping>
<servlet-name>appServlet</servlet-name>
<url-pattern>/</url-pattern>
</servlet-mapping>
</web-app>
root-context.xml
<?xml version="1.0" encoding="UTF-8"?>
<beans xmlns="http://www.springframework.org/schema/beans"
xmlns:xsi="http://www.w3.org/2001/XMLSchema-instance"
xsi:schemaLocation="http://www.springframework.org/schema/beans
http://www.springframework.org/schema/beans/spring-beans.xsd">
<!-- Root Context: defines shared resources visible to all other web components -->
</beans>
servlet-context.xml
<?xml version="1.0" encoding="UTF-8"?>
<beans:beans xmlns="http://www.springframework.org/schema/mvc"
xmlns:xsi="http://www.w3.org/2001/XMLSchema-instance"
xmlns:beans="http://www.springframework.org/schema/beans"
xmlns:context="http://www.springframework.org/schema/context"
xsi:schemaLocation="http://www.springframework.org/schema/mvc http://www.springframework.org/schema/mvc/spring-mvc.xsd
http://www.springframework.org/schema/beans http://www.springframework.org/schema/beans/spring-beans.xsd http://www.springframework.org/schema/context http://www.springframework.org/schema/context/spring-context.xsd">
<!-- DispatcherServlet Context: defines this servlet's request-processing infrastructure -->
<!-- Enables the Spring MVC @Controller programming model -->
<annotation-driven />
<!--
Handles HTTP GET requests for /resources/** by efficiently serving up static resources in the ${webappRoot}/resources directory
-->
<resources mapping="/resources/**" location="/resources/" />
<!-- Resolves views selected for rendering by @Controllers to .jsp resources in the /WEB-INF/views directory -->
<beans:bean class="org.springframework.web.servlet.view.InternalResourceViewResolver">
<beans:property name="prefix" value="/WEB-INF/views/" />
<beans:property name="suffix" value=".jsp" />
</beans:bean>
<beans:bean id="employeeValidator" class="org.lxl.spring.form.validator.EmployeeFormValidator"/>
<beans:bean id="messageSource"
class="org.springframework.context.support.ReloadableResourceBundleMessageSource">
<beans:property name="basename" value="classpath:LocalValidationMessages_zh"/>
<beans:property name="defaultEncoding" value="UTF-8"/>
</beans:bean>
<context:component-scan base-package="org.lxl.spring" />
</beans:beans>
唯一重要的一点需要注意的是 employeeValidator 要注入到一个Controller,messageSource指定了本地验证配置文件的位置。剩下的部分就是支持注解、寻找视图等spring MVC基本配置了。
模型类
Customer.java
package org.lxl.spring.form.model;
import java.util.Date;
import javax.validation.constraints.Max;
import javax.validation.constraints.Min;
import javax.validation.constraints.NotNull;
import javax.validation.constraints.Past;
import javax.validation.constraints.Size;
import org.hibernate.validator.constraints.Email;
import org.hibernate.validator.constraints.NotEmpty;
import org.springframework.format.annotation.DateTimeFormat;
import org.lxl.spring.form.validator.Phone;
public class Customer {
@Size(min=2,max=30)
private String name;
@NotEmpty @Email
private String email;
@NotNull @Min(18) @Max(100)
private Integer age;
@NotNull
private Gender gender;
@DateTimeFormat(pattern="yyyy-MM-dd")
@NotNull @Past
private Date birthday;
@Phone
private String phone;
public enum Gender{
MALE,FEMALE
}
public String getName(){
return name;
}
public void setName(String name) {
this.name = name;
}
public String getEmail() {
return email;
}
public void setEmail(String email) {
this.email = email;
}
public Integer getAge() {
return age;
}
public void setAge(Integer age) {
this.age = age;
}
public Gender getGender() {
return gender;
}
public void setGender(Gender gender) {
this.gender = gender;
}
public Date getBirthday() {
return birthday;
}
public void setBirthday(Date birthday) {
this.birthday = birthday;
}
public String getPhone() {
return phone;
}
public void setPhone(String phone) {
this.phone = phone;
}
}
注意:我们使用的@Email,@NotEmpty是hibernate-validator提供的;@DateTimeFormat是spring-context提供的;@Size,@NotNull等是validation-api提供的。
@Phone是我们基于JSR-303规范自定义的注解,在后面我们会看到这个注解是如何创建的
Employee.java
package org.lxl.spring.form.model;
public class Employee {
private int id;
private String name;
private String role;
public int getId() {
return id;
}
public void setId(int id) {
this.id = id;
}
public String getName() {
return name;
}
public void setName(String name) {
this.name = name;
}
public String getRole() {
return role;
}
public void setRole(String role) {
this.role = role;
}
}
Employee是一个标准的java bean,我们使用Validate接口的实现类来验证这个类。
自定义验证实现
Phone.java
package org.lxl.spring.form.validator;
import java.lang.annotation.Documented;
import java.lang.annotation.Retention;
import java.lang.annotation.Target;
import java.lang.annotation.ElementType;
import java.lang.annotation.RetentionPolicy;
import javax.validation.Constraint;
import javax.validation.Payload;
@Documented
@Constraint(validatedBy = PhoneValidator.class)
@Target({ElementType.METHOD,ElementType.FIELD})
@Retention(RetentionPolicy.RUNTIME)
public @interface Phone {
String message() default "{Phone}";
Class<?>[] groups() default {};
Class<? extends Payload>[] payload() default {};
}
大多数的部分是样板式代码与jsr - 303规范确认。最重要的部分是@Constraint注释,我们提供的类即PhoneValidator将用于验证。
PhoneValidator.java
package org.lxl.spring.form.validator;
import javax.validation.ConstraintValidator;
import javax.validation.ConstraintValidatorContext;
public class PhoneValidator implements ConstraintValidator<Phone,String> {
@Override
public void initialize(Phone paramA) {
}
@Override
public boolean isValid(String phoneNo, ConstraintValidatorContext ctx) {
if(phoneNo == null){
return false;
}
//validate phone numbers of format "1234567890"
if(phoneNo.matches("\\d{10}")) return true;
//validate phone number with -, . or spaces
else if(phoneNo.matches("\\d{3}[-\\.\\s]\\d{3}[-\\.\\s]\\d{4}}")) return true;
//validating phone number with extension length from 3 to 5
else if(phoneNo.matches("\\d{3}-\\d{3}-\\d{4}\\s(x|(ext))\\d{3,5}")) return true;
//validating phone number where area code is in braces()
else if(phoneNo.matches("\\(\\d{3}\\)-\\d{3}-\\d{4}")) return true;
//return false if nothing matches the input
else return false;
}
}
我们应该实现javax.validation.ConstraintValidatorinterface jsr - 303规范验证器实现。如果我们使用数据源等一些资源,我们可以在initialize()方法初始化它们。验证方法是isValid和其他它返回true,如果数据是有效的它应该返回false。
EmployeeFormValidator.java
package org.lxl.spring.form.validator;
import org.springframework.validation.Errors;
import org.springframework.validation.ValidationUtils;
import org.springframework.validation.Validator;
import org.lxl.spring.form.model.Employee;
public class EmployeeFormValidator implements Validator{
//which objects can be validated by this validator
@Override
public boolean supports(Class<?> paramClass) {
return Employee.class.equals(paramClass);
}
@Override
public void validate(Object obj, Errors errors) {
ValidationUtils.rejectIfEmptyOrWhitespace(errors, "id", "id.required");
Employee emp = (Employee) obj;
if(emp.getId() <=0){
errors.rejectValue("id", "negativeValue",new Object[]{"'id'"},"id can't be negative");
}
ValidationUtils.rejectIfEmptyOrWhitespace(errors, "name", "name.required");
ValidationUtils.rejectIfEmptyOrWhitespace(errors, "role", "role.required");
}
}
EmployeeFormValidator是自定义验证实现类。support()方法是validator接口中规定的方法,告诉Spring框架,哪个类能使用这个验证。
注意:validationUtils.rejectIfEmptyOrWhitespace()方法最后一个参数是本地验证信息配置文件中的名称(LocalValidationMessages_zh.properties),这样我们能够提供本地错误信息给用户。
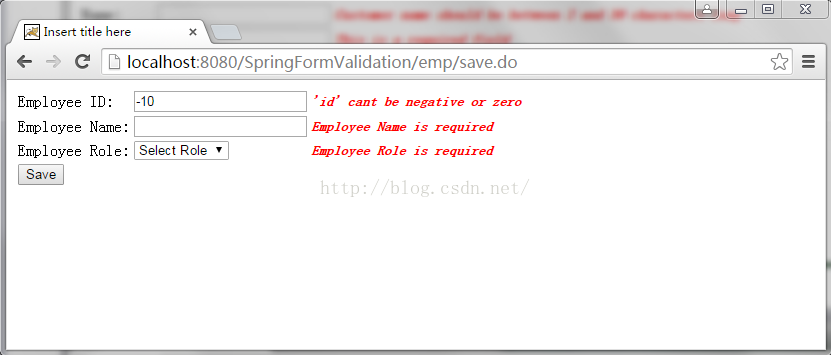
Controller类
我们有两个Controller类,一个是基于注解的,另一个使用自定义验证实现类。
CustomerController.java
package org.lxl.spring.form.controllers;
import java.sql.Date;
import java.text.SimpleDateFormat;
import java.util.HashMap;
import java.util.Map;
import javax.validation.Valid;
import org.lxl.spring.form.model.Customer;
import org.slf4j.Logger;
import org.slf4j.LoggerFactory;
import org.springframework.stereotype.Controller;
import org.springframework.ui.Model;
import org.springframework.validation.BindingResult;
import org.springframework.web.bind.annotation.RequestMapping;
import org.springframework.web.bind.annotation.RequestMethod;
@Controller
public class CustomerController{
private static final Logger logger = LoggerFactory
.getLogger(CustomerController.class);
private Map<String,Customer> customers = null;
public CustomerController(){
customers = new HashMap<String,Customer>();
}
@RequestMapping(value = "/cust/save", method = RequestMethod.GET)
public String saveCustomerPage(Model model){
logger.info("Returning custSave.jsp page");
model.addAttribute("customer",new Customer());
return "custSave";
}
@RequestMapping(value = "/cust/save.do",method = RequestMethod.POST)
public String saveCustomerAction(
@Valid Customer customer,
BindingResult bindingResult,Model model){
if(bindingResult.hasErrors()){
logger.info("Returning custSave.jsp page");
return "custSave";
}
logger.info("Returning custSaveSuccess.jsp page");
model.addAttribute("customer", customer);
customers.put(customer.getEmail(), customer);
return "custSaveSuccess";
}
}
当我们使用注解来验证时,只需要小小的修改就能实现。
首先我们需要用@Valid注解来修饰模型类。然后方法中要加入BindingResult参数,传来错误信息。这个控制器方法非常简单,如过有错误则跳转到custsave.jsp,没错误就跳转到custSaveSuccess.jsp。
另一个关键点是我们在model中加入了customer属性,这个是非常必要的,在跳转后的jsp中我们才能使用customer对象的属性。
EmployeeController.java
package org.lxl.spring.form.controllers;
import java.util.HashMap;
import java.util.Map;
import org.slf4j.Logger;
import org.slf4j.LoggerFactory;
import org.springframework.beans.factory.annotation.Autowired;
import org.springframework.beans.factory.annotation.Qualifier;
import org.springframework.stereotype.Controller;
import org.springframework.ui.Model;
import org.springframework.validation.BindingResult;
import org.springframework.validation.Validator;
import org.springframework.validation.annotation.Validated;
import org.springframework.web.bind.WebDataBinder;
import org.springframework.web.bind.annotation.InitBinder;
import org.springframework.web.bind.annotation.ModelAttribute;
import org.springframework.web.bind.annotation.RequestMapping;
import org.springframework.web.bind.annotation.RequestMethod;
import org.lxl.spring.form.model.Employee;
@Controller
public class EmployeeController {
private static final Logger logger = LoggerFactory
.getLogger(EmployeeController.class);
private Map<Integer,Employee> emps = null;
@Autowired
@Qualifier("employeeValidator")
private Validator validator;
@InitBinder
private void initBinder(WebDataBinder binder){
binder.setValidator(validator);
}
public EmployeeController(){
emps = new HashMap<Integer,Employee>();
}
@ModelAttribute("employee")
public Employee createEmployeeModel(){
// ModelAttribute value should be same as used in the empSave.jsp
return new Employee();
}
@RequestMapping(value="/emp/save",method = RequestMethod.GET)
public String saveEmployeePage(Model model){
logger.info("Returing empSave.jsp page");
return "empSave";
}
@RequestMapping(value="/emp/save.do",method = RequestMethod.POST)
public String saveEmployeeAction(
@ModelAttribute("employee") @Validated Employee employee,
BindingResult bindingResult,Model model){
if(bindingResult.hasErrors()){
logger.info("Returning empSave.jsp pagte");
return "empSave";
}
logger.info("Returning empSaveSuccess.jsp page");
model.addAttribute("emp", employee);
emps.put(employee.getId(), employee);
return "empSaveSuccess";
}
}
使用自定义验证,首先我们需要注入validate。我们使用@Autowired和@Qualifier注解。
接下来我们需要一个方法,用WebDataBinder作为参数,让自定义验证生效。这个方法需要使用@InitBinder注解。
使用@ModelAttribute注解是另一种添加模型对象的方法。剩下的代码类似于通常的Controller方法的写法。
表单验证错误消息资源包
LocalValidationMessages_zh.properties
#application defined error messages
id.required=Employee ID is required
name.required=Employee Name is required
role.required=Employee Role is required
negativeValue={0} can't be negative or zero
#Spring framework error messages to be used when conversion from form data to bean fails
typeMismatch.int={0} Value must be an integer
typeMismatch.java.lang.Integer={0} must be an integer
typeMismatch={0} is of invalid format
#application messages for annotations, {ValidationClass}.{modelObjectName}.{field}
#the {0} is field name,other fields are in alphabatical order,max and then min
Size.customer.email=Email is a required field
NotNull.customer.age=Customer {0} should be in years
#Generic annotation class messages
Email=Email address is not valid
NotNull=This is a required field
NotEmpty=This is a required field
Past=Date should be Past
#Custom validation annotation
Phone=Invalid format,valid formats are 123467890,123-456-7890 x1234
带有表单和错误提示信息的页面
使用Spring验证框架,需要使用Spring表单标签去显示错误信息并且设置表单元素的名称要与模板对象名称对应。
custSave.jsp
<%@ page language="java" contentType="text/html; charset=UTF-8"
pageEncoding="UTF-8"%>
<!DOCTYPE html PUBLIC "-//W3C//DTD HTML 4.01 Transitional//EN" "http://www.w3.org/TR/html4/loose.dtd">
<%@ taglib uri="http://www.springframework.org/tags/form"
prefix="springForm" %>
<html>
<head>
<meta http-equiv="Content-Type" content="text/html; charset=UTF-8">
<title>Customer Save Page</title>
<style type="text/css">
.error{
color:#ff0000;
font-style:italic;
font-weight:bold;
font-size:14px;
font-family:幼圆;
}
</style>
</head>
<body>
<springForm:form method="POST" commandName="customer"
action="save.do">
<table>
<tr>
<td>Name:</td>
<td><springForm:input path="name"/></td>
<td><springForm:errors path="name" cssClass="error"/></td>
</tr>
<tr>
<td>Email:</td>
<td><springForm:input path="email"/></td>
<td><springForm:errors path="email" cssClass="error"/></td>
</tr>
<tr>
<td>Age:</td>
<td><springForm:input path="age"/></td>
<td><springForm:errors path="age" cssClass="error"/></td>
</tr>
<tr>
<td>Gender:</td>
<td><springForm:select path="gender">
<springForm:option value="" label="Select Gender"/>
<springForm:option value="MALE" label="Male"/>
<springForm:option value="FEMALE" label="Female"/>
</springForm:select></td>
<td><springForm:errors path="gender" cssClass="error"/></td>
</tr>
<tr>
<td>Birthday:</td>
<td><springForm:input path="birthday" placeholder="yyyy-MM-dd"/></td>
<td><springForm:errors path="birthday" cssClass="error"/></td>
</tr>
<tr>
<td>Phone:</td>
<td><springForm:input path="phone"/></td>
<td><springForm:errors path="phone" cssClass="error"/></td>
</tr>
<tr>
<td colspan="3"><input type="submit" value="Save Customer"></td>
</tr>
</table>
</springForm:form>
</body>
</html>
commandName=”customer”用来设置对应的模型类名称。
springForm:errors用来展示错误信息。
path属性与模型类属性对应,给模型属性提供数据。
其他代码是标准的HTML+css代码。
custSaveSuccess.jsp
<%@ page language="java" contentType="text/html; charset=UTF-8"
pageEncoding="UTF-8"%>
<%@ taglib uri="http://java.sun.com/jsp/jstl/core" prefix="c" %>
<%@ taglib prefix="fmt" uri="http://java.sun.com/jsp/jstl/fmt" %>
<%@ page session="false" %>
<!DOCTYPE html PUBLIC "-//W3C//DTD HTML 4.01 Transitional//EN" "http://www.w3.org/TR/html4/loose.dtd">
<html>
<head>
<meta http-equiv="Content-Type" content="text/html; charset=UTF-8">
<title>Customer Saved Successfully</title>
</head>
<body>
<h3>
Customer Saved Successfully.
</h3>
<strong>Customer Name:${customer.name }</strong><br>
<strong>Customer Email:${customer.email }</strong><br>
<strong>Customer Age:${customer.age }</strong><br>
<strong>Customer Gender:${customer.gender }</strong><br>
<strong>Customer Birthday:<fmt:formatDate value="${customer.birthday }" type="date"/></strong><br>
</body>
</html>
如果通过验证,显示的JSP页面,简单的展示了客户端输入的数据。
empSave.jsp
<%@ page language="java" contentType="text/html; charset=UTF-8"
pageEncoding="UTF-8"%>
<!DOCTYPE html PUBLIC "-//W3C//DTD HTML 4.01 Transitional//EN" "http://www.w3.org/TR/html4/loose.dtd">
<%@ taglib uri="http://www.springframework.org/tags/form"
prefix="springForm" %>
<html>
<head>
<meta http-equiv="Content-Type" content="text/html; charset=UTF-8">
<title>Insert title here</title>
<style type="text/css">
.error{
color:#ff0000;
font-style:italic;
font-weight:bold;
font-size:14px;
font-family:幼圆;
}
</style>
</head>
<body>
<springForm:form method="POST" commandName="employee"
action="save.do">
<table>
<tr>
<td>Employee ID:</td>
<td><springForm:input path="id"/></td>
<td><springForm:errors path="id" cssClass="error"/></td>
</tr>
<tr>
<td>Employee Name:</td>
<td><springForm:input path="name"/></td>
<td><springForm:errors path="name" cssClass="error"/></td>
</tr>
<tr>
<td>Employee Role:</td>
<td><springForm:select path="role">
<springForm:option value="" label="Select Role"/>
<springForm:option value="ceo" label="CEO"/>
<springForm:option value="developer" label="Developer"/>
<springForm:option value="manager" label="Manager"/>
</springForm:select></td>
<td><springForm:errors path="role" cssClass="error"/></td>
</tr>
<tr>
<td colspan="3"><input type="submit" value="Save"></td>
</tr>
</table>
</springForm:form>
</body>
</html>
empSaveSuccess.jsp
<%@ page language="java" contentType="text/html; charset=UTF-8"
pageEncoding="UTF-8"%>
<%@ taglib uri="http://java.sun.com/jsp/jstl/core" prefix="c" %>
<%@ page session="false" %>
<!DOCTYPE html PUBLIC "-//W3C//DTD HTML 4.01 Transitional//EN" "http://www.w3.org/TR/html4/loose.dtd">
<html>
<head>
<meta http-equiv="Content-Type" content="text/html; charset=UTF-8">
<title>Employee Saved Successfully</title>
</head>
<body>
<h3>
Employee Saved Successfully.
</h3>
<strong>Employee ID:${emp.id }</strong>
<strong>Employee Name:${emp.name }</strong>
<strong>Employee Role:${emp.role }</strong>
</body>
</html>
测试

相关文章推荐
- 分享微信开发Html5轻游戏中的几个坑
- 一个jar包里的网站
- 一个jar包里的网站之文件上传
- 一个jar包里的网站之返回对媒体类型
- Zend的MVC机制使用分析(二)
- ASP.NET MVC 4 捆绑和缩小实例介绍
- ASP.NET MVC中将控制器分离到类库的实现
- asp.net实现在非MVC中使用Razor模板引擎的方法
- ASP.NET MVC中的AJAX应用
- 为ASP.NET MVC及WebApi添加路由优先级
- ASP.NET MVC中图表控件的使用方法
- ASP.NET MVC的四种验证编程方式
- ASP.NET MVC 3仿Server.Transfer效果的实现方法
- 如何在MVC应用程序中使用Jquery
- ASP.NET MVC小结之基础篇(二)
- ASP.NET小结之MVC, MVP, MVVM比较以及区别(一)
- Asp.net实现MVC处理文件的上传下载功能实例教程
- ASP.NET MVC小结之基础篇(一)
- 12种JavaScript常用的MVC框架比较分析
- 浅析Asp.net MVC 中Ajax的使用