Spring3.2+springMVC3.2+Mybatis3.2.7项目搭建
2015-12-12 21:24
585 查看
上一篇,我们搭建了spring+struts+mybatis框架, 与struts2功能类似的还有springmvc框架,这一篇我们就来介绍下目前另一种更为流行的java web开发框架:spring+springmvc+mybatis
springMVC是spring后期产品,是整个spring体系中的一员,有着spring开发团队的大力支持,springMVC继承和发扬了spring的大量优秀特性,在web开发领域也得到了开发者的广泛欢迎。相比其前辈struts2相比, springMVC拥有更多高级的特性和更大的灵活度,多处理器映射器支持,自动参数pojo绑定,单实例开发支持,多视图解析支持,RESTfull风格开发支持,自动json对象转换支持等。
江山代有才人出,各领风骚数百年。springMVC的确值得骄傲!!
下面我们开始进入主题。
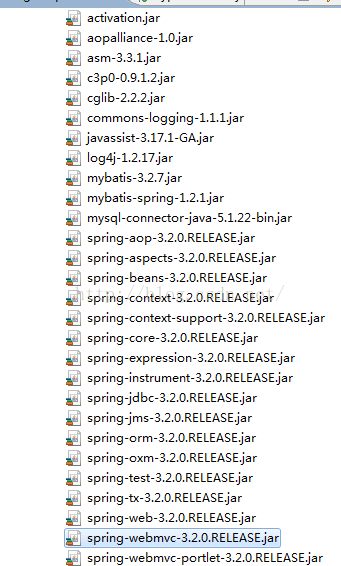
一、创建一个web项目,引入相应的jar包,分为spring的jar包 springMVC jar包 mybatis jar包和数据库驱动包
二 、配置web.xml
与struts2不同,springMVC是通过一个servlet启动(这一点与struts1的设计理念相同),这个servlet就是springMVC的核心控制器,我们也通常称之为“前端控制器”,而struts2是通过过滤器启动。
大体执行流程是: 浏览器发起请求----前端控制器 ----处理器映射器----前端控制器----处理器适配器----处理器----前端控制器---视图解析器----解析视图----前端控制器----响应
三 、配置spring配置文件 applicationContext.xml
四、配置springmvc 配置文件 springmvc.xml
其他配文件 log4j.properties
五、配置文件都已经配置完成了,下面开始编码测试
创建一个简单的实体bean---- User
package com.jelly.smvcm01.entity;
六、创建UserController 控制器(相当于struts2中的action) web层
七、创建UserService (业务层)
八、创建UserMapper.java 接口文件和UserMapper.xml映射文件
首先是UserMapper.java 接口
其次是UserMapper.xml 映射文件
九、创建3个jsp文件
用户列表页面、用户修改页面、用户添加页面
注:mapper的java接口文件和映射xml文件必须发在同一目录中
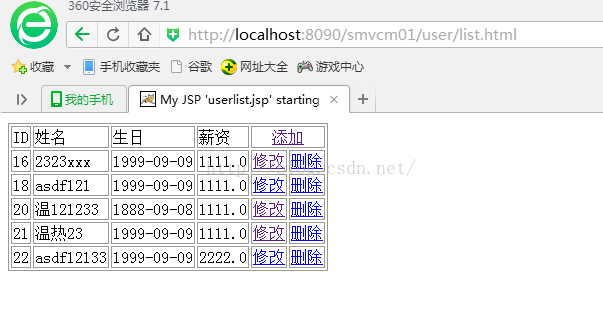
最后,我们发布web项目的服务器中,运行下看下效果。
项目源码下载:http://yunpan.cn/c3WX5LVzh6GL9 访问密码 1409
springMVC是spring后期产品,是整个spring体系中的一员,有着spring开发团队的大力支持,springMVC继承和发扬了spring的大量优秀特性,在web开发领域也得到了开发者的广泛欢迎。相比其前辈struts2相比, springMVC拥有更多高级的特性和更大的灵活度,多处理器映射器支持,自动参数pojo绑定,单实例开发支持,多视图解析支持,RESTfull风格开发支持,自动json对象转换支持等。
<span style="background-color: rgb(255, 255, 255);"> </span>
江山代有才人出,各领风骚数百年。springMVC的确值得骄傲!!
下面我们开始进入主题。
一、创建一个web项目,引入相应的jar包,分为spring的jar包 springMVC jar包 mybatis jar包和数据库驱动包
二 、配置web.xml
<?xml version="1.0" encoding="UTF-8"?>
<web-app version="3.0"
xmlns="http://java.sun.com/xml/ns/javaee"
xmlns:xsi="http://www.w3.org/2001/XMLSchema-instance"
xsi:schemaLocation="http://java.sun.com/xml/ns/javaee http://java.sun.com/xml/ns/javaee/web-app_3_0.xsd">
<!--配置springmvc过滤器   -->
<servlet>
<servlet-name>springmvc</servlet-name>
<servlet-class>org.springframework.web.servlet.DispatcherServlet</servlet-class>
<init-param>
<param-name>contextConfigLocation</param-name>
<param-value>classpath:springmvc.xml</param-value>
</init-param>
</servlet>
<servlet-mapping>
<servlet-name>springmvc</servlet-name>
<url-pattern>*.html</url-pattern>
</servlet-mapping>
<servlet-mapping>
<servlet-name>springmvc</servlet-name>
<url-pattern>*.do</url-pattern>
</servlet-mapping>

<!--配置spring 监听器  -->
<context-param>
<param-name>contextConfigLocation</param-name>
<param-value>classpath:application*.xml</param-value>
</context-param>
<listener>
<listener-class>org.springframework.web.context.ContextLoaderListener</listener-class>
</listener>

<!--  编码过滤器 -->
<filter>
<filter-name>characterEncodingFilter</filter-name>
<filter-class>org.springframework.web.filter.CharacterEncodingFilter</filter-class>
<init-param>
<param-name>encoding</param-name>
<param-value>UTF-8</param-value>
</init-param>
</filter>
<filter-mapping>
<filter-name>characterEncodingFilter</filter-name>
<url-pattern>/*</url-pattern>
</filter-mapping>

<welcome-file-list>
<welcome-file>index.jsp</welcome-file>
</welcome-file-list>
</web-app>
与struts2不同,springMVC是通过一个servlet启动(这一点与struts1的设计理念相同),这个servlet就是springMVC的核心控制器,我们也通常称之为“前端控制器”,而struts2是通过过滤器启动。
大体执行流程是: 浏览器发起请求----前端控制器 ----处理器映射器----前端控制器----处理器适配器----处理器----前端控制器---视图解析器----解析视图----前端控制器----响应
三 、配置spring配置文件 applicationContext.xml
<?xml version="1.0" encoding="UTF-8"?>
<beans xmlns="http://www.springframework.org/schema/beans"
xmlns:xsi="http://www.w3.org/2001/XMLSchema-instance"
xmlns:context="http://www.springframework.org/schema/context"
xmlns:aop="http://www.springframework.org/schema/aop"
xmlns:tx="http://www.springframework.org/schema/tx"
xsi:schemaLocation=" http://www.springframework.org/schema/beans http://www.springframework.org/schema/beans/spring-beans-3.2.xsd http://www.springframework.org/schema/context http://www.springframework.org/schema/context/spring-context-3.2.xsd http://www.springframework.org/schema/aop http://www.springframework.org/schema/aop/spring-aop-3.2.xsd http://www.springframework.org/schema/tx http://www.springframework.org/schema/tx/spring-tx-3.2.xsd
">

<!-- 导入外部的properties文件 -->
<context:property-placeholder location="classpath:jdbc.properties"/>

<bean id="dataSource" class="com.mchange.v2.c3p0.ComboPooledDataSource" destroy-method="close">
<!-- 数据连接信息 -->
<property name="jdbcUrl" value="${jdbc.url}">
</property>
<property name="driverClass" value="${jdbc.driver}"></property>
<property name="user" value="${jdbc.username}"></property>
<property name="password" value="${jdbc.password}"></property>
<!-- 其他配置 -->
<!--初始化时获取三个连接,取值应在minPoolSize与maxPoolSize之间。Default: 3 -->
<property name="initialPoolSize" value="3"></property>
<!--连接池中保留的最小连接数。Default: 3 -->
<property name="minPoolSize" value="3"></property>
<!--连接池中保留的最大连接数。Default: 15 -->
<property name="maxPoolSize" value="5"></property>
<!--当连接池中的连接耗尽的时候c3p0一次同时获取的连接数。Default: 3 -->
<property name="acquireIncrement" value="3"></property>
<!-- 控制数据源内加载的PreparedStatements数量。如果maxStatements与maxStatementsPerConnection均为0,则缓存被关闭。Default: 0 -->
<property name="maxStatements" value="8"></property>
<!--maxStatementsPerConnection定义了连接池内单个连接所拥有的最大缓存statements数。Default: 0 -->
<property name="maxStatementsPerConnection" value="5"></property>
<!--最大空闲时间,1800秒内未使用则连接被丢弃。若为0则永不丢弃。Default: 0 -->
<property name="maxIdleTime" value="1800"></property>
</bean>

<!-- 2   配置mybatis 的SqlSessionFactoryBean  -->
<bean id="sqlSessionFactory" class="org.mybatis.spring.SqlSessionFactoryBean">
<!--引入数据源dataSource  -->
<property name="dataSource" ref="dataSource"></property>
<!-- 实体bean自动别名  -->
<property name="typeAliasesPackage"  value="com.jelly.smvcm01.entity"></property>
</bean>
<!-- 3  自动扫描mapper sql映射文件base包   xxxMapper.xml 和xxxMapper 的dao接口文件  -->
<bean id="mapperScannerConfigurer" class="org.mybatis.spring.mapper.MapperScannerConfigurer">
<property name="basePackage" value="com.jelly.smvcm01.mapper"/>
<!--  <property name="sqlSessionFacto
4000
ry" ref="sqlSessionFactory"/> -->
<property name="sqlSessionFactoryBeanName" value="sqlSessionFactory"></property>
</bean>
<!--4  配置spring 事务管理器  -->
<bean id="txTransactionManager" class="org.springframework.jdbc.datasource.DataSourceTransactionManager">
<property name="dataSource" ref="dataSource"/>
</bean>
<!--5   使用声明事务  -->
<tx:annotation-driven transaction-manager="txTransactionManager"/>

</beans>
四、配置springmvc 配置文件 springmvc.xml
<?xml version="1.0" encoding="UTF-8"?>
<beans xmlns="http://www.springframework.org/schema/beans"
xmlns:xsi="http://www.w3.org/2001/XMLSchema-instance"
xmlns:context="http://www.springframework.org/schema/context"
xmlns:aop="http://www.springframework.org/schema/aop"
xmlns:tx="http://www.springframework.org/schema/tx"
xmlns:mvc="http://www.springframework.org/schema/mvc"
xsi:schemaLocation=" http://www.springframework.org/schema/beans http://www.springframework.org/schema/beans/spring-beans-3.2.xsd http://www.springframework.org/schema/context http://www.springframework.org/schema/context/spring-context-3.2.xsd http://www.springframework.org/schema/aop http://www.springframework.org/schema/aop/spring-aop-3.2.xsd http://www.springframework.org/schema/tx http://www.springframework.org/schema/tx/spring-tx-3.2.xsd http://www.springframework.org/schema/mvc http://www.springframework.org/schema/mvc/spring-mvc-3.2.xsd
">
<!--注册springmvc的注解驱动  -->
<mvc:annotation-driven />
<context:component-scan base-package="com.jelly.smvcm01"/>
<!--配置处理器映射器  -->
<!--配置处理器适配器  -->
<!--  annotation适配器 -->
<!--  <bean id="handlerMapping" class="org.springframework.web.servlet.mvc.method.annotation.RequestMappingHandlerMapping" />
<bean id="handlerAdapter" class="org.springframework.web.servlet.mvc.method.annotation.RequestMappingHandlerAdapter" />  -->

<!--配置试图解析器  -->
<bean class="org.springframework.web.servlet.view.InternalResourceViewResolver">
<!-- InternalResourceViewResolver viewClass默认值就是JstlView -->

<property name="viewClass" value="org.springframework.web.servlet.view.JstlView"/>
<property name="prefix" value="/WEB-INF/views/"/>
<!--  <property name="suffix" value=".jsp"/> -->

</bean>

</beans>
其他配文件 log4j.properties
### direct log messages to stdout ###
log4j.appender.stdout=org.apache.log4j.ConsoleAppender
log4j.appender.stdout.Target=System.out
log4j.appender.stdout.layout=org.apache.log4j.PatternLayout
log4j.appender.stdout.layout.ConversionPattern=%d{ABSOLUTE} %5p %c{1}:%L - %m%n
log4j.rootLogger=error, stdout
log4j.logger.com.jelly.smvcm01=debug
五、配置文件都已经配置完成了,下面开始编码测试
创建一个简单的实体bean---- User
package com.jelly.smvcm01.entity;
package com.jelly.smvcm01.entity;
import java.io.Serializable;
import java.util.Date;
public class User implements Serializable{
/**
*
*/
private static final long serialVersionUID = -6596798696065943789L;
private int id;
private String name;
private Date birthday;
private double salary;
public int getId() {
return id;
}
public void setId(int id) {
this.id = id;
}
public String getName() {
return name;
}
public void setName(String name) {
this.name = name;
}
public Date getBirthday() {
return birthday;
}
public void setBirthday(Date birthday) {
this.birthday = birthday;
}
public double getSalary() {
return salary;
}
public void setSalary(double salary) {
this.salary = salary;
}
@Override
public String toString() {
return "User [id=" + id + ", name=" + name + ", birthday=" + birthday
+ ", salary=" + salary + "]";
}
public User(String name, Date birthday, double salary) {
super();
this.name = name;
this.birthday = birthday;
this.salary = salary;
}
public User(int id, String name, Date birthday, double salary) {
super();
this.id = id;
this.name = name;
this.birthday = birthday;
this.salary = salary;
}
public User() {
super();
// TODO Auto-generated constructor stub
}

}
六、创建UserController 控制器(相当于struts2中的action) web层
package com.jelly.smvcm01.controller;
import java.util.List;
import javax.annotation.Resource;
import javax.servlet.http.HttpServletRequest;
import javax.servlet.http.HttpServletResponse;
import org.springframework.stereotype.Controller;
import org.springframework.ui.Model;
import org.springframework.web.bind.annotation.RequestHeader;
import org.springframework.web.bind.annotation.RequestMapping;
import org.springframework.web.bind.annotation.RequestParam;

import com.jelly.smvcm01.entity.User;
import com.jelly.smvcm01.service.UserService;

@Controller
@RequestMapping("/user")
public class UserController {
@Resource
private UserService userService;
@RequestMapping("/list")
public String userlist(HttpServletRequest request,Model model){
try {
List<User> userList=  userService.getUserList();
model.addAttribute("userList", userList);
return "/user/userlist.jsp";// 返回页面
} catch (Exception e) {
e.printStackTrace();
return "redirect:/public/error.jsp";
}

}
@RequestMapping("/add")
public String userAdd(){
return "user/userAdd.jsp";
}
@RequestMapping("/addSubmit")
public String userAddSubmit(User user,HttpServletResponse response){
try {
int i=userService.addUser(user);
if(i==1){
//response.sendRedirect("list.html");
return "redirect:/user/list.html";//页面重定向
}
return null;
} catch (Exception e) {
e.printStackTrace();
return "redirect:/public/error.jsp";
}
}
@RequestMapping("/delete")
public String userDelete(int id){
int i=	userService.deleteUser(id);
if(i==1){
return "redirect:/user/list.html";
}
return "redirect:/public/error.jsp";
}
@RequestMapping("/update")
public String userUpdate(@RequestParam(value="id",defaultValue="0" ,required=true) int id,Model model){
try {
User user= userService.getUserbyid(id);
model.addAttribute("user", user);
return "/user/userUpdate.jsp";
} catch (Exception e) {
e.printStackTrace();
return "redirect:/public/error.jsp";
}

}
@RequestMapping("/updateSubmit")
public String updateSubmit(User user){
int i=userService.updateUser(user);
if(i==1){
return "redirect:/user/list.html";
}
return "redirect:/public/error.jsp";
}
}<pre name="code" class="java">
七、创建UserService (业务层)
package com.jelly.smvcm01.service;
import java.util.List;
import javax.annotation.Resource;
import org.springframework.stereotype.Service;
import org.springframework.transaction.annotation.Transactional;
import com.jelly.smvcm01.entity.User;
import com.jelly.smvcm01.mapper.UserMapper;
@Service
@Transactional
public class UserService {
@Resource
private UserMapper userMapper;
public List<User> getUserList() {
try {
List<User> userlist=userMapper.findAll();
return userlist;
} catch (Exception e) {
e.printStackTrace();
return null;
}
}
public int addUser(User user) {
try {
int i = userMapper.save(user);
return i;
} catch (Exception e) {
e.printStackTrace();
return -1;
}

}
public int deleteUser(int id) {
try {
int i=	userMapper.delete(id);
return i;
} catch (Exception e) {
e.printStackTrace();
return -1;
}
}
public int updateUser(User user) {
try {
int i=	userMapper.update(user);
return i;
} catch (Exception e) {
e.printStackTrace();
return -1;
}
}
public User getUserbyid(int id) {
try {
User user=	userMapper.findById(id);
return user;
} catch (Exception e) {
e.printStackTrace();
return null;
}
}
}
八、创建UserMapper.java 接口文件和UserMapper.xml映射文件
首先是UserMapper.java 接口
package com.jelly.smvcm01.mapper;

import java.util.List;
import com.jelly.smvcm01.entity.User;
public interface UserMapper {
public  int save(User user);
public int update(User user);
public  int delete(int id);
public User findById(int id);
public List<User> findAll();
}
其次是UserMapper.xml 映射文件
<?xml version="1.0" encoding="UTF-8" ?>
<!DOCTYPE mapper
PUBLIC "-//mybatis.org//DTD Mapper 3.0//EN"
"http://mybatis.org/dtd/mybatis-3-mapper.dtd">

<mapper namespace="com.jelly.smvcm01.mapper.UserMapper">
<insert id="save" parameterType="User">
insert into t_user(name,birthday,salary) values(#{name},#{birthday},#{salary})
</insert>
<update id="update" parameterType="User">
update  t_user t
<set>
<if test="name!=null">
t.name=#{name},
</if>
<if test="birthday!=null">
t.birthday=#{birthday},
</if>
<if test="salary!=null">
t.salary=#{salary},
</if>
</set>
where t.id=#{id}
</update>
<delete id="delete" parameterType="int"  >
delete from t_user where id=#{id}
</delete>
<select id="findById" parameterType="int" resultType="User">
select * from t_user t where t.id=#{id}
</select>
<select id="findAll" resultType="User" >
select * from t_user
</select>
</mapper>
九、创建3个jsp文件
用户列表页面、用户修改页面、用户添加页面
<%@ page language="java" import="java.util.*" pageEncoding="utf-8"%>
<%
String path = request.getContextPath();
String basePath = request.getScheme()+"://"+request.getServerName()+":"+request.getServerPort()+path+"/";
%>
<%@taglib prefix="c" uri="http://java.sun.com/jsp/jstl/core" %>
<%@taglib prefix="fmt" uri="http://java.sun.com/jsp/jstl/fmt" %>
<!DOCTYPE HTML PUBLIC "-//W3C//DTD HTML 4.01 Transitional//EN">
<html>
<head>
<base href="<%=basePath%>">

<title>My JSP 'userlist.jsp' starting page</title>

<meta http-equiv="pragma" content="no-cache">
<meta http-equiv="cache-control" content="no-cache">
<meta http-equiv="expires" content="0">
<meta http-equiv="keywords" content="keyword1,keyword2,keyword3">
<meta http-equiv="description" content="This is my page">
</head>
<body>
<table border="1" bordercolor="#999" >
<tr>
<td>ID </td>
<td>姓名 </td>
<td>生日 </td>
<td >薪资</td>
<td colspan="2" align="center"><a href="user/add.html">添加</a></td>
</tr>
<c:if test="${!empty userList}">
<c:forEach items="${userList}" var="user">
<tr>
<td>${user.id }</td>
<td>${user.name }</td>
<td><fmt:formatDate value="${user.birthday}" pattern="yyyy-MM-dd"/></td>
<td>${user.salary}</td>
<td><a href="${pageContext.request.contextPath }/user/update.html?id=${user.id}">修改</a></td>
<td><a href="${pageContext.request.contextPath }/user/delete.html?id=${user.id}" onclick="return confirm('确定删除吗?')">删除</a></td>
</tr>
</c:forEach>
</c:if>
</table>
</body>
<script>

</script>
</html>
<%@ page language="java" import="java.util.*" pageEncoding="utf-8"%>
<%
String path = request.getContextPath();
String basePath = request.getScheme()+"://"+request.getServerName()+":"+request.getServerPort()+path+"/";
%>
<%@taglib prefix="c" uri="http://java.sun.com/jsp/jstl/core" %>
<%@taglib prefix="fmt" uri="http://java.sun.com/jsp/jstl/fmt" %>
<!DOCTYPE HTML PUBLIC "-//W3C//DTD HTML 4.01 Transitional//EN">
<html>
<head>
<base href="<%=basePath%>">
<title>My JSP 'useredit.jsp' starting page</title>
<meta http-equiv="pragma" content="no-cache">
<meta http-equiv="cache-control" content="no-cache">
<meta http-equiv="expires" content="0">
<meta http-equiv="keywords" content="keyword1,keyword2,keyword3">
<meta http-equiv="description" content="This is my page">
</head>
<body>
<form action="http://localhost:8090/smvcm01/user/updateSubmit.html" method="post">
用户名: <input name="name" value="${user.name }"/> <br/>
生 日: <input name="birthday" value='<fmt:formatDate value="${user.birthday}" pattern="yyyy-MM-dd"/>'/> <br/>
薪 资: <input name="salary" value="${user.salary}"/> <br/>
<input type="hidden" name="id" value="${user.id}"/><br/>
<input type="submit" value="提交" />
</form>
</body>
</html><%@ page language="java" import="java.util.*" pageEncoding="utf-8"%> <% String path = request.getContextPath(); String basePath = request.getScheme()+"://"+request.getServerName()+":"+request.getServerPort()+path+"/"; %> <%@taglib prefix="c" uri="http://java.sun.com/jsp/jstl/core" %> <!DOCTYPE HTML PUBLIC "-//W3C//DTD HTML 4.01 Transitional//EN"> <html> <head> <base href="<%=basePath%>"> <title>My JSP 'useradd.jsp' starting page</title> <meta http-equiv="pragma" content="no-cache"> <meta http-equiv="cache-control" content="no-cache"> <meta http-equiv="expires" content="0"> <meta http-equiv="keywords" content="keyword1,keyword2,keyword3"> <meta http-equiv="description" content="This is my page"> </head> <body> <form action="user/addSubmit.html" method="post"> 用户名: <input name="name"/> <br/> 生 日: <input name="birthday"/> <br/> 薪 资: <input name="salary"/> <br/> <input type="submit" value="提交" /> </form> </body> </html>
注:mapper的java接口文件和映射xml文件必须发在同一目录中
最后,我们发布web项目的服务器中,运行下看下效果。
项目源码下载:http://yunpan.cn/c3WX5LVzh6GL9 访问密码 1409

相关文章推荐
- java对世界各个时区(TimeZone)的通用转换处理方法(转载)
- java-注解annotation
- java-模拟tomcat服务器
- java-用HttpURLConnection发送Http请求.
- java-WEB中的监听器Lisener
- Android IPC进程间通讯机制
- Android Native 绘图方法
- Android java 与 javascript互访(相互调用)的方法例子
- 介绍一款信息管理系统的开源框架---jeecg
- 聚类算法之kmeans算法java版本
- java实现 PageRank算法
- PropertyChangeListener简单理解
- 插入排序
- 冒泡排序
- 堆排序
- 快速排序
- 二叉查找树
- 一个jar包里的网站