iOS-布局-Masonry
2015-12-09 11:52
537 查看
一.说明:demo中的举例视图介绍
UIView *_blackView; 作为父视图
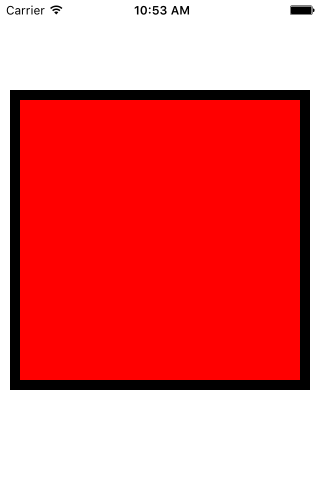
UIView *_redView; 与父视图内边距为10
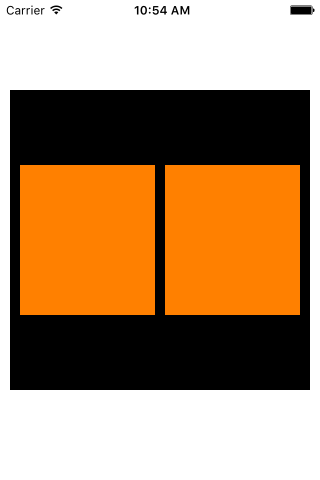
UIView *_orangeView1; 父视图的内左视图
UIView *_orangeView2; 父视图的内右视图
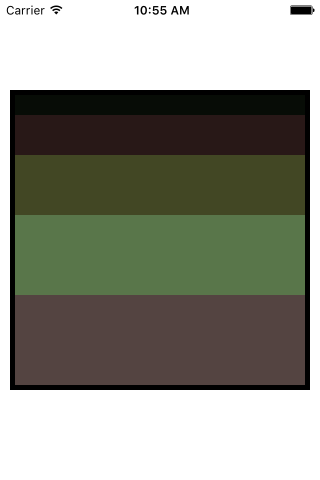
二.先上演示截图
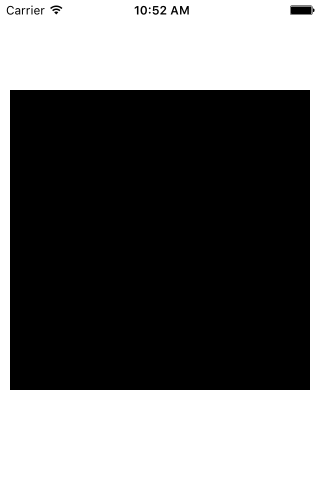
1黑色父视图
2.在黑色父视图上添加距父视图内边距为10的红色视图
3.在黑色父视图上添加两个橘黄色视图
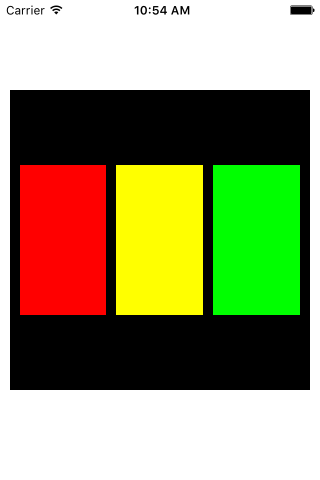
4.在黑色父视图上添加三个等边距的视图
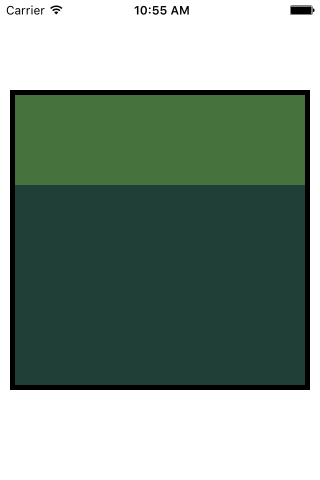
5.在黑色视图上添加滑动视图
(1)滑动视图的头视图
(2)滑动视图的尾部视图
三.解惑
1.关键词
make 需要添加约束的对象
and 无具体意义的语句连贯词
with 无具体意义的语句连贯词
offset 边距
equalTo 相对于,等同于
2.make的属性
3.分类
4.对比
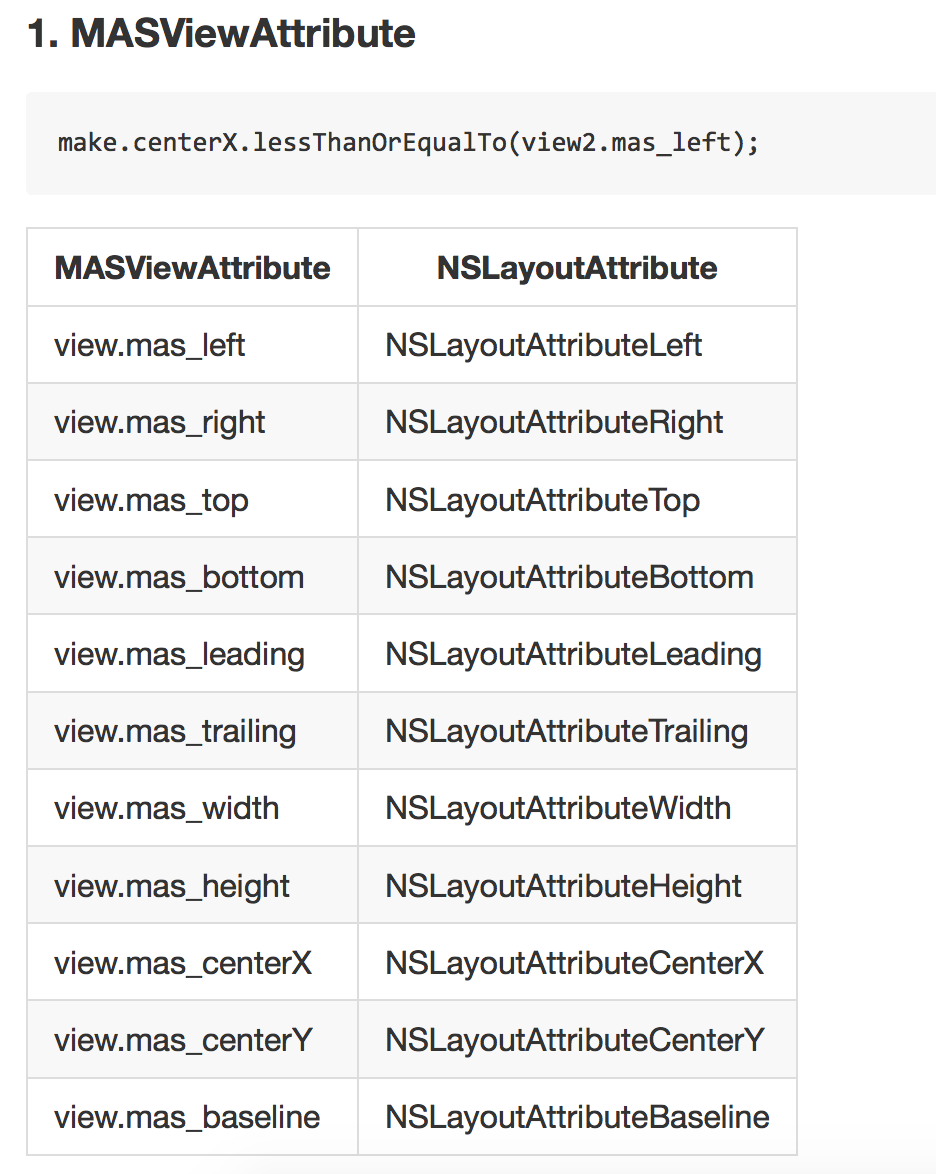
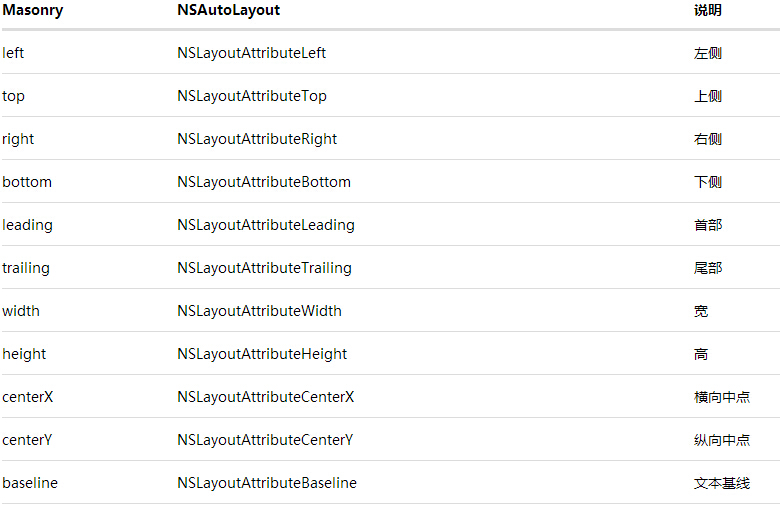
其中leading与left trailing与right 在正常情况下是等价的 但是当一些布局是从右至左时(比如阿拉伯文?没有类似的经验) 则会对调 换句话说就是基本可以不理不用 用left和right就好了。
以上说明了上下左右等属性的对应替代属性。
四.三个添加约束的方法
//设置约束
- (NSArray *)mas_makeConstraints:(void(^)(MASConstraintMaker *))block;
//如果之前已经有约束,则更新新的约束,如果没有约束,则添加约束
- (NSArray *)mas_updateConstraints:(void(^)(MASConstraintMaker *))block;
//将之前的约束全部删除,添加新的约束
- (NSArray *)mas_remakeConstraints:(void(^)(MASConstraintMaker *make))block;
五.添加控件
(
1.需要把控件先添加到父视图上,否则会报错。
2.不需要 _blackView.translatesAutoresizingMaskIntoConstraints = NO;已经封装进去了
3.只需要设置一些与控件frame无关的就可以了
)
_blackView = [UIView new];
_blackView.backgroundColor = [UIColor blackColor];
// 在做autoLayout 之前 一定要先将view添加到superView上, 否则会报错
[self.view addSubview:_blackView];
六.给控件添加约束
效果:控件的bounds(0,0,300,300).控件的中心在self.view的中心上。两个约束确定了控件的位置。
//mas_makeConstrains就是Masonry的autoLayout添加函数 将所需的约束添加到block中就行了
[_blackView mas_makeConstraints:^(MASConstraintMaker *make) {
//居中
make.center.equalTo(self.view);
//将size设置成(300,300);
make.size.mas_equalTo(CGSizeMake(300, 300));
}];
七.代码
#import "ViewController.h"
#import "Masonry.h"
@interface ViewController ()
{
UIView *_blackView;
UIView *_redView;
UIView *_orangeView1;
UIView *_orangeView2;
UIScrollView *_scrolView;
}
@end
@implementation ViewController
- (void)viewDidLoad {
[super viewDidLoad];
[self addBlackView];
//[self addRedView];
//[self addTwoOrangeColorView];
//[self addMoreView];
[self addScrolView];
}
#pragma mark 添加黑色视图
- (void)addBlackView
{
_blackView = [UIView new];
_blackView.backgroundColor = [UIColor blackColor];
// 在做autoLayout 之前 一定要先将view添加到superView上, 否则会报错
[self.view addSubview:_blackView];
//mas_makeConstrains就是Masonry的autoLayout添加函数 将所需的约束添加到block中就行了
[_blackView mas_makeConstraints:^(MASConstraintMaker *make) {
//居中
make.center.equalTo(self.view);
//将size设置成(300,300);
make.size.mas_equalTo(CGSizeMake(300, 300));
}];
}
#pragma mark 添加红色视图
- (void)addRedView
{
_redView = [UIView new];
_redView.backgroundColor = [UIColor redColor];
[self.view addSubview:_redView];
[_redView mas_makeConstraints:^(MASConstraintMaker *make) {
//这三种方式等价
//方式一:
make.edges.equalTo(_blackView).with.insets(UIEdgeInsetsMake(10, 10, 10, 10));
//方式二:
// make.top.equalTo(_blackView).with.offset(10);
// make.left.equalTo(_blackView).with.offset(10);
// make.bottom.equalTo(_blackView).with.offset(-10);
// make.right.equalTo(_blackView).with.offset(-10);
//方式三:
// make.top.left.bottom.and.right.equalTo(_blackView).with.insets(UIEdgeInsetsMake(10, 10, 10, 10));
}];
}
#pragma mark 添加俩橘色视图
- (void)addTwoOrangeColorView
{
//定义边距为10
int padding1 = 10;
_orangeView1 = [UIView new];
_orangeView1.backgroundColor = [UIColor orangeColor];
[self.view addSubview:_orangeView1];
_orangeView2 = [UIView new];
_orangeView2.backgroundColor = [UIColor orangeColor];
[self.view addSubview:_orangeView2];
[_orangeView1 mas_makeConstraints:^(MASConstraintMaker *make) {
make.centerY.mas_equalTo(_blackView.mas_centerY);
make.left.equalTo(_blackView.mas_left).with.offset(padding1);
make.right.equalTo(_orangeView2.mas_left).with.offset(-padding1);
make.height.mas_equalTo(@150);
make.width.equalTo(_orangeView2);
}];
[_orangeView2 mas_makeConstraints:^(MASConstraintMaker *make) {
make.centerY.mas_equalTo(_blackView.mas_centerY);
make.left.equalTo(_orangeView1.mas_right).with.offset(padding1);
make.right.equalTo(_blackView.mas_right).with.offset(-padding1);
make.height.mas_equalTo(@150);
make.width.equalTo(_orangeView1);
}];
}
#pragma mark 添加多个等间距的视图
- (void)addMoreView
{
UIView *view1 = [[UIView alloc] init];
view1.backgroundColor = [UIColor redColor];
[_blackView addSubview:view1];
UIView *view2 = [[UIView alloc] init];
view2.backgroundColor = [UIColor yellowColor];
[_blackView addSubview:view2];
UIView *view3 = [[UIView alloc] init];
view3.backgroundColor = [UIColor greenColor];
[self.view addSubview:view3];
int padding = 10;
[view1 mas_makeConstraints:^(MASConstraintMaker *make) {
//设置竖直方向约束
// 设置view1的Y中心点
make.centerY.mas_equalTo(_blackView);
// 设置高度
make.height.mas_equalTo(@150);
//设置水平方向约束
// 设置左侧距离父视图10
make.left.equalTo(_blackView).with.offset(padding);
// 设置右侧距离和view2的左侧相隔10
make.right.equalTo(view2.mas_left).with.offset(-padding);
// 宽度设置和view2以及view3相同
make.width.equalTo(@[view2, view3]);
}];
[view2 mas_makeConstraints:^(MASConstraintMaker *make) {
make.centerY.mas_equalTo(_blackView);
make.height.mas_equalTo(view1);
make.width.equalTo(@[view1, view3]);
}];
[view3 mas_makeConstraints:^(MASConstraintMaker *make) {
make.centerY.mas_equalTo(_blackView);
make.left.equalTo(view2.mas_right).with.offset(padding);
make.right.equalTo(_blackView).with.offset(-padding);
make.height.mas_equalTo(view1);
make.width.equalTo(@[view2, view1]);
}];
}
#pragma mark 添加滑动视图
- (void)addScrolView
{
_scrolView = [UIScrollView new];
_scrolView.backgroundColor = [UIColor whiteColor];
[_blackView addSubview:_scrolView];
[_scrolView mas_makeConstraints:^(MASConstraintMaker *make) {
make.edges.equalTo(_blackView).with.insets(UIEdgeInsetsMake(5, 5, 5, 5));
}];
UIView * container = [UIView new];
[_scrolView addSubview:container];
[container mas_makeConstraints:^(MASConstraintMaker *make) {
make.edges.equalTo(_scrolView);
make.width.equalTo(_scrolView);
}];
int count = 10;
UIView * lastView = nil;
for (int i = 0; i <= count; i ++)
{
UIView * subView = [UIView new];
[container addSubview:subView];
subView.backgroundColor = [UIColor colorWithHue:(arc4random() % 156 / 256.0) saturation:(arc4random() % 128 / 256.0) brightness:(arc4random() % 128 / 256.0) alpha:1];
[subView mas_makeConstraints:^(MASConstraintMaker *make) {
make.left.and.right.equalTo(container);
make.height.equalTo(@(20*i));
if (lastView) {
make.top.mas_equalTo(lastView.mas_bottom);
}
else
{
make.top.mas_equalTo(container.mas_top);
}
}];
lastView = subView;
}
[container mas_makeConstraints:^(MASConstraintMaker *make) {
make.bottom.equalTo(lastView.mas_bottom);
}];
}
- (void)viewDidAppear:(BOOL)animated
{
[super viewDidAppear:animated];
NSLog(@"_blackView.frame: %@",NSStringFromCGRect(_blackView.frame));
NSLog(@"_blackView1.frame: %@",NSStringFromCGRect(_blackView.frame));
NSLog(@"_orangeView1.frame: %@",NSStringFromCGRect(_orangeView1.frame));
NSLog(@"_orangeView2.frame: %@",NSStringFromCGRect(_orangeView2.frame));
NSLog(@"_scrolView.frame: %@",NSStringFromCGRect(_scrolView.frame));
}
@end
UIView *_blackView; 作为父视图
UIView *_redView; 与父视图内边距为10
UIView *_orangeView1; 父视图的内左视图
UIView *_orangeView2; 父视图的内右视图
二.先上演示截图
1黑色父视图
2.在黑色父视图上添加距父视图内边距为10的红色视图
3.在黑色父视图上添加两个橘黄色视图
4.在黑色父视图上添加三个等边距的视图
5.在黑色视图上添加滑动视图
(1)滑动视图的头视图
(2)滑动视图的尾部视图
三.解惑
1.关键词
make 需要添加约束的对象
and 无具体意义的语句连贯词
with 无具体意义的语句连贯词
offset 边距
equalTo 相对于,等同于
multipliedBy 倍数
举例:make.width.equalTo(self.view.mas_width).multipliedBy(0.5);//设置宽度为self.view的一半,multipliedBy是倍数的意思,也就是,使宽度等于self.view宽度的0.5倍
2.make的属性
// 左侧
@property (nonatomic, strong, readonly) MASConstraint *left;
// 顶部
@property (nonatomic, strong, readonly) MASConstraint *top;
// 右侧
@property (nonatomic, strong, readonly) MASConstraint *right;
// 底部
@property (nonatomic, strong, readonly) MASConstraint *bottom;
// 首部
@property (nonatomic, strong, readonly) MASConstraint *leading;
// 尾部
@property (nonatomic, strong, readonly) MASConstraint *trailing;
// 宽
@property (nonatomic, strong, readonly) MASConstraint *width;
// 高
@property (nonatomic, strong, readonly) MASConstraint *height;
// 中心点x
@property (nonatomic, strong, readonly) MASConstraint *centerX;
// 中心点y
@property (nonatomic, strong, readonly) MASConstraint *centerY;
// 文本基线
@property (nonatomic, strong, readonly) MASConstraint *baseline;
3.分类
| 分类 | 含义 | 举例 |
| size | 尺寸,包含(wdith,height) | make.size.mas_equalTo(CGSizeMake(300, 300)); |
| edges | 边距,包含(top,left,right,bottom) | make.edges.equalTo(_blackView).with.insets(UIEdgeInsetsMake(10, 10, 10, 10)); 可以写成 make.top.equalTo(_blackView).with.offset(10); make.left.equalTo(_blackView).with.offset(10); make.bottom.equalTo(_blackView).with.offset(-10); make.right.equalTo(_blackView).with.offset(-10); 或者 make.top.left.bottom.and.right.equalTo(_blackView).with.insets(UIEdgeInsetsMake(10, 10, 10, 10)); |
| center | 中心,包含(centerX,centerY) | make.center.equalTo(self.view); |
其中leading与left trailing与right 在正常情况下是等价的 但是当一些布局是从右至左时(比如阿拉伯文?没有类似的经验) 则会对调 换句话说就是基本可以不理不用 用left和right就好了。
以上说明了上下左右等属性的对应替代属性。
四.三个添加约束的方法
//设置约束
- (NSArray *)mas_makeConstraints:(void(^)(MASConstraintMaker *))block;
//如果之前已经有约束,则更新新的约束,如果没有约束,则添加约束
- (NSArray *)mas_updateConstraints:(void(^)(MASConstraintMaker *))block;
//将之前的约束全部删除,添加新的约束
- (NSArray *)mas_remakeConstraints:(void(^)(MASConstraintMaker *make))block;
五.添加控件
(
1.需要把控件先添加到父视图上,否则会报错。
2.不需要 _blackView.translatesAutoresizingMaskIntoConstraints = NO;已经封装进去了
3.只需要设置一些与控件frame无关的就可以了
)
_blackView = [UIView new];
_blackView.backgroundColor = [UIColor blackColor];
// 在做autoLayout 之前 一定要先将view添加到superView上, 否则会报错
[self.view addSubview:_blackView];
六.给控件添加约束
效果:控件的bounds(0,0,300,300).控件的中心在self.view的中心上。两个约束确定了控件的位置。
//mas_makeConstrains就是Masonry的autoLayout添加函数 将所需的约束添加到block中就行了
[_blackView mas_makeConstraints:^(MASConstraintMaker *make) {
//居中
make.center.equalTo(self.view);
//将size设置成(300,300);
make.size.mas_equalTo(CGSizeMake(300, 300));
}];
七.代码
#import "ViewController.h"
#import "Masonry.h"
@interface ViewController ()
{
UIView *_blackView;
UIView *_redView;
UIView *_orangeView1;
UIView *_orangeView2;
UIScrollView *_scrolView;
}
@end
@implementation ViewController
- (void)viewDidLoad {
[super viewDidLoad];
[self addBlackView];
//[self addRedView];
//[self addTwoOrangeColorView];
//[self addMoreView];
[self addScrolView];
}
#pragma mark 添加黑色视图
- (void)addBlackView
{
_blackView = [UIView new];
_blackView.backgroundColor = [UIColor blackColor];
// 在做autoLayout 之前 一定要先将view添加到superView上, 否则会报错
[self.view addSubview:_blackView];
//mas_makeConstrains就是Masonry的autoLayout添加函数 将所需的约束添加到block中就行了
[_blackView mas_makeConstraints:^(MASConstraintMaker *make) {
//居中
make.center.equalTo(self.view);
//将size设置成(300,300);
make.size.mas_equalTo(CGSizeMake(300, 300));
}];
}
#pragma mark 添加红色视图
- (void)addRedView
{
_redView = [UIView new];
_redView.backgroundColor = [UIColor redColor];
[self.view addSubview:_redView];
[_redView mas_makeConstraints:^(MASConstraintMaker *make) {
//这三种方式等价
//方式一:
make.edges.equalTo(_blackView).with.insets(UIEdgeInsetsMake(10, 10, 10, 10));
//方式二:
// make.top.equalTo(_blackView).with.offset(10);
// make.left.equalTo(_blackView).with.offset(10);
// make.bottom.equalTo(_blackView).with.offset(-10);
// make.right.equalTo(_blackView).with.offset(-10);
//方式三:
// make.top.left.bottom.and.right.equalTo(_blackView).with.insets(UIEdgeInsetsMake(10, 10, 10, 10));
}];
}
#pragma mark 添加俩橘色视图
- (void)addTwoOrangeColorView
{
//定义边距为10
int padding1 = 10;
_orangeView1 = [UIView new];
_orangeView1.backgroundColor = [UIColor orangeColor];
[self.view addSubview:_orangeView1];
_orangeView2 = [UIView new];
_orangeView2.backgroundColor = [UIColor orangeColor];
[self.view addSubview:_orangeView2];
[_orangeView1 mas_makeConstraints:^(MASConstraintMaker *make) {
make.centerY.mas_equalTo(_blackView.mas_centerY);
make.left.equalTo(_blackView.mas_left).with.offset(padding1);
make.right.equalTo(_orangeView2.mas_left).with.offset(-padding1);
make.height.mas_equalTo(@150);
make.width.equalTo(_orangeView2);
}];
[_orangeView2 mas_makeConstraints:^(MASConstraintMaker *make) {
make.centerY.mas_equalTo(_blackView.mas_centerY);
make.left.equalTo(_orangeView1.mas_right).with.offset(padding1);
make.right.equalTo(_blackView.mas_right).with.offset(-padding1);
make.height.mas_equalTo(@150);
make.width.equalTo(_orangeView1);
}];
}
#pragma mark 添加多个等间距的视图
- (void)addMoreView
{
UIView *view1 = [[UIView alloc] init];
view1.backgroundColor = [UIColor redColor];
[_blackView addSubview:view1];
UIView *view2 = [[UIView alloc] init];
view2.backgroundColor = [UIColor yellowColor];
[_blackView addSubview:view2];
UIView *view3 = [[UIView alloc] init];
view3.backgroundColor = [UIColor greenColor];
[self.view addSubview:view3];
int padding = 10;
[view1 mas_makeConstraints:^(MASConstraintMaker *make) {
//设置竖直方向约束
// 设置view1的Y中心点
make.centerY.mas_equalTo(_blackView);
// 设置高度
make.height.mas_equalTo(@150);
//设置水平方向约束
// 设置左侧距离父视图10
make.left.equalTo(_blackView).with.offset(padding);
// 设置右侧距离和view2的左侧相隔10
make.right.equalTo(view2.mas_left).with.offset(-padding);
// 宽度设置和view2以及view3相同
make.width.equalTo(@[view2, view3]);
}];
[view2 mas_makeConstraints:^(MASConstraintMaker *make) {
make.centerY.mas_equalTo(_blackView);
make.height.mas_equalTo(view1);
make.width.equalTo(@[view1, view3]);
}];
[view3 mas_makeConstraints:^(MASConstraintMaker *make) {
make.centerY.mas_equalTo(_blackView);
make.left.equalTo(view2.mas_right).with.offset(padding);
make.right.equalTo(_blackView).with.offset(-padding);
make.height.mas_equalTo(view1);
make.width.equalTo(@[view2, view1]);
}];
}
#pragma mark 添加滑动视图
- (void)addScrolView
{
_scrolView = [UIScrollView new];
_scrolView.backgroundColor = [UIColor whiteColor];
[_blackView addSubview:_scrolView];
[_scrolView mas_makeConstraints:^(MASConstraintMaker *make) {
make.edges.equalTo(_blackView).with.insets(UIEdgeInsetsMake(5, 5, 5, 5));
}];
UIView * container = [UIView new];
[_scrolView addSubview:container];
[container mas_makeConstraints:^(MASConstraintMaker *make) {
make.edges.equalTo(_scrolView);
make.width.equalTo(_scrolView);
}];
int count = 10;
UIView * lastView = nil;
for (int i = 0; i <= count; i ++)
{
UIView * subView = [UIView new];
[container addSubview:subView];
subView.backgroundColor = [UIColor colorWithHue:(arc4random() % 156 / 256.0) saturation:(arc4random() % 128 / 256.0) brightness:(arc4random() % 128 / 256.0) alpha:1];
[subView mas_makeConstraints:^(MASConstraintMaker *make) {
make.left.and.right.equalTo(container);
make.height.equalTo(@(20*i));
if (lastView) {
make.top.mas_equalTo(lastView.mas_bottom);
}
else
{
make.top.mas_equalTo(container.mas_top);
}
}];
lastView = subView;
}
[container mas_makeConstraints:^(MASConstraintMaker *make) {
make.bottom.equalTo(lastView.mas_bottom);
}];
}
- (void)viewDidAppear:(BOOL)animated
{
[super viewDidAppear:animated];
NSLog(@"_blackView.frame: %@",NSStringFromCGRect(_blackView.frame));
NSLog(@"_blackView1.frame: %@",NSStringFromCGRect(_blackView.frame));
NSLog(@"_orangeView1.frame: %@",NSStringFromCGRect(_orangeView1.frame));
NSLog(@"_orangeView2.frame: %@",NSStringFromCGRect(_orangeView2.frame));
NSLog(@"_scrolView.frame: %@",NSStringFromCGRect(_scrolView.frame));
}
@end

相关文章推荐
- 导航栏透明 毛玻璃效果iOS
- ios正在使用NSDateComponents、NSDate、NSCalendar它的结论是在当前时间是在一段时间在一天。
- ios判断是否展示轮播图
- IOS 十六进制字符串转十六进制数字
- iOS 事件处理机制与图像渲染过程(转)
- iOS 常用的宏定义
- IOS私人API用法
- iOS 摇一摇
- iOS中定时器NSTimer的开启与关闭
- iOS开发笔记--iOS沙盒机制
- iOS---如何在一个应用程序中调用另一个应用程序
- ios简单自定义view(1)
- iOS BCD码、数据流、字节和MD5计算
- iOS的文字自适应
- iOS: 枚举类型 enum,NS_ENUM,NS_OPTIONS
- iOS几种数据持久化方法
- iOS学习之 plist文件的读写
- IOS 自定义button有效点击范围
- ios 属性和实例变量的区别
- iOS开发之单例模式