nginx常用配置
2015-11-28 11:25
525 查看
官档
http://nginx.org/en/docs/
nginx的负载均衡主要依赖这个模块:ngx_http_upstream_module
2、修改egrep -v "#|^$" nginx.conf.default > nginx.conf
对其进行修改
以下是对上面标红的3个地方的解释
01:
02:proxy_pass 代理通道,指向了一个upstream组件,请求将由upstream组件中配置的webserver进行处理
03:webserver池,由关键字upstream标识,weight表示权重,backup代表备份机。其他参数在后面会提到。
3、测试
测试用两台机器(192.168.1.108,192.168.1.109),使用Apachehttpd作为web服务器
a、配置 web服务器
curl 192.168.1.111
curl 192.168.1.111
curl 192.168.1.111
多次访问,看返回的ip地址是否不同的webserver的地址。
这里要关闭防火墙。
ip_hash的配置
参数
server server [ip|domain]:port
weight weight=[0-9]
默认是1
max_fails max_fails=2
最大尝试失败次数,0表示禁止尝试
backup
热备节点。所有的几点都down后,热备节点启用。
fail_timeout=20s
失败超时时间,默认10s,通常配置2、3,间隔20s去检查一次,该节点是否存活
down
服务器不可用,这个参数可配合ip_hash使用
max_conns server ip weight=5 max_conns=2000
并发连接数
least_conn
最小连接数。谁连接少,就发给谁
更多参见nginx文档
location 路径{} 可以配置多个。proxy_pass 可以放的位置是 location,if,limit标签
解决虚拟主机:避免nginx通过ip地址访问资源,通过ip地址直接访问资源而没有host头,若web服务器配置了虚拟主机,则虚拟主机会失效。
所以经过nginx时,要把host头带过去。
配置了 X-Forwarded-For $remote_addr; 后可以经过nginx将ip带到web服务器。
cache功能
http://nginx.org/en/docs/
nginx的负载均衡主要依赖这个模块:ngx_http_upstream_module
负载均衡的简易配置
1、安装好nginx(192.168.1.111)2、修改egrep -v "#|^$" nginx.conf.default > nginx.conf
对其进行修改
worker_processes  1;
events {
worker_connections  1024;
}
http {
include       mime.types;
default_type  application/octet-stream;
sendfile        on;
keepalive_timeout  65;
server {
listen       80;
server_name  iktz.cn;#01
location / {
root   html;
index  index.html index.htm;
<span style="white-space:pre">	</span>    proxy_pass http://webserver_pool;#02 }
}
#03
upstream webserver_pool {
server 192.168.1.108       weight=5;
server 192.168.1.109       weight=5;
server 192.168.1.110       backup;
}
}
访问server_name的时候,会找listen端口,所有“/”目录以下的请求,都会经过nginx,抛给http://webserver_pool 中定义的web服务器。以下是对上面标红的3个地方的解释
01:
02:proxy_pass 代理通道,指向了一个upstream组件,请求将由upstream组件中配置的webserver进行处理
03:webserver池,由关键字upstream标识,weight表示权重,backup代表备份机。其他参数在后面会提到。
nginx -t #用于检查语法
[root@lb01 conf]# ../sbin/nginx -t
nginx: the configuration file /application/nginx-1.6.3/conf/nginx.conf syntax is ok
nginx: configuration file /application/nginx-1.6.3/conf/nginx.conf test is successful
重新加载配置
nginx -s reload
3、测试
测试用两台机器(192.168.1.108,192.168.1.109),使用Apachehttpd作为web服务器
a、配置 web服务器
分别在108、109上执行一下操作
挂载iso文件,配置本地yum源后
yum install httpd
然后 echo ${ip} > /var/www/html/index.html
启动httpd /etc/init.d/httpd start
curl 127.0.0.1b、测试连接curl 192.168.1.111
curl 192.168.1.111
curl 192.168.1.111
多次访问,看返回的ip地址是否不同的webserver的地址。
检查负载均衡器到web服务器通不通
[root@lb01 conf]# curl 192.168.1.109
curl: (7) couldn't connect to host
[root@lb01 conf]# curl 192.168.1.108
curl: (7) couldn't connect to host

[root@lb01 conf]# telnet 192.168.1.108 80
Trying 192.168.1.108...
telnet: connect to address 192.168.1.108: No route to host
这里要关闭防火墙。
ip_hash
上面使用的是nginx的轮循请求分发策略,ip_hash则不同,相同的ip会映射为一个hash值,来自这个ip的请求,并被分发到同一台webserver上。这样,一个客户端永远定位到一台服务器,适用于回话保持。ip_hash的配置
upstream webserver_pool {
<span style="color:#cc0000;">  ip_hash</span>
server 192.168.1.111       weight=5;
server 192.168.1.108    #   weight=5;权重失效
#server 192.168.1.109       backup;   #备份不能用
}配置了ip_hash后,权重失效,备份机配置失效。参数
server server [ip|domain]:port
weight weight=[0-9]
默认是1
max_fails max_fails=2
最大尝试失败次数,0表示禁止尝试
backup
热备节点。所有的几点都down后,热备节点启用。
fail_timeout=20s
失败超时时间,默认10s,通常配置2、3,间隔20s去检查一次,该节点是否存活
down
服务器不可用,这个参数可配合ip_hash使用
max_conns server ip weight=5 max_conns=2000
并发连接数
least_conn
最小连接数。谁连接少,就发给谁
更多参见nginx文档
http_proxy_module:proxy_pass
具体可参见文档,这里对一些常用属性做介绍。location 路径{} 可以配置多个。proxy_pass 可以放的位置是 location,if,limit标签
server {
listen       80;
server_name  iktz.cn;#01
location / {
root   html;
index  index.html index.htm;
proxy_pass http://webserver_pool;#02 }
<span style="color:#ff0000;">	location /path1 {
proxy_pass http://192.168.1.103/path1; }  </span>
}
记录客户端真实ip,解决虚拟主机的问题:proxy_set_header参数
nginx后端的web服务器,不会记录客户端的真实ip(即经过nginx后,丢失了http头中的HOST),需要在nginx中配置proxy_set_header参数。解决虚拟主机:避免nginx通过ip地址访问资源,通过ip地址直接访问资源而没有host头,若web服务器配置了虚拟主机,则虚拟主机会失效。
所以经过nginx时,要把host头带过去。
配置了 X-Forwarded-For $remote_addr; 后可以经过nginx将ip带到web服务器。
<pre name="code" class="plain">location / {
root   html;
index  index.html index.htm;
proxy_pass http://webserver_pool; proxy_set_header Host $host;
proxy_set_header X-Forwarded-For $remote_addr;
}
通过nginx实现动、静、上传访问分离
架构图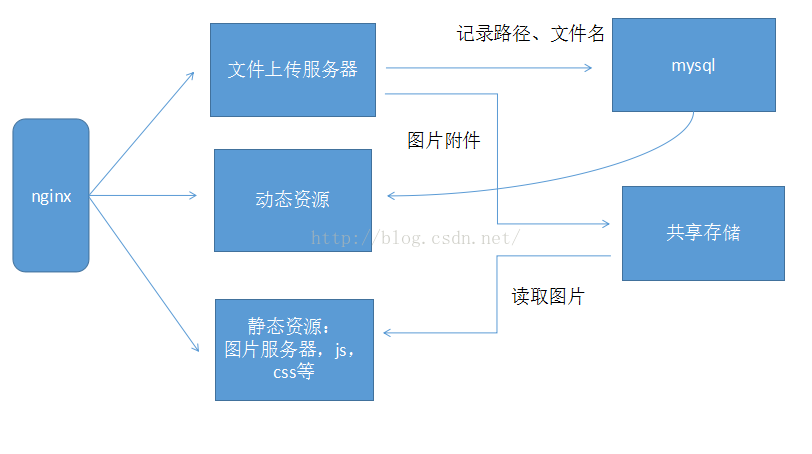
location / {
root   html;
index  index.html index.htm;
proxy_pass http://default_webserver_pool; }
location /static {
proxy_pass http://static_webserver_pool; }
location /dynamic {
proxy_pass http://dynamic_webserver_pool; }
upstream default_webserver_pool{
}
upstream static_webserver_pool{
}
upstream dynamic_webserver_pool{
}
根据扩展名转发
location / {
root   html;
index  index.html index.htm;
proxy_pass http://default_webserver_pool; }
location ~.*.(gif|jpg|css|js)$ {
root   html;
index  index.html index.htm;
proxy_pass http://default_webserver_pool; }
upstream default_webserver_pool{
}
移动端和pc端同域名分离访问、根据客户端agent调度
location / {
if($http_user_agent ~* "Firefox"){
proxy_pass http://dynamic_pools; }
proxy_pass http://dynamic_pools;
}
访问出错后根据状态码跳转
location / {
if($http_user_agent ~* "Firefox"){
proxy_pass http://dynamic_pools; }
proxy_pass http://dynamic_pools; proxy_next_upstream error timeout invalid_header http_500 http_502 http_503 http_504;
}
cache功能
优化
调度算法
健康检查

相关文章推荐
- linux下Nginx服务器导致CSS以及js无法解析不起效果
- ubuntu14 + nginx + php
- 编写脚本实现Zabbix监控Nginx状态
- 阿里云CentOS6.5(nginx+PHP-fpm)及RDS初级使用指南和简单安全设置
- Nginx实现浏览器实时查看访问日志
- nginx+keepalive主从双机热备+自动切换解决方案
- 安装LNMP记录
- 教你如何在Mac上搭建自己的服务器——Nginx
- Linux内核参数的优化(Nginx)
- nginx配置
- Python+Tornado+Nginx服务器部署解决方案
- nginx 重写 rewrite 基础及实例
- Nginx安装部署
- nginx编译
- NGINX配置详解
- Nginx正向代理配置
- nginx中的超时设置
- tenginx+ImageMagick+Lua自动缩略图
- nginx编译增加其他模块
- nginx配置问题