Spring3之零配置注解详解
2015-11-25 00:00
483 查看
<context:component-scan>标签将自动开启“注解实现Bean依赖注入”支持。标签来表示需要要自动注册Bean定义,而通过base-package属性指定扫描的类路径位置。
<aop:aspectj-autoproxy/>用于开启Spring对@AspectJ风格切面的支持。
Spring自带的@Component注解及扩展:@Repository、@Service、@Controller

@ManagedBean注解及自定义扩展:@ManagedBean注解,需要在应用服务器环境使用(如Jboss),自定义扩展部分是为了配合Spring自带的模式注解扩展自定义的,并不包含在Java EE 6规范中,在Java EE 6中相应的服务层、DAO层功能由EJB来完成。
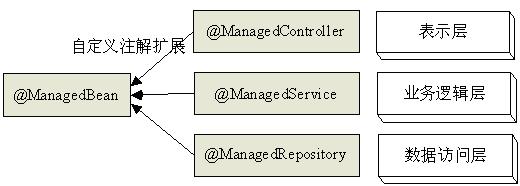
@Named注解及自定义扩展,允许放置在类型、字段、方法参数上:

@ManagedBean和@Named用法可以参考博客:http://jinnianshilongnian.iteye.com/blog/1461055
常用的Bean的配置元数据:@Lazy,@DependsOn,@Scope,@Qualifier,@Primary
常用依赖注入注解:@Autowired:自动装配,@Value:注入SpEL表达式,@Qualifier:限定描述符,@Resource:自动装配,@PostConstruct和PreDestroy:通过注解指定初始化和销毁方法定义;
@AspectJ风格的切面可以通过@Compenent注解标识其为Spring管理Bean,而@Aspect注解不能被Spring自动识别并注册为Bean,必须通过@Component注解来完成,示例如下:
细粒度控制Bean定义扫描
在XML配置中完全消除了Bean定义,而是只有一个<context:component-scan>标签来支持注解Bean定义扫描。
前边的示例完全采用默认扫描设置,如果我们有几个组件不想被扫描并自动注册、我们想更改默认的Bean标识符生成策略该如何做呢?接下来让我们看一下如何细粒度的控制Bean定义扫描,具体定义如下:
base-package:表示扫描注解类的开始位置,即将在指定的包中扫描,其他包中的注解类将不被扫描,默认将扫描所有类路径;
resource-pattern:表示扫描注解类的后缀匹配模式,即“base-package+resource-pattern”将组成匹配模式用于匹配类路径中的组件,默认后缀为“**/*.class”,即指定包下的所有以.class结尾的类文件;
name-generator:默认情况下的Bean标识符生成策略,默认是AnnotationBeanNameGenerator,其将生成以小写开头的类名(不包括包名);可以自定义自己的标识符生成策略;
use-default-filters:默认为true表示扫描@Component、@ManagedBean、@Named注解的类,如果改为false默认将不扫描这些默认的注解来定义Bean,即这些注解类不能被扫描到,即不能通过这些注解进行Bean定义;
annotation-config:表示是否自动支持注解实现Bean依赖注入,默认支持,如果设置为false,将关闭支持注解的依赖注入,需要通过<context:annotation-config/>开启。
默认情况下将自动扫描@Component、@ManagedBean、@Named注解的类并将其注册为Spring管理Bean,可以通过在<context:component-scan>标签中指定自定义过滤器将扫描到匹配条件的类注册为Spring管理Bean,过滤器用里面的<context:include-filter />标签来定义:
<context:include-filter>:表示扫描到的类将被注册为Spring管理Bean;
<context:exclude-filter>:表示扫描到的类将不被注册为Spring管理Bean,它比<context:include-filter>具有更高优先级;
type:表示过滤器类型,目前支持注解类型、类类型、正则表达式、aspectj表达式过滤器,当然也可以自定义自己的过滤器,实现org.springframework.core.type.filter.TypeFilter即可;
expression:表示过滤器表达式。
一般情况下没必要进行自定义过滤,如果需要请参考博客:
http://jinnianshilongnian.iteye.com/blog/1461055
基于Java类定义Bean配置元数据
基于Java类定义Bean配置元数据,其实就是通过Java类定义Spring配置元数据,且直接消除XML配置文件。
基于Java类定义Bean配置元数据中的@Configuration注解的类等价于XML配置文件,@Bean注解的方法等价于XML配置文件中的Bean定义。
基于Java类定义Bean配置元数据需要通过AnnotationConfigApplicationContext加载配置类及初始化容器,类似于XML配置文件需要使用ClassPathXmlApplicationContext加载配置文件及初始化容器。
这种用法是Spring3.X的新特性,但是用起来还是没有注解或者XML形式的直观,不建议使用,而且在WEB应用中还需要特别去修改web.xml文件。具体用法请参考博客:
http://jinnianshilongnian.iteye.com/blog/1463704
<aop:aspectj-autoproxy/>用于开启Spring对@AspectJ风格切面的支持。
<beans xmlns="http://www.springframework.org/schema/beans"
xmlns:xsi="http://www.w3.org/2001/XMLSchema-instance"
xmlns:aop="http://www.springframework.org/schema/aop"
xmlns:context="http://www.springframework.org/schema/context"
xsi:schemaLocation=" http://www.springframework.org/schema/beans http://www.springframework.org/schema/beans/spring-beans-3.0.xsd http://www.springframework.org/schema/aop http://www.springframework.org/schema/aop/spring-aop-3.0.xsd http://www.springframework.org/schema/context http://www.springframework.org/schema/context/spring-context-3.0.xsd"
default-lazy-init="true">

<context:annotation-config />
<context:component-scan base-package="com.chou.spring.bean"/>
<aop:aspectj-autoproxy proxy-target-class="true" />

<bean id="myBeanAA" class="com.chou.spring.bean.MyBeanA" />
</beans>
//main方法
ApplicationContext cxt = new ClassPathXmlApplicationContext("applicationContext-an.xml");
MyBeanB b = cxt.getBean("myBeanB",MyBeanB.class);
b.domain();Spring自带的@Component注解及扩展:@Repository、@Service、@Controller
@ManagedBean注解及自定义扩展:@ManagedBean注解,需要在应用服务器环境使用(如Jboss),自定义扩展部分是为了配合Spring自带的模式注解扩展自定义的,并不包含在Java EE 6规范中,在Java EE 6中相应的服务层、DAO层功能由EJB来完成。
@Named注解及自定义扩展,允许放置在类型、字段、方法参数上:
@ManagedBean和@Named用法可以参考博客:http://jinnianshilongnian.iteye.com/blog/1461055
常用的Bean的配置元数据:@Lazy,@DependsOn,@Scope,@Qualifier,@Primary
常用依赖注入注解:@Autowired:自动装配,@Value:注入SpEL表达式,@Qualifier:限定描述符,@Resource:自动装配,@PostConstruct和PreDestroy:通过注解指定初始化和销毁方法定义;
@Repository
public class MyBeanB implements MyBean{
protected static final Log logger = LogFactory.getLog(MyBeanB.class);

@PostConstruct
public void MyInit(){
logger.info("[INFO]...MyBeanB is initing...", null);
}

@PreDestroy
public void Mydestory() {
logger.info("[INFO]...MyBeanB is destorying...", null);
}

/**
* @Autowired 默认byType进行自动装配,可以用于构造器、字段、方法注入
* 且必须有一个Bean候选者注入,如果允许出现0个Bean候选者需要设置属性“required=false”,
* “required”属性含义和@Required一样,只是@Required只适用于基于XML配置的setter注入方式。
*
* @Resource 默认如果name和type属性都不指定,将先byName自动装配,找不到再byType
* 如果配置了name属性,使用byName进行自动装配,而使用type时则使用byType进行装配
* 如果同时指定name和type,则从容器中找唯一匹配的bean装配,找不到抛出异常
*
* @Resource 注解应该只用于setter方法注入和字段属性注入,不能提供如@Autowired多参数方法注入;
* @Resource 首先将从JNDI环境中查找资源,如果没找到默认再到Spring容器中查找,
* 因此如果JNDI环境中有和Spring容器同名的资源时需要注意。
*/
//@Resource //注意这里是javax.annotation.Resource
private MyBeanA bean;

@Autowired(required = true)
public void setBean(@Qualifier("myBeanAA") MyBeanA myBean) {
//@Qualifier用于按类型自动装配时有多个同类型的bean时,规定选择某一个名称的bean
this.bean = myBean;
}

public void domain(){
System.out.println("MyBeanB is executing...");
bean.domain();
bean.sayAround("haha");
//throw new RuntimeException("This is a RuntimeException");
}

}
@Component("myBeanA")//初始化bean的名字默认是类名第一个字母小写
//@Controller 表示层
//@Service //业务逻辑层
//@Repository //数据访问层
//@Lazy(false) //延迟初始化
//@DependsOn("myBeanB") ////定义Bean初始化及销毁时的顺序
//@Scope("prototype") //默认单例singleton
//@Primary //自动装配时当出现多个Bean候选者时,将作为首选者
public class MyBeanA{
protected static final Log logger = LogFactory.getLog(MyBeanA.class);
@PostConstruct
public void MyInit(){//bean初始化之前调用的方法,等同于xml配置的init-method
logger.info("[INFO]...MyBeanA is initing...", null);
}
@PreDestroy
public void Mydestory() {//bean销毁之前调用的方法,等同于xml配置的destroy-method
logger.info("[INFO]...MyBeanA is destorying...", null);
}
//@Value用于注入SpEL表达式,可以放置在字段方法或参数上
@Value(value = "#{'Hello Spring!!!'[0]}")
private String myName;
@Value("#{100}")
private Long myAge;
private Map<String, String> resultMap;
@Value("abc")
private String arg1;
@Value("101")
private Long arg2;
@Value("#{1==1 ? true : false}")
private Boolean b1;
@Value("#{'no'}")
private Boolean b2;
@Value("#{'on'}")
private Boolean b3;
@Value("#{@systemProperties}")
private Properties pros;
@Value("#{ new double[]{100,44,3.1415,0.4432} }")
private Double[] nums;
public void domain() {
System.out.println("MyBeanA is executing...");
for (int i = 0; i < nums.length; i++) {
System.out.println(nums[i]);
}
System.out.println(pros.getProperty("os.name"));
//System.out.println(System.getProperties());
System.out.println(b1);
System.out.println(b2);
System.out.println(b3);
System.out.println(arg1);
System.out.println(arg2);
System.out.println(myName);
System.out.println(myAge);
if (resultMap != null) {
System.out.println(resultMap.values());
}
}
public void sayAround(String param) {
System.out.println("around param:" + param);
}
//依赖检查必须是set方法上,并通过xml文件的property属性注入
//@Required 表示一定要有property属性注入,很少用到
public void setResultMap(Map<String, String> resultMap) {
this.resultMap = resultMap;
}
}@AspectJ风格的切面可以通过@Compenent注解标识其为Spring管理Bean,而@Aspect注解不能被Spring自动识别并注册为Bean,必须通过@Component注解来完成,示例如下:
@Aspect
@Component
public class Interceptor {

@Pointcut("execution ( public * com.chou.spring.bean..*.domain(..))")
public void myPointcut() {}

@Before("myPointcut()")
public void beforeDomain() {
System.out.println("This is beforeDomain....");
}

@AfterReturning("execution ( public * com.chou.spring.bean.MyBeanA.domain(..))")
public void afterReturning() {
System.out.println("This is afterReturning....");
}

@AfterThrowing("myPointcut()")
public void afterThrowing() {
System.out.println("This is afterThrowing....");
}

@After("myPointcut()")
public void afterDomain() {
System.out.println("This is afterDomain....");
}

@Around("execution(* com.chou.spring.bean..*.sayAround(..))")
public Object around(ProceedingJoinPoint pjp) throws Throwable {
System.out.println("===========around before advice");
Object retVal = pjp.proceed(new Object[] {"【环绕通知】"});
System.out.println("===========around after advice");
return retVal;
}
}
细粒度控制Bean定义扫描
在XML配置中完全消除了Bean定义,而是只有一个<context:component-scan>标签来支持注解Bean定义扫描。
前边的示例完全采用默认扫描设置,如果我们有几个组件不想被扫描并自动注册、我们想更改默认的Bean标识符生成策略该如何做呢?接下来让我们看一下如何细粒度的控制Bean定义扫描,具体定义如下:
<context:component-scan
base-package=""
resource-pattern="**/*.class"
name-generator="org.springframework.context.annotation.AnnotationBeanNameGenerator"
use-default-filters="true"
annotation-config="true">
<context:include-filter type="aspectj" expression=""/>
<context:exclude-filter type="regex" expression=""/>
</context:component-scan>
base-package:表示扫描注解类的开始位置,即将在指定的包中扫描,其他包中的注解类将不被扫描,默认将扫描所有类路径;
resource-pattern:表示扫描注解类的后缀匹配模式,即“base-package+resource-pattern”将组成匹配模式用于匹配类路径中的组件,默认后缀为“**/*.class”,即指定包下的所有以.class结尾的类文件;
name-generator:默认情况下的Bean标识符生成策略,默认是AnnotationBeanNameGenerator,其将生成以小写开头的类名(不包括包名);可以自定义自己的标识符生成策略;
use-default-filters:默认为true表示扫描@Component、@ManagedBean、@Named注解的类,如果改为false默认将不扫描这些默认的注解来定义Bean,即这些注解类不能被扫描到,即不能通过这些注解进行Bean定义;
annotation-config:表示是否自动支持注解实现Bean依赖注入,默认支持,如果设置为false,将关闭支持注解的依赖注入,需要通过<context:annotation-config/>开启。
默认情况下将自动扫描@Component、@ManagedBean、@Named注解的类并将其注册为Spring管理Bean,可以通过在<context:component-scan>标签中指定自定义过滤器将扫描到匹配条件的类注册为Spring管理Bean,过滤器用里面的<context:include-filter />标签来定义:
<context:include-filter type="aspectj" expression=""/>
<context:exclude-filter type="regex" expression=""/>
<context:include-filter>:表示扫描到的类将被注册为Spring管理Bean;
<context:exclude-filter>:表示扫描到的类将不被注册为Spring管理Bean,它比<context:include-filter>具有更高优先级;
type:表示过滤器类型,目前支持注解类型、类类型、正则表达式、aspectj表达式过滤器,当然也可以自定义自己的过滤器,实现org.springframework.core.type.filter.TypeFilter即可;
expression:表示过滤器表达式。
一般情况下没必要进行自定义过滤,如果需要请参考博客:
http://jinnianshilongnian.iteye.com/blog/1461055
基于Java类定义Bean配置元数据
基于Java类定义Bean配置元数据,其实就是通过Java类定义Spring配置元数据,且直接消除XML配置文件。
基于Java类定义Bean配置元数据中的@Configuration注解的类等价于XML配置文件,@Bean注解的方法等价于XML配置文件中的Bean定义。
基于Java类定义Bean配置元数据需要通过AnnotationConfigApplicationContext加载配置类及初始化容器,类似于XML配置文件需要使用ClassPathXmlApplicationContext加载配置文件及初始化容器。
这种用法是Spring3.X的新特性,但是用起来还是没有注解或者XML形式的直观,不建议使用,而且在WEB应用中还需要特别去修改web.xml文件。具体用法请参考博客:
http://jinnianshilongnian.iteye.com/blog/1463704

相关文章推荐
- java-注解annotation
- 一个jar包里的网站
- 一个jar包里的网站之文件上传
- 一个jar包里的网站之返回对媒体类型
- 模拟Spring的简单实现
- spring+html5实现安全传输随机数字密码键盘
- Spring中属性注入详解
- struts2 spring整合fieldError问题
- spring的jdbctemplate的crud的基类dao
- 读取spring配置文件的方法(spring读取资源文件)
- Spring Bean基本管理实例详解
- Java Annotation Overview详解
- java实现简单美女拼图游戏
- java基本教程之线程休眠 java多线程教程
- JSP开发中在spring mvc项目中实现登录账号单浏览器登录
- java教程之java注解annotation使用方法
- spring boot实战之内嵌容器tomcat配置
- 基于Spring框架的Shiro配置方法
- Spring MVC中上传文件实例