springMVC入门程序-注解开发环境配置
2015-11-14 17:00
609 查看
在进行springMVC开发时,我们也希望通过注解进行开发,这样比较快捷方便。现将springMVC开发步骤记录如下:
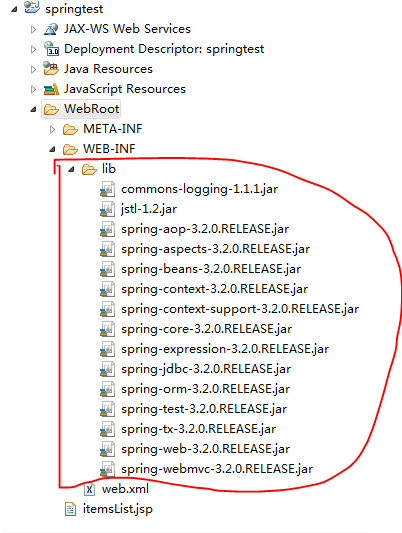
1、新建web程序,导入springMVC需要的jar包:
2、配置web.xml文件。主要是进行servlet的配置。
注意:其中servlet-class的路径org.springframework.web.servlet.DispatcherServlet可以在spring-webmvc-3.2.0.RELEASE.jar中找到。
3、在工程目录下新建resource-folder命名为config,然后创建springmvc.xml文件,并进行配置,头部可以拷贝。

4、在springmvc.xml文件中配置注解开发的映射器、适配器和视图解析器:
注意:在实际开发工程可以使用<mvc:annotation-driven></mvc:annotation-driven>代替映射器和适配器。
5、编写模型层,并开发controler处理器。在处理器类上面使用@Controller注解,并在需要映射的方法上面使用@RequestMapping("/queryItems")注解。这样就可以访问地址/queryItmes.action了。

注意:注解的时候,使用的url会默认加上.action,所以输入网址的时候不要忘记了带上.action.
附:
其实,我们也可以改变springmvc.xml的配置,在视图解析器上配置视图的前缀和后缀。
当加入了视图解析器的前缀和后缀以后,我们在跳转页面的时候就不用再加了,否则会出现重复导致路径错误。
1、新建web程序,导入springMVC需要的jar包:
2、配置web.xml文件。主要是进行servlet的配置。
<servlet>
<servlet-name>springmvc</servlet-name>
<servlet-class>org.springframework.web.servlet.DispatcherServlet</servlet-class>
<init-param>
<param-name>contextConfigLocation</param-name>
<param-value>classpath:springmvc.xml</param-value>
</init-param>
</servlet>

<servlet-mapping>
<servlet-name>springmvc</servlet-name>
<url-pattern>*.action</url-pattern>
</servlet-mapping>
注意:其中servlet-class的路径org.springframework.web.servlet.DispatcherServlet可以在spring-webmvc-3.2.0.RELEASE.jar中找到。
3、在工程目录下新建resource-folder命名为config,然后创建springmvc.xml文件,并进行配置,头部可以拷贝。
<?xml version="1.0" encoding="UTF-8"?>
<beans xmlns="http://www.springframework.org/schema/beans"
xmlns:xsi="http://www.w3.org/2001/XMLSchema-instance" xmlns:mvc="http://www.springframework.org/schema/mvc"
xmlns:context="http://www.springframework.org/schema/context"
xmlns:aop="http://www.springframework.org/schema/aop" xmlns:tx="http://www.springframework.org/schema/tx"
xsi:schemaLocation="http://www.springframework.org/schema/beans http://www.springframework.org/schema/beans/spring-beans-3.2.xsd http://www.springframework.org/schema/mvc http://www.springframework.org/schema/mvc/spring-mvc-3.2.xsd http://www.springframework.org/schema/context http://www.springframework.org/schema/context/spring-context-3.2.xsd http://www.springframework.org/schema/aop http://www.springframework.org/schema/aop/spring-aop-3.2.xsd http://www.springframework.org/schema/tx http://www.springframework.org/schema/tx/spring-tx-3.2.xsd ">

</beans>
4、在springmvc.xml文件中配置注解开发的映射器、适配器和视图解析器:
<?xml version="1.0" encoding="UTF-8"?>
<beans xmlns="http://www.springframework.org/schema/beans"
xmlns:xsi="http://www.w3.org/2001/XMLSchema-instance" xmlns:mvc="http://www.springframework.org/schema/mvc"
xmlns:context="http://www.springframework.org/schema/context"
xmlns:aop="http://www.springframework.org/schema/aop" xmlns:tx="http://www.springframework.org/schema/tx"
xsi:schemaLocation="http://www.springframework.org/schema/beans http://www.springframework.org/schema/beans/spring-beans-3.2.xsd http://www.springframework.org/schema/mvc http://www.springframework.org/schema/mvc/spring-mvc-3.2.xsd http://www.springframework.org/schema/context http://www.springframework.org/schema/context/spring-context-3.2.xsd http://www.springframework.org/schema/aop http://www.springframework.org/schema/aop/spring-aop-3.2.xsd http://www.springframework.org/schema/tx http://www.springframework.org/schema/tx/spring-tx-3.2.xsd ">
   <!-- 使用了注解,但是不要忘记加载该类 为了方便实际开发建议使用context:component-scan 扫描组建-->
      <!-- <bean class="com.yy.ssm.controller.ItemsController3"/> -->

      <!--使用扫描组建扫描controller包  -->
      <context:component-scan base-package="com.yy.ssm.controller"></context:component-scan>

<!-- 注解的映射器 -->
<bean class="org.springframework.web.servlet.mvc.method.annotation.RequestMappingHandlerMapping"/>
<!-- 注解的适配器 -->
<bean class="org.springframework.web.servlet.mvc.method.annotation.RequestMappingHandlerAdapter"/>

<!-- 使用 mvc:annotation-driven代替上边注解映射器和注解适配器配置
mvc:annotation-driven默认加载很多的参数绑定方法,
比如json转换解析器就默认加载了,
如果使用mvc:annotation-driven不用配置上边的RequestMappingHandlerMapping和RequestMappingHandlerAdapter
实际开发时使用mvc:annotation-driven
-->
<!-- <mvc:annotation-driven></mvc:annotation-driven> -->
<!-- 视图解析器 -->
<bean class="org.springframework.web.servlet.view.InternalResourceViewResolver"/>
</beans>
注意:在实际开发工程可以使用<mvc:annotation-driven></mvc:annotation-driven>代替映射器和适配器。
5、编写模型层,并开发controler处理器。在处理器类上面使用@Controller注解,并在需要映射的方法上面使用@RequestMapping("/queryItems")注解。这样就可以访问地址/queryItmes.action了。
package com.yy.ssm.controller;

import java.sql.Date;
import java.util.ArrayList;
import java.util.List;

import org.springframework.stereotype.Controller;
import org.springframework.web.bind.annotation.RequestMapping;
import org.springframework.web.servlet.ModelAndView;

import com.yy.po.Items;
/**
* 使用@Controller注解标识 它是一个控制器,另外要在springmvc.xml文件中要配置bean以加载该类
* @author YUAN
*
*/
@Controller
public class ItemsController3 {
/**
* 使用@RequestMapping("/queryItems")注解标识, 用于映射该方法的映射路径,
* 默认的是.action,所以可以省略.action,不用特意写为:@RequestMapping("/queryItems.action")
* @return
*/
@RequestMapping("/queryItems")
public ModelAndView queryItems() {
// 调用service查询数据
List<Items> itemsList = new ArrayList<Items>();
Items items1 = new Items("小浣熊", 2f, new Date(System.currentTimeMillis()), "好吃又实惠");
Items items2 = new Items("咖啡", 5f, new Date(System.currentTimeMillis()), "香浓更好心情");
Items items3 = new Items("雪碧加冰", 3f, new Date(System.currentTimeMillis()), "清新冰凉");
Items items4 = new Items("来一桶老坛酸菜面", 5f, new Date(System.currentTimeMillis()), "酸爽好哈吃");
itemsList.add(items1);
itemsList.add(items2);
itemsList.add(items3);
itemsList.add(items4);
// 返回modeAndView
ModelAndView modelAndView = new ModelAndView();
// 相当于request的setAttribute,可以在JSP页面中取出数据
modelAndView.addObject("itemsList", itemsList);
// 指定视图
modelAndView.setViewName("itemsList.jsp");
return modelAndView;
}

}
注意:注解的时候,使用的url会默认加上.action,所以输入网址的时候不要忘记了带上.action.
附:
其实,我们也可以改变springmvc.xml的配置,在视图解析器上配置视图的前缀和后缀。
<bean class="org.springframework.web.servlet.view.InternalResourceViewResolver">
<!--视图的前缀  -->
<property name="prefix" value="" />
<!--视图的后缀  -->
<property name="suffix" value=".jsp" />
</bean>
当加入了视图解析器的前缀和后缀以后,我们在跳转页面的时候就不用再加了,否则会出现重复导致路径错误。
// 指定视图
//modelAndView.setViewName("itemsList.jsp");
//配置了后缀,所以不要加.jsp
modelAndView.setViewName("itemsList");

相关文章推荐
- 异常处理:java.lang.NoClassDefFoundError: com/mchange/v2/ser/Indirector
- 安卓java代码中获取控件的高和宽(1)
- springmvc注解开发
- java开发环境 jdk环境变量配置
- Java集合Set、Map、HashSet、HashMap、TreeSet、TreeMap等
- 求1到给定数的阶乘的和
- Java三大框架
- 求给定两个数之间的所有质数
- Java Web(1)类库依赖神器搭建——Maven
- Java中泛型类和方法
- javac 可以生成Java文件,但是找不到,或者无法加载主类
- 解决:IntelliJ IDEA 编译错误,提示 Compilation failed: internal java compiler error
- java MS之泛型
- 关于Spring与WebSocket结合的简单例子
- 论java底层native
- Java中使用AES加密的简单示例
- 中断Java线程
- spring mvc 接收页面表单List
- Android Studio导入Eclipse工程及相关问题
- Struts2 学习系列 (6) 类型转换器