IOS小应用1-逗图片查看器~
2015-10-28 09:59
232 查看
题外话:
学了一点IOS基础,就写了这样一个小的图片查看器,别的不说,上几张效果图吧~:
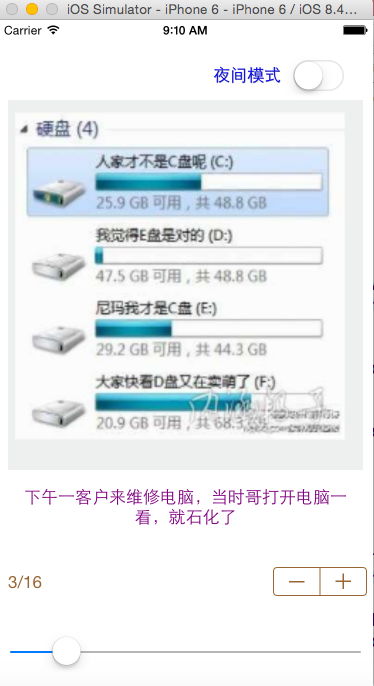
功能其实很简单:
就是点击APP右下方的+/-按钮然后图片和下面的文字就会切换,同时左下方的图片页码,正下方的滑动条也可以跟着切换。
用到的设计模式:
MVC模式:模型-视图-控制器
用到的IOS控件:
UILabel,UISwitch,UIStepper,UISlider,UIImageView
步骤:
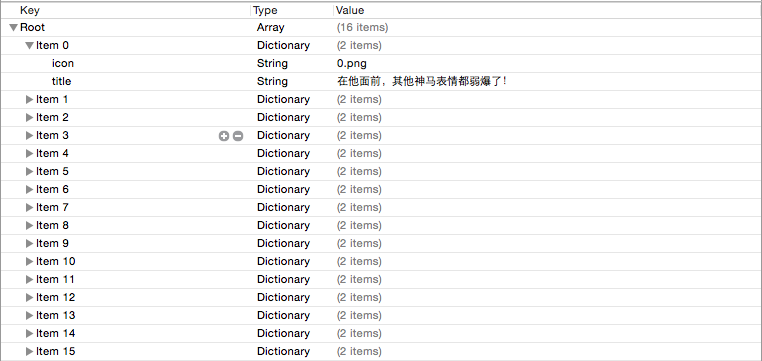
1.首先封装数据:在images.plist里面封装了一个根数组,里面的每个元素是字典,字典里有图片和说明文字,数据项截图如下:
所以创建一个类DataList,内容如下:
//
//  DataList.h
//  图片查看器练习-1
//
//  Created by mac on 15/10/27.
//  Copyright (c) 2015年 macb. All rights reserved.
//

#import <Foundation/Foundation.h>
#import <UIKit/UIKit.h>
@interface DataList : NSObject
@property(nonatomic,strong)UIImage *image;//图片
@property(nonatomic,copy)NSString *title;//说明文字
-(void)setImage:(UIImage *)image andTitle:(NSString*)title;
//工厂方法
+(id)dataListWithImage:(UIImage*)image andTitle:(NSString*)title;
@end
//
//  DataList.m
//  图片查看器练习-1
//
//  Created by mac on 15/10/27.
//  Copyright (c) 2015年 macb. All rights reserved.
//

#import "DataList.h"

@implementation DataList
-(void)setImage:(UIImage *)image andTitle:(NSString *)title{
_image=image;
_title=title;
}
+(id)dataListWithImage:(UIImage *)image andTitle:(NSString *)title{
DataList *datalist=[[DataList alloc] init];
[datalist setImage:image andTitle:title];
return datalist;
}
@end
2.声明一个全局数组,加载数据:
声明一个全局数组:@property(nonatomic,strong)NSArray *dataArray;
加载数据:
#pragma mark 加载数据
-(void)addData{
//    解析Plist文件
NSString *path=[[NSBundle mainBundle]pathForResource:@"images" ofType:@"plist"];
//将plist中的rootArray取出
NSArray *rootArray=[NSArray arrayWithContentsOfFile:path];
//    定义一个可变数组
NSMutableArray *mArray=[NSMutableArray arrayWithCapacity:kImageCount];
//    遍历生成模型
for (NSDictionary *dictionary in rootArray) {
//        从字典中取出title
NSString *title=[dictionary objectForKey:@"title"];
//        从字典中取出imageNamed并且生成image
UIImage *image=[UIImage imageNamed:[dictionary objectForKey:@"icon"]];
//        将image和title存入dataList中
DataList *dataList=[DataList dataListWithImage:image andTitle:title];
//        将生成的dataList存入数组
[mArray addObject:dataList];
}
self.dataArray=mArray;

}
3.声明要用到的UI控件成员变量和宏定义:
要把应用中的UI控件声明成全局变量的原因是当我们要切换图片时候,ImageView,Label,还有Slider都要一起跟着变化,所以为了在不同的方法中获取这些控件,我们就把所有控件声明成全局变量。@property(nonatomic,strong)NSArray *dataArray; @property(nonatomic,strong)UIImageView *imageView; @property(nonatomic,strong)UILabel *titleLabel; @property(nonatomic,strong)UILabel *numberLabel; @property(nonatomic,strong)UIStepper *stepper; @property(nonatomic,strong)UISlider *slider;
因为一共有16张图片,所以写一个宏定义:
#define kImageCount 16
4.搭建UI界面:
#pragma mark 搭建界面
-(void)buildInterFace{
//    夜间模式提示文字
[self createModelLabel];
//    夜间模式开关
[self createSwitch];
//    ImageView
[self createImageView];
//    创建图片TitleLabel
[self createTitleLabel];
//    创建NumberLabel
[self createNumberLabel];
//    创建Stepper
[self createStepper];
//    创建Slidder
[self createSilder];
}
以下是搭建UI界面中用到的方法:
#pragma mark 夜间模式提示文字
-(void)createModelLabel{
UILabel *label=[[UILabel alloc] initWithFrame:CGRectMake(self.view.bounds.size.width-160, 40, 120, 30)];
[label setTextColor:[UIColor blueColor]];
[label setText:@"夜间模式"];
[label setShadowColor:[UIColor grayColor]];
[label setShadowOffset:CGSizeMake(0.3, 0.3)];
[self.view addSubview:label];
}
#pragma mark 夜间模式开关
-(void)createSwitch{
UISwitch *mySwitch=[[UISwitch alloc]initWithFrame:CGRectMake(self.view.bounds.size.width-80, 40, 40, 30)];
//    开关的消息监听--EventValueChanged
[mySwitch addTarget:self action:@selector(switchClicked:) forControlEvents:UIControlEventValueChanged];
[self.view addSubview:mySwitch];
}
#pragma mark 创建ImageView
-(void)createImageView{
// 从dataArray中取得数据单元0
DataList *dataList=self.dataArray[0];
UIImageView *imageView=[[UIImageView alloc] initWithImage:dataList.image];
[imageView setFrame:CGRectMake(10,80,self.view.bounds.size.width-20, 370)];
[self.view addSubview:imageView];
_imageView=imageView;
}
#pragma mark 创建TitleLabel
-(void)createTitleLabel{
//    从模型中获取title
DataList *dataList=self.dataArray[0];
UILabel *titleLabel=[[UILabel alloc] initWithFrame:CGRectMake(10, self.view.bounds.size.height-220, self.view.bounds.size.width-20, 80)];
[titleLabel setText:dataList.title];
[titleLabel setTextColor:[UIColor purpleColor]];
//    设置自动换行
[titleLabel  setNumberOfLines:0];
[titleLabel setTextAlignment:NSTextAlignmentCenter];
[self.view addSubview:titleLabel];
_titleLabel=titleLabel;
}
#pragma mark 创建NumberLabel
-(void)createNumberLabel{
UILabel *numberLabel=[[UILabel alloc] initWithFrame:CGRectMake(10, self.view.bounds.size.height-120, 60, 30)];
[numberLabel setText:[NSString stringWithFormat:@"1/16"]];
[numberLabel setTextColor:[UIColor brownColor]];
[self.view addSubview:numberLabel];
_numberLabel=numberLabel;
}
#pragma mark 创建Stepper
-(void)createStepper{
UIStepper *stepper=[[UIStepper alloc] initWithFrame:CGRectMake(self.view.bounds.size.width-100, self.view.bounds.size.height-120, 80, 80)];
[stepper setTintColor:[UIColor brownColor]];
//    设置循环最大值
[stepper setMaximumValue:16];
//    设置循环最小值
[stepper setMinimumValue:1];
//    设置初始化时候默认值
[stepper setValue:1];
//    设置循环
[stepper setWraps:YES];
//    添加消息响应
[stepper addTarget:self  action:@selector(stepperClicked:) forControlEvents:UIControlEventValueChanged];
[self.view addSubview:stepper];
_stepper=stepper;

}
#pragma mark 创建Slider
-(void)createSilder{
UISlider *slider=[[UISlider alloc] initWithFrame:CGRectMake(10,self.view.bounds.size.height-50 , self.view.bounds.size.width-20, 30)];
//    设置最大最小值
[slider setMaximumValue:16];
[slider setMinimumValue:1];
[slider setValue:1];

//    添加消息监听
[slider addTarget:self action:@selector(sliderClicked:) forControlEvents:UIControlEventValueChanged];
[self.view addSubview:slider];
_slider=slider;
}
#pragma mark 开关的消息监听
-(void)switchClicked:(UISwitch*)sender{
//    改变背景颜色
if (sender.isOn) {
[self.view setBackgroundColor:[UIColor darkGrayColor]];
}else{
[self.view setBackgroundColor:[UIColor whiteColor]];
}
}
#pragma mark Stepper的消息监听
-(void)stepperClicked:(UIStepper*)sender{
//    改变页面抽出代码
[self changePage:sender.value];
//    同步改变滑动条
[self.slider setValue:sender.value];
}
#pragma mark Slider的消息监听
-(void)sliderClicked:(UISlider*)sender{
//    改变页面抽出代码
[self changePage:sender.value];
//    同步改变Stepper
[self.stepper setValue:sender.value];
}
#pragma mark 改变页面的抽出代码
-(void)changePage:(NSInteger)index{
DataList *dataList=self.dataArray[index-1];
//    改变图片
[_imageView setImage:dataList.image];
//    改变图片说明文字
[_titleLabel setText:dataList.title];
//    改变图片标号
[_numberLabel setText:[NSString stringWithFormat:@"%ld/16",index]];
}
5.需要注意的点:
需要添加消息响应的控件就是UIStepper,UISlider,UISwitch,其中UIStepper和UISlider的消息响应几乎是相同的,所以就把代码抽出来写了一个changePage方法,还要注意的就是要给stepper和slider都要设置最大最小值,stepper要设置wraps这个BOOL值为YES,这样才可以保证当图片切换到第16张的时候,下次切换就回到了第1张。源代码:
源代码我上传到csdn,大家自行下载,链接:http://download.csdn.net/detail/u012320459/9219437

相关文章推荐
- 分享微信开发Html5轻游戏中的几个坑
- 峰回路转,Firefox 浏览器即将重返 iOS 平台
- 峰回路转,Firefox 浏览器即将重返 iOS 平台
- 不可修补的 iOS 漏洞可能导致 iPhone 4s 到 iPhone X 永久越狱
- iOS 12.4 系统遭黑客破解,漏洞危及数百万用户
- 100 个最佳 Ubuntu 应用(中)
- 在 AppImage、Flathub 和 Snapcraft 平台上搜索 Linux 应用
- 每日安全资讯:NSO,一家专业入侵 iPhone 的神秘公司
- [转][源代码]Comex公布JailbreakMe 3.0源代码
- 24 个必备的 Linux 应用程序
- 注册表趣味应用小集
- 远程控制技术的应用
- 按右键另存图片只能存BMP
- photoshop去除图片上的水印
- 路由器访问列表的应用
- xDSL技术及其应用
- upload上传单张图片
- 图片引发的溢出危机(图)
- 基于XML的桌面应用