制作iOS推送-Step by step
2015-10-14 11:12
597 查看
网上找了好多这方面的资料,但大部分都显得有些过时了。不光iOS系统在变,连开发者网站也在变。幸好还是找到了一些很有价值的参考资料,再次进行总结归纳,并加入自己的实践,希望对以后的开发有帮助。本篇博客中提到的证书均是开发版本,发布版本制作过程与开发版本一样。
一、苹果推送原理(APNs)
1、推送机制:

2、详见流程:
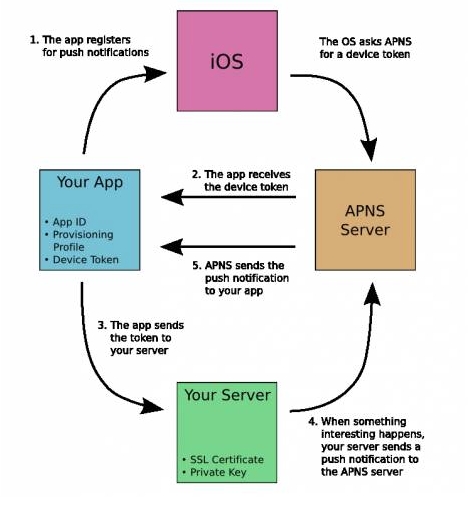
到此为止。不需要任何解释,上面的两张图已经解释的非常清楚了。
二、推送证书及各个文件的配置
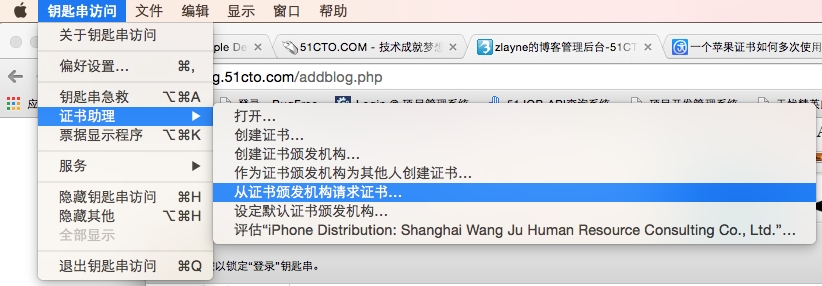
1、生成CertificateSigningRequest.certSigningRequest文件。
打开钥匙串,选择证书助理,如下图:
按下图设置完后生成请求文件:

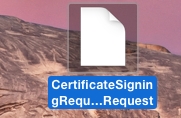
其中,电子邮件地址输入你自己的邮箱,常用名称就是钥匙串中的密钥名称(请求文件生成之后会在钥匙串中自动加入两个密钥,一个公钥一个专用密钥),随便起。点击继续就会在本地生成CertificateSigningRequest.certSigningRequest请求文件。
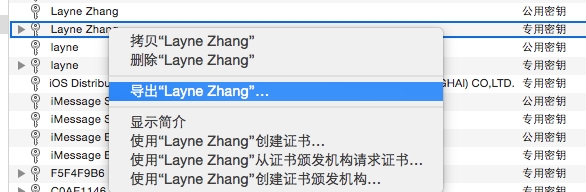
2、生成.p12文件。(p12文件经过处理之后给server使用)
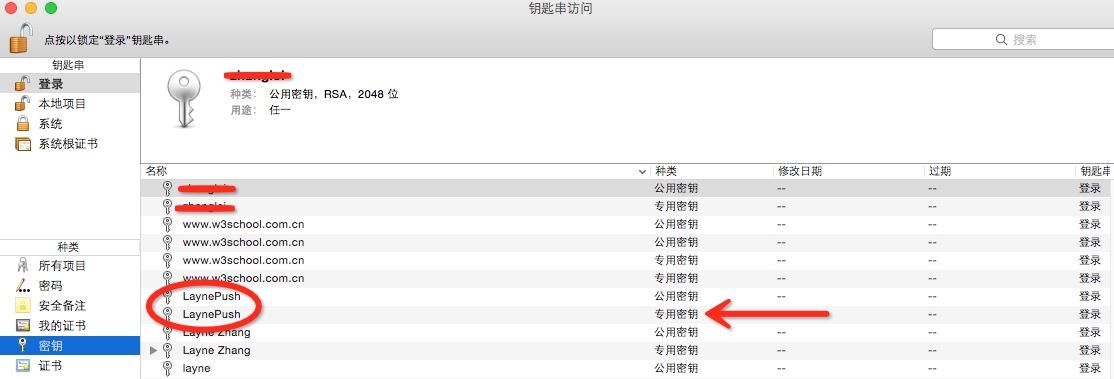
打开钥匙串,找到1中生成的那俩密钥(一个公钥,一个专用密钥):
选择专有密钥,右击导出生成p12文件。
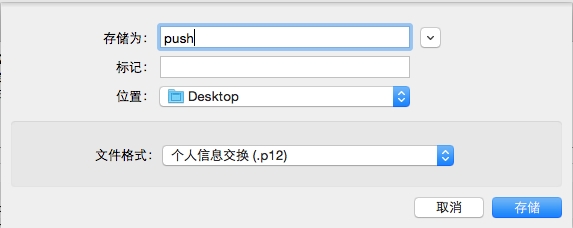
点击存储会会要求设置密码,设置完之后在桌面生成p12文件。
3、开发证书+推送证书+AppID+Provisioning Profile
(1)生成开发证书。
按正常流程来就好,使用上面生成的CertificateSigningRequest.certSigningRequest请求文件。
最后生成ios_development.cer.
(2)配置AppID(要先配置AppID才能生成推送证书)。
注意:配置AppID时,必须要使用“Explicit App ID”而不能使用“Wild App ID”,否则在App Services里无法选择Push Notifications。
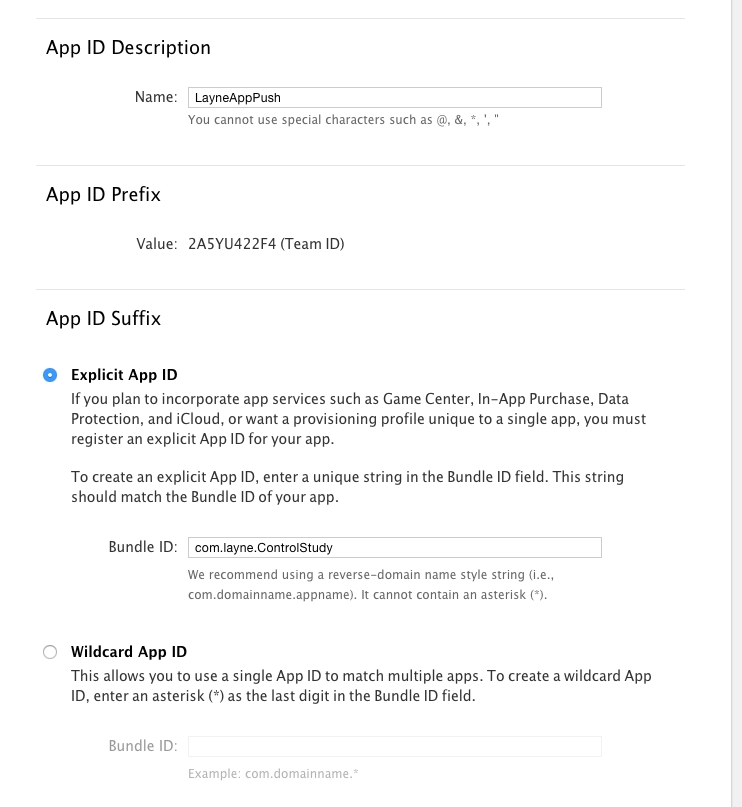
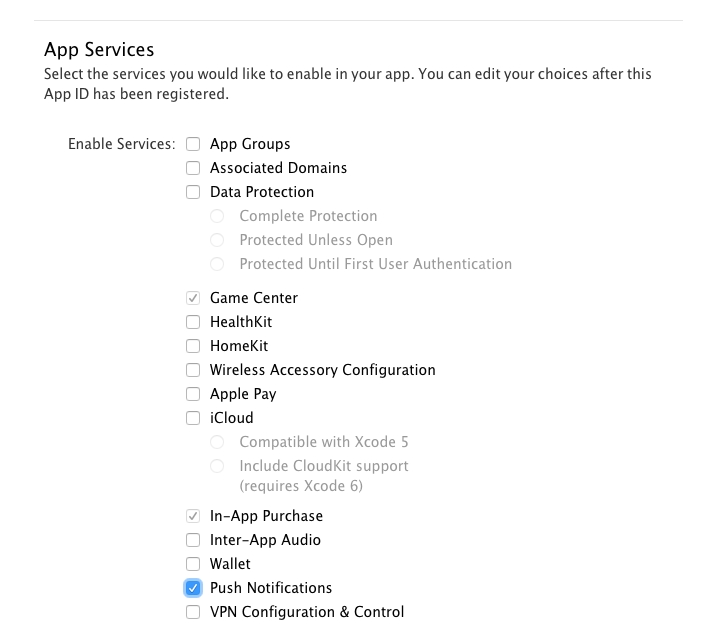
点击继续,最终生成名为LayneAppPush的AppID。
(3)生成推送证书。
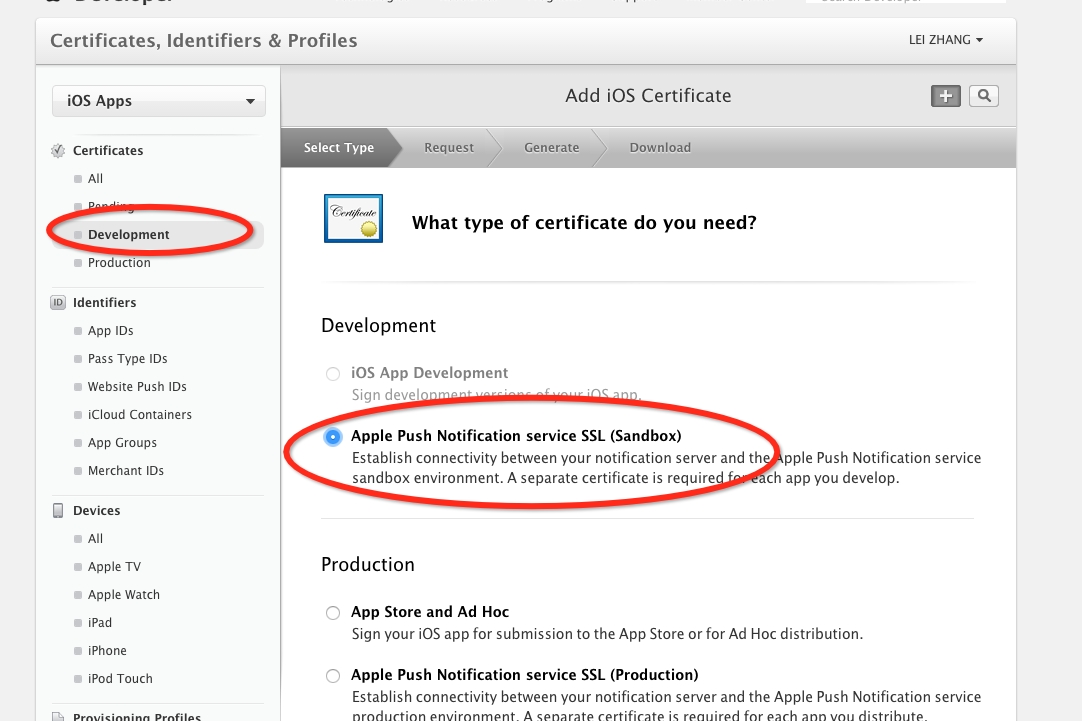
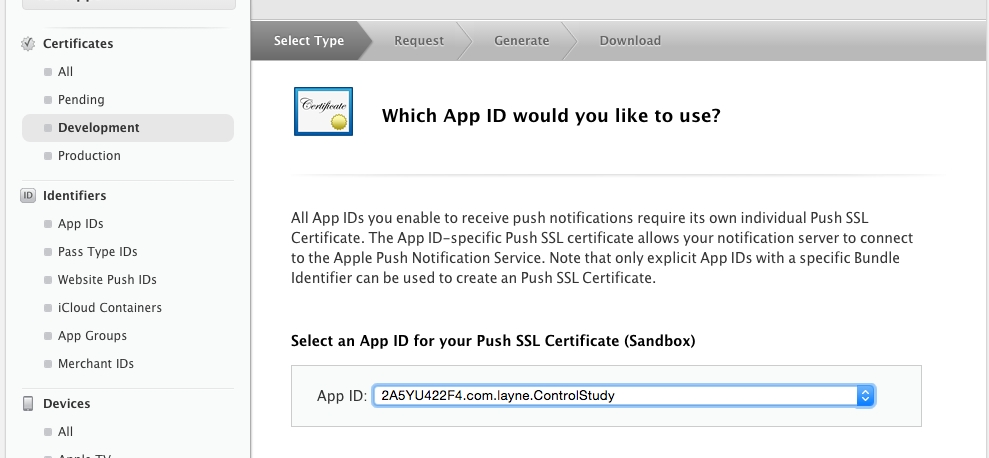
这里选择之前配置的App ID。
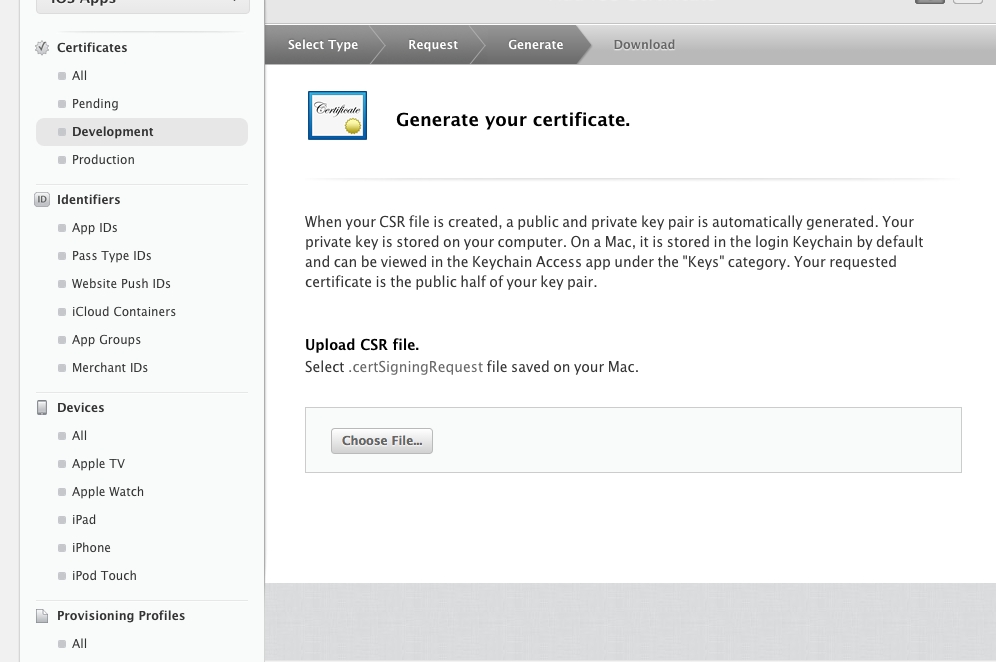
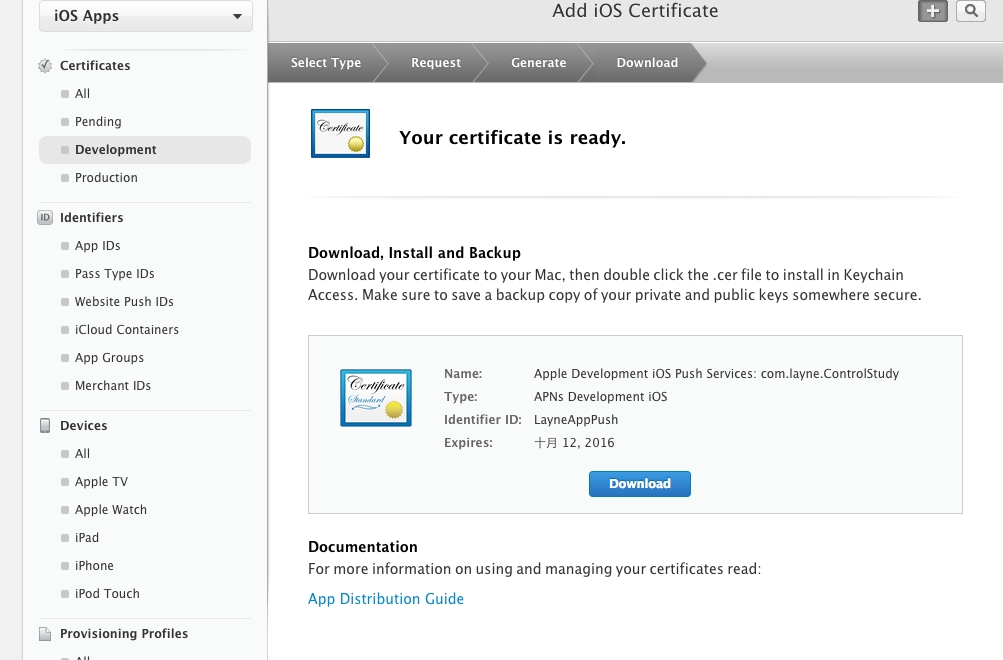
上传上面生成的CertificateSigningRequest.certSigningRequest文件。最终生成APNs Development iOS证书。
(4)生成Provisioning Profiles.
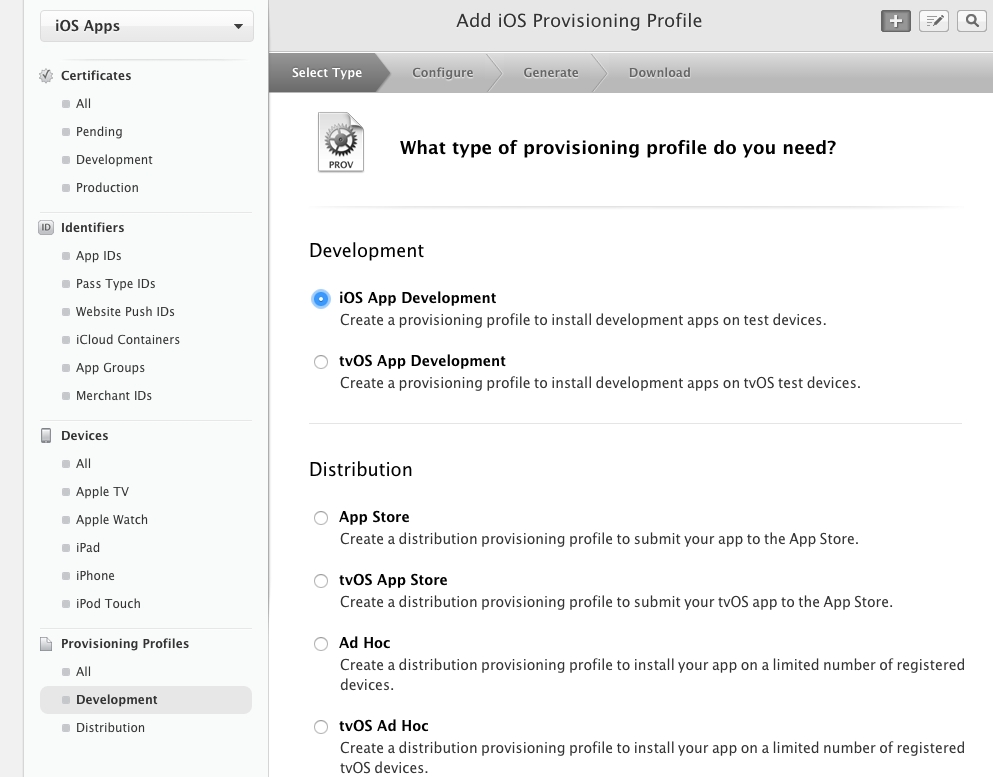
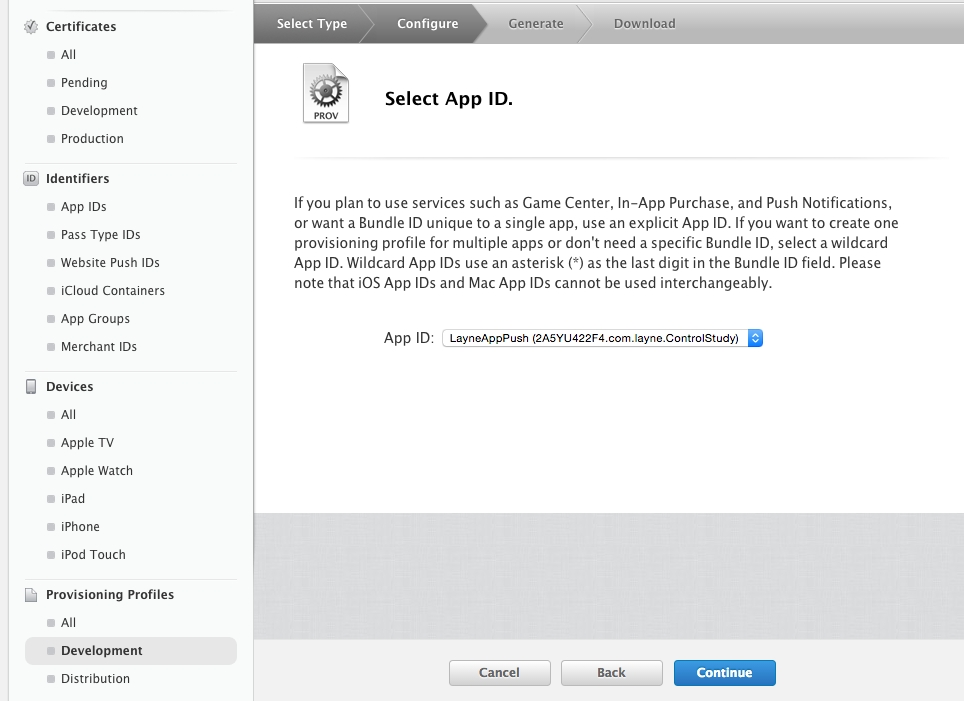
这里选择之前配置的App ID。

这里着重说明一下:尽管在上面几步生成了开发证书和推送证书,但这里只有开发证书的选项,所以只选择开发证书就好。
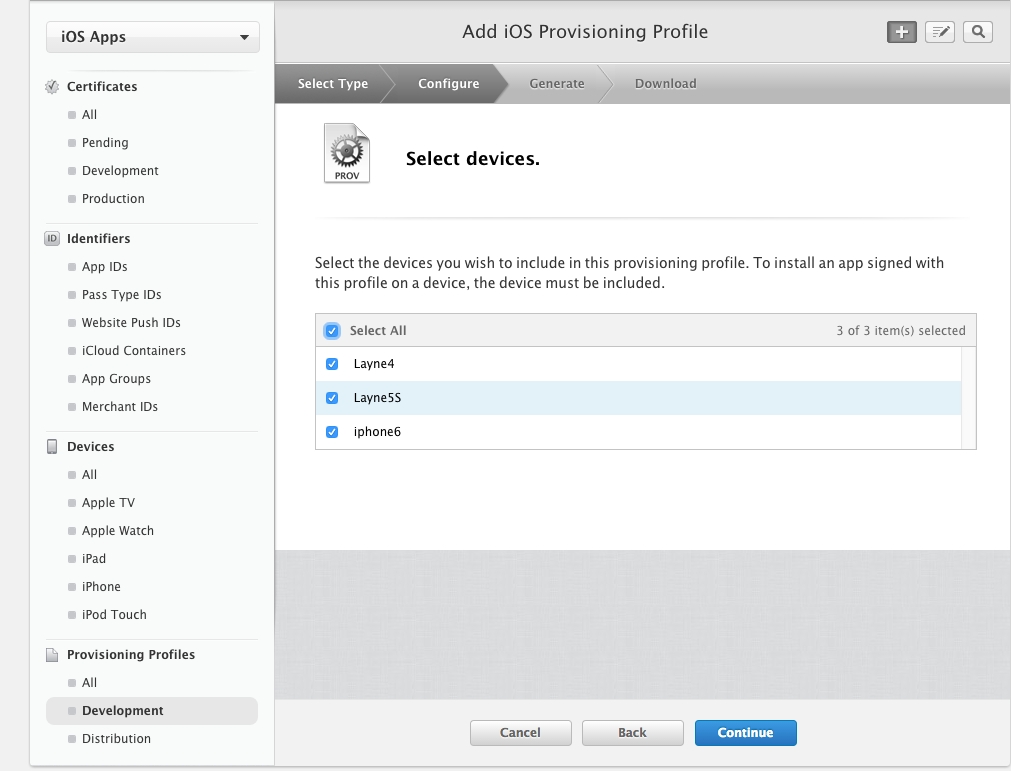
选择设备。
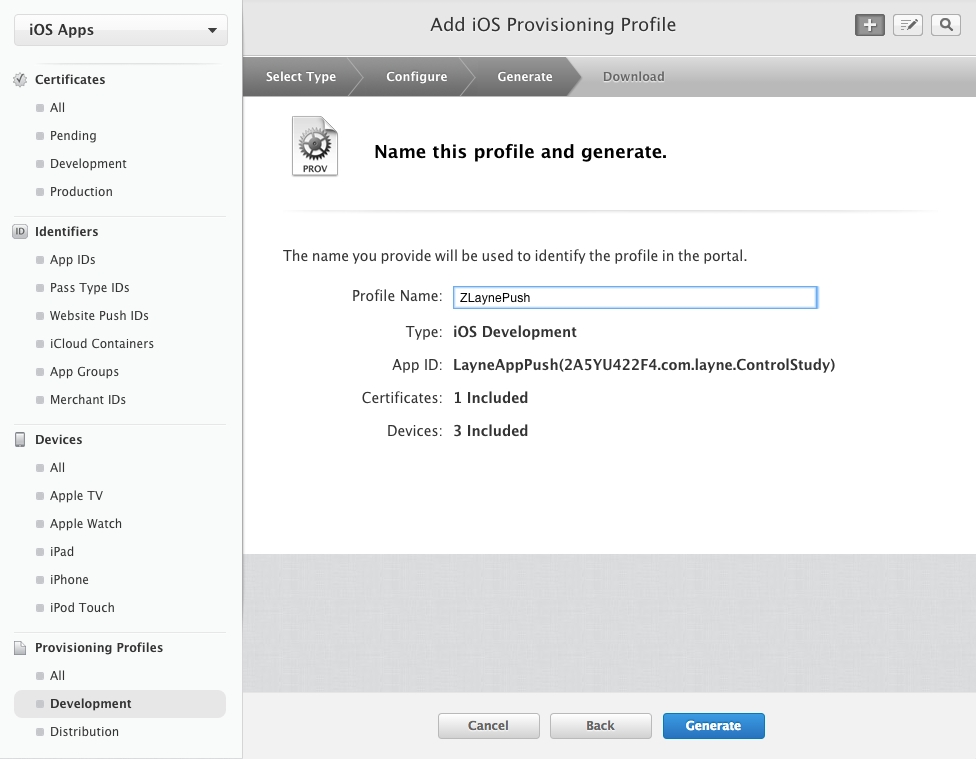
给Profile命名,并将其下载下来。
至此,证书及文件的制作就彻底完成了。
三、证书及文件的处理。
1、安装证书和provisioning profile
现在我们手里有以下文件:

(1)双击ios_development.cer,安装开发证书。
(2)双击aps_development.cer,安装推送证书。
(3)双击ZLaynePush.mobileprovision,给Xcode安装provisioning profile。
2、生成pem文件
(1)推送证书aps_developmen.cer转换为pem文件:

说明:Enter Import Password输入的就是当初导出p12文件时设定的密码。后边Enter PEM pass phrase是给新生成的pem文件设置加密密码。可以和p12文件的密码一样,防止混淆。(3)将生成的LaynePushCert.pem和LaynePushKey.pem合并成一个pem文件。
四、测试。1、测试证书是否正常工作:

如果得到一个错误信息,那么有可能是你的的防火墙禁止了2195端口。2、(转)下面我们要使用我们生成的SSL证书和私钥来设置一个安全的链接去链接苹果服务器:
当你在最后的时候你看到这样说明你已经成功了:
五、App端的配置。
以上就是所有的过程,具体服务器端代码即配置,可参照http://blog.csdn.net/showhilllee/article/details/8631734。
参考:http://blog.csdn.net/showhilllee/article/details/8631734 http://www.cocoachina.com/bbs/read.php?tid=102110&page=1 http://blog.csdn.net/jerryvon/article/details/8288944
一、苹果推送原理(APNs)
1、推送机制:
2、详见流程:
到此为止。不需要任何解释,上面的两张图已经解释的非常清楚了。
二、推送证书及各个文件的配置
1、生成CertificateSigningRequest.certSigningRequest文件。
打开钥匙串,选择证书助理,如下图:
按下图设置完后生成请求文件:
其中,电子邮件地址输入你自己的邮箱,常用名称就是钥匙串中的密钥名称(请求文件生成之后会在钥匙串中自动加入两个密钥,一个公钥一个专用密钥),随便起。点击继续就会在本地生成CertificateSigningRequest.certSigningRequest请求文件。
2、生成.p12文件。(p12文件经过处理之后给server使用)
打开钥匙串,找到1中生成的那俩密钥(一个公钥,一个专用密钥):
选择专有密钥,右击导出生成p12文件。
点击存储会会要求设置密码,设置完之后在桌面生成p12文件。
3、开发证书+推送证书+AppID+Provisioning Profile
(1)生成开发证书。
按正常流程来就好,使用上面生成的CertificateSigningRequest.certSigningRequest请求文件。
最后生成ios_development.cer.
(2)配置AppID(要先配置AppID才能生成推送证书)。
注意:配置AppID时,必须要使用“Explicit App ID”而不能使用“Wild App ID”,否则在App Services里无法选择Push Notifications。
点击继续,最终生成名为LayneAppPush的AppID。
(3)生成推送证书。
这里选择之前配置的App ID。
上传上面生成的CertificateSigningRequest.certSigningRequest文件。最终生成APNs Development iOS证书。
(4)生成Provisioning Profiles.
这里选择之前配置的App ID。
这里着重说明一下:尽管在上面几步生成了开发证书和推送证书,但这里只有开发证书的选项,所以只选择开发证书就好。
选择设备。
给Profile命名,并将其下载下来。
至此,证书及文件的制作就彻底完成了。
三、证书及文件的处理。
1、安装证书和provisioning profile
现在我们手里有以下文件:
(1)双击ios_development.cer,安装开发证书。
(2)双击aps_development.cer,安装推送证书。
(3)双击ZLaynePush.mobileprovision,给Xcode安装provisioning profile。
2、生成pem文件
(1)推送证书aps_developmen.cer转换为pem文件:
openssl x509 -in aps_development.cer -inform der -out LaynePushCert.pem在桌面上会生成一个LaynePushCert.pem文件(2)将p12文件push.p12转换为pem文件:
openssl pkcs12 -nocerts -out LaynePushKey.pem -in push.p12
说明:Enter Import Password输入的就是当初导出p12文件时设定的密码。后边Enter PEM pass phrase是给新生成的pem文件设置加密密码。可以和p12文件的密码一样,防止混淆。(3)将生成的LaynePushCert.pem和LaynePushKey.pem合并成一个pem文件。
cat LaynePushCert.pem LaynePushKey.pem > ck.pem到此为止,我们的证书就处理完成了。
四、测试。1、测试证书是否正常工作:
telnet gateway.sandbox.push.apple.com 2195它将尝试发送一个规则的,不加密的连接到APNS服务器。如果获得如下反馈,说明没问题:
如果得到一个错误信息,那么有可能是你的的防火墙禁止了2195端口。2、(转)下面我们要使用我们生成的SSL证书和私钥来设置一个安全的链接去链接苹果服务器:
openssl s_client -connect gateway.sandbox.push.apple.com:2195 -cert LaynePushCert.pem -key LaynePushKey.pem执行完这一句命令后需要我们输入密语Enter pass phrase for PushChatKey.pem:我们输入abcabc按回车你会看到一个完整的输出,让你明白OpenSSL在后台做什么。如果链接是成功的,你可以随便输入一个字符,按下回车,服务器就会断开链接,如果建立连接时有问题,OpenSSL会给你返回一个错误信息。
当你在最后的时候你看到这样说明你已经成功了:
CONNECTED(00000003)
depth=1 /C=US/O=Entrust, Inc./OU=www.entrust.net/rpa isincorporated by reference/OU=(c) 2009 Entrust, Inc./CN=Entrust CertificationAuthority - L1C
verify error:num=20:unable to get local issuercertificate
verify return:0
---
Certificate chain
0s:/C=US/ST=California/L=Cupertino/O=Apple Inc./OU=iTMSEngineering/CN=gateway.sandbox.push.apple.com
i:/C=US/O=Entrust, Inc./OU=www.entrust.net/rpa is incorporated byreference/OU=(c) 2009 Entrust, Inc./CN=Entrust Certification Authority - L1C
1s:/C=US/O=Entrust, Inc./OU=www.entrust.net/rpa is incorporated byreference/OU=(c) 2009 Entrust, Inc./CN=Entrust Certification Authority - L1C
i:/O=Entrust.net/OU=www.entrust.net/CPS_2048incorp. by ref. (limits liab.)/OU=(c) 1999 Entrust.net Limited/CN=Entrust.netCertification Authority (2048)
---
Server certificate
-----BEGIN CERTIFICATE-----
MIIFGzCCBAOgAwIBAgIETBz90jANBgkqhkiG9w0BAQUFADCBsTELMAkGA1UEBhMC
……省略……
fMGbLqkGn8YogdPqe5T1
-----END CERTIFICATE-----
subject=/C=US/ST=California/L=Cupertino/O=AppleInc./OU=iTMS Engineering/CN=gateway.sandbox.push.apple.com
issuer=/C=US/O=Entrust, Inc./OU=www.entrust.net/rpa isincorporated by reference/OU=(c) 2009 Entrust, Inc./CN=Entrust CertificationAuthority - L1C
---
No client certificate CA names sent
---
SSL handshake has read 2731 bytes and written 2165 bytes
---
New, TLSv1/SSLv3, Cipher is AES256-SHA
Server public key is 2048 bit
Secure Renegotiation IS supported
Compression: NONE
Expansion: NONE
SSL-Session:
Protocol  : TLSv1
Cipher    : AES256-SHA
Session-ID:
Session-ID-ctx:
Master-Key:C7A47EED5E1F5……省略……369D4
Key-Arg   : None
Start Time:1361862882
Timeout   : 300 (sec)
Verify return code: 0 (ok)
---
如果出现
verify error:num=20:unable to get local issuercertificate
verify return:0
也是没问题的。
五、App端的配置。
- (BOOL)application:(UIApplication *)application didFinishLaunchingWithOptions:(NSDictionary *)launchOptions {

if ([[[UIDevice currentDevice] systemVersion] floatValue] >= 8.0)
{
[[UIApplication sharedApplication] registerUserNotificationSettings:[UIUserNotificationSettings
settingsForTypes:(UIUserNotificationTypeSound | UIUserNotificationTypeAlert | UIUserNotificationTypeBadge)
categories:nil]];

[[UIApplication sharedApplication] registerForRemoteNotifications];
}
else
{
//这里还是原来的代码
[[UIApplication sharedApplication] registerForRemoteNotificationTypes:(UIUserNotificationTypeBadge | UIUserNotificationTypeSound | UIUserNotificationTypeAlert)];
}
//其他代码
return YES;
}
由于registerForRemoteNotificationTypes在ios 8+已经被废弃了,所以这里要对系统版本号进行判断。- (void)application:(UIApplication *)application didRegisterForRemoteNotificationsWithDeviceToken:(NSData *)pToken {
NSLog(@"regisger success:%@",pToken);
//注册成功,将deviceToken保存到应用服务器数据库中
}
- (void)application:(UIApplication *)application didReceiveRemoteNotification:(NSDictionary *)userInfo{
// 处理推送消息
NSLog(@"userinfo:%@",userInfo);
NSLog(@"收到推送消息:%@",[[userInfo objectForKey:@"aps"] objectForKey:@"alert"]);
}
- (void)application:(UIApplication *)application didFailToRegisterForRemoteNotificationsWithError:(NSError *)error {
NSLog(@"Registfail%@",error);
}以上就是所有的过程,具体服务器端代码即配置,可参照http://blog.csdn.net/showhilllee/article/details/8631734。
参考:http://blog.csdn.net/showhilllee/article/details/8631734 http://www.cocoachina.com/bbs/read.php?tid=102110&page=1 http://blog.csdn.net/jerryvon/article/details/8288944

相关文章推荐
- .net 通过URL推送POST数据具体实现
- 通过 Push 来提高移动应用的活跃度 3ff0
- iOS 设备通过 java-apns 组件实现苹果 APNs 消息推送实现
- 基于Android移动平台僵尸网络模拟工具设计与实现
- IOS消息推送
- 配置iOS推送通知与推送通知iOS客户端编写实现及推送服务器端编写
- 推送 通知
- 如何解决Backup Exec Remote Agent推送安装失败的问题
- Android 推送技术解析
- 网络营销的精准之道专业网络营销
- iOS消息推送机制的实现
- ANPS
- Ajax长链接(模拟推送)
- ios消息推送,Java服务器后台证书制作。
- xcode6开发ios8app应用程序,如何进行APNs推送消息(获取device token)和集成激光推送教程
- 把token的<>去掉
- 使用友盟消息推送中遇到的哪些问题--索引(开发者必读)
- iOS(iOS7 iOS6)推送教程(一步一步实现,简单易懂)
- iOS推送方法调用