iOS 新浪微博-3.0 新特性
2015-10-11 17:06
585 查看
每个程序在第一次启动的时候,都会显示新特性。效果如下:

思路:
添加一个ViewController,里面放两个View,一个是UISrollView,另一个pageControl
往UISrollView添加四个UIImageView,并在最后一个添加分享和开始微博按钮
实现UISrollViewDelegate,在滚动的时候,监听页数,设置pageControl页数显示
设置启动时,window显示的是新特性Controller,并判断版本号
NewfeatureViewController.h
NewfeatureViewController.m
设置启动时,window显示的是新特性Controller,并判断版本号
新建一个分类来处理,以后其它地方也可以使用
UIWindow+Extension.h
UIWindow+Extension.m
接下来,在AppDelegate里调用就很简单了,只需要一行代码即可。
隐藏导航栏
第一步:选择iPhone
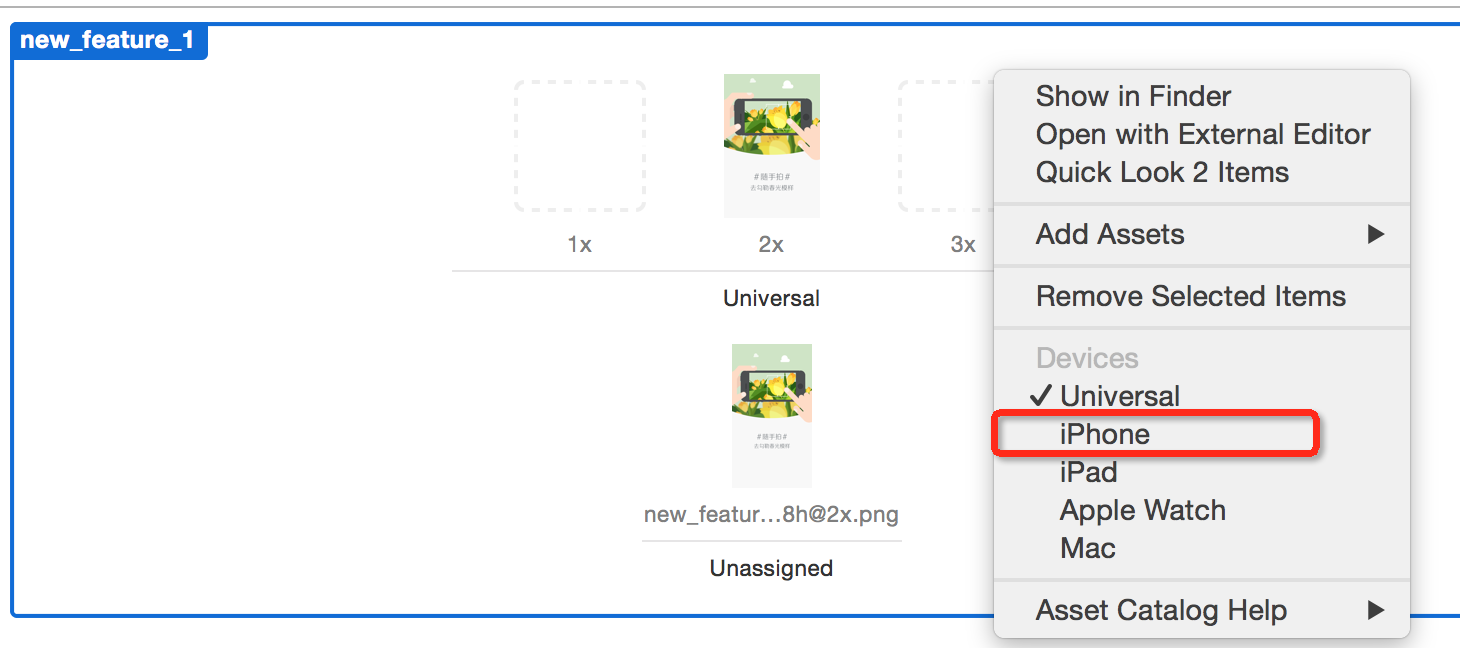
第二步:调整显示格式如下

第三步:打开目录,点击Contents.json,添加Retina4 图片尺寸(和x3是一样的)。

最终显示效果:

实际,也可以通过另一种方式来实现,那就是定义一个宏,如果屏幕尺寸大于568,则使用568的图片。
宏定义:
界面调整:
章节源代码下载:http://pan.baidu.com/s/1dDi8XiD
新浪微博Github:https://github.com/jiangys/Weibo
思路:
添加一个ViewController,里面放两个View,一个是UISrollView,另一个pageControl
往UISrollView添加四个UIImageView,并在最后一个添加分享和开始微博按钮
实现UISrollViewDelegate,在滚动的时候,监听页数,设置pageControl页数显示
设置启动时,window显示的是新特性Controller,并判断版本号
代码实现
1,2,3实现代码在同一个控制器里NewfeatureViewController.h
#import <UIKit/UIKit.h>

@interface NewfeatureViewController : UIViewController

@end
NewfeatureViewController.m
//
//  NewfeatureViewController.m
//  Weibo
//
//  Created by jiangys on 15/10/11.
//  Copyright © 2015年 Jiangys. All rights reserved.
//

#import "NewfeatureViewController.h"
#import "TabBarViewController.h"

// 新特性图片总数
#define NewfeatureCount 4

@interface NewfeatureViewController ()<UIScrollViewDelegate>

/** 滑动图片 分页 */
@property (nonatomic, strong) UIPageControl *pageControl;

@end

@implementation NewfeatureViewController

- (void)viewDidLoad {
[super viewDidLoad];

// 1.添加UISrollView
[self setupScrollView];

// 2.添加pageControl
[self setupPageControl];
}

/**
*  添加UISrollView
*/
- (void)setupScrollView
{
UIScrollView *scrollView=[[UIScrollView alloc] init];
scrollView.frame=self.view.bounds;
scrollView.delegate=self;
[self.view addSubview:scrollView];

CGFloat scrollW=scrollView.width;
CGFloat scrollH=scrollView.height;
for (int i=0; i < NewfeatureCount;i++) {
UIImageView *imageView=[[UIImageView alloc] init];
imageView.width=scrollW;
imageView.height=scrollH;
imageView.y=0;
imageView.x=i*scrollW;
// 显示图片
NSString *name=[NSString stringWithFormat:@"new_feature_%d",i+1];
//        if (FourInch) { // 4inch  需要手动去加载4inch对应的-568h图片
//            name = [name stringByAppendingString:@"-568h"];
//        }
imageView.image=[UIImage imageNamed:name];
if (i==(NewfeatureCount-1)) {
[self setupLastImageView:imageView];
}

[scrollView addSubview:imageView];
}

// 3.设置scrollView的其他属性
// 如果想要某个方向上不能滚动,那么这个方向对应的尺寸数值传0即可
scrollView.contentSize = CGSizeMake(NewfeatureCount * scrollW, 0);
scrollView.bounces = NO; // 去除弹簧效果
scrollView.pagingEnabled = YES;
scrollView.showsHorizontalScrollIndicator = NO;
}

/**
*  添加pageControl
*/
- (void)setupPageControl
{
UIPageControl *pageControl=[[UIPageControl alloc] init];
pageControl.numberOfPages=NewfeatureCount;
pageControl.currentPageIndicatorTintColor=YSColor(253, 98, 42);
pageControl.pageIndicatorTintColor=YSColor(189, 189, 189);
pageControl.centerX=self.view.width * 0.5;
pageControl.centerY=self.view.height-50;

[self.view addSubview:pageControl];
self.pageControl=pageControl;
}

/**
*  初始化最后一个imageView
*
*  @param imageView 最后一个imageView
*/
- (void)setupLastImageView:(UIImageView *)imageView
{
// 开启交互
imageView.userInteractionEnabled=YES;

// 添加分享复选框
UIButton *shareBtn=[[UIButton alloc] init];
[shareBtn setImage:[UIImage imageNamed:@"new_feature_share_false"] forState:UIControlStateNormal];
[shareBtn setImage:[UIImage imageNamed:@"new_feature_share_true"] forState:UIControlStateSelected];
[shareBtn setTitle:@"分享给大家" forState:UIControlStateNormal];
[shareBtn setTitleColor:[UIColor blackColor] forState:UIControlStateNormal];
shareBtn.titleLabel.font=[UIFont systemFontOfSize:15];
// titleEdgeInsets:只影响按钮内部的titleLabel
shareBtn.titleEdgeInsets = UIEdgeInsetsMake(0, 10, 0, 0);
shareBtn.width=200;
shareBtn.height=30;
shareBtn.centerX=imageView.width*0.5;
shareBtn.centerY=imageView.height*0.7;
[shareBtn addTarget:self action:@selector(shareClick:) forControlEvents:UIControlEventTouchUpInside];
[imageView addSubview:shareBtn];

// 开始微博
UIButton *startBtn=[[UIButton alloc] init];
[startBtn setBackgroundImage:[UIImage imageNamed:@"new_feature_finish_button"] forState:UIControlStateNormal];
[startBtn setBackgroundImage:[UIImage imageNamed:@"new_feature_finish_button_highlighted"] forState:UIControlStateHighlighted];
[startBtn setTitle:@"开始微博" forState:UIControlStateNormal];
startBtn.size=startBtn.currentBackgroundImage.size;
startBtn.centerX=imageView.width*0.5;
startBtn.centerY=imageView.height*0.78;
[startBtn addTarget:self action:@selector(startClick) forControlEvents:UIControlEventTouchUpInside];
[imageView addSubview:startBtn];
}

/**
*  分享给大家
*/
- (void)shareClick:(UIButton *)shareBtn
{
shareBtn.selected=!shareBtn.isSelected;
}

/**
*  开始微博
*/
- (void)startClick
{
// 切换到TabBarController
/*
切换控制器的手段
1.push:依赖于UINavigationController,控制器的切换是可逆的,比如A切换到B,B又可以回到A
2.modal:控制器的切换是可逆的,比如A切换到B,B又可以回到A
3.切换window的rootViewController
*/
UIWindow *window = [UIApplication sharedApplication].keyWindow;
window.rootViewController = [[TabBarViewController alloc] init];
}

#pragma ScrollView 代理
-(void)scrollViewDidScroll:(UIScrollView *)scrollView
{
// 获取页码
CGFloat doublePage=scrollView.contentOffset.x/scrollView.width;
int intPage=(int)(doublePage+0.5);

// 设置页码
self.pageControl.currentPage=intPage;
}

@end
设置启动时,window显示的是新特性Controller,并判断版本号
新建一个分类来处理,以后其它地方也可以使用
UIWindow+Extension.h
#import <UIKit/UIKit.h>

@interface UIWindow (Extension)

- (void)switchRootViewController;

@end
UIWindow+Extension.m
#import "UIWindow+Extension.h"
#import "TabBarViewController.h"
#import "NewfeatureViewController.h"

@implementation UIWindow (Extension)

- (void)switchRootViewController
{
NSString *key = @"CFBundleVersion";
// 上一次的使用版本(存储在沙盒中的版本号)
NSString *lastVersion = [[NSUserDefaults standardUserDefaults] objectForKey:key];
// 当前软件的版本号(从Info.plist中获得)
NSString *currentVersion = [NSBundle mainBundle].infoDictionary[key];

if ([currentVersion isEqualToString:lastVersion]) { // 版本号相同:这次打开和上次打开的是同一个版本
self.rootViewController = [[TabBarViewController alloc] init];
} else { // 这次打开的版本和上一次不一样,显示新特性
self.rootViewController = [[NewfeatureViewController alloc] init];

// 将当前的版本号存进沙盒
[[NSUserDefaults standardUserDefaults] setObject:currentVersion forKey:key];
[[NSUserDefaults standardUserDefaults] synchronize];
}
}

@end
接下来,在AppDelegate里调用就很简单了,只需要一行代码即可。
- (BOOL)application:(UIApplication *)application didFinishLaunchingWithOptions:(NSDictionary *)launchOptions {

self.window=[[UIWindow alloc]init];
self.window.frame=[UIScreen mainScreen].bounds;
[self.window switchRootViewController];  // 只需要添加这一行代码
[self.window makeKeyAndVisible];

return YES;
}
隐藏导航栏
// 隐藏状态栏
- (BOOL)prefersStatusBarHidden
{
return YES;
}
显示新特性图片设置
在设置新特性的时候,由于图片是全屏的,因而,不同的手机屏幕尺寸需要不同的图片。实际上,4s 使用的是2x,5s使用的是ratain 2x,6 和6s使用的是3x第一步:选择iPhone
第二步:调整显示格式如下
第三步:打开目录,点击Contents.json,添加Retina4 图片尺寸(和x3是一样的)。
最终显示效果:
实际,也可以通过另一种方式来实现,那就是定义一个宏,如果屏幕尺寸大于568,则使用568的图片。
宏定义:
// 是否为4inch以上
#define FourInch ([UIScreen mainScreen].bounds.size.height >= 568.0)
界面调整:
// 显示图片
NSString *name=[NSString stringWithFormat:@"new_feature_%d",i+1];
if (FourInch) { // 4inch  需要手动去加载4inch对应的-568h图片
name = [name stringByAppendingString:@"-568h"];
}章节源代码下载:http://pan.baidu.com/s/1dDi8XiD
新浪微博Github:https://github.com/jiangys/Weibo

相关文章推荐
- iOS 开发笔记-控制器tab切换view显示
- ios 判断至多两位小数的正则表达式
- 安卓仿ios侧滑删除地址-SwipeMenuListView
- 芒果iOS开发之利用U盘给Mac重新安装系统
- iOS动画组基础
- iOS9适配 之 关于info.plist 第三方登录 添加URL Schemes白名单
- [iOS开发项目-10] 图片轮播器
- iOS:quartz2D绘图(在PDF文件上绘制图片)
- ios9新特性概述
- iOS开发 ----- 自动循环滚动或引导页效果
- iOS判断手机是否联网AFNetworking以及SystemConfiguration.framework
- ios开发实践
- iOS9和iOS9新特性
- iOS5编程--ARC在工程上的相关设置
- iOS工程中的info.plist文件
- IOS开发调用系统相机和打开闪光灯
- 【iOS开展-50】使用它来创建一个新的类的实现代码包,因此,不自觉地练习简单MVC实验,附带动画
- iOS --- 使用NSTimer设置定时任务的注意事项
- iOS 移动应用开发中常见的第三方库
- iOS软件开发常见通过Cocoapods安装的第三方框架