Spring MVC hello world annotation example
2015-09-21 11:17
381 查看
In this tutorial, we will take the previous Spring MVC hello world XML-based, and convert it to a annotation-based project.
Technologies used :
Spring 2.5.6
JDK 1.6
Maven 3
Eclipse 3.6
Controller – The controller class is no longer need to extend the base controller like
Handler Mapping – No more declaration for the handler mapping like
If the
In this case, if a URI pattern
6.
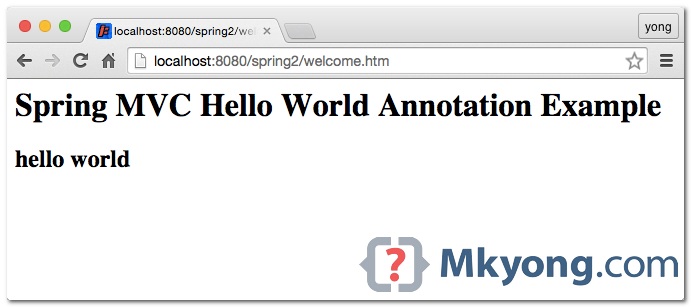
URL : http://localhost:8080/spring2/welcome.htm
Note
If you compare this Spring MVC annotation-based hello world example with previously XML-based example, you can see that this annotation approach is easier and flexible in wiring the controller class and URL handler mapping, because you do not need to declare the controller class explicitly or extends any particular class.
Technologies used :
Spring 2.5.6
JDK 1.6
Maven 3
Eclipse 3.6
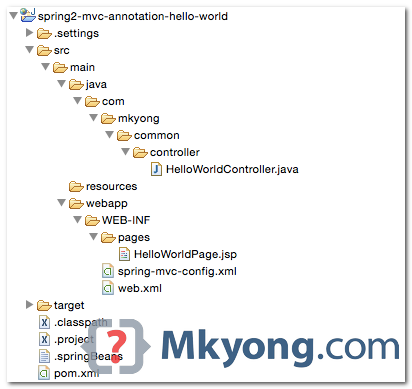
1. Directory Structure
2. Maven
Spring’s annotation is bundled in the samespring-webmvc.jar.
pom.xml
<project xmlns="http://maven.apache.org/POM/4.0.0"
xmlns:xsi="http://www.w3.org/2001/XMLSchema-instance"
xsi:schemaLocation="http://maven.apache.org/POM/4.0.0 http://maven.apache.org/maven-v4_0_0.xsd"> <modelVersion>4.0.0</modelVersion>
<groupId>com.mkyong.common</groupId>
<artifactId>spring2-mvc-annotation-hello-world</artifactId>
<packaging>war</packaging>
<version>1.0-SNAPSHOT</version>
<name>Spring 2 MVC</name>

<properties>
<jdk.version>1.6</jdk.version>
<spring.version>2.5.6</spring.version>
<jstl.version>1.2</jstl.version>
<servletapi.version>2.5</servletapi.version>
</properties>

<dependencies>

<!-- Spring MVC framework -->
<dependency>
<groupId>org.springframework</groupId>
<artifactId>spring-webmvc</artifactId>
<version>${spring.version}</version>
</dependency>

<!-- JSTL -->
<dependency>
<groupId>javax.servlet</groupId>
<artifactId>jstl</artifactId>
<version>${jstl.version}</version>
</dependency>

<!-- for compile only, your container should have this -->
<dependency>
<groupId>javax.servlet</groupId>
<artifactId>servlet-api</artifactId>
<version>${servletapi.version}</version>
<scope>provided</scope>
</dependency>

</dependencies>

<build>

<plugins>
<plugin>
<groupId>org.apache.maven.plugins</groupId>
<artifactId>maven-compiler-plugin</artifactId>
<version>3.3</version>
<configuration>
<source>${jdk.version}</source>
<target>${jdk.version}</target>
</configuration>
</plugin>

<plugin>
<groupId>org.eclipse.jetty</groupId>
<artifactId>jetty-maven-plugin</artifactId>
<version>9.2.11.v20150529</version>
<configuration>
<scanIntervalSeconds>10</scanIntervalSeconds>
<webApp>
<contextPath>/spring2</contextPath>
</webApp>
</configuration>
</plugin>

<plugin>
<groupId>org.apache.maven.plugins</groupId>
<artifactId>maven-eclipse-plugin</artifactId>
<version>2.9</version>
<configuration>
<downloadSources>true</downloadSources>
<downloadJavadocs>true</downloadJavadocs>
<wtpversion>2.0</wtpversion>
<wtpContextName>spring2</wtpContextName>
</configuration>
</plugin>

</plugins>

</build>

</project>
3. Controller & Handler Mapping
Now, you can use@Controllerand
@RequestMappingto replace the XML configuration.
Controller – The controller class is no longer need to extend the base controller like
AbstractControlleror
SimpleFormController, just simply annotate the class with a
@Controllerannotation.
Handler Mapping – No more declaration for the handler mapping like
BeanNameUrlHandlerMapping,
ControllerClassNameHandlerMappingor
SimpleUrlHandlerMapping, all are replaced with a standard
@RequestMappingannotation.
HelloWorldController.java
package com.mkyong.common.controller;

import org.springframework.stereotype.Controller;
import org.springframework.web.bind.annotation.RequestMapping;
import org.springframework.web.bind.annotation.RequestMethod;
import org.springframework.web.servlet.ModelAndView;

@Controller
@RequestMapping("/welcome")
public class HelloWorldController{

@RequestMapping(method = RequestMethod.GET)
public ModelAndView helloWorld(){

ModelAndView model = new ModelAndView("HelloWorldPage");
model.addObject("msg", "hello world");

return model;
}
}
If the
@RequestMappingis applied at the class level (can apply at method level with multi-actions controller), it required to put a
RequestMethodto indicate which method to handle the mapping request.
In this case, if a URI pattern
/welcomeis requested, it will map to this
HelloWorldController, and handle the request with
helloWorld()method.
4. Spring XML Configuration
You still need to configure the view resolver and component scanning in XML file./WEB-INF/spring-mvc-config.xml
<beans xmlns="http://www.springframework.org/schema/beans"
xmlns:xsi="http://www.w3.org/2001/XMLSchema-instance"
xmlns:context="http://www.springframework.org/schema/context"
xsi:schemaLocation="http://www.springframework.org/schema/beans http://www.springframework.org/schema/beans/spring-beans-2.5.xsd http://www.springframework.org/schema/context http://www.springframework.org/schema/context/spring-context-2.5.xsd">
<bean id="viewResolver"
class="org.springframework.web.servlet.view.InternalResourceViewResolver">
<property name="prefix">
<value>/WEB-INF/pages/</value>
</property>
<property name="suffix">
<value>.jsp</value>
</property>
</bean>

<context:component-scan base-package="com.mkyong.common.controller" />

</beans>
5. JSP Page
A simple JSP page for demonstration.HelloWorldPage.jsp
.
<%@ taglib prefix="c" uri="http://java.sun.com/jsp/jstl/core"%>
<html>
<body>
<h1>Spring MVC Hello World Annotation Example</h1>

<h2>${msg}</h2>
</body>
</html>
6. web.xml
web.xml
<web-app id="WebApp_ID" version="2.4"
xmlns="http://java.sun.com/xml/ns/j2ee"
xmlns:xsi="http://www.w3.org/2001/XMLSchema-instance"
xsi:schemaLocation="http://java.sun.com/xml/ns/j2ee http://java.sun.com/xml/ns/j2ee/web-app_2_4.xsd">
<display-name>Spring Web MVC Application</display-name>

<servlet>
<servlet-name>mvc-dispatcher</servlet-name>
<servlet-class>org.springframework.web.servlet.DispatcherServlet</servlet-class>
<init-param>
<param-name>contextConfigLocation</param-name>
<param-value>/WEB-INF/spring-mvc-config.xml</param-value>
</init-param>
<load-on-startup>1</load-on-startup>
</servlet>

<servlet-mapping>
<servlet-name>mvc-dispatcher</servlet-name>
<url-pattern>*.htm</url-pattern>
</servlet-mapping>

</web-app>
6. Demo
6.1 To run with the embedded Jetty, type :
$ mvn jetty:run
URL : http://localhost:8080/spring2/welcome.htm
6.2 To import into Eclipse IDE.
$ mvn eclipse:eclipse
Note
If you compare this Spring MVC annotation-based hello world example with previously XML-based example, you can see that this annotation approach is easier and flexible in wiring the controller class and URL handler mapping, because you do not need to declare the controller class explicitly or extends any particular class.

相关文章推荐
- 分享微信开发Html5轻游戏中的几个坑
- 一个jar包里的网站
- 一个jar包里的网站之文件上传
- 一个jar包里的网站之返回对媒体类型
- MyEclipse Web Project转Eclipse Dynamic Web Project
- Windows Clang开发环境备忘
- Ubuntu 安装 JDK 问题
- 傻瓜式用Eclipse连接MySQL数据库
- Zend的MVC机制使用分析(二)
- ASP.NET MVC 4 捆绑和缩小实例介绍
- ASP.NET MVC中将控制器分离到类库的实现
- asp.net实现在非MVC中使用Razor模板引擎的方法
- ASP.NET MVC中的AJAX应用
- 如何在MVC应用程序中使用Jquery
- 让Flex Builder 3.0与Eclipse3.4整合起来
- ASP.NET MVC小结之基础篇(二)
- ASP.NET小结之MVC, MVP, MVVM比较以及区别(一)
- Asp.net实现MVC处理文件的上传下载功能实例教程
- ASP.NET MVC小结之基础篇(一)
- Eclipse配置Javascript开发环境图文教程