Qt 学习之路:元素布局
2015-09-15 18:38
561 查看
上一章我们介绍了 QML 中用于定位的几种元素,被称为定位器。除了定位器,QML 还提供了另外一种用于布局的机制。我们将这种机制成为锚点(anchor)。锚点允许我们灵活地设置两个元素的相对位置。它使两个元素之间形成一种类似于锚的关系,也就是两个元素之间形成一个固定点。锚点的行为类似于一种链接,它要比单纯地计算坐标改变更强。由于锚点描述的是相对位置,所以在使用锚点时,我们必须指定两个元素,声明其中一个元素相对于另外一个元素。锚点是
Item元素的基本属性之一,因而适用于所有 QML 可视元素。
一个元素有 6 个主要的锚点的定位线,如下图所示:
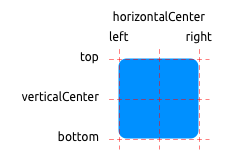
这 6 个定位线分别是:
top、
bottom、
left、
right、
horizontalCenter和
verticalCenter。对于
Text元素,还有一个
baseline锚点。每一个锚点定位线都可以结合一个偏移的数值。其中,
top、
bottom、
left和
right称为外边框;
horizontalCenter、
verticalCenter和
baseline称为偏移量。
下面,我们使用例子来说明这些锚点的使用。首先,我们需要重新定义一下上一章使用过的
BlueRectangle组件:
BlueRectangle
| 1 2 3 4 5 6 7 8 9 10 11 12 13 | import QtQuick 2.0 Rectangle { width: 48 height: 48 color: "blue" border.color: Qt.lighter(color) MouseArea { anchors.fill: parent drag.target: parent } } |
BlueRectangle最后增加了一个
MouseArea组件。前面的章节中,我们简单使用了这个组件。顾名思义,这是一个用于处理鼠标事件的组件。之前我们使用了它处理鼠标点击事件。这里,我们使用了其拖动事件。
anchors.fill: parent一行的含义马上就会解释;
drag.target: parent则说明拖动目标是
parent。我们的拖动对象是
MouseArea的父组件,也就是
BlueRectangle组件。
接下来看第一个例子:
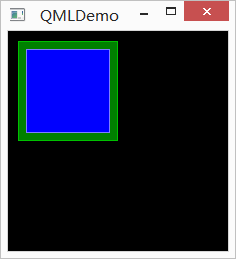
代码如下:
| 1 2 3 4 5 6 7 8 9 10 11 12 13 14 15 16 17 18 19 20 | import QtQuick 2.0 Rectangle { id: root width: 220 height: 220 color: "black" GreenRectangle { x: 10 y: 10 width: 100 height: 100 BlueRectangle { width: 12 anchors.fill: parent anchors.margins: 8 } } } |
anchors.fill设置内部蓝色矩形的锚点为填充(fill),填充的目的对象是
parent;填充边距是 8px。注意,尽管我们设置了蓝色矩形宽度为 12px,但是因为锚点的优先级要高于宽度属性设置,所以蓝色矩形的实际宽度是 100px – 8px – 8px = 84px。
第二个例子:
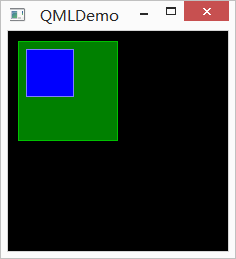
代码如下:
| 1 2 3 4 5 6 7 8 9 10 11 12 13 14 15 16 17 18 19 20 21 | import QtQuick 2.0 Rectangle { id: root width: 220 height: 220 color: "black" GreenRectangle { x: 10 y: 10 width: 100 height: 100 BlueRectangle { width: 48 y: 8 anchors.left: parent.left anchors.leftMargin: 8 } } } |
anchors.left设置内部蓝色矩形的锚点为父组件的左边线(parent.left);左边距是 8px。另外,我们可以试着拖动蓝色矩形,看它的移动方式。在我们拖动时,蓝色矩形只能沿着距离父组件左边 8px 的位置上下移动,这是由于我们设置了锚点的缘故。正如我们前面提到过的,锚点要比单纯地计算坐标改变的效果更强,更优先。
第三个例子:
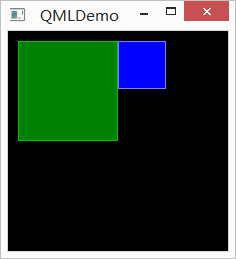
代码如下:
| 1 2 3 4 5 6 7 8 9 10 11 12 13 14 15 16 17 18 19 | import QtQuick 2.0 Rectangle { id: root width: 220 height: 220 color: "black" GreenRectangle { x: 10 y: 10 width: 100 height: 100 BlueRectangle { width: 48 anchors.left: parent.right } } } |
anchors.left: parent.right,也就是将组件锚点的左边线设置为父组件的右边线。效果即如上图所示。当我们拖动组件时,依然只能上下移动。
下一个例子:
代码如下:
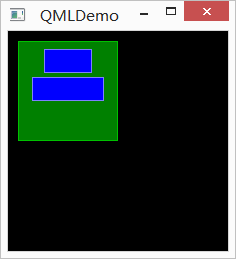
| 1 2 3 4 5 6 7 8 9 10 11 12 13 14 15 16 17 18 19 20 21 22 23 24 25 26 27 28 29 | import QtQuick 2.0 Rectangle { id: root width: 220 height: 220 color: "black" GreenRectangle { x: 10 y: 10 width: 100 height: 100 BlueRectangle { id: blue1 width: 48; height: 24 y: 8 anchors.horizontalCenter: parent.horizontalCenter } BlueRectangle { id: blue2 width: 72; height: 24 anchors.top: blue1.bottom anchors.topMargin: 4 anchors.horizontalCenter: blue1.horizontalCenter } } } |
blue1和
blue2。
blue1的锚点水平中心线设置为父组件的水平中心;
blue2的锚点上边线相对于
blue1的底部,其中边距为 4px,另外,我们还增加了一个水平中线为
blue1的水平中线。这样,
blue1相对于父组件,
blue2相对于
blue1,这样便决定了三者之间的相对关系。当我们拖动蓝色矩形时可以发现,
blue1和
blue2的相对位置始终不变,因为我们已经明确指定了这种相对位置,而二者可以像一个整体似的同时上下移动(因为我们没有指定其中任何一个的上下边距与父组件的关系)。
另外一个例子:
代码如下所示:
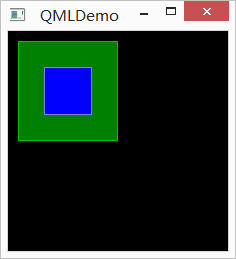
| 1 2 3 4 5 6 7 8 9 10 11 12 13 14 15 16 17 18 19 20 | import QtQuick 2.0 Rectangle { id: root width: 220 height: 220 color: "black" GreenRectangle { x: 10 y: 10 width: 100 height: 100 BlueRectangle { width: 48 anchors.centerIn: parent } } } |
anchors.centerIn: parent将蓝色矩形的中心固定在父组件的中心。由于我们已经指明是中心,所以也不能拖动这个蓝色矩形。
最后一个例子:
代码如下:
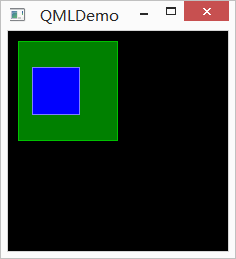
| 1 2 3 4 5 6 7 8 9 10 11 12 13 14 15 16 17 18 19 20 21 22 | import QtQuick 2.0 Rectangle { id: root width: 220 height: 220 color: "black" GreenRectangle { x: 10 y: 10 width: 100 height: 100 BlueRectangle { width: 48 anchors.horizontalCenter: parent.horizontalCenter anchors.horizontalCenterOffset: -12 anchors.verticalCenter: parent.verticalCenter } } } |
anchors.centerIn: parent可以看作等价于
anchors.horizontalCenter: parent.horizontalCenter和
anchors.verticalCenter: parent.verticalCenter。而这里,我们设置了
anchors.horizontalCenterOffset为 -12,也就是向左偏移 12px。当然,我们也可以在
anchors.centerIn: parent的基础上增加
anchors.horizontalCenterOffset的值,二者是等价的。由于我们在这里指定的相对位置已经很明确,拖动也是无效的。
至此,我们简单介绍了 QML 中定位器和锚点的概念。看起来这些元素和机制都很简单,但是,通过有机地结合,足以灵活应对更复杂的场景。我们所要做的就是不断熟悉、深化对这些定位布局技术的理解。

相关文章推荐
- Qt自带的软件安装包制作工具
- Qt 学习之路 2(80):定位器
- Qt 学习之路 2(79):QML 组件
- Qt 学习之路:QML 组件
- Qt 学习之路:QML 基本元素
- qt 学习之路 :QML 语法
- 转载:QTableView中嵌入可视化组件
- Qt 事件过滤器问题
- QT自动打包依赖dll
- Qt中字符编码问题-1
- Qt 学习之路:线程总结
- Qt 在VS下设置exe图标
- QT4.8.4+DirectFB1.4.3
- Qt 学习之路 :Qt 线程相关类
- Qt 学习之路:线程和事件循环
- Qt 学习之路 :线程简介
- Qt 学习之路 :进程间通信
- QT QSerialPort类使用时连接出错(VS)
- Qt 模块简介
- Qt 模块简介