DI注解
2015-09-12 13:28
330 查看
问题引入:
在过去,我们经常使用setter来给属性赋值,这样会造成要写很多代码,如果属性一多,代码量就非常的惊人,虽然说不用我们自己写setter,但是代码量还是要算的。那么,为了解决这个问题,spring就引入了注解来为Di中的属性赋值。
我们拿代码来说话
public class Person implements Serializable {
//基本类型
private Long pid;
//String
private String pname;
//引用类型
//引入注解,name在这里指的是配置文件中bean的id
@Resource(name="student_annotation")
private Student student;
//集合
private List list;
private Set set;
private Map map;

public void showStudent(){
this.student.show();
}

}

public class Student implements Serializable {
public void show(){
System.out.println("student");
}
}

配置文件:
<?xml version="1.0" encoding="UTF-8"?>
<beans xmlns="http://www.springframework.org/schema/beans"
xmlns:context="http://www.springframework.org/schema/context"
xmlns:xsi="http://www.w3.org/2001/XMLSchema-instance"
xsi:schemaLocation="http://www.springframework.org/schema/beans http://www.springframework.org/schema/beans/spring-beans-2.5.xsd http://www.springframework.org/schema/context http://www.springframework.org/schema/context/spring-context-2.5.xsd"> <context:annotation-config></context:annotation-config>
<bean id="person_annotation" class="cn.ansel.annotation.Person"></bean>
<bean id="student_annotation" class="cn.ansel.annotation.Student"></bean>
</beans>
细心的人会发现,配置文件多了几行数据,没错。
xmlns:context="http://www.springframework.org/schema/context" http://www.springframework.org/schema/context http://www.springframework.org/schema/context/spring-context-2.5.xsd
是它的命名空间及地址
又因为我们使用了注解,所以要加上注解解析器,否则注解不起作用
<!--
引入注解解析器
-->
<context:annotation-config></context:annotation-config>
测试类
public class annotationTest {
@Test
public void test(){
//启动spring容器
ApplicationContext applicationContext=new ClassPathXmlApplicationContext("applicationContext.xml");
//得到对象
Person person=(Person) applicationContext.getBean("person_annotation");
//调用方法
person.showStudent();
}
}
运行:

成功输出student.
注解的运行流程及resource的取值:
1、启动spring容器,加载spring的配置文件2、为配置文件中每一个bean创建对象
3、查找每一个bean中是否有@Resource,如果有的话,再看Resource有没有值,如果没有写name的话,默认是“”
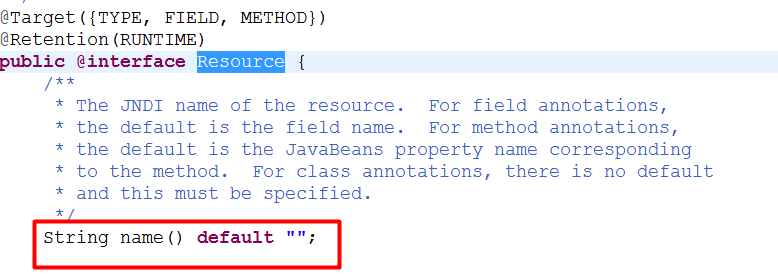
从recource的源代码中可以看到,name的默认取值是空字符串,并且该注解可以存在于(如下为Type的源代码)

4、(a)如果resource里面的name没有写,即默认为空字符串,那么spring容器会按照使用该注解的引用名作为bean的id来与配置文件中的bean匹配。如果这一次匹配失败,那么spring容器会继续根据当前引用对象的类型与配置文件的bean匹配(!注意:这时候的匹配,如果相同的类很多的话,也会报错),如果还是匹配失败,那么还是报错。
(b)如果resource中的name有值,那么直接根据name的值与配置文件中bean的id匹配,如果匹配成功就直接创建对象,然后为这个引用赋值,如果匹配失败直接报错。
5、创建完对象,赋好值之后,就是我们客户端的调用,调用完后就是关闭spring容器。
注意:
由于这里的@Resource是javax.annotation.Resource 包(扩展包),这时候spring不服,于是推出了自己的注解:@Autowired
这个注解的作用是按照与引用类相同的类型与配置文件进行匹配。然后还有一个@Qualifier(“student_annotation”)`,因为qualifier里面有一个属性value,所以前面直接把它的值写上去。这两个注解加起来的作用跟@Resource的作用是一样的。

相关文章推荐
- 一个jar包里的网站
- 一个jar包里的网站之文件上传
- 一个jar包里的网站之返回对媒体类型
- spring+html5实现安全传输随机数字密码键盘
- Spring中属性注入详解
- struts2 spring整合fieldError问题
- spring的jdbctemplate的crud的基类dao
- 读取spring配置文件的方法(spring读取资源文件)
- java实现简单美女拼图游戏
- java基本教程之线程休眠 java多线程教程
- JSP开发中在spring mvc项目中实现登录账号单浏览器登录
- 基于Spring框架的Shiro配置方法
- Spring MVC中上传文件实例
- 实例讲解Java的Spring框架中的AOP实现
- 解析Java中如何获取Spring中配置的bean
- Spring的注解配置与XML配置之间的比较
- java Spring整合Freemarker的详细步骤
- Java 二维码,QR码,J4L-QRCode 的资料整理
- java当中的定时器的4种使用方式
- java中 spring 定时任务 实现代码