Squid服务基础及构建代理服务器
2015-08-29 18:33
411 查看
1.1 Squid服务基础
1.1.1 缓存代理概述
Squid:应用层的代理服务软件,主要提供缓存加速、应用层过滤控制的能
1.代理的工作机制:
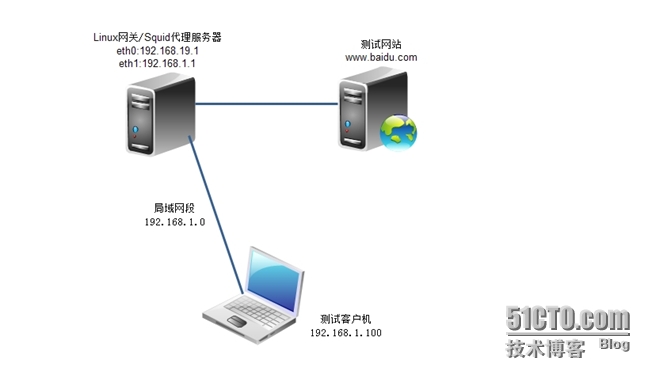
当客户机通过代理来请求web页面时,指定的代理服务器会先检查自己的缓存,如果缓存中已经有客户机需呀的页面,则直接将缓存中的页面内容反馈给客户机;如果缓存中没有客户机要的访问页面,则由代理服务器向internet发送请求,当获得返回的web页面以后,将网页数据保存到缓存中并发送给客户机,如下图所示。

2.代理的基本类型
传统代理:也就是普通的代理服务器,首先必须在客户机的浏览器、QQ聊天工具、下载软件等程序中手动设置代理服务器的地址和端口,然后才能使用代理来访问网络。
透明代理:提供与传统代理相同的功能和服务,其区别在于客户机不需要指定代理服务器的地址和端口,而是通过默认路由,防火墙策略将web访问重定向,实际仍然交给代理服务器来处理。
1.1.2 安装及运行控制
下面以Squid 3.4.6版为例,介绍其安装和运行控制。
1.编译安装Squid
[root@www ~]# tar -zxvf squid-3.4.6.tar.gz -C /usr/src/ #将squid解压到/usr/src/
[root@www ~]# cd /usr/local/squid/ #到squid目录
[root@www squid-3.4.6]# ./configure --prefix=/usr/local/squid \ #安装目录
-sysconfdir=/etc \ #单独将配置文件修改到其他目录
--enable-arp-acl \ #可以在规则中设置直接通过客户端MAC进行管理,防止客户端使用IP欺骗
--enable-linux-netfilter \ #使用内核过滤
--enable-linux-tproxy \ #支持透明模式
--enable-async-io=100 \ #异步I/O,提升存储性能,相当于--enable-pthreads
--enable-err-language="Simplify_Chinese" \ #错误信息的提示语言
--enable-underscore \ #允许URL中有下划线
--enable-poll \ #使用Poll()模式,提升性能
--enable-gnuregex \ #使用GNU正则表达式
[root@www squid-3.4.6]# make && make install
安装完成后,创建连接文件,创建用户和组
[root@www ~]# ln -s /usr/local/squid/sbin/* /usr/local/sbin/
[root@www ~]#useradd -M -s /sbin/nologin squid
[root@www ~]#chown -R squid:squid /usr/local/squid/var/
2.Squid的配置文件
Squid服务的配置文件位于/etc/squid.conf,充分了解配置行的作用将有助于管理员根据实际情况灵活配置代理服务.更详细的配置项请参考/etc/squid.conf.documented文件
acl localnet src 10.0.0.0/8 # RFC1918 possible internal network
acl localnet src 172.16.0.0/12 # RFC1918 possible internal network
acl localnet src 192.168.0.0/16 # RFC1918 possible internal network
acl localnet src fc00::/7 # RFC 4193 local private network range
acl localnet src fe80::/10 # RFC 4291 link-local (directly plugged) machines
acl SSL_ports port 443
acl Safe_ports port 80 # http
acl Safe_ports port 21 # ftp
acl Safe_ports port 443 # https
acl Safe_ports port 70 # gopher
acl Safe_ports port 210 # wais
acl Safe_ports port 1025-65535 # unregistered ports
acl Safe_ports port 280 # http-mgmt
acl Safe_ports port 488 # gss-http
acl Safe_ports port 591 # filemaker
acl Safe_ports port 777 # multiling http
http_access deny !Safe_ports
http_access deny CONNECT !SSL_portshttp_access allow localhost managerhttp_access deny managerhttp_access allow localnethttp_access allow localhosthttp_access deny allhttp_port 3128 #用来指定代理服务监听的地址和端口(默认的端口号为3128)cache_effective_user squid #指定squid的程序用户,用来设置初始化、运行时缓存的账号cache_effective_group squid #默认为cache_effective_user指定账号的基本组coredump_dir /usr/local/squid/var/cache/squidrefresh_pattern ^ftp: 1440 20% 10080
refresh_pattern ^gopher: 1440 0% 1440
refresh_pattern -i (/cgi-bin/|\?) 0 0% 0
refresh_pattern . 0 20% 4320
3.Squid的运行控制
1)检查配置文件语法是否正确
[root@www ~]# squid -k parse
2)启动.停止Squid
第一你启动squid服务时,会自动初始化缓存目录。在没有可用的squid服务脚本的情况下,也可以直接调用squid程序来启动服务,这是需要先进性初始化。
[root@www ~]# squid -z # -z选项用来初始化缓存目录
[root@www ~]# squid # 启动squid服务
确认Squid服务处于监听状态。
[root@www ~]# netstat -uptln |grep squid
tcp 0 0 192.168.1.1:3128 0.0.0.0:* LISTEN
1.2 构建代理服务器
1.2.1 传统代理
1.Squid服务器的配置
1)修改squid.conf配置文件
[root@www ~]# vim /etc/squid.conf
http_access allow all #添加此行,在deny上面
http_access deny all
http_port 3128
cache_effective_user squid #初始化、运行时缓存的账号,否则启动不成功
cache_effective_group squid
:wq
2)在防火墙上添加加允许策略
[root@www ~]# iptables -I INPUT -p tcp --dport 3128 -j ACCEPT
[root@www ~]# /etc/init.d/iptables save
3)重载squid服务
[root@www ~]# squid reload
2.客户机的代理配置
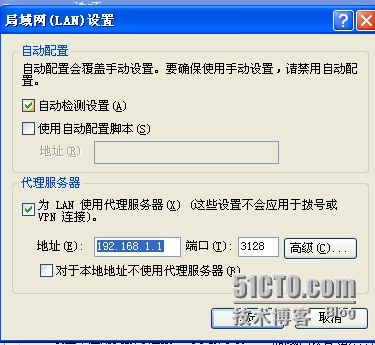
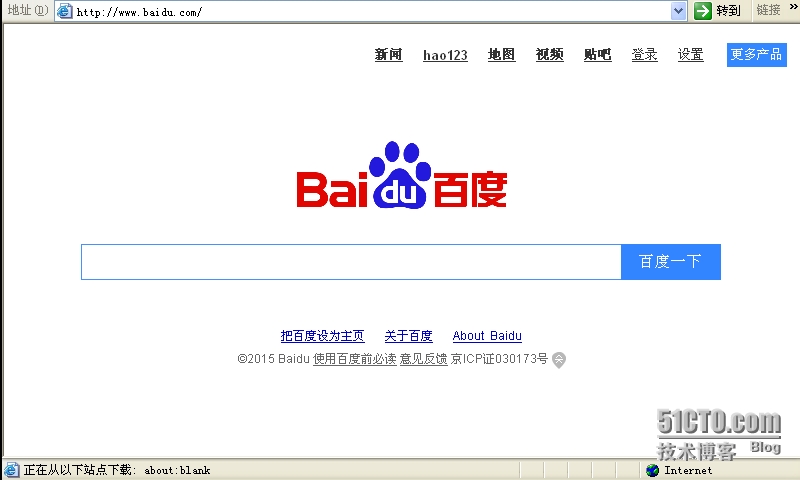
打开网页测试

1.2.2 透明代理
1.相关网络配置
[root@www ~]# vim -O /etc/sysconfig/network-scripts/ifcfg-eth{0,1}
DEVICE=eth0 |DEVICE=eth1
HWADDR=00:0C:29:d1:00:1e |HWADDR=00:0C:29:d1:00:28
TYPE=Ethernet |TYPE=Ethernet
ONBOOT=yes |ONBOOT=yes
NM_CONTROLLED=no |NM_CONTROLLED=no
BOOTPROTO=static |BOOTPROTO=static
IPADDR=192.168.19.99 |IPADDR=192.168.1.1
NETMASK=255.255.255.0 |NETMASK=255.255.255.0
GATEWAY=192.168.19.1 |DNS1=192.168.3.5
DNS1=192.168.3.5
2.配置linux网关/Squid代理服务
1)清空已有的防火墙规则,打开IP转发
[root@www ~]# /etc/init.d/iptables stop
[root@www ~]# setenforce 0
[root@www ~]# vim /etc/sysctl.conf
net.ipv4.ip_forward = 1
:wq
[root@www ~]# sysctl -p
2)添加snat策略实现共享上网
[root@www ~]# iptables -t nat -I POSTROUTING -o eth1 -s 192.168.1.0/24 -j SNAT --to-source 192.168.19.99
3)修改squid.conf配置文件
[root@www ~]# vim /etc/squid.conf
http_port 192.168.1.1:3128 transparent
cache_effective_user squid
cache_effective_group squid
visible_hostname gateway.linuxfan.cn
:wq
检查配置文件语法是否正确
[root@www ~]# squid -k parse
初始化缓存目录
[root@www ~]# vim /etc/squid.conf
cache_dir ufs /usr/local/squid/var/cache/squid 100 16 256
[root@www ~]# squid -z
4)添加REDIRECT策略支持透明代理
[root@www ~]# iptables -t nat -I PREROUTING -i eth1 -s 192.168.1.0/24 -p tcp --dport 80 -j REDIRECT --to 3128
[root@www ~]# iptables -t nat -I PREROUTING -i eth1 -s 192.168.1.0/24 -p tcp --dport 443 -j REDIRECT --to 3128
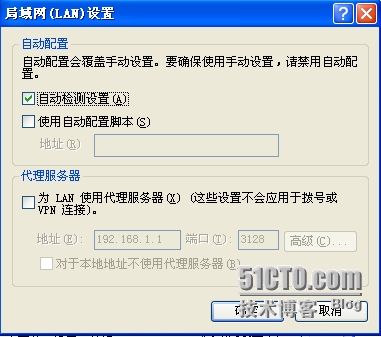
3.验证透明代理
4.ACL访问控制
1)定义访问控制列表
[root@www ~]# vim /etc/squid.conf
acl localhost src 127.0.0.1/255.255.255.255 #源地址位127.0.0.1
acl MYLAN src 192.168.1.0/24 192.168.4.0/24 #客户机网段
acl to_localhost dst 127.0.0.0/8 #目标地址为127.0.0.0/8网段
acl MC20 maxconn 20 #最大并发连接20
acl BlackURl url_regex -i ^rtsp:// ^emule:// #以rtsp://等开头的url
acl MEDIAFILE urlpath_regex -i \.mp3$ \.mp4$ \.rmvb$ #以.mp3 .mp4 .rmvb结尾的url
acl WORKTIME time MTWHF 08:30-17:30 #时间为周一至周五8:30-17:30
:wq
2)设置访问权限
http_access deny MYLAN MEDIAFILE #禁止下载MP4,MP3等文件
http_access deny MYLAN IPBLOCK #禁止访问黑名单中的地址
http_access deny MYLAN DMBLOCK #禁止访问黑名单的地址域
http_access deny MYLAN MC20 #客户机的最大并发连接20
http_access deny MYLAN WORKTIME #允许客户机在工作时间上网
http_access deny all #默认策略禁止任何客户机使用代理服务
1.1.1 缓存代理概述
Squid:应用层的代理服务软件,主要提供缓存加速、应用层过滤控制的能
1.代理的工作机制:
当客户机通过代理来请求web页面时,指定的代理服务器会先检查自己的缓存,如果缓存中已经有客户机需呀的页面,则直接将缓存中的页面内容反馈给客户机;如果缓存中没有客户机要的访问页面,则由代理服务器向internet发送请求,当获得返回的web页面以后,将网页数据保存到缓存中并发送给客户机,如下图所示。
2.代理的基本类型
传统代理:也就是普通的代理服务器,首先必须在客户机的浏览器、QQ聊天工具、下载软件等程序中手动设置代理服务器的地址和端口,然后才能使用代理来访问网络。
透明代理:提供与传统代理相同的功能和服务,其区别在于客户机不需要指定代理服务器的地址和端口,而是通过默认路由,防火墙策略将web访问重定向,实际仍然交给代理服务器来处理。
1.1.2 安装及运行控制
下面以Squid 3.4.6版为例,介绍其安装和运行控制。
1.编译安装Squid
[root@www ~]# tar -zxvf squid-3.4.6.tar.gz -C /usr/src/ #将squid解压到/usr/src/
[root@www ~]# cd /usr/local/squid/ #到squid目录
[root@www squid-3.4.6]# ./configure --prefix=/usr/local/squid \ #安装目录
-sysconfdir=/etc \ #单独将配置文件修改到其他目录
--enable-arp-acl \ #可以在规则中设置直接通过客户端MAC进行管理,防止客户端使用IP欺骗
--enable-linux-netfilter \ #使用内核过滤
--enable-linux-tproxy \ #支持透明模式
--enable-async-io=100 \ #异步I/O,提升存储性能,相当于--enable-pthreads
--enable-err-language="Simplify_Chinese" \ #错误信息的提示语言
--enable-underscore \ #允许URL中有下划线
--enable-poll \ #使用Poll()模式,提升性能
--enable-gnuregex \ #使用GNU正则表达式
[root@www squid-3.4.6]# make && make install
安装完成后,创建连接文件,创建用户和组
[root@www ~]# ln -s /usr/local/squid/sbin/* /usr/local/sbin/
[root@www ~]#useradd -M -s /sbin/nologin squid
[root@www ~]#chown -R squid:squid /usr/local/squid/var/
2.Squid的配置文件
Squid服务的配置文件位于/etc/squid.conf,充分了解配置行的作用将有助于管理员根据实际情况灵活配置代理服务.更详细的配置项请参考/etc/squid.conf.documented文件
acl localnet src 10.0.0.0/8 # RFC1918 possible internal network
acl localnet src 172.16.0.0/12 # RFC1918 possible internal network
acl localnet src 192.168.0.0/16 # RFC1918 possible internal network
acl localnet src fc00::/7 # RFC 4193 local private network range
acl localnet src fe80::/10 # RFC 4291 link-local (directly plugged) machines
acl SSL_ports port 443
acl Safe_ports port 80 # http
acl Safe_ports port 21 # ftp
acl Safe_ports port 443 # https
acl Safe_ports port 70 # gopher
acl Safe_ports port 210 # wais
acl Safe_ports port 1025-65535 # unregistered ports
acl Safe_ports port 280 # http-mgmt
acl Safe_ports port 488 # gss-http
acl Safe_ports port 591 # filemaker
acl Safe_ports port 777 # multiling http
http_access deny !Safe_ports
http_access deny CONNECT !SSL_portshttp_access allow localhost managerhttp_access deny managerhttp_access allow localnethttp_access allow localhosthttp_access deny allhttp_port 3128 #用来指定代理服务监听的地址和端口(默认的端口号为3128)cache_effective_user squid #指定squid的程序用户,用来设置初始化、运行时缓存的账号cache_effective_group squid #默认为cache_effective_user指定账号的基本组coredump_dir /usr/local/squid/var/cache/squidrefresh_pattern ^ftp: 1440 20% 10080
refresh_pattern ^gopher: 1440 0% 1440
refresh_pattern -i (/cgi-bin/|\?) 0 0% 0
refresh_pattern . 0 20% 4320
3.Squid的运行控制
1)检查配置文件语法是否正确
[root@www ~]# squid -k parse
2)启动.停止Squid
第一你启动squid服务时,会自动初始化缓存目录。在没有可用的squid服务脚本的情况下,也可以直接调用squid程序来启动服务,这是需要先进性初始化。
[root@www ~]# squid -z # -z选项用来初始化缓存目录
[root@www ~]# squid # 启动squid服务
确认Squid服务处于监听状态。
[root@www ~]# netstat -uptln |grep squid
tcp 0 0 192.168.1.1:3128 0.0.0.0:* LISTEN
1.2 构建代理服务器
1.2.1 传统代理
1.Squid服务器的配置
1)修改squid.conf配置文件
[root@www ~]# vim /etc/squid.conf
http_access allow all #添加此行,在deny上面
http_access deny all
http_port 3128
cache_effective_user squid #初始化、运行时缓存的账号,否则启动不成功
cache_effective_group squid
:wq
2)在防火墙上添加加允许策略
[root@www ~]# iptables -I INPUT -p tcp --dport 3128 -j ACCEPT
[root@www ~]# /etc/init.d/iptables save
3)重载squid服务
[root@www ~]# squid reload
2.客户机的代理配置
打开网页测试
1.2.2 透明代理
1.相关网络配置
[root@www ~]# vim -O /etc/sysconfig/network-scripts/ifcfg-eth{0,1}
DEVICE=eth0 |DEVICE=eth1
HWADDR=00:0C:29:d1:00:1e |HWADDR=00:0C:29:d1:00:28
TYPE=Ethernet |TYPE=Ethernet
ONBOOT=yes |ONBOOT=yes
NM_CONTROLLED=no |NM_CONTROLLED=no
BOOTPROTO=static |BOOTPROTO=static
IPADDR=192.168.19.99 |IPADDR=192.168.1.1
NETMASK=255.255.255.0 |NETMASK=255.255.255.0
GATEWAY=192.168.19.1 |DNS1=192.168.3.5
DNS1=192.168.3.5
2.配置linux网关/Squid代理服务
1)清空已有的防火墙规则,打开IP转发
[root@www ~]# /etc/init.d/iptables stop
[root@www ~]# setenforce 0
[root@www ~]# vim /etc/sysctl.conf
net.ipv4.ip_forward = 1
:wq
[root@www ~]# sysctl -p
2)添加snat策略实现共享上网
[root@www ~]# iptables -t nat -I POSTROUTING -o eth1 -s 192.168.1.0/24 -j SNAT --to-source 192.168.19.99
3)修改squid.conf配置文件
[root@www ~]# vim /etc/squid.conf
http_port 192.168.1.1:3128 transparent
cache_effective_user squid
cache_effective_group squid
visible_hostname gateway.linuxfan.cn
:wq
检查配置文件语法是否正确
[root@www ~]# squid -k parse
初始化缓存目录
[root@www ~]# vim /etc/squid.conf
cache_dir ufs /usr/local/squid/var/cache/squid 100 16 256
[root@www ~]# squid -z
4)添加REDIRECT策略支持透明代理
[root@www ~]# iptables -t nat -I PREROUTING -i eth1 -s 192.168.1.0/24 -p tcp --dport 80 -j REDIRECT --to 3128
[root@www ~]# iptables -t nat -I PREROUTING -i eth1 -s 192.168.1.0/24 -p tcp --dport 443 -j REDIRECT --to 3128
3.验证透明代理
4.ACL访问控制
1)定义访问控制列表
[root@www ~]# vim /etc/squid.conf
acl localhost src 127.0.0.1/255.255.255.255 #源地址位127.0.0.1
acl MYLAN src 192.168.1.0/24 192.168.4.0/24 #客户机网段
acl to_localhost dst 127.0.0.0/8 #目标地址为127.0.0.0/8网段
acl MC20 maxconn 20 #最大并发连接20
acl BlackURl url_regex -i ^rtsp:// ^emule:// #以rtsp://等开头的url
acl MEDIAFILE urlpath_regex -i \.mp3$ \.mp4$ \.rmvb$ #以.mp3 .mp4 .rmvb结尾的url
acl WORKTIME time MTWHF 08:30-17:30 #时间为周一至周五8:30-17:30
:wq
2)设置访问权限
http_access deny MYLAN MEDIAFILE #禁止下载MP4,MP3等文件
http_access deny MYLAN IPBLOCK #禁止访问黑名单中的地址
http_access deny MYLAN DMBLOCK #禁止访问黑名单的地址域
http_access deny MYLAN MC20 #客户机的最大并发连接20
http_access deny MYLAN WORKTIME #允许客户机在工作时间上网
http_access deny all #默认策略禁止任何客户机使用代理服务

相关文章推荐
- 代理服务器的路由分析
- 在Windows下利用Squid开设代理服务器
- 教你如何使用node.js制作代理服务器
- Perl实现的Linux下socket代理服务器
- 简单架设SSH+Squid代理服务器的自由上网通道的方法
- PHP实例分享判断客户端是否使用代理服务器及其匿名级别
- PHP实现检测客户端是否使用代理服务器及其匿名级别
- Python实现简单的代理服务器
- nginx搭建tcp代理服务器
- Python写的Socks5协议代理服务器
- Linux下Squid代理服务器的架设与维护经验分享
- PHP实现检测客户端是否使用代理服务器及其匿名级别
- Nginx搭建反向代理服务器过程详解
- 京东618备战技术分享:保障秒杀系统高并发与高性能的11个方法
- 使用 Nginx 配置jsp服务器
- squid完全攻略(一)squid优化后详细安装步骤
- Squid代理服务器应用案例 多出口多用户认证上网
- Nginx+Keepalived高可用架构平台
- nginx文件路径处理远程命令执行漏洞(转)
- 图解正向代理、反向代理、透明代理