mysql高可用架构之mysql-mmm配置详解
2015-08-13 07:31
796 查看
实验系统:CentOS 6.6_x86_64
实验前提:防火墙和selinux都关闭
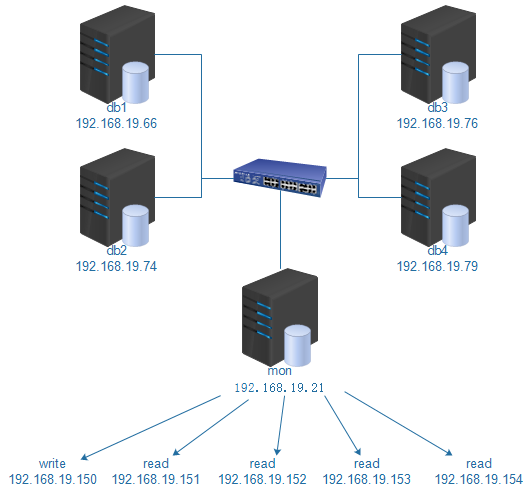
实验说明:本实验共有5台主机,IP分配如拓扑
实验软件:mariadb-10.0.20 mysql-mmm-2.2.1 mysql-mmm-monitor-2.2.1 mysql-mmm-agent-2.2.1
下载地址:http://pan.baidu.com/s/1bnnYiMr
实验拓扑:
一、准备工作
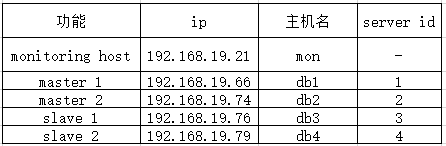
1.根据下表,将各主机名进行修改:
2.修改hosts文件,添加如下内容:
3.规划虚拟ip,列表如下:

二、安装mariadb并配置
1.在db1-4上安装:
2.编辑配置文件:
db1:
db2:
db3:
db4:
3.在db1上创建用户:
这里需要创建三个用户,如下表:

4.查看二进制日志位置:
5.不要关闭这个mysql进程连接,避免锁失效,我们另起一个ssh连接db1服务器,进行数据库备份:
6.回到刚才mysql进程,进行解锁:
7.将database-backup.sql文件复制到其他db节点:
8.db2-4主机导入sql文件,并刷新权限:
三、设置复制
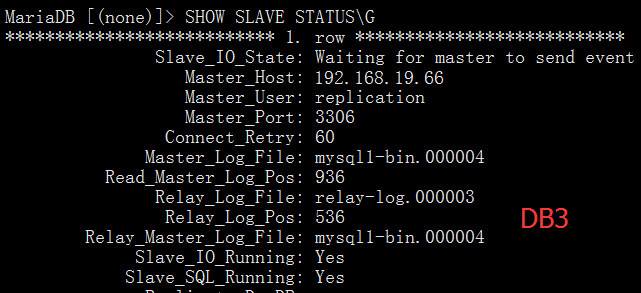
1.在db2-4上操作,将db1设置为db2-4的主:
2.查看状态:


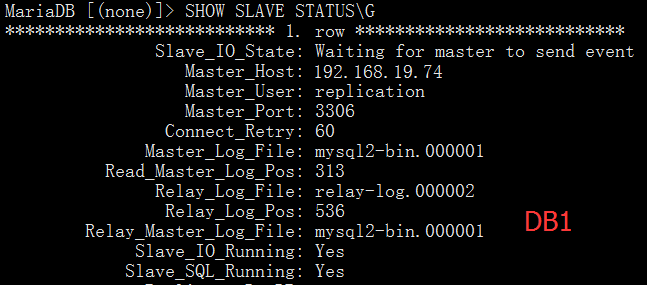
3.查看db2的master日志位置:
4.在db1上操作,将db2设置为db1的主:
四、安装MMM
1.创建用户:
2.在mon上安装:
3.在db1-4上安装:
4.编写配置文件,五台主机必须一致:
5.在db1-4上修改mmm_agent.conf,只需要修改db1这里,是哪台就改成哪台,这里只给出db1的:
6.配置mon上的mmm_mon.conf:
五、启动测试:
1.在db1-4上启动agents:
2.在mon上启动monitor:
3.检查集群状态:

如果服务器状态不是ONLINE,可以用如下命令将服务器上线,例如:
4.从刚才图片可以看到,写请求的VIP在db1上,所有从节点也都把db1当做主节点。下面将db1停掉:
可以看到写请求的VIP已经转移到db2上了,且从节点的主都指向了db2:

5.最后开启db3、db4的只读:
到此为止,所有的配置都完成了。一个writer的VIP和四个reader的VIP都已经正常分配,大家可以创建一个远程登录账号进行测试,这里就不再给出具体的过程了。由于时间紧迫,且经验有限,配置过程中可能会出现纰漏,如有发现请及时联系我,欢迎大家的指正,谢谢! 联系QQ:82800542
实验前提:防火墙和selinux都关闭
实验说明:本实验共有5台主机,IP分配如拓扑
实验软件:mariadb-10.0.20 mysql-mmm-2.2.1 mysql-mmm-monitor-2.2.1 mysql-mmm-agent-2.2.1
下载地址:http://pan.baidu.com/s/1bnnYiMr
实验拓扑:
一、准备工作
1.根据下表,将各主机名进行修改:
2.修改hosts文件,添加如下内容:
vim /etc/hosts
------------------------------------------->
192.168.19.21   mon
192.168.19.66   db1
192.168.19.74   db2
192.168.19.76   db3
192.168.19.79   db4
3.规划虚拟ip,列表如下:
二、安装mariadb并配置
1.在db1-4上安装:
tar xf mariadb-10.0.20-linux-x86_64.tar.gz  -C /usr/local/
cd /usr/local/
ln -sv mariadb-10.0.20-linux-x86_64 mysql
useradd -r mysql
mkdir -pv /mydata/data
chown -R mysql.mysql /mydata/data/
cd mysql/
chown -R root.mysql .
scripts/mysql_install_db --user=mysql --datadir=/mydata/data/
cp support-files/my-large.cnf /etc/my.cnf
cp support-files/mysql.server /etc/init.d/mysqld
chkconfig --add mysqld
chkconfig mysqld on
2.编辑配置文件:
db1:
vim /etc/my.cnf
--------------------------------------------->
[mysqld]
server-id = 1
datadir = /mydata/data
log-bin = /mydata/data/mysql1-bin
binlog_format = ROW
relay_log = /mydata/data/relay-log
auto-increment-increment = 2
auto-increment-offset = 1
sync_binlog = 1
sync_master_info = 1
sync_relay_log = 1
sync_relay_log_info = 1
max_binlog_size  = 100M
log_slave_updates   = 1
<---------------------------------------------
service mysqld start
db2:
vim /etc/my.cnf
--------------------------------------------->
[mysqld]
server-id = 2
datadir = /mydata/data
log-bin = /mydata/data/mysql2-bin
binlog_format = ROW
relay_log = /mydata/data/relay-log
auto-increment-increment = 2
auto-increment-offset = 2
sync_binlog = 1
sync_master_info = 1
sync_relay_log = 1
sync_relay_log_info = 1
max_binlog_size  = 100M
log_slave_updates   = 1
<---------------------------------------------
service mysqld start
db3:
vim /etc/my.cnf
--------------------------------------------->
[mysqld]
server-id = 3
datadir = /mydata/data
log-bin = /mydata/data/mysql3-bin
binlog_format = ROW
relay_log = /mydata/data/relay-log
sync_binlog = 1
sync_master_info = 1
sync_relay_log = 1
sync_relay_log_info = 1
max_binlog_size  = 100M
log_slave_updates   = 1
<---------------------------------------------
service mysqld start
db4:
vim /etc/my.cnf
--------------------------------------------->
[mysqld]
server-id = 4
datadir = /mydata/data
log-bin = /mydata/data/mysql4-bin
binlog_format = ROW
relay_log = /mydata/data/relay-log
sync_binlog = 1
sync_master_info = 1
sync_relay_log = 1
sync_relay_log_info = 1
max_binlog_size  = 100M
log_slave_updates   = 1
<---------------------------------------------
service mysqld start
3.在db1上创建用户:
这里需要创建三个用户,如下表:
/usr/local/mysql/bin/mysql
------------------------------------------------->
GRANT REPLICATION CLIENT ON *.* TO 'mmm_monitor'@'192.168.19.%' IDENTIFIED BY '123456';
GRANT SUPER,REPLICATION CLIENT,PROCESS ON *.* TO 'mmm_agent'@'192.168.19.%' IDENTIFIED BY '123456';
GRANT REPLICATION SLAVE ON *.* TO 'replication'@'192.168.19.%' IDENTIFIED BY '123456'
4.查看二进制日志位置:
FLUSH TABLES WITH READ LOCK;          //施加锁
SHOW MASTER STATUS;
+-------------------+----------+--------------+------------------+
| File              | Position | Binlog_Do_DB | Binlog_Ignore_DB |
+-------------------+----------+--------------+------------------+
| mysql1-bin.000004 |      936 |              |                  |
+-------------------+----------+--------------+------------------+
5.不要关闭这个mysql进程连接,避免锁失效,我们另起一个ssh连接db1服务器,进行数据库备份:
/usr/local/mysql/bin/mysqldump --all-databases > /tmp/database-backup.sql
6.回到刚才mysql进程,进行解锁:
UNLOCK TABLES;
7.将database-backup.sql文件复制到其他db节点:
scp /tmp/database-backup.sql db2:/tmp/
scp /tmp/database-backup.sql db3:/tmp/
scp /tmp/database-backup.sql db4:/tmp/
8.db2-4主机导入sql文件,并刷新权限:
/usr/local/mysql/bin/mysql < /tmp/database-backup.sql
/usr/local/mysql/bin/mysql
------------------------------------------------->
FLUSH PRIVILEGES;
三、设置复制
1.在db2-4上操作,将db1设置为db2-4的主:
CHANGE MASTER TO MASTER_HOST='192.168.19.66',MASTER_USER='replication',MASTER_PASSWORD='123456',MASTER_LOG_FILE='mysql1-bin.000004',MASTER_LOG_POS=936;
START SLAVE;
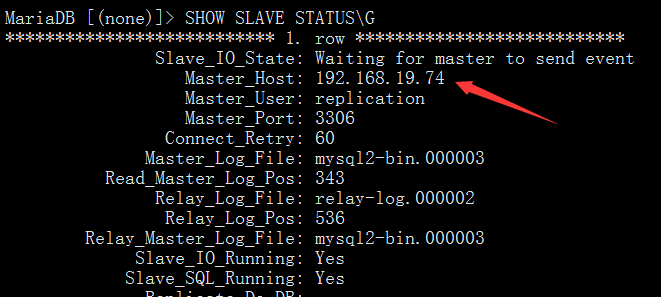
2.查看状态:
SHOW SLAVE STATUS\G
3.查看db2的master日志位置:
SHOW MASTER STATUS;
+-------------------+----------+--------------+------------------+
| File              | Position | Binlog_Do_DB | Binlog_Ignore_DB |
+-------------------+----------+--------------+------------------+
| mysql2-bin.000001 |      313 |              |                  |
+-------------------+----------+--------------+------------------+
4.在db1上操作,将db2设置为db1的主:
CHANGE MASTER TO MASTER_HOST='192.168.19.74',MASTER_USER='replication',MASTER_PASSWORD='123456',MASTER_LOG_FILE='mysql2-bin.000001',MASTER_LOG_POS=313;
START SLAVE;
SHOW SLAVE STATUS\G
四、安装MMM
1.创建用户:
useradd -s /sbin/nologin mmmd
2.在mon上安装:
yum -y install mysql-mmm-monitor
3.在db1-4上安装:
yum -y install mysql-mmm-agent
4.编写配置文件,五台主机必须一致:
vim /etc/mysql-mmm/mmm_common.conf
-------------------------------------------------------->
active_master_role      writer

<host default>
cluster_interface       eth0
pid_path                /var/run/mysql-mmm/mmm_agentd.pid
bin_path                /usr/libexec/mysql-mmm/
replication_user        replication           //用于复制的用户
replication_password    123456                //复制用户的密码
agent_user              mmm_agent             //用于改变模式的用户
agent_password          123456                //改变模式用户的密码
</host>

<host db1>
ip      192.168.19.66
mode    master
peer    db2                                   //需要监视的“同伴”
</host>

<host db2>
ip      192.168.19.74
mode    master
peer    db1
</host>

<host db3>
ip      192.168.19.76
mode    slave
</host>

<host db4>
ip      192.168.19.79
mode    slave
</host>

<role writer>
hosts   db1, db2                             //可写节点
ips     192.168.19.150                       //写操作使用的VIP
mode    exclusive                            //排他模式,此处资源同一时间只能分配给一个主机
</role>

<role reader>
hosts   db1, db2, db3, db4                  //可读节点
ips     192.168.19.151, 192.168.19.152, 192.168.19.153, 192.168.19.154    //读操作使用的VIP
mode    balanced                            //平衡模式
</role>
5.在db1-4上修改mmm_agent.conf,只需要修改db1这里,是哪台就改成哪台,这里只给出db1的:
vim /etc/mysql-mmm/mmm_agent.conf
------------------------------------------------->
include mmm_common.conf

# The 'this' variable refers to this server.  Proper operation requires
# that 'this' server (db1 by default), as well as all other servers, have the
# proper IP addresses set in mmm_common.conf.
this db1             //只改这里
6.配置mon上的mmm_mon.conf:
vim /etc/mysql-mmm/mmm_mon.conf
---------------------------------------------------->
include mmm_common.conf

<monitor>
ip                  127.0.0.1
pid_path            /var/run/mysql-mmm/mmm_mond.pid
bin_path            /usr/libexec/mysql-mmm
status_path         /var/lib/mysql-mmm/mmm_mond.status
ping_ips           192.168.19.50, 192.168.19.66, 192.168.19.74, 192.168.19.76, 192.168.19.79
//用于测试网络可用性的IP地址,其中有一个地址能ping通,就代表网络正常,不要写入本机的ip地址
auto_set_online     60    //是否设置自动上线,如果该值大于0,抖动的主机在抖动的时间范围过后,则设置自动上线

# The kill_host_bin does not exist by default, though the monitor will
# throw a warning about it missing.  See the section 5.10 "Kill Host
# Functionality" in the PDF documentation.
#
# kill_host_bin     /usr/libexec/mysql-mmm/monitor/kill_host
#
</monitor>

<host default>
monitor_user        mmm_monitor       //用于监控的用户
monitor_password    123456            //监控用户的密码
</host>

debug 0
五、启动测试:
1.在db1-4上启动agents:
chkconfig mysql-mmm-agent on
service mysql-mmm-agent start
2.在mon上启动monitor:
vim /etc/default/mysql-mmm-monitor
--------------------------------------------------->
ENABLED=1
<---------------------------------------------------
service mysql-mmm-monitor start
3.检查集群状态:
mmm_control show
如果服务器状态不是ONLINE,可以用如下命令将服务器上线,例如:
mmm_control set_online db1
4.从刚才图片可以看到,写请求的VIP在db1上,所有从节点也都把db1当做主节点。下面将db1停掉:
service mysqld stop //停掉db1的mysql服务
可以看到写请求的VIP已经转移到db2上了,且从节点的主都指向了db2:
5.最后开启db3、db4的只读:
vim /etc/my.cnf
------------------------------->
[mysqld]
read_only = 1
<-------------------------------
service mysqld restart
到此为止,所有的配置都完成了。一个writer的VIP和四个reader的VIP都已经正常分配,大家可以创建一个远程登录账号进行测试,这里就不再给出具体的过程了。由于时间紧迫,且经验有限,配置过程中可能会出现纰漏,如有发现请及时联系我,欢迎大家的指正,谢谢! 联系QQ:82800542

相关文章推荐
- hadoop学习笔记之HiveSQL DDL
- PLSQLDeveloper中文显示乱码的解决方法
- 关于MySQL的TPS和QPS
- MySQL数据库ERROR 1030 (HY000): Got error 28 from storage engine
- Oracle Instant Client(即时客户端) 安装与配置 PLSQL Developer
- SqlBulkCopy批量添加数据
- pl/sql developer 编码格式设置
- SQLiteCursor和ContentProvider的线程安全问题
- MySQL server has gone away - in exactly 60 seconds
- MySQL必知必会笔记(七)安全管理 数据库维护 改善性能
- Zabbix监控mysql Master Slave主从同步(复制)状态,附脚本
- 64位win7 pl/sql developer连接linux oracle11g服务端
- 探讨Mysql中OPTIMIZE TABLE的作用详解
- mysql:Access denied; you need (at least one of) the RELOAD privilege(s) for this operation
- 一步一步跟我学习hadoop(7)----hadoop连接mysql数据库执行数据读写数据库操作
- tpcc-mysql测试mysql5.6 (xfs文件系统)
- SQL 维护计划
- win764bit系统plsqldeveloper11连接oracle11g64bit配置方法
- Linux运维 第四阶段 (五)MySQL用户和权限管理、日志管理
- SQLMap Pangolin环境搭建