iOS之触摸事件和手势
2015-08-04 19:31
676 查看
13.1 事件概述
13.2 触摸事件
13.3 手势
事件是当用户手指触击屏幕及在屏幕上移动时,系统不断发送给应用程序的对象。
系统将事件按照特定的路径传递给可以对其进行处理的对象。
在iOS中,一个UITouch对象表示一个触摸,一个UIEvent对象表示一个事件。事件对象中包含与当前多点触摸序列相对应的所有触摸对象,还可以提供与特定视图或窗口相关联的触摸对象。
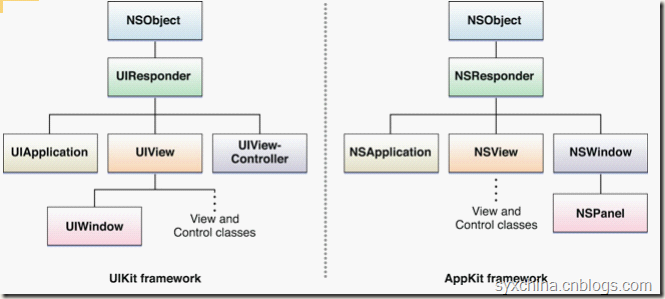
响应者对象
响应者对象是可以响应事件并对其进行处理的对象。
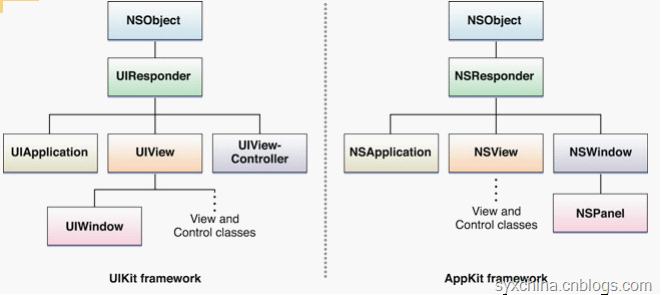
UIResponder是所有响应者对象的基类,它不仅为事件处理,而且也为常见的响应者行为定义编程接口。
UIApplication、UIView、和所有从UIView派生出来的UIKit类(包括UIWindow)都直接或间接地继承自UIResponder类。
第一响应者是应用程序中当前负责接收触摸事件的响应者对象(通常是一个UIView对象)。UIWindow对象以消息的形式将事件发送给第一响应者,使其有机会首先处理事件。如果第一响应者没有进行处理,系统就将事件(通过消息)传递给响应者链中的下一个响应者,看看它是否可以进行处理。
响应者链
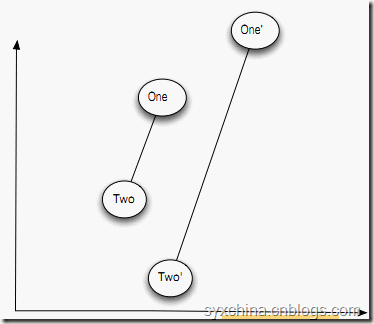
响应链是一个响应者对象的连接序列,事件或动作消息(或菜单编辑消息)依次传递。它允许响应者对象把事件处理的职责转交给其它更高层的对象。应用程序通过向上传递一个事件来查找合适的处理对象。因为点击检测视图也是一个响应者对象,应用程序在处理触摸事件时也可以利用响应链。响应链由一系列的下一个响应者组成。
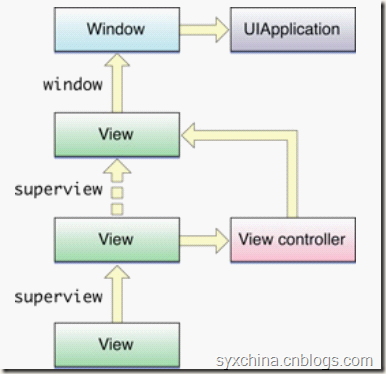
响应者链处理原则
1. 点击检测视图或者第一响应者传递事件或动作消息给它的视图控制器(如果它有的话);如果没有一个视图控制器,就传递给它的父视图。
2. 如果一个视图或者它的视图控制器不能处理这个事件或动作消息,它将传递给该视图的父视图。
3. 在这个视图层次中的每个后续的父视图遵循上述的模式,如果它不能处理这个事件或动作消息的话。
4. 最顶层的视图如果不能处理这个事件或动作消息,就传递给UIWindow对象来处理。
5. 如果UIWindow 对象不能处理,就传给单件应用程序对象UIApplication。
如果应用程序对象也不能处理这个事件或动作消息,将抛弃它。
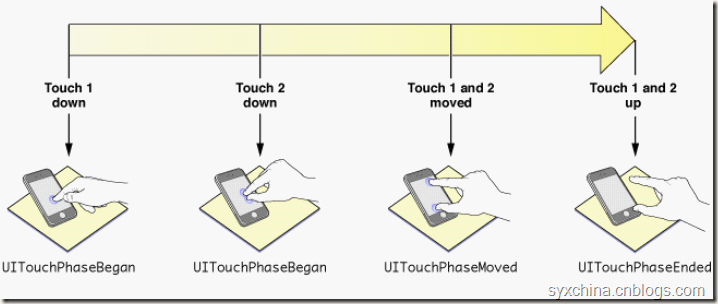
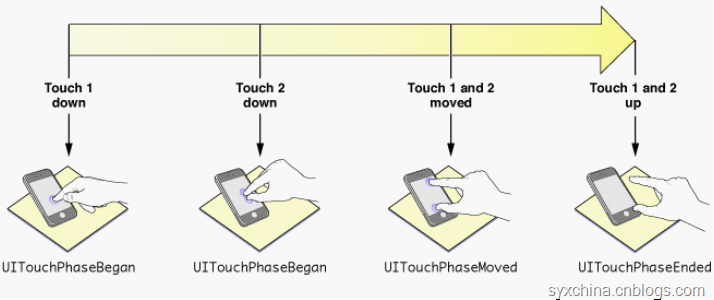
触摸信息有时间和空间两方面,时间方面的信息称为阶段(phrase),表示触摸是否刚刚开始、是否正在移动或处于静止状态,以及何时结束—也就是手指何时从屏幕抬起。触摸信息还包括当前在视图或窗口中的位置信息,以及之前的位置信息(如果有的话)。当一个手指接触屏幕时,触摸就和某个窗口或视图关联在一起,这个关联在事件的整个生命周期都会得到维护。
触摸事件的阶段
事件处理方法
在给定的触摸阶段中,如果发生新的触摸动作或已有的触摸动作发生变化,应用程序就会发送这些消息:
当一个或多个手指触碰屏幕时,发送touchesBegan:withEvent:消息。
当一个或多个手指在屏幕上移动时,发送touchesMoved:withEvent:消息。
当一个或多个手指离开屏幕时,发送touchesEnded:withEvent:消息。
当触摸序列被诸如电话呼入这样的系统事件所取消时,发送touchesCancelled:withEvent:消息。
触摸事件实例 EventInfo
touch.phase,触摸事件的阶段。
touch.tapCount,触摸事件的轻碰次数,可以判断双击事件。
UIEvent 的allTouches方法,可以获得触摸点的集合,可以判断多点触摸事件。
手势在iPhone中很重要,手势就是手触摸屏幕的方式。
单碰击
双碰击
多点触摸(合拢和展开)
轻抚
… …
单碰击和双碰击实例:MultiTap
单碰击为红色,双碰击为蓝色
[self performSelector:@selector(turnRed) withObject:nil afterDelay:0.10f]; 是在0.1秒后调用turnRed方法。
[[self class]cancelPreviousPerformRequestsWithTarget:self selector:@selector(turnRed) object:nil]; 是取消调用方法turnRed。
多点触摸(合拢和展开)PinchZoom
PinchZoomView .h文件
m文件
awakeFromNib当nib文件被加载的时候,加载器会发送一个awakeFromNib的消息到nib文件中的每个对象,每个对象都可以定义自己的 awakeFromNib方法来响应这个消息,执行一些必要的操作。也就是说通过nib文件创建view对象是执行awakeFromNib 。
robotLayer是 CALayer 对象,本例子中我们把图片对象添加到robotLayer对象中。使用 CALayer需要引入 <QuartzCore/QuartzCore.h>头文件和添加QuartzCore.framework框架。
previousDistance 是获得两个点的距离。
pow是平方函数。
sqrt是开平方根函数。
注:
1 本教程是基于关东升老师的教程
2 基于黑苹果10.6.8和xcode4.2
3 本人初学,有什么不对的望指教
4 教程会随着本人学习,持续更新
5 教程是本人从word笔记中拷贝出来了,所以格式请见谅
转载自:http://www.cnblogs.com/syxchina/archive/2012/10/14/2723541.html
13.2 触摸事件
13.3 手势
13.1 事件概述
事件是当用户手指触击屏幕及在屏幕上移动时,系统不断发送给应用程序的对象。系统将事件按照特定的路径传递给可以对其进行处理的对象。
在iOS中,一个UITouch对象表示一个触摸,一个UIEvent对象表示一个事件。事件对象中包含与当前多点触摸序列相对应的所有触摸对象,还可以提供与特定视图或窗口相关联的触摸对象。
响应者对象
响应者对象是可以响应事件并对其进行处理的对象。
UIResponder是所有响应者对象的基类,它不仅为事件处理,而且也为常见的响应者行为定义编程接口。
UIApplication、UIView、和所有从UIView派生出来的UIKit类(包括UIWindow)都直接或间接地继承自UIResponder类。
第一响应者是应用程序中当前负责接收触摸事件的响应者对象(通常是一个UIView对象)。UIWindow对象以消息的形式将事件发送给第一响应者,使其有机会首先处理事件。如果第一响应者没有进行处理,系统就将事件(通过消息)传递给响应者链中的下一个响应者,看看它是否可以进行处理。
响应者链
响应链是一个响应者对象的连接序列,事件或动作消息(或菜单编辑消息)依次传递。它允许响应者对象把事件处理的职责转交给其它更高层的对象。应用程序通过向上传递一个事件来查找合适的处理对象。因为点击检测视图也是一个响应者对象,应用程序在处理触摸事件时也可以利用响应链。响应链由一系列的下一个响应者组成。

响应者链处理原则
1. 点击检测视图或者第一响应者传递事件或动作消息给它的视图控制器(如果它有的话);如果没有一个视图控制器,就传递给它的父视图。
2. 如果一个视图或者它的视图控制器不能处理这个事件或动作消息,它将传递给该视图的父视图。
3. 在这个视图层次中的每个后续的父视图遵循上述的模式,如果它不能处理这个事件或动作消息的话。
4. 最顶层的视图如果不能处理这个事件或动作消息,就传递给UIWindow对象来处理。
5. 如果UIWindow 对象不能处理,就传给单件应用程序对象UIApplication。
如果应用程序对象也不能处理这个事件或动作消息,将抛弃它。
13.2 触摸事件
触摸信息有时间和空间两方面,时间方面的信息称为阶段(phrase),表示触摸是否刚刚开始、是否正在移动或处于静止状态,以及何时结束—也就是手指何时从屏幕抬起。触摸信息还包括当前在视图或窗口中的位置信息,以及之前的位置信息(如果有的话)。当一个手指接触屏幕时,触摸就和某个窗口或视图关联在一起,这个关联在事件的整个生命周期都会得到维护。触摸事件的阶段
事件处理方法
在给定的触摸阶段中,如果发生新的触摸动作或已有的触摸动作发生变化,应用程序就会发送这些消息:
当一个或多个手指触碰屏幕时,发送touchesBegan:withEvent:消息。
当一个或多个手指在屏幕上移动时,发送touchesMoved:withEvent:消息。
当一个或多个手指离开屏幕时,发送touchesEnded:withEvent:消息。
当触摸序列被诸如电话呼入这样的系统事件所取消时,发送touchesCancelled:withEvent:消息。
触摸事件实例 EventInfo
#import <UIKit/UIKit.h>

@interface TouchView : UIView {
}
- (void)logTouchInfo:(UITouch *)touch;
@end
@implementation TouchView
- (void)logTouchInfo:(UITouch *)touch {
CGPoint locInSelf = [touch locationInView:self];
CGPoint locInWin = [touch locationInView:nil];
NSLog(@" touch.locationInView = {%2.3f, %2.3f}", locInSelf.x, locInSelf.y);
NSLog(@" touch.locationInWin = {%2.3f, %2.3f}", locInWin.x, locInWin.y);
NSLog(@" touch.phase = %d", touch.phase);
NSLog(@" touch.tapCount = %d", touch.tapCount);
}
- (void)touchesBegan:(NSSet *)touches withEvent:(UIEvent *)event {
NSLog(@"touchesBegan - touch count = %d", [touches count]);
for(UITouch *touch in event.allTouches) {
[self logTouchInfo:touch];
}
}touch.phase,触摸事件的阶段。
touch.tapCount,触摸事件的轻碰次数,可以判断双击事件。
UIEvent 的allTouches方法,可以获得触摸点的集合,可以判断多点触摸事件。
- (void)touchesMoved:(NSSet *)touches withEvent:(UIEvent *)event {
NSLog(@"touchesMoved - touch count = %d", [touches count]);
for(UITouch *touch in event.allTouches) {
[self logTouchInfo:touch];
}
}

- (void)touchesEnded:(NSSet *)touches withEvent:(UIEvent *)event {
NSLog(@"touchesEnded - touch count = %d", [touches count]);
for(UITouch *touch in event.allTouches) {
[self logTouchInfo:touch];
}
}

- (void)touchesCancelled:(NSSet *)touches withEvent:(UIEvent *)event {
NSLog(@"touchesCancelled - touch count = %d", [touches count]);
for(UITouch *touch in event.allTouches) {
[self logTouchInfo:touch];
}
}
13.3 手势
手势在iPhone中很重要,手势就是手触摸屏幕的方式。单碰击
双碰击
多点触摸(合拢和展开)
轻抚
… …
单碰击和双碰击实例:MultiTap
单碰击为红色,双碰击为蓝色
#import <UIKit/UIKit.h>
@interface MultiTapView : UIView {
}
@end
#import "MultiTapView.h"
@implementation MultiTapView
- (void)turnBlue {
self.backgroundColor = [UIColor blueColor];
}
- (void)turnRed {
self.backgroundColor = [UIColor redColor];
}
//START:code.MultiTapView.touchesBegan:
- (void)touchesBegan:(NSSet *)touches withEvent:(UIEvent *)event {
UITouch *touch = [touches anyObject];
if(touch.tapCount == 2) {
[[self class] cancelPreviousPerformRequestsWithTarget:self
selector:@selector(turnRed)
object:nil];
}
}
//END:code.MultiTapView.touchesBegan:
//START:code.MultiTapView.touchesEnded:
- (void)touchesEnded:(NSSet *)touches withEvent:(UIEvent *)event {
UITouch *touch = [touches anyObject];
if(touch.tapCount == 1) {
[self performSelector:@selector(turnRed) withObject:nil afterDelay:0.10f];
}
if(touch.tapCount == 2) {
[self turnBlue];
}
}
//END:code.MultiTapView.touchesEnded:
@end[self performSelector:@selector(turnRed) withObject:nil afterDelay:0.10f]; 是在0.1秒后调用turnRed方法。
[[self class]cancelPreviousPerformRequestsWithTarget:self selector:@selector(turnRed) object:nil]; 是取消调用方法turnRed。
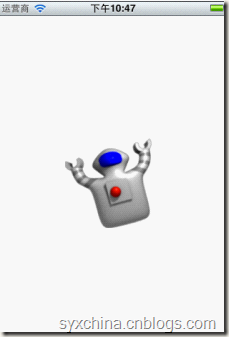
多点触摸(合拢和展开)PinchZoom

PinchZoomView .h文件
#import <UIKit/UIKit.h>
#import <QuartzCore/QuartzCore.h>

@interface PinchZoomView : UIView {
CALayer *robotLayer;
CGFloat previousDistance;
CGFloat zoomFactor;
BOOL pinchZoom;
}

@property(nonatomic, retain) CALayer *robotLayer;

@end
m文件
#import "PinchZoomView.h"

@implementation PinchZoomView

@synthesize robotLayer;

- (void)awakeFromNib {
self.robotLayer = [CALayer layer];
UIImage *image = [UIImage imageNamed:@"Robot.png"];
self.robotLayer.contents = (id)[image CGImage];
self.robotLayer.bounds = CGRectMake(0.0f, 0.0f, image.size.width, image.size.height);
self.robotLayer.position = CGPointMake(CGRectGetMidX(self.bounds), CGRectGetMidY(self.bounds));
[self.layer addSublayer:self.robotLayer];
pinchZoom = NO;
previousDistance = 0.0f;
zoomFactor = 1.0f;
}
awakeFromNib当nib文件被加载的时候,加载器会发送一个awakeFromNib的消息到nib文件中的每个对象,每个对象都可以定义自己的 awakeFromNib方法来响应这个消息,执行一些必要的操作。也就是说通过nib文件创建view对象是执行awakeFromNib 。
robotLayer是 CALayer 对象,本例子中我们把图片对象添加到robotLayer对象中。使用 CALayer需要引入 <QuartzCore/QuartzCore.h>头文件和添加QuartzCore.framework框架。
//START:code.PinchZoomView.touchesBegan
- (void)touchesBegan:(NSSet *)touches withEvent:(UIEvent *)event {
if(event.allTouches.count == 2) {
pinchZoom = YES;
NSArray *touches = [event.allTouches allObjects];
CGPoint pointOne = [[touches objectAtIndex:0] locationInView:self];
CGPoint pointTwo = [[touches objectAtIndex:1] locationInView:self];
previousDistance = sqrt(pow(pointOne.x - pointTwo.x, 2.0f) +
pow(pointOne.y - pointTwo.y, 2.0f));
} else {
pinchZoom = NO;
}
}
//END:code.PinchZoomView.touchesBegan
previousDistance 是获得两个点的距离。
pow是平方函数。
sqrt是开平方根函数。

//START:code.PinchZoomView.touchesMoved
- (void)touchesMoved:(NSSet *)touches withEvent:(UIEvent *)event {
if(YES == pinchZoom && event.allTouches.count == 2) {
NSArray *touches = [event.allTouches allObjects];
CGPoint pointOne = [[touches objectAtIndex:0] locationInView:self];
CGPoint pointTwo = [[touches objectAtIndex:1] locationInView:self];
CGFloat distance = sqrt(pow(pointOne.x - pointTwo.x, 2.0f) +
pow(pointOne.y - pointTwo.y, 2.0f));
zoomFactor += (distance - previousDistance) / previousDistance;
zoomFactor = fabs(zoomFactor);
previousDistance = distance;
self.robotLayer.transform = CATransform3DMakeScale(zoomFactor, zoomFactor, 1.0f);
}
}
//END:code.PinchZoomView.touchesMoved
//START:code.PinchZoomView.touchesEnded
- (void)touchesEnded:(NSSet *)touches withEvent:(UIEvent *)event {
if(event.allTouches.count != 2) {
pinchZoom = NO;
previousDistance = 0.0f;
}
if(event.allTouches.count == 1) {
// NSArray *touches = [event.allTouches allObjects];
// UITouch *touch = [touches objectAtIndex:0];
UITouch *touch = [touches anyObject];
NSInteger tapCount = [touch tapCount];
if (tapCount == 2) {
zoomFactor += 0.4;
self.robotLayer.transform = CATransform3DMakeScale(zoomFactor, zoomFactor, 1.0f);
} else if (tapCount == 3) {
zoomFactor += 0.6;
self.robotLayer.transform = CATransform3DMakeScale(zoomFactor, zoomFactor, 1.0f);
} else if (tapCount == 4) {
zoomFactor += 0.8;
self.robotLayer.transform = CATransform3DMakeScale(zoomFactor, zoomFactor, 1.0f);
}
}
}
//END:code.PinchZoomView.touchesEnded
- (void)dealloc {
self.robotLayer = nil;
[robotLayer release];
[super dealloc];
}注:
1 本教程是基于关东升老师的教程
2 基于黑苹果10.6.8和xcode4.2
3 本人初学,有什么不对的望指教
4 教程会随着本人学习,持续更新
5 教程是本人从word笔记中拷贝出来了,所以格式请见谅
转载自:http://www.cnblogs.com/syxchina/archive/2012/10/14/2723541.html

相关文章推荐
- iOS界面-仿网易新闻左侧抽屉式交互
- iOS Xcode6 新建OC Category文件
- 27个提升效率的iOS开源库推荐 第三方开放框架
- 【读书笔记】iOS-安全地传输用户密码的方法
- 【读书笔记】iOS-安全地传输用户密码的方法
- iOS开发系列--音频播放、录音、视频播放、拍照、视频录制
- ios修改textField的小技巧
- iOS中bundle的意义
- iOS开发里的Bundle是个啥玩意?!
- iOS开发之地图-----01定位CoreLocation
- IOS storyboard 和模拟器的尺寸大小不符,选择的是iPhone6 但 storyboard面板太大!!!
- webrtc开发中,音频实时对讲采集的问题(ios mic mute)
- iOS keyChain 研究
- iOS依赖注入框架系列(三):模块化Typhoon
- iOS依赖注入框架系列(二):设置Typhoon
- iOS依赖注入框架系列(一):介绍Typhoon
- IOS 页面跳转传值方法总结
- iOS培训-oc类中常用数据类型总结
- 在企业内部分发 iOS 应用程序(旧版)
- iOS 实现圆角图片显示