LAMP搭建 (apache2.4 FCGI+php5+mysql5.5)
2015-07-07 21:06
537 查看
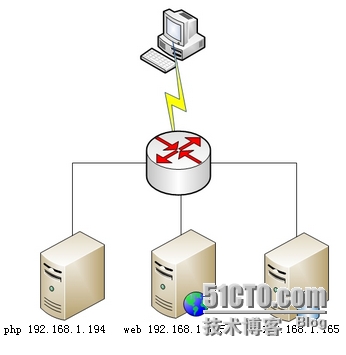
网络拓扑:
系统及软件版本:
CENTOS 6.5 apache2.4.12 php5.5.8 mysql5.5.44
一、安装APACHE
1.解决依赖 LAMP
yum install gcc gcc-c++ gcc-g77 flex bison autoconf automake bzip2-devel zlib-devel ncurses-devel libjpeg-devel libpng-devel libtiff-devel freetype-devel pam-devel openssl-devel libxml2-devel gettext-devel pcre-devel mysql-devel net-snmp-devel curl-devel perl-DBI
2.安装apr、apr-util
tar zxvf apr-util-1.5.4.tar.gz
tar zxvf apr-1.5.2.tar.gz
cd apr-1.5.2
./configure --prefix=/usr/local/apr
make && make install
cd apr-util-1.5.4
./configure --prefix=/usr/local/apr-util --with-apr=/usr/local/apr/
make && make install
3.编译安装httpd-2.4.12
4.启动验证
/usr/local/apache/bin/apachectl
5.
配置启动脚本 cd /etc/init.d/ cp httpd httpd24:复制原有脚本,如果没有就新建 vim httpd24:修改脚本 #!/bin/bash
#
# httpd Startup script for the Apache HTTP Server
#
# chkconfig: - 85 15
# description: The Apache HTTP Server is an efficient and extensible \
# server implementing the current HTTP standards.
# processname: httpd
# config: /etc/httpd/conf/httpd.conf
# config: /etc/sysconfig/httpd
# pidfile: /var/run/httpd/httpd.pid
#
### BEGIN INIT INFO
# Provides: httpd
# Required-Start: $local_fs $remote_fs $network $named
# Required-Stop: $local_fs $remote_fs $network
# Should-Start: distcache
# Short-Description: start and stop Apache HTTP Server
# Description: The Apache HTTP Server is an extensible server
# implementing the current HTTP standards.
### END INIT INFO
# Source function library.
. /etc/rc.d/init.d/functions
if [ -f /etc/sysconfig/httpd ]; then
. /etc/sysconfig/httpd
fi
# Start httpd in the C locale by default.
HTTPD_LANG=${HTTPD_LANG-"C"}
# This will prevent initlog from swallowing up a pass-phrase prompt if
# mod_ssl needs a pass-phrase from the user.
INITLOG_ARGS=""
# Set HTTPD=/usr/sbin/httpd.worker in /etc/sysconfig/httpd to use a server
# with the thread-based "worker" MPM; BE WARNED that some modules may not
# work correctly with a thread-based MPM; notably PHP will refuse to start.
# Path to the apachectl script, server binary, and short-form for messages.
apachectl=/usr/local/apache/bin/apachectl
httpd=${HTTPD-/usr/local/apache/bin/httpd}
prog=httpd
pidfile=${PIDFILE-/var/run/httpd.pid}
lockfile=${LOCKFILE-/var/lock/subsys/httpd}
RETVAL=0
STOP_TIMEOUT=${STOP_TIMEOUT-10}
# The semantics of these two functions differ from the way apachectl does
# things -- attempting to start while running is a failure, and shutdown
# when not running is also a failure. So we just do it the way init scripts
# are expected to behave here.
start() {
echo -n $"Starting $prog: "
LANG=$HTTPD_LANG daemon --pidfile=${pidfile} $httpd $OPTIONS
RETVAL=$?
echo
[ $RETVAL = 0 ] && touch ${lockfile}
return $RETVAL
}
# When stopping httpd, a delay (of default 10 second) is required
# before SIGKILLing the httpd parent; this gives enough time for the
# httpd parent to SIGKILL any errant children.
stop() {
echo -n $"Stopping $prog: "
killproc -p ${pidfile} -d ${STOP_TIMEOUT} $httpd
RETVAL=$?
echo
[ $RETVAL = 0 ] && rm -f ${lockfile} ${pidfile}
}
reload() {
echo -n $"Reloading $prog: "
if ! LANG=$HTTPD_LANG $httpd $OPTIONS -t >&/dev/null; then
RETVAL=6
echo $"not reloading due to configuration syntax error"
failure $"not reloading $httpd due to configuration syntax error"
else
# Force LSB behaviour from killproc
LSB=1 killproc -p ${pidfile} $httpd -HUP
RETVAL=$?
if [ $RETVAL -eq 7 ]; then
failure $"httpd shutdown"
fi
fi
echo
}
# See how we were called.
case "$1" in
start)
start
;;
stop)
stop
;;
status)
status -p ${pidfile} $httpd
RETVAL=$?
;;
restart)
stop
start
;;
condrestart|try-restart)
if status -p ${pidfile} $httpd >&/dev/null; then
stop
start
fi
;;
force-reload|reload)
reload
;;
graceful|help|configtest|fullstatus)
$apachectl $@
RETVAL=$?
;;
*)
echo $"Usage: $prog {start|stop|restart|condrestart|try-restart|force-reload|reload|status|fullstatus|graceful|help|configtest}"
RETVAL=2
esac
exit $RETVAL
chkconfig --add httpd24 设置启动项
yum update //更新yum源
./configure --prefix=/usr/local/php --with-openssl --enable-mbstring --with-freetype-dir --with-jpeg-dir --with-png-dir --with-zlib --with-libxml-dir=/usr --enable-xml --enable-sockets --with-mcrypt --with-config-file-path=/etc --with-config-file-scan-dir=/etc/php.d --with-bz2 --enable-maintainer-zts --with-mysql=mysqlnd --with-pdo-mysql=mysqlnd --with-mysqli=mysqlnd --enable-fpm
make && make install
[root@station79 php-5.4.26]# cp php.ini-production /etc/php.ini
[root@station79 php-5.4.26]# cp sapi/fpm/init.d.php-fpm /etc/init.d/php-fpm
[root@station79 php-5.4.26]# chmod +x /etc/init.d/php-fpm
[root@station79 php-5.4.26]# chkconfig --add php-fpm
[root@station79 php-5.4.26]# chkconfig php-fpm on
[root@station79 php-5.4.26]# cp /usr/local/php/etc/php-fpm.conf.default /usr/local/php/etc/php-fpm.conf
编辑php-fpm的配置文件:
# vim /usr/local/php/etc/php-fpm.conf
配置fpm的相关选项为你所需要的值,并启用pid文件(如下最后一行):
pm.max_children = 50
pm.start_servers = 5
pm.min_spare_servers = 2
pm.max_spare_servers = 8
pid = /usr/local/php/var/run/php-fpm.pid
说明:pid这里原本是一个相对路径,而且和我们编译安装的位置不一样,所以需要修改,但是,若你在编译php的时候,若没有指定pid文件的存放路径,那你怎么知道pid文件在哪呢?
方法:grep pid /etc/init.d/php-fpm
php_fpm_PID=${prefix}/var/run/php-fpm.pid
其他无效信息已省略...
${prefix}指的是php编译安装的路径,即为/usr/local/php
启动php-fpm
[root@station79 php-5.4.26]# service php-fpm start
Starting php-fpm done
使用如下命令来验正(如果此命令输出有中几个php-fpm进程就说明启动成功了):
[root@station79 php-5.4.26]# ps aux|grep "php-fpm"|grep -v "grep"
root 4278 0.0 0.4 69468 4604 ? Ss 17:13 0:00 php-fpm: master process (/usr/local/php/etc/php-fpm.conf)
nobody 4279 0.0 0.3 69468 3932 ? S 17:13 0:00 php-fpm: pool www
nobody 4280 0.0 0.3 69468 3936 ? S 17:13 0:00 php-fpm: pool www
nobody 4281 0.0 0.3 69468 3936 ? S 17:13 0:00 php-fpm: pool www
nobody 4282 0.0 0.3 69468 3936 ? S 17:13 0:00 php-fpm: pool www
nobody 4283 0.0 0.3 69468 3936 ? S 17:13 0:00 php-fpm: pool www
默认情况下,fpm监听在127.0.0.1的9000端口,也可以使用如下命令验正其是否已经监听在相应的套接字
[root@station79 php-5.4.26]# ss -tnl|grep ":9000"
LISTEN 0 128 127.0.0.1:9000 *:*
######################Starting##############################
Apache 77
创建站点目录及测试页
# mkdir -p /web/{a.com,b.org}/htdocs
[root@station123 ~]# cd /etc/httpd/extra/
[root@station123 extra]# vim httpd-vhosts.conf
[root@station123 extra]# service httpd graceful
[root@station123 extra]# ss -tnl|grep ":80" |grep -v "grep"
LISTEN 0 128 :::80 :::*
[root@station123 extra]# /etc/init.d/httpd -M #查看已被编译安装的模块
主配置文件相关的操作:
[root@station123 httpd]# vim httpd.conf
# 在httpd主配置文件中将中心主机用"#"注释掉,操作如下行:
#DocumentRoot "/usr/local/apache/htdocs"
# 在默认首页位置添加index.php,这样,服务器被访问的时候,就会先找到index.php,若该文件存在,就停止查找;若该文件不存在,就会继续向右查找,以此类推
<IfModule dir_module>
DirectoryIndex index.php index.html
</IfModule>
# 因为在后面我要在/etc/httpd/extra/httpd-vhosts.conf中,即在扩展配置文件中定义虚拟主机,所以
需要开启Virtual hosts的功能,操作如下2行:
# Virtual hosts 此行是注释不用理会
Include /etc/httpd/extra/httpd-vhosts.conf #此行默认是被注释掉的,要启用它,需将行首的#去掉
添加如下两行:
AddType application/x-httpd-php .php
AddType application/x-httpd-php-source .phps
作用:
#若proxy_module和proxy_fcgi_module模块已成功编译进httpd,那么在主配置文件中就会有下面这样两行,
#不过,这两行默认都未被启用,若想启用,将这两行行首的注释去掉
LoadModule proxy_module modules/mod_proxy.so
LoadModule proxy_fcgi_module modules/mod_proxy_fcgi.so
扩展配置文件相关的操作:
[root@station123 httpd]# cd extra
[root@station123 extra]# vim httpd-vhosts.conf
<VirtualHost *:80>
ServerAdmin webadmin@a.com
DocumentRoot "/web/a.com/htdocs"
ServerName www.a.com
ServerAlias a.com
ErrorLog "logs/a.com-error_log"
CustomLog "logs/a.com-access_log" combined
<Directory "/web/a.com/htdocs">
Options None
Require all granted
</Directory>
ProxyRequests Off
ProxyPassMatch ^/(.*\.php)$ fcgi://172.16.251.79:9000/web/a.com/htdocs/$1
</VirtualHost>
<VirtualHost *:80>
ServerAdmin webadmin@b.org
DocumentRoot "/web/b.org/htdocs"
ServerName www.b.org
ServerAlias b.org
ErrorLog "logs/b.org-error_log"
CustomLog "logs/b.org-access_log" combined
<Directory "/web/b.org/htdocs">
Options None
Require all granted
</Directory>
ProxyRequests Off
ProxyPassMatch ^/(.*\.php)$ fcgi://172.16.251.79:9000/web/b.org/htdocs/$1
</VirtualHost>
向Apache端/etc/hosts文件中添加域名解析
172.16.251.77 www.a.com a.com www.b.org b.org
因为我们待会要通过宿主机的浏览器,使用域名来访问我们的站点,所以我们也需要修改宿主机的hosts文件,以便支持域名解析功能,(若有DNS就更好了)
路径:C:\Windows\System32\drivers\etc
添加如下行
172.16.251.77 www.a.com www.b.org www.c.com www.d.org
有时候,宿主机上的防火墙可能会阻止我们修改此文件,暂时关闭宿主机上的防火墙即可
78 MySQL端,此时不用进行其他的配置
79 PHP端,配置如下:
[root@station79 ~]# vim /usr/local/php/etc/php-fpm.conf
# 修改监听的地址为PHP所在服务器IP,端口不变,默认是监听127.0.0.1:9000
listen = 172.16.251.79:9000
启动php-fpm服务
[root@station79 php-5.4.26]# service php-fpm restart
Gracefully shutting down php-fpm warning, no pid file found - php-fpm is not running ?
Starting php-fpm done
查看监听的地址是否为本机IP(172.16.251.79),且端口为9000
[root@station79 php-5.4.26]# ss -tnl|grep ":9000"
LISTEN 0 128 172.16.251.79:9000
创建站点目录
[root@station79 php-5.4.26]# mkdir -p /web/{a.com,b.org}/htdocs
[root@station79 php-5.4.26]# cd
[root@station79 ~]# vim /web/a.com/htdocs/index.php
Wecome to www.a.com
<?php
phpinfo();
?>
[root@station79 ~]# vim /web/b.org/htdocs/index.php
Wecome to www.b.org
<?php
phpinfo();
?>
添加完测试页后,其实不需要重启php-fpm服务的
查看php-fpm脚本都支持哪些选项
[root@station79 htdocs]# service php-fpm
Usage: /etc/init.d/php-fpm {start|stop|force-quit|restart|reload|status}
启动php-fpm服务
[root@station79 php-5.4.26]# service php-fpm reload
至此,所有配置工作已完成
现在,我们可通过宿主机的浏览器来访问刚刚我们新建的站点了
www.a.com/ 或 a.com
www.b.org 或 b.org
都可访问相应的站点
结果我已保存成网页,可供大家查看 到目前为止,位于不同主机上的LAMP架构已搭建完毕,不过由于时间有限,我只能先介绍到这里,稍后,我会在此文的基础上继续为大家演示如何使用php加速插件,提高访问速度,以及LAMP架构的优化,使我们的站点逐渐健壮起来。 歉意:此文,尚未仔细排版,有些粗糙,还请各位博友多多包涵,稍后我会对此文重新排版发布的....
下面我将为php程序安装一个加速插件,并使之生效[root@station79 ~]# cd tools/
[root@station79 tools]# tar xf xcache-3.0.3.tar.bz2
[root@station79 tools]# cd xcache-3.0.3[root@station79 xcache-3.0.3]# /usr/local/php/bin/phpize[root@station79 xcache-3.0.3]# ./configure --enable-xcache --with-php-config=/usr/local/php/bin/php-config[root@station79 xcache-3.0.3]# make && make install安装结束时,会出现类似如下行:
Installing shared extensions: /usr/local/php/lib/php/extensions/no-debug-zts-20100525/
编辑php.ini,整合php和xcache:
首先将xcache提供的样例配置导入php.ini
# mkdir /etc/php.d
# cp xcache.ini /etc/php.d
说明:xcache.ini文件在xcache的源码目录中。
接下来编辑/etc/php.d/xcache.ini早期的xcache版本,找到zend_extension开头的行,修改为如下行:
zend_extension = /usr/local/php/lib/php/extensions/no-debug-zts-20100525/xcache.so
xcache 3.0.3版本,操作如下:[xcache-common]
;; non-Windows example:
extension = /usr/local/php/lib/php/extensions/no-debug-zts-20100525/xcache.so
;; Windows example:
; extension = php_xcache.dll注意:如果php.ini文件中有多条zend_extension(早期版本)或extension(新版本)指令行,要确保此新增的行排在第一位。保存退出,并重启service php-fpm restart访问测试已okMYSQL安装略
主要参考这两篇博文:
http://1757513075.blog.51cto.com/8607255/1383569 http://tanxw.blog.51cto.com/4309543/1386381 写的仓促,不懂看配置文件附件的
系统及软件版本:
CENTOS 6.5 apache2.4.12 php5.5.8 mysql5.5.44
一、安装APACHE
1.解决依赖 LAMP
yum install gcc gcc-c++ gcc-g77 flex bison autoconf automake bzip2-devel zlib-devel ncurses-devel libjpeg-devel libpng-devel libtiff-devel freetype-devel pam-devel openssl-devel libxml2-devel gettext-devel pcre-devel mysql-devel net-snmp-devel curl-devel perl-DBI
2.安装apr、apr-util
tar zxvf apr-util-1.5.4.tar.gz
tar zxvf apr-1.5.2.tar.gz
cd apr-1.5.2
./configure --prefix=/usr/local/apr
make && make install
cd apr-util-1.5.4
./configure --prefix=/usr/local/apr-util --with-apr=/usr/local/apr/
make && make install
3.编译安装httpd-2.4.12
./configure --prefix=/usr/local/apache --sysconfdir=/etc/httpd24 --enable-so --enable-ssl --enable-cgi --enable-rewrite --with-zlib --with-pcre --with-apr=/usr/local/apr/ --with-apr-util=/usr/local/apr-util/ --enable-mpms-shared=all --with-mpm=event --enable-modules=mostmake && make install
4.启动验证
/usr/local/apache/bin/apachectl
5.
配置启动脚本 cd /etc/init.d/ cp httpd httpd24:复制原有脚本,如果没有就新建 vim httpd24:修改脚本 #!/bin/bash
#
# httpd Startup script for the Apache HTTP Server
#
# chkconfig: - 85 15
# description: The Apache HTTP Server is an efficient and extensible \
# server implementing the current HTTP standards.
# processname: httpd
# config: /etc/httpd/conf/httpd.conf
# config: /etc/sysconfig/httpd
# pidfile: /var/run/httpd/httpd.pid
#
### BEGIN INIT INFO
# Provides: httpd
# Required-Start: $local_fs $remote_fs $network $named
# Required-Stop: $local_fs $remote_fs $network
# Should-Start: distcache
# Short-Description: start and stop Apache HTTP Server
# Description: The Apache HTTP Server is an extensible server
# implementing the current HTTP standards.
### END INIT INFO
# Source function library.
. /etc/rc.d/init.d/functions
if [ -f /etc/sysconfig/httpd ]; then
. /etc/sysconfig/httpd
fi
# Start httpd in the C locale by default.
HTTPD_LANG=${HTTPD_LANG-"C"}
# This will prevent initlog from swallowing up a pass-phrase prompt if
# mod_ssl needs a pass-phrase from the user.
INITLOG_ARGS=""
# Set HTTPD=/usr/sbin/httpd.worker in /etc/sysconfig/httpd to use a server
# with the thread-based "worker" MPM; BE WARNED that some modules may not
# work correctly with a thread-based MPM; notably PHP will refuse to start.
# Path to the apachectl script, server binary, and short-form for messages.
apachectl=/usr/local/apache/bin/apachectl
httpd=${HTTPD-/usr/local/apache/bin/httpd}
prog=httpd
pidfile=${PIDFILE-/var/run/httpd.pid}
lockfile=${LOCKFILE-/var/lock/subsys/httpd}
RETVAL=0
STOP_TIMEOUT=${STOP_TIMEOUT-10}
# The semantics of these two functions differ from the way apachectl does
# things -- attempting to start while running is a failure, and shutdown
# when not running is also a failure. So we just do it the way init scripts
# are expected to behave here.
start() {
echo -n $"Starting $prog: "
LANG=$HTTPD_LANG daemon --pidfile=${pidfile} $httpd $OPTIONS
RETVAL=$?
echo
[ $RETVAL = 0 ] && touch ${lockfile}
return $RETVAL
}
# When stopping httpd, a delay (of default 10 second) is required
# before SIGKILLing the httpd parent; this gives enough time for the
# httpd parent to SIGKILL any errant children.
stop() {
echo -n $"Stopping $prog: "
killproc -p ${pidfile} -d ${STOP_TIMEOUT} $httpd
RETVAL=$?
echo
[ $RETVAL = 0 ] && rm -f ${lockfile} ${pidfile}
}
reload() {
echo -n $"Reloading $prog: "
if ! LANG=$HTTPD_LANG $httpd $OPTIONS -t >&/dev/null; then
RETVAL=6
echo $"not reloading due to configuration syntax error"
failure $"not reloading $httpd due to configuration syntax error"
else
# Force LSB behaviour from killproc
LSB=1 killproc -p ${pidfile} $httpd -HUP
RETVAL=$?
if [ $RETVAL -eq 7 ]; then
failure $"httpd shutdown"
fi
fi
echo
}
# See how we were called.
case "$1" in
start)
start
;;
stop)
stop
;;
status)
status -p ${pidfile} $httpd
RETVAL=$?
;;
restart)
stop
start
;;
condrestart|try-restart)
if status -p ${pidfile} $httpd >&/dev/null; then
stop
start
fi
;;
force-reload|reload)
reload
;;
graceful|help|configtest|fullstatus)
$apachectl $@
RETVAL=$?
;;
*)
echo $"Usage: $prog {start|stop|restart|condrestart|try-restart|force-reload|reload|status|fullstatus|graceful|help|configtest}"
RETVAL=2
esac
exit $RETVAL
chkconfig --add httpd24 设置启动项
http://tanxw.blog.51cto.com/4309543/1386381
编译PHP如果遇到如下错误:
configure: error: mcrypt.h not found. Please reinstall libmcrypt.则:
yum install epel-release //扩展包更新包yum update //更新yum源
./configure --prefix=/usr/local/php --with-openssl --enable-mbstring --with-freetype-dir --with-jpeg-dir --with-png-dir --with-zlib --with-libxml-dir=/usr --enable-xml --enable-sockets --with-mcrypt --with-config-file-path=/etc --with-config-file-scan-dir=/etc/php.d --with-bz2 --enable-maintainer-zts --with-mysql=mysqlnd --with-pdo-mysql=mysqlnd --with-mysqli=mysqlnd --enable-fpm
make && make install
[root@station79 php-5.4.26]# cp php.ini-production /etc/php.ini
[root@station79 php-5.4.26]# cp sapi/fpm/init.d.php-fpm /etc/init.d/php-fpm
[root@station79 php-5.4.26]# chmod +x /etc/init.d/php-fpm
[root@station79 php-5.4.26]# chkconfig --add php-fpm
[root@station79 php-5.4.26]# chkconfig php-fpm on
[root@station79 php-5.4.26]# cp /usr/local/php/etc/php-fpm.conf.default /usr/local/php/etc/php-fpm.conf
编辑php-fpm的配置文件:
# vim /usr/local/php/etc/php-fpm.conf
配置fpm的相关选项为你所需要的值,并启用pid文件(如下最后一行):
pm.max_children = 50
pm.start_servers = 5
pm.min_spare_servers = 2
pm.max_spare_servers = 8
pid = /usr/local/php/var/run/php-fpm.pid
说明:pid这里原本是一个相对路径,而且和我们编译安装的位置不一样,所以需要修改,但是,若你在编译php的时候,若没有指定pid文件的存放路径,那你怎么知道pid文件在哪呢?
方法:grep pid /etc/init.d/php-fpm
php_fpm_PID=${prefix}/var/run/php-fpm.pid
其他无效信息已省略...
${prefix}指的是php编译安装的路径,即为/usr/local/php
启动php-fpm
[root@station79 php-5.4.26]# service php-fpm start
Starting php-fpm done
使用如下命令来验正(如果此命令输出有中几个php-fpm进程就说明启动成功了):
[root@station79 php-5.4.26]# ps aux|grep "php-fpm"|grep -v "grep"
root 4278 0.0 0.4 69468 4604 ? Ss 17:13 0:00 php-fpm: master process (/usr/local/php/etc/php-fpm.conf)
nobody 4279 0.0 0.3 69468 3932 ? S 17:13 0:00 php-fpm: pool www
nobody 4280 0.0 0.3 69468 3936 ? S 17:13 0:00 php-fpm: pool www
nobody 4281 0.0 0.3 69468 3936 ? S 17:13 0:00 php-fpm: pool www
nobody 4282 0.0 0.3 69468 3936 ? S 17:13 0:00 php-fpm: pool www
nobody 4283 0.0 0.3 69468 3936 ? S 17:13 0:00 php-fpm: pool www
默认情况下,fpm监听在127.0.0.1的9000端口,也可以使用如下命令验正其是否已经监听在相应的套接字
[root@station79 php-5.4.26]# ss -tnl|grep ":9000"
LISTEN 0 128 127.0.0.1:9000 *:*
######################Starting##############################
Apache 77
创建站点目录及测试页
# mkdir -p /web/{a.com,b.org}/htdocs
[root@station123 ~]# cd /etc/httpd/extra/
[root@station123 extra]# vim httpd-vhosts.conf
[root@station123 extra]# service httpd graceful
[root@station123 extra]# ss -tnl|grep ":80" |grep -v "grep"
LISTEN 0 128 :::80 :::*
[root@station123 extra]# /etc/init.d/httpd -M #查看已被编译安装的模块
主配置文件相关的操作:
[root@station123 httpd]# vim httpd.conf
# 在httpd主配置文件中将中心主机用"#"注释掉,操作如下行:
#DocumentRoot "/usr/local/apache/htdocs"
# 在默认首页位置添加index.php,这样,服务器被访问的时候,就会先找到index.php,若该文件存在,就停止查找;若该文件不存在,就会继续向右查找,以此类推
<IfModule dir_module>
DirectoryIndex index.php index.html
</IfModule>
# 因为在后面我要在/etc/httpd/extra/httpd-vhosts.conf中,即在扩展配置文件中定义虚拟主机,所以
需要开启Virtual hosts的功能,操作如下2行:
# Virtual hosts 此行是注释不用理会
Include /etc/httpd/extra/httpd-vhosts.conf #此行默认是被注释掉的,要启用它,需将行首的#去掉
添加如下两行:
AddType application/x-httpd-php .php
AddType application/x-httpd-php-source .phps
作用:
#若proxy_module和proxy_fcgi_module模块已成功编译进httpd,那么在主配置文件中就会有下面这样两行,
#不过,这两行默认都未被启用,若想启用,将这两行行首的注释去掉
LoadModule proxy_module modules/mod_proxy.so
LoadModule proxy_fcgi_module modules/mod_proxy_fcgi.so
扩展配置文件相关的操作:
[root@station123 httpd]# cd extra
[root@station123 extra]# vim httpd-vhosts.conf
<VirtualHost *:80>
ServerAdmin webadmin@a.com
DocumentRoot "/web/a.com/htdocs"
ServerName www.a.com
ServerAlias a.com
ErrorLog "logs/a.com-error_log"
CustomLog "logs/a.com-access_log" combined
<Directory "/web/a.com/htdocs">
Options None
Require all granted
</Directory>
ProxyRequests Off
ProxyPassMatch ^/(.*\.php)$ fcgi://172.16.251.79:9000/web/a.com/htdocs/$1
</VirtualHost>
<VirtualHost *:80>
ServerAdmin webadmin@b.org
DocumentRoot "/web/b.org/htdocs"
ServerName www.b.org
ServerAlias b.org
ErrorLog "logs/b.org-error_log"
CustomLog "logs/b.org-access_log" combined
<Directory "/web/b.org/htdocs">
Options None
Require all granted
</Directory>
ProxyRequests Off
ProxyPassMatch ^/(.*\.php)$ fcgi://172.16.251.79:9000/web/b.org/htdocs/$1
</VirtualHost>
向Apache端/etc/hosts文件中添加域名解析
172.16.251.77 www.a.com a.com www.b.org b.org
因为我们待会要通过宿主机的浏览器,使用域名来访问我们的站点,所以我们也需要修改宿主机的hosts文件,以便支持域名解析功能,(若有DNS就更好了)
路径:C:\Windows\System32\drivers\etc
添加如下行
172.16.251.77 www.a.com www.b.org www.c.com www.d.org
有时候,宿主机上的防火墙可能会阻止我们修改此文件,暂时关闭宿主机上的防火墙即可
78 MySQL端,此时不用进行其他的配置
79 PHP端,配置如下:
[root@station79 ~]# vim /usr/local/php/etc/php-fpm.conf
# 修改监听的地址为PHP所在服务器IP,端口不变,默认是监听127.0.0.1:9000
listen = 172.16.251.79:9000
启动php-fpm服务
[root@station79 php-5.4.26]# service php-fpm restart
Gracefully shutting down php-fpm warning, no pid file found - php-fpm is not running ?
Starting php-fpm done
查看监听的地址是否为本机IP(172.16.251.79),且端口为9000
[root@station79 php-5.4.26]# ss -tnl|grep ":9000"
LISTEN 0 128 172.16.251.79:9000
创建站点目录
[root@station79 php-5.4.26]# mkdir -p /web/{a.com,b.org}/htdocs
[root@station79 php-5.4.26]# cd
[root@station79 ~]# vim /web/a.com/htdocs/index.php
Wecome to www.a.com
<?php
phpinfo();
?>
[root@station79 ~]# vim /web/b.org/htdocs/index.php
Wecome to www.b.org
<?php
phpinfo();
?>
添加完测试页后,其实不需要重启php-fpm服务的
查看php-fpm脚本都支持哪些选项
[root@station79 htdocs]# service php-fpm
Usage: /etc/init.d/php-fpm {start|stop|force-quit|restart|reload|status}
启动php-fpm服务
[root@station79 php-5.4.26]# service php-fpm reload
至此,所有配置工作已完成
现在,我们可通过宿主机的浏览器来访问刚刚我们新建的站点了
www.a.com/ 或 a.com
www.b.org 或 b.org
都可访问相应的站点
结果我已保存成网页,可供大家查看 到目前为止,位于不同主机上的LAMP架构已搭建完毕,不过由于时间有限,我只能先介绍到这里,稍后,我会在此文的基础上继续为大家演示如何使用php加速插件,提高访问速度,以及LAMP架构的优化,使我们的站点逐渐健壮起来。 歉意:此文,尚未仔细排版,有些粗糙,还请各位博友多多包涵,稍后我会对此文重新排版发布的....
下面我将为php程序安装一个加速插件,并使之生效[root@station79 ~]# cd tools/
[root@station79 tools]# tar xf xcache-3.0.3.tar.bz2
[root@station79 tools]# cd xcache-3.0.3[root@station79 xcache-3.0.3]# /usr/local/php/bin/phpize[root@station79 xcache-3.0.3]# ./configure --enable-xcache --with-php-config=/usr/local/php/bin/php-config[root@station79 xcache-3.0.3]# make && make install安装结束时,会出现类似如下行:
Installing shared extensions: /usr/local/php/lib/php/extensions/no-debug-zts-20100525/
编辑php.ini,整合php和xcache:
首先将xcache提供的样例配置导入php.ini
# mkdir /etc/php.d
# cp xcache.ini /etc/php.d
说明:xcache.ini文件在xcache的源码目录中。
接下来编辑/etc/php.d/xcache.ini早期的xcache版本,找到zend_extension开头的行,修改为如下行:
zend_extension = /usr/local/php/lib/php/extensions/no-debug-zts-20100525/xcache.so
xcache 3.0.3版本,操作如下:[xcache-common]
;; non-Windows example:
extension = /usr/local/php/lib/php/extensions/no-debug-zts-20100525/xcache.so
;; Windows example:
; extension = php_xcache.dll注意:如果php.ini文件中有多条zend_extension(早期版本)或extension(新版本)指令行,要确保此新增的行排在第一位。保存退出,并重启service php-fpm restart访问测试已okMYSQL安装略
主要参考这两篇博文:
http://1757513075.blog.51cto.com/8607255/1383569 http://tanxw.blog.51cto.com/4309543/1386381 写的仓促,不懂看配置文件附件的

相关文章推荐
- org.apache.jasper.JasperException: Unable to compile class for JSP
- [SoapUI] SoapUI+Groovy中"org.apache.xmlbeans.XmlException: error:
- MAC下Apache配置
- 把ssl模块加入到已经编译好的apache中
- Cloudera的CDH和Apache的Hadoop的区别
- Apache Kafka:下一代分布式消息系统
- Apache Thrift 在 Ubuntu 的简单使用
- Apache2.4.x与Apache2.2.x的一些区别
- apache2设置core dump文件(debian7)
- 内存数据库之ApacheDerby
- java.lang.NoClassDefFoundError: org/apache/log4j/Level
- Centos7下Apache详细安装配置及证书申请SSL配置介绍
- Java执行外部程序(Apache Commons Exec)
- CentOS Apache编译安装及APR not found错误排除
- Apache Shiro
- 解决Django-1.8.2应用部署到Apache后无法显示admin应用的CSS
- APACHE如何里一个站点绑定多个域名?用ServerAlias
- 配置apache 支持 php
- 大约apache 2.4.X虚拟主机配置问题的版本号后,
- linux 源码安装apache2.4并添加服务