斯坦福大学iOS应用开发教程学习笔记
2015-07-06 10:37
781 查看
第一课 MVC.and.Introduction.to.Objective-C
1、iOS的概述 -什么是iOS
2、MVC - 面向对象的概念
3、Objective-C-介绍下语言的概念
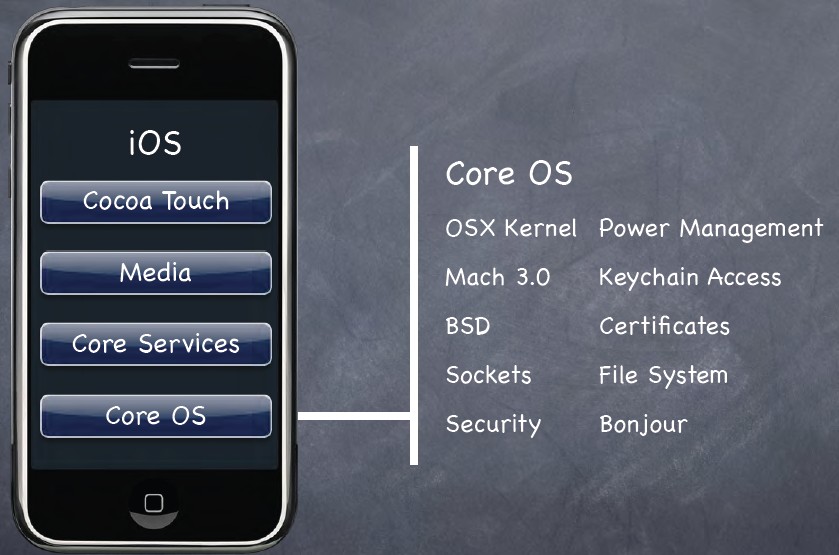
1、内核
内核是mach 4.x BSD UNIX内核 mac OS 10操作系统,是个多任务的UNIX内核。在这层上提供了网络,socket,安全机制,文件系统,大部分这些api是c api,因为这写都是UNIX代码。我们不会在这层上写代码。
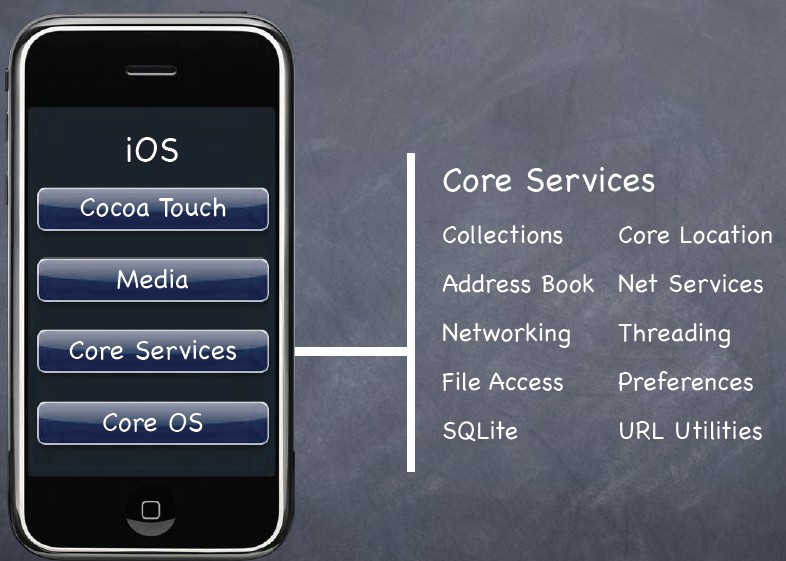
2、Core Sevices层
这层开始面向对象了,提供了很多底层服务。提供运行时,多线程等。还有集合类,数组,字典啊。可以把这层当做提供了面向对象的Core OS的封装。
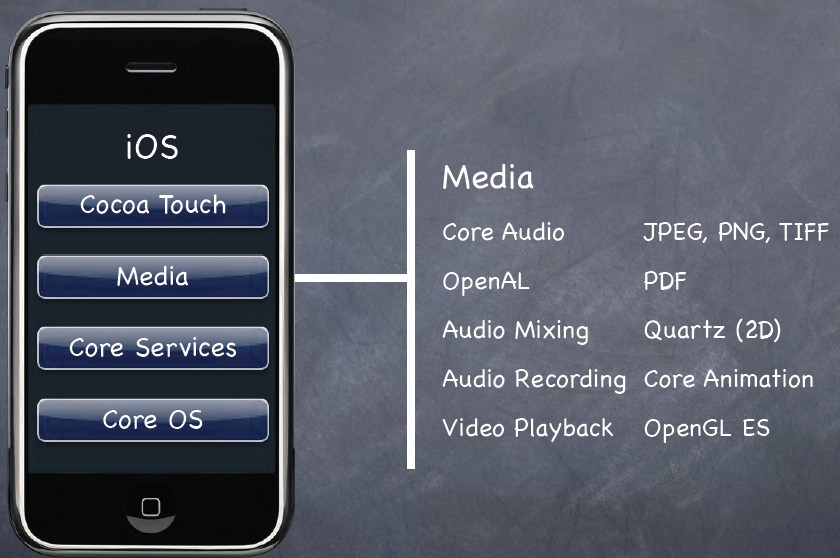
3、多媒体层
好像离硬件更远了,其实是还是很近, iPhone iPod iPad都是多媒体设备, 多媒体相关的代码贯彻了整个iOS,在开发者眼中 core services都是多媒体的api。
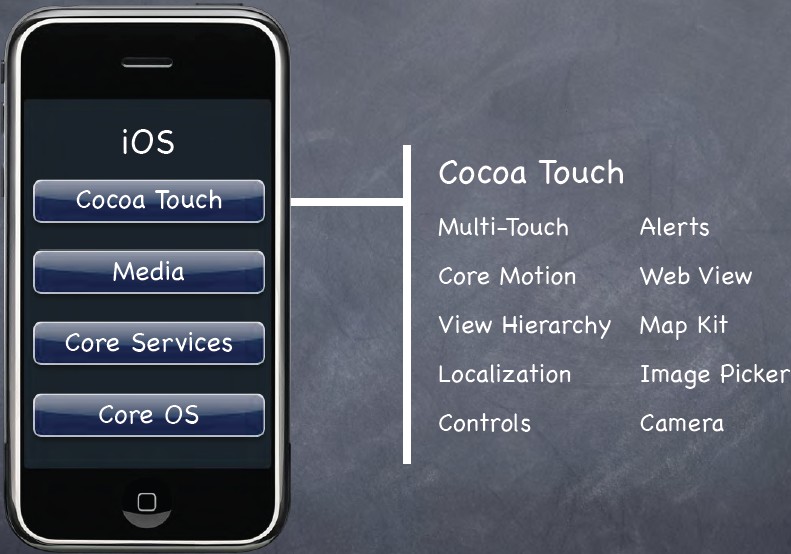
4、Cocoa Touch 层
我们的 90%时间都用在这层, 按钮,滚动条,各种控件等。
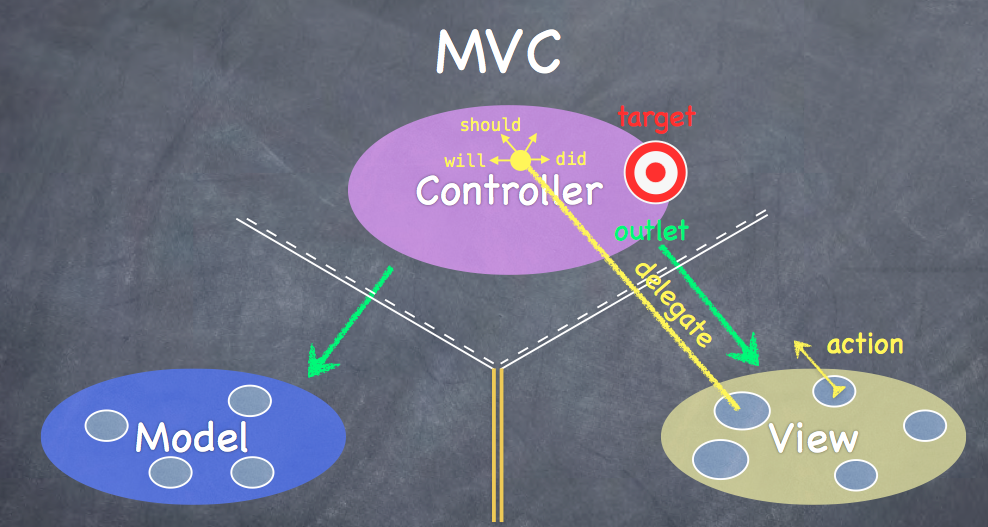
描述的是你的程序是什么。如太空船的程序,比如飞船的位置,型号,飞船有多少个机枪,护甲多少。
controller
描述你的model如何展现在用户面前,它获取到了飞船在太空中的位置,然后算出来怎么在屏幕上展现出来。比如飞船的多个机枪如何在屏幕上展现。总之controller控制如何在UI上展现model。
view
是controller的小弟,view是工具。尽可能是view通用的,按钮,滚动条等,决不能包含任何如何去表现的逻辑。controller用这些通用的view做model想要做的事情。
controller->view 完全允许 。 通讯属性outlet,在controller里创建outlets传输到view中。
model---view 之间永远不会通讯。因为model和界面没有关系。view是要重用的,model和view关联,当model改变后,view得重写。
view->controller 通过 target action这个结构来通讯。controller自己画了个 target(目标) ,然后把action(动作)交给view。当view发生一些事情,比如按钮被按下,它把action 发送到target,这时候controller就知道了。
view 和controller还有别的通讯机制,比如view要告诉controller发生什么事情 ,将要发生什么事情,或询问是否允许,用到了will did should 。
controller把自己设置成委托,用协议来完成委托。来回应will,did,should。这时候,view 还是不知道回应的controller是哪个类。
记住:views 不拥有它们展示的数据。
那view如何获取数据呢?
通过协议获取,delegation 方法,比如data at , count.
数据源的delegation永远是controller,不可能是model。
三大阵营的工作流程是这样的:
controller去model那取数据,告诉view展现数据在屏幕上。即使只有一行代码,也得有controller来参与,不能坏了规矩。
model不能主动勾搭controller,那model数据有变化了,那怎么让controller知道呢?Notification 或KVO机制。当model数据改变,它就广播,controller就收到了。
MVC模式关系,请记住这张图,后面讲的课经常提到些关系:
第三课Objective-C
提供延迟实例化,比如:UI更新,一次性检测。
property可以没有实体变量,怎么做到的呢?
不要用@synthesize,自己创建getter 和setter.
反过来,也可以有实体变量,没有property。不过建议使用property。
可以和C语言的结构体配合
注意类型需要大写,这是个规范。
3、strong VS weak
strong,weak都是指针的属性,
strong 是只要指向那块内存,就不能释放。
weak 是内存有strong指向的时候才被保留,没strong的指向weak也会被置为nil。
weak在iOS 5才能使用。
这是引用计数技术,不是垃圾回收。当失去所有的strong的指向时,立马释放内存。
strong weak是针对property的,本地变量都是strong的。
BOOL 类型:YES NO;
不能用小写的bool。
-号是实例方法
方法的参数识别:带星号的,是类指针变量,内容在堆上;
不带星号的是变量在栈上。
通过alloc 和init创建对象
alloc是NSObject的类方法,alloc是不够的,还要初始化,必须要初始化。
可以自定义很多的init方法,NSString 有实际中init方法比如:
- (id)initWithCharacters:(const unichar *)characters length:(int)length;
- (id)initWithFormat:(NSString *)format, ...;
- (id)initWithData:(NSData *)data encoding:(NSStringEncoding)encoding;
初始化时,要先调用父类的初始化方法。
要指定初始化方法。防治循环调用。
数组的指针都是strong
初始化方法:
[objc] view
plaincopy
@implementation MyObject
- (id)init
{
self = [super init]; // call our super’s designated initializer
if (self) {
// initialize our subclass here
}
return self;
}
@end
为什么要给self赋值呢?因为这是一种协议机制,确保super的初始化在我们之前初始化,如果super初始化失败,那就返回nil。
id 不等于(void*),id是obj-c的一个内置的类型。
例子代码:
[objc] view
plaincopy
@interface Vehicle
- (void)move;
@end
@interface Ship : Vehicle
- (void)shoot;
@end
Ship *s = [[Ship alloc] init];
[s shoot];
[s move];
Vehicle *v = s;
[v shoot];
当调用给v 发送shoot的消息时,虽然Vehicle没有shoot方法,但是程序不会崩溃,编译器会给个警告而已,运行时会找到v其实时有shoot方法的。
如何知道id的类呢?
isKindOfClass: returns whether an object is that kind of class (inheritance included)
isMemberOfClass: returns whether an object is that kind of class (no inheritance)
respondsToSelector: returns whether an object responds to a given method
SEL类型
SEL shootSelector = @selector(shoot);
SEL shootAtSelector = @selector(shootAt:);
SEL moveToSelector = @selector(moveTo:withPenColor:);
[obj performSelector:shootSelector]; 无参数的SEL
[obj performSelector:shootAtSelector withObject:coordinate];有一个参数的SEL。
-(NSString*)description ,用在NSLog,%@。
NSString对象
NSString 对Unicode编码的任意语言的字符串,可以容纳任何语言。用@""编译成NSString
NSString是不可变的。会返回新的字符串。
NSString的使用方法太多了,建议查看文档使用。
NSString已经优化的性能非常的好了,最好不要使用MutableString。
NSNumber 封装原始数据比如 Int float double等。
NSValue 封装非对象的数据
NSData 二进制
NSDate 日历
NSArray 有序的对象集合,不可变。下面是最常用的数组的方法。
[objc] view
plaincopy
+ (id)arrayWithObjects:(id)firstObject, ...; // nil-terminated arguments
NSArray *primaryColors = [NSArray arrayWithObjects:@“red”, @“yellow”, @“blue”, nil nil];
+ (id)arrayWithObject:(id)soleObjectInTheArray; // more useful than you might think!
- (int)count;
- (id)objectAtIndex:(int)index;
- (id)lastObject; // returns nil (doesn’t crash) if there are no objects in the array
- (NSArray *)sortedArrayUsingSelector:(SEL)aSelector;
- (void)makeObjectsPerformSelector:(SEL)aSelector withObject:(id)selectorArgument;
- (NSString *)componentsJoinedByString:(NSString *)separator;
- (BOOL)containsObject:(id)anObject; // could be slow, think about NSOrderedSet
不能把nil放到数组中。NSNull都能放进去,但是它只是个占位符。
copy,可变数组返回不可变
不可变数组可以返回可变的。
NSMutableArray
[objc] view
plaincopy
+ (id)arrayWithCapacity:(int)initialSpace; // initialSpace is a performance hint only + (id)array;
- (void)addObject:(id)anObject; // at the end of the array - (void)insertObject:(id)anObject atIndex:(int)index;
- (void)removeObjectAtIndex:(int)index;
- (void)removeLastObject;
- (id)copy;
可变继承了不可变。
NSDictionary类
[objc] view
plaincopy
+ (id)dictionaryWithObjects:(NSArray *)values forKeys:(NSArray *)keys;
+ (id)dictionaryWithObjectsAndKeys:(id)firstObject, ...;
NSDictionary *base = [NSDictionary dictionaryWithObjectsAndKeys: [NSNumber numberWithInt:2], @“binary”,
[NSNumber numberWithInt:16], @“hexadecimal”, nil nil];
- (int)count;
- (id)objectForKey:(id)key;
- (NSArray *)allKeys;
- (NSArray *)allValues;
NSMutableDicationary
[objc] view
plaincopy
+ (id)dictionary; // creates an empty dictionary (don’t forget it inherits + methods from super)
- (void)setObject:(id)anObject forKey:(id)key;
- (void)removeObjectForKey:(id)key;
- (void)removeAllObjects;
- (void)addEntriesFromDictionary:(NSDictionary *)otherDictionary;
NSSet 不可变无序的唯一对象集合
[objc] view
plaincopy
+ (id)setWithObjects:(id)firstObject, ...;
+ (id)setWithArray:(NSArray *)anArray;
- (int)count;
- (BOOL)containsObject:(id)anObject;
- (id)anyObject;
- (void)makeObjectsPerformSelector:(SEL)aSelector;
NSMutableSet
[objc] view
plaincopy
- (void)addObject:(id)anObject; // does nothing if object that isEqual:anObject is already in - (void)removeObject:(id)anObject;
- (void)unionSet:(NSSet *)otherSet;
- (void)minusSet:(NSSet *)otherSet;
- (void)intersectSet:(NSSet *)otherSet;
NSOrderSet。是NSArray和NSSet的合体,比NSSet快。
[objc] view
plaincopy
- (int)indexOfObject:(id)anObject;
- (id)objectAtIndex:(int)anIndex;
- (id)firstObject; and - (id)lastObject; - (NSArray *)array;
- (NSSet *)set;
NSMutableOrderSet
[objc] view
plaincopy
- (void)insertObject:(id)anObject atIndex:(int)anIndex;
- (void)removeObject:(id)anObject;
- (void)setObject:(id)anObject atIndex:(int)anIndex;
Enumeration
[objc] view
plaincopy
NSSet *mySet = ...;
for (id obj in mySet) {
if ([obj isKindOfClass:[NSString class]]) {
}
NSDictionary *myDictionary = ...;
for (id key in myDictionary) {
// do something with key here
id value = [myDictionary objectForKey:key];
// do something with value here
}
11、NSUserDefaults是轻量级的property List存储。
通过standardUserDefaults方法来存取。
常用方法
- (void)setDouble:(double)aDouble forKey:(NSString *)key;
- (NSInteger)integerForKey:(NSString *)key; // NSInteger is a typedef to 32 or 64 bit int
- (void)setObject:(id)obj forKey:(NSString *)key; // obj must be a Property List
- (NSArray *)arrayForKey:(NSString *)key; // will return nil if value for key is not
用[[NSUserDefaults standardUserDefaults] synchronize];方法来同步到去存储,任何操作后都要存储一下,开销不大。
1、View是屏幕上一个矩形的空间
2、View处理两件事:画出矩形控件,并处理其中的事件
3、view组织架构:View是层结构的,View只有superView,可以有多个subView。
子view的顺序和数组中的位置有关系,数字越大,越显示在后面。
4、UIWindow ,iOS中,UIWindow没有那么重要了。交给view,viewcontroller处理。
-(void)addSubView:(UIView *)aView;
-(void)removeFromSuperview;
需要注意点的是:
通过父view添加子view
通过子view自己移除自己
CGFloat ,是个float数字,在obj-c里就要用这个单位
CGPoint,是个C结构体,CGPoint p = CGPointMake(33.2.22.3); 表示位置。
CGSize, 是个结构体,表示大小。
CGRect :由一个 CGPoint和一个CGSize组成
用来描述view的主要四种类型。
坐标:
左上角是坐标的原点。
不用关心一个的点有都少像素,系统会自动适配。如果有需要获取一个点是多少像素,通过这个属性:@property CGFloat contentScaleFactor。
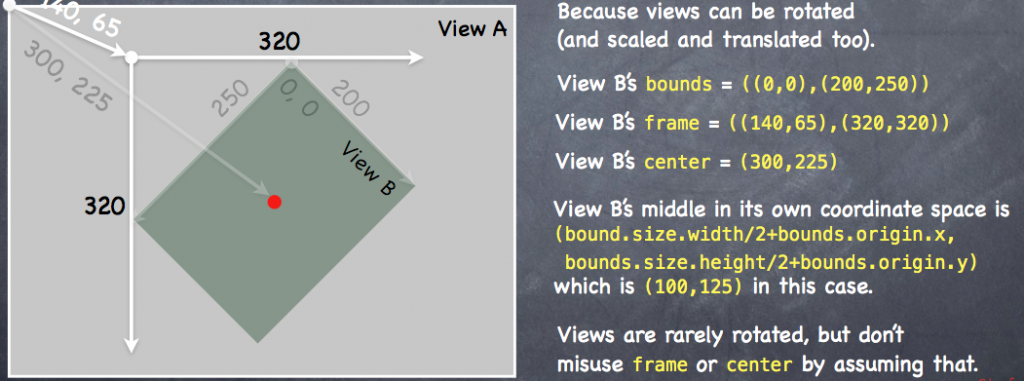
view有三个属性和它的位置大小有关:
CGRect bounds 自己内部的绘制空间。
下面两个属性是父类用来定位你的view的属性。
CGRect center
CGRect frame
为什么bounds和frame 不一样呢?因为view是可以伸缩,可以旋转的,看下图:
通过alloc init 创建view .例子:
CGRect labelRect = CGRectMake(20, 20, 50, 30);
UILabel *label = [[UILabel alloc] initWithFrame:labelRect];
label.text = @”Hello!”;
[self.view addSubview:label];
每个controller都有一个顶级的view,其他view都放在这个view上。
什么时候需要自定义view呢?当需要特殊的图形,或控制触摸事件的时候
通常不要继承内置的控件。
红色警告:决不能自己调用drawRect:。系统调用这个方法。如果你需要重绘怎么办?发送这两个消息
- (void)setNeedsDisplay;
绘制开销很大
如何利用drawRect呢?调用核心图形框架,它是C的接口,不是面向对象的。
Core Graphics framework的基本概念是,你创建一个环境,然后创建一些轨迹,比如直线和弧线,再设置他们都字体颜色样式等并描边或填充到轨迹里。这就是绘图的过程。
绘制图片和文字是主要的,文字和轨迹是一回事,它有很多精细的弧线组成。
绘制图片是赋值二进制码。
context(环境) ,决定了你要在哪绘制。
每次drawRect是的环境都是不一样的,所以不要缓存context。
获取环境的代码:
CGContextRef context = UIGraphicsGetCurrentContext();
几乎所有的drawRect都把这个放在第一行。
[cpp] view
plaincopy
CGContextBeginPath(context);
CGContextMoveToPoint(context, 75, 10);
CGContextAddLineToPoint(context, 160, 150);
CGContextAddLineToPoint(context, 10, 150);
[[UIColor greenColor] setFill];
[[UIColor redColor] setStroke];
CGContextDrawPath(context,kCGPathFillStroke); //kCGPathFillStroke is a constant
上面代码:绘制的过程,先开始一个轨迹,移动轨迹的点,添加线,填充绿色,描边是红色, 颜色不需要指定context,默认就是当前的context。
调用 CGContextDrawpath在屏幕上画出来。
可以定义一个轨迹保存,在其他环境重用。
透明:
@property CGFloat alpha
@property BOOL opaque
alpha 1,不透明, 0透明。
@property (nonatomic) BOOL hidden;
隐藏view。
用UIFont设置字体 大小
UIFont *myFont = [UIFont systemFontOfSize:12.0];
UIFont *theFont = [UIFont fontWithName:@“Helvetica” size:36.0];
NSArray *availableFonts = [UIFont familyNames];
最后一个获取可用的字体。
用NSString 来画文字
NSString *text = ...;
[text drawAtPoint:(CGPoint)p withFont:theFont]; // NSString instance method
因为UIKit,所以NSString也能实现UI上的功能,用了categories .
通过下面的方式后去图像:
UIImage *image = [UIImage imageNamed:@“foo.jpg”];
二进制,网络
UIImage *image = [[UIImage alloc] initWithContentsOfFile:(NSString *)fullPath];
UIImage *image = [[UIImage alloc] initWithData:(NSData *)imageData];
通过CGContext函数
UIGraphicsBeginImageContext(CGSize);
// draw with CGContext functions
UIImage *myImage = UIGraphicsGetImageFromCurrentContext();
UIGraphicsEndImageContext();
在环境里画出来
[image drawAtPoint:(CGPoint)p];
[image drawInRect:(CGRect)r];
[image drawAsPatternInRect:(CGRect)patRect;
drawAtPoint 会按原大小画出来
drawInRect会缩放。
drawAsPatternInRect会重复绘制来甜蜜指定的区域。
第五课Protocols,手势识别
第五课内容: 自动旋转、 Protocols、 手势识别、一个自定义UIView的Demo
plaincopy
- (BOOL)shouldAutorotateToInterfaceOrientation:(UIInterfaceOrientation)orientation
{
return UIInterfaceOrientationIsPortrait(orientation); // only support portrait
return YES; // support all orientations
return (orientation != UIInterfaceOrientationPortraitUpsideDown); // anything but
}
当旋转的时候,view的bounds会改变,子view的frame,子view的子view也会改变。
改变的规则是:struts和springs。
当view的bound改变时,drawRect不会默认调用
.png)
红色的I就是struts,中间的红色箭头就是springs。
右边红白色的显示屏似的就是用动画告诉你view如何改变。白色的是父view,红色的是你选中的view。
这个控制在iPhone上一般使用不到,因为屏幕太小了。
幸运的是,有UIView有这么个属性来控制
2、缩放的控制属性:
UIViewContentModeScale{ToFill,AspectFill,AspectFit} // bit stretching/shrinking
分别是填充,内容填充,内容适应。 toFill是默认的模式,它会自动缩放像素点填满新的空间,可能会造成图形扭曲。
3、
@property (nonatomic) CGRect contentStretch;
指定某一个区域拉伸
初始化一个UIView.
plaincopy
@protocol Foo <Other, NSObject> // implementors must implement Other and NSObject too
- (void)doSomething; // implementors must implement this (methods are @required by default)
@optional
- (int)getSomething; // implementors do not have to implement this
- (void)doSomethingOptionalWithArgument:(NSString *)argument; // also optional
@required
- (NSArray *)getManySomethings:(int)howMany; // back to being “must implement”
@property (nonatomic, strong) NSString *fooProp; // note that you must specify strength
@end
可以定义在自己的头文件里,也可以定义在其他类的头文件中。
实现协议,并使用的语法:
[objc] view
plaincopy
#import “Foo.h” // importing the header file that declares the Foo @protocol
@interface MyClass : NSObject <Foo> // MyClass is saying it implements the Foo @protocol
...
@en
[objc] view
plaincopy
id <Foo> obj = [[MyClass alloc] init];
[objc] view
plaincopy
@property (nonatomic, weak) id <Foo> myFooProperty; // properties too!
协议的主要作用:
实现委托和数据源。
委托几乎都是weak的,因为被设置为委托的对象通常都是委托对象的所有者或创建者。
比如controller通常把自己设置成view的委托或数据源,你不要它们相互的strong指针指向。
scrollView例子
[objc] view
plaincopy
@protocol UIScrollViewDelegate
@optional
- (UIView *)viewForZoomingInScrollView:(UIScrollView *)sender;
- (void)scrollViewDidEndDragging:(UIScrollView *)sender willDecelerate:(BOOL)decelerate;
@end
@interface UIScrollView : UIView
@property (nonatomic, weak) id <UIScrollViewDelegate> delegate;
@end
@interface MyViewController : UIViewController <UIScrollViewDelegate>
@property (nonatomic, weak) IBOutlet UIScrollView *scrollView;
@end
@implementation MyViewController
- (void)setScrollView:(UIScrollView *)scrollView {
_scrollView = scrollView;
self.scrollView.delegate = self; // compiler won’t complain
}
- (UIView *)viewForZoomingInScrollView:(UIScrollView *)sender { return ... };
@end
相应预定义好的手势
UIGestureRecognizer类,它是个抽象类,需要实现。
第一步由controller来完成
第二步由UIView自己完成
从controller添加一个手势到UIView:
[objc] view
plaincopy
- (void)setPannableView:(UIView *)pannableView
{
_pannableView = pannableView;
UIPanGestureRecognizer *pangr =
[[UIPanGestureRecognizer alloc] initWithTarget:pannableView action:@selector(pan:)];
[pannableView addGestureRecognizer:pangr];
}
target 是手势识别之后的处理者,这里就是view本身。
plaincopy
- (CGPoint)translationInView:(UIView *)aView;
- (CGPoint)velocityInView:(UIView *)aView;
- (void)setTranslation:(CGPoint)translation inView:(UIView *)aView;
第一个告诉移动的距离
第二个告诉移动的速度
第三个是重新设置
状态从possible
如果手势比较短:recognized
如果持续:Began - Changed ,
最后Ended
还有Failed 和 Cancelled状态,取消或其他操作中断时会有这个情况。
pan:是什么样的呢:
[objc] view
plaincopy
- (void)pan:(UIPanGestureRecognizer *)recognizer
{
if ((recognizer.state == UIGestureRecognizerStateChanged) ||
(recognizer.state == UIGestureRecognizerStateEnded)) {
CGPoint translation = [recognizer translationInView:self];
// move something in myself (I’m a UIView) by translation.x and translation.y
// for example, if I were a graph and my origin was set by an @property called origin
self.origin = CGPointMake(self.origin.x+translation.x, self.origin.y+translation.y);
[recognizer setTranslation:CGPointZero inView:self];
}
}
UIRotationGestureRecognizer 旋转手势,两个手指按下,然后旋转,是个弧度,不是角度。
UISwipeGestureRecognizer 滑动手势, 一个或多个手指滑动,
UITapGestureRecognizer 点击手势
一个MVC只能控制一屏幕或更小的区域。
那如何切换两个MVC呢,用控制器群里的控制器:UINavigationController。


.jpg)
中间有个title。
它是个特殊的controller,因为它有一个Outlet只向一另外一个MVC,就是它的rootViewController。
rootViewController就是出现在白色区域的。原来的rootViewController放到UINavigationController后,它 的bounds高度会变小一些。
通过执行一个segues,可以跳转到另外一个MVC上。就是把新的MVC push都屏幕上,点返回,把当前的MVC pop出来。
push
model
custom
或者直接拖动到一个viewController连接;
.jpg)
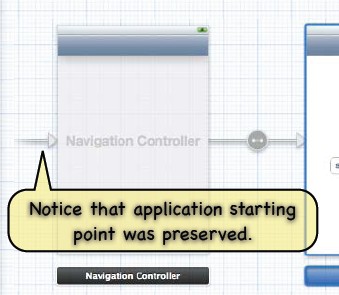
这个箭头表示程序的开始。
.jpg)
- (void)popViewControllerAnimated:(BOOL)animated;
plaincopy
- (void)prepareForSegue:(UIStoryboardSegue *)segue sender:(id)sender
{
if ([segue.identifier isEqualToString:@“DoAParticularThing”]) {
UIViewController *newController = segue.destinationViewController;
}
}
可以决定你是否跳转到这个页面,获取到即将跳转页面的controller的实例,这样可以提前去设置它的属性。
plaincopy
- (void)performSegueWithIdentifier:(NSString *)segueId sender:(id)sender;
例子:
[objc] view
plaincopy
- (IBAction)rentEquipment
{
if (self.snowTraversingTalent == Skiing) {
[self performSegueWithIdentifier:@“AskAboutSkis” sender:self];
} else {
[self performSegueWithIdentifier:@“AskAboutSnowboard” sender:self];
}
}
UIViewController *controller = [storyboard instantiateViewControllerWithIdentifier:vcid];
self.storyboard是一个ViewController的属性。
例子:
[objc] view
plaincopy
- (IBAction)doit
{
DoitViewController *doit =
[self.storyboard instantiateViewControllerWithIdentifier:@”doit1”];
doit.infoDoitNeeds = self.info;
[self.navigationController pushViewController:doit animated:YES];
}
获取后,把它push到navigationController展示。
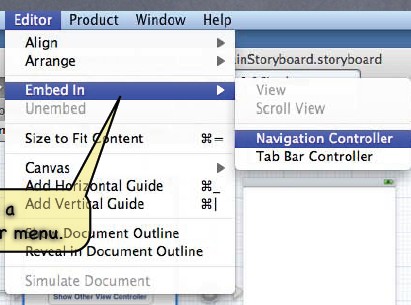
把ViewController内嵌到NavigationController中去。
identifier
destinationViewController
这节课的Demo是把UIToolbar拖放到iPad的故事版的顶部来使用。
– splitViewController:shouldHideViewController:inOrientation:
-splitViewController:willHideViewController:withBarButtonItem:forPopoverController:
– splitViewController:willShowViewController:invalidatingBarButtonItem:
– splitViewController:popoverController:willPresentViewController:
这几个代理方法会用到。
有了这些理论知识后,
按command+ ->改变模拟器的方向,上面的的button显示不大好看,改一下 spring&structs。
这样在app水平放下时按钮自动缩放了。
开始通用程序的修改吧
略。。。。
第八课viewController生命周期
通过 一个segue或故事版的instantiateViewControllerWithIdentifer:实例化。
一般情况不要自己定义UIViewController的初始化方法。
awakeFromNib 可选的,awakeFromNib是view的方法,有很多方法可以替代awakeFromNib放置。
awakeFromNib很早期就被调用了,那时候outlet还没连起来。那时候viewController还没完全构建完毕,不过可能有一些事情比如设置 split view delegate需要在非常早的时间完成。
- (void)viewDidLoad;
在实例化和outlet-setting后, viewDidload被调用。
在viewController已经构建完毕,只是没显示出来。
可以放置大部分的初始化的代码,
但是不能放置关于设置view大小的代码。
view 是controller的一个property,是指在视图中最顶层的矩形区域,是你在故事版中编辑的最顶层的那个东西。
view的尺寸放在下个方法。
- (void)viewWillAppear:(BOOL)animated;
在view准备要显示的时候调用。
另外一个合适在viewWillAppear里做的就是 laziy do stuff 缓式动作。
比如lazy init.
viewWillAppear是做那些很费资源的事情的地方
不过太费时的话就得开启新线程来搞。
总之 viewWillAppear适合做两件事:
1.最后时刻延时加载高开销的操作,
2.改变view的几何特性。
- (void)viewWillDisappear:(BOOL)animated
当你的视图将要在屏幕上消失的时候调用
可以在这里记录你view的状态,数据。一般要写到磁盘里,下次进来的时候
[objc] view
plaincopy
- (void)viewWillDisappear:(BOOL)animated
{
[super viewWillDisappear:animated]; // 这个要写
 [self rememberScrollPosition]; // 记住滚动的位置
[self saveDataToPermanentStore]; // maybe do in did instead?
// 注意不要在这里进行比耗时的操作,界面更流畅。
}
Did版本的两个方法。
- (void)viewDidAppear:(BOOL)animated; //可以在显示之后做一些操作,比如动画之类的。
- (void)viewDidDisappear:(BOOL)animated;
都需要调用 super版本方法。在你的操作之前之后都行,看自己的需求。
Frame 改变,如果 struts and spring 不足够的话就用
[objc] view
plaincopy
- (void)view{Will,Did}LayoutSubviews;
- (void)willRotateToInterfaceOrientation:(UIInterfaceOrientation)anOrientation
duration:(NSTimeInterval)seconds;
- (void)willAnimateRotationToInterfaceOrientation:(UIInterfaceOriention)orient
duration:(NSTimeInterval)seconds;
- (void)didRotateFromInterfaceOrientation:(UIInterfaceOrientation)anOrientation;
@property UIInterfaceOrientation interfaceOrientati
viewDidUnload
当内存不足的时候系统会卸载你的view.
最好在这里试着outlet为nil
[objc] view
plaincopy
- (void)viewDidUnload
{
self.faceView = nil;
}
view controller的初始化:
从.xib创建一个UIViewController。那是4.x才创建方式。
用alloc init 创建 ,初始化方法的设计。
从代码创建UIViewController:
覆盖方法- (void)loadView和 设置 self.view
如果从故事版和.xib创建那么请遵守下面几个原则:
不要是实现loadview方法。
不要设置self.view.除了loadview能设置self.view之外,其他都不能设置。
没有设置self.view的话就不要实现Loadview。
尽量不要使用awakeFromNib。
UIView's frame
谁来设置UIView的 frame呢?
答案是:把view放到view组织架构里的那个对象。一般情况下对象是谁啊? 是故事版。
@property (nonatomic, strong) UIImage *image; // will not adjust frame size
记住UIView’s contentMode property
Top Left ScaleToFit 等属性。设置image的在UIImageView的边界缩放等。
基于Webkit,一个HTML的开源的渲染框架。
支持javascript
重要的属性:
@property (nonatomic) BOOL scalesPagesToFit;
设置是否缩放到合适尺寸。YES就缩放到合适尺寸,如果NO,则保持原网页大小不变。
@property (nonatomic, readonly, strong) UIScrollView *scrollView;
控制滚动。
加载HTML的三个方法:
[objc] view
plaincopy
- (void)loadRequest:(NSURLRequest *)request;
- (void)loadHTMLString:(NSString *)string baseURL:(NSURL *)baseURL;
- (void)loadData:(NSData *)data
MIMEType:(NSString *)MIMEtype
textEncodingName:(NSString *)encodingName
baseURL:(NSURL *)baseURL;
可以指定文件类型,比如pdf来显示。
NSURLRequest
[objc] view
plaincopy
NSURLRequest
+ (NSURLRequest *)requestWithURL:(NSURL *)url;
+ (NSURLRequest *)requestWithURL:(NSURL *)url
cachePolicy:(NSURLRequestCachePolicy)policy
timeoutInterval:(NSTimeInterval)timeoutInterval;
NSURL 基本和NSString类似,一个好的 格式而已,比如 :file:// http:// 上面两个方法的区别主要是缓存策略,超时的设置。如果不指定,那就是默认的。
1、让用户拖拽到想展示的内容区域
2、让用户可以放大缩小内容的区域
我自己找了张手机里的图片,用代码实现scrollview:
[objc] view
plaincopy
UIImage *image = [UIImage imageNamed:@"bigimage"];
UIImageView *iv = [[UIImageView alloc] initWithImage:image];
iv.frame = CGRectMake(0, 0, image.size.width, image.size.height) ;
CGRect fullScreenRect=[[UIScreen mainScreen] applicationFrame];
UIScrollView *scrollView=[[UIScrollView alloc] initWithFrame:fullScreenRect];
[scrollView addSubview:iv];
scrollView.contentSize=CGSizeMake(2592 ,1952);
[self.view addSubview:scrollView];
下图中的方法可以这样是测试:
[objc] view
plaincopy
scrollViewWillEndDragging:withVelocity:targetContentOffset是UIScrollViewDelegate的方法。
-(void)scrollViewWillEndDragging:(UIScrollView *)scrollView withVelocity:(CGPoint)velocity targetContentOffset:(inout CGPoint *)targetContentOffset{
CGPoint upperLeftOfVisible = scrollView.contentOffset;
NSLog(@"x:%f, y:%f", upperLeftOfVisible.x, upperLeftOfVisible.y);
}
放大缩小:
在.h文件实现
[objc] view
plaincopy
UIScrollViewDelegate协议,
UIImage *image = [UIImage imageNamed:@"bigimage"];
imageView = [[UIImageView alloc] initWithImage:image];
imageView.frame = CGRectMake(0, 0, image.size.width, image.size.height) ;
CGRect fullScreenRect=[[UIScreen mainScreen] applicationFrame];
UIScrollView *scrollView=[[UIScrollView alloc] initWithFrame:fullScreenRect];
scrollView.delegate = self;
scrollView.minimumZoomScale = 0.2;
scrollView.maximumZoomScale = 2.0;
[scrollView addSubview:imageView];
scrollView.contentSize=CGSizeMake(2592 ,1952);
[self.view addSubview:scrollView];
- (UIView *)viewForZoomingInScrollView:(UIScrollView *)scrollView
{
return imageView;
}
这样就可<span style="font-family: Arial; background-color: rgb(255, 255, 255);">以放大缩小了。</span>
1、iOS的概述 -什么是iOS
2、MVC - 面向对象的概念
3、Objective-C-介绍下语言的概念
1、iOS包括四层
1、内核内核是mach 4.x BSD UNIX内核 mac OS 10操作系统,是个多任务的UNIX内核。在这层上提供了网络,socket,安全机制,文件系统,大部分这些api是c api,因为这写都是UNIX代码。我们不会在这层上写代码。
2、Core Sevices层
这层开始面向对象了,提供了很多底层服务。提供运行时,多线程等。还有集合类,数组,字典啊。可以把这层当做提供了面向对象的Core OS的封装。
3、多媒体层
好像离硬件更远了,其实是还是很近, iPhone iPod iPad都是多媒体设备, 多媒体相关的代码贯彻了整个iOS,在开发者眼中 core services都是多媒体的api。
4、Cocoa Touch 层
我们的 90%时间都用在这层, 按钮,滚动条,各种控件等。
2、MVC
model view controller
model描述的是你的程序是什么。如太空船的程序,比如飞船的位置,型号,飞船有多少个机枪,护甲多少。
controller
描述你的model如何展现在用户面前,它获取到了飞船在太空中的位置,然后算出来怎么在屏幕上展现出来。比如飞船的多个机枪如何在屏幕上展现。总之controller控制如何在UI上展现model。
view
是controller的小弟,view是工具。尽可能是view通用的,按钮,滚动条等,决不能包含任何如何去表现的逻辑。controller用这些通用的view做model想要做的事情。
他们之间管理和通信了。
controller->model 完全允许。因为controller 要问model如何在屏幕展现内容。controller->view 完全允许 。 通讯属性outlet,在controller里创建outlets传输到view中。
model---view 之间永远不会通讯。因为model和界面没有关系。view是要重用的,model和view关联,当model改变后,view得重写。
view->controller 通过 target action这个结构来通讯。controller自己画了个 target(目标) ,然后把action(动作)交给view。当view发生一些事情,比如按钮被按下,它把action 发送到target,这时候controller就知道了。
view 和controller还有别的通讯机制,比如view要告诉controller发生什么事情 ,将要发生什么事情,或询问是否允许,用到了will did should 。
controller把自己设置成委托,用协议来完成委托。来回应will,did,should。这时候,view 还是不知道回应的controller是哪个类。
记住:views 不拥有它们展示的数据。
那view如何获取数据呢?
通过协议获取,delegation 方法,比如data at , count.
数据源的delegation永远是controller,不可能是model。
三大阵营的工作流程是这样的:
controller去model那取数据,告诉view展现数据在屏幕上。即使只有一行代码,也得有controller来参与,不能坏了规矩。
model不能主动勾搭controller,那model数据有变化了,那怎么让controller知道呢?Notification 或KVO机制。当model数据改变,它就广播,controller就收到了。
MVC模式关系,请记住这张图,后面讲的课经常提到些关系:
第三课Objective-C
1、为什么用property,理由有两个:
实体变量的安全性和继承能力提供延迟实例化,比如:UI更新,一次性检测。
property可以没有实体变量,怎么做到的呢?
不要用@synthesize,自己创建getter 和setter.
反过来,也可以有实体变量,没有property。不过建议使用property。
2、为什么用.号
美观,可读性增强可以和C语言的结构体配合
注意类型需要大写,这是个规范。
3、strong VS weak
strong,weak都是指针的属性,
strong 是只要指向那块内存,就不能释放。
weak 是内存有strong指向的时候才被保留,没strong的指向weak也会被置为nil。
weak在iOS 5才能使用。
这是引用计数技术,不是垃圾回收。当失去所有的strong的指向时,立马释放内存。
strong weak是针对property的,本地变量都是strong的。
4、nil =0.
给nil发送消息,也是ok的。BOOL 类型:YES NO;
不能用小写的bool。
5、类方法和实例方法
+号是类方法-号是实例方法
方法的参数识别:带星号的,是类指针变量,内容在堆上;
不带星号的是变量在栈上。
6、实例化
通过其他对象创建对象。通过alloc 和init创建对象
alloc是NSObject的类方法,alloc是不够的,还要初始化,必须要初始化。
可以自定义很多的init方法,NSString 有实际中init方法比如:
- (id)initWithCharacters:(const unichar *)characters length:(int)length;
- (id)initWithFormat:(NSString *)format, ...;
- (id)initWithData:(NSData *)data encoding:(NSStringEncoding)encoding;
初始化时,要先调用父类的初始化方法。
要指定初始化方法。防治循环调用。
数组的指针都是strong
初始化方法:
[objc] view
plaincopy
@implementation MyObject
- (id)init
{
self = [super init]; // call our super’s designated initializer
if (self) {
// initialize our subclass here
}
return self;
}
@end
为什么要给self赋值呢?因为这是一种协议机制,确保super的初始化在我们之前初始化,如果super初始化失败,那就返回nil。
id 不等于(void*),id是obj-c的一个内置的类型。
7、动态绑定
id类型和NSString*类型实质上没有什么区别,实质为了更好的找出语法方面的bug.在运行时发现消息都会去浔找消息的执行。例子代码:
[objc] view
plaincopy
@interface Vehicle
- (void)move;
@end
@interface Ship : Vehicle
- (void)shoot;
@end
Ship *s = [[Ship alloc] init];
[s shoot];
[s move];
Vehicle *v = s;
[v shoot];
当调用给v 发送shoot的消息时,虽然Vehicle没有shoot方法,但是程序不会崩溃,编译器会给个警告而已,运行时会找到v其实时有shoot方法的。
8、内省
id可以让数组里存入各种类型的对象。如何知道id的类呢?
isKindOfClass: returns whether an object is that kind of class (inheritance included)
isMemberOfClass: returns whether an object is that kind of class (no inheritance)
respondsToSelector: returns whether an object responds to a given method
SEL类型
SEL shootSelector = @selector(shoot);
SEL shootAtSelector = @selector(shootAt:);
SEL moveToSelector = @selector(moveTo:withPenColor:);
[obj performSelector:shootSelector]; 无参数的SEL
[obj performSelector:shootAtSelector withObject:coordinate];有一个参数的SEL。
9、foundation 框架
NSObject的方法-(NSString*)description ,用在NSLog,%@。
NSString对象
NSString 对Unicode编码的任意语言的字符串,可以容纳任何语言。用@""编译成NSString
NSString是不可变的。会返回新的字符串。
NSString的使用方法太多了,建议查看文档使用。
NSString已经优化的性能非常的好了,最好不要使用MutableString。
NSNumber 封装原始数据比如 Int float double等。
NSValue 封装非对象的数据
NSData 二进制
NSDate 日历
NSArray 有序的对象集合,不可变。下面是最常用的数组的方法。
[objc] view
plaincopy
+ (id)arrayWithObjects:(id)firstObject, ...; // nil-terminated arguments
NSArray *primaryColors = [NSArray arrayWithObjects:@“red”, @“yellow”, @“blue”, nil nil];
+ (id)arrayWithObject:(id)soleObjectInTheArray; // more useful than you might think!
- (int)count;
- (id)objectAtIndex:(int)index;
- (id)lastObject; // returns nil (doesn’t crash) if there are no objects in the array
- (NSArray *)sortedArrayUsingSelector:(SEL)aSelector;
- (void)makeObjectsPerformSelector:(SEL)aSelector withObject:(id)selectorArgument;
- (NSString *)componentsJoinedByString:(NSString *)separator;
- (BOOL)containsObject:(id)anObject; // could be slow, think about NSOrderedSet
不能把nil放到数组中。NSNull都能放进去,但是它只是个占位符。
copy,可变数组返回不可变
不可变数组可以返回可变的。
NSMutableArray
[objc] view
plaincopy
+ (id)arrayWithCapacity:(int)initialSpace; // initialSpace is a performance hint only + (id)array;
- (void)addObject:(id)anObject; // at the end of the array - (void)insertObject:(id)anObject atIndex:(int)index;
- (void)removeObjectAtIndex:(int)index;
- (void)removeLastObject;
- (id)copy;
可变继承了不可变。
NSDictionary类
[objc] view
plaincopy
+ (id)dictionaryWithObjects:(NSArray *)values forKeys:(NSArray *)keys;
+ (id)dictionaryWithObjectsAndKeys:(id)firstObject, ...;
NSDictionary *base = [NSDictionary dictionaryWithObjectsAndKeys: [NSNumber numberWithInt:2], @“binary”,
[NSNumber numberWithInt:16], @“hexadecimal”, nil nil];
- (int)count;
- (id)objectForKey:(id)key;
- (NSArray *)allKeys;
- (NSArray *)allValues;
NSMutableDicationary
[objc] view
plaincopy
+ (id)dictionary; // creates an empty dictionary (don’t forget it inherits + methods from super)
- (void)setObject:(id)anObject forKey:(id)key;
- (void)removeObjectForKey:(id)key;
- (void)removeAllObjects;
- (void)addEntriesFromDictionary:(NSDictionary *)otherDictionary;
NSSet 不可变无序的唯一对象集合
[objc] view
plaincopy
+ (id)setWithObjects:(id)firstObject, ...;
+ (id)setWithArray:(NSArray *)anArray;
- (int)count;
- (BOOL)containsObject:(id)anObject;
- (id)anyObject;
- (void)makeObjectsPerformSelector:(SEL)aSelector;
NSMutableSet
[objc] view
plaincopy
- (void)addObject:(id)anObject; // does nothing if object that isEqual:anObject is already in - (void)removeObject:(id)anObject;
- (void)unionSet:(NSSet *)otherSet;
- (void)minusSet:(NSSet *)otherSet;
- (void)intersectSet:(NSSet *)otherSet;
NSOrderSet。是NSArray和NSSet的合体,比NSSet快。
[objc] view
plaincopy
- (int)indexOfObject:(id)anObject;
- (id)objectAtIndex:(int)anIndex;
- (id)firstObject; and - (id)lastObject; - (NSArray *)array;
- (NSSet *)set;
NSMutableOrderSet
[objc] view
plaincopy
- (void)insertObject:(id)anObject atIndex:(int)anIndex;
- (void)removeObject:(id)anObject;
- (void)setObject:(id)anObject atIndex:(int)anIndex;
Enumeration
[objc] view
plaincopy
NSSet *mySet = ...;
for (id obj in mySet) {
if ([obj isKindOfClass:[NSString class]]) {
}
NSDictionary *myDictionary = ...;
for (id key in myDictionary) {
// do something with key here
id value = [myDictionary objectForKey:key];
// do something with value here
}
10、property List
NSArray, NSDictionary, NSNumber, NSString, NSDate, NSData 这6中是property List11、NSUserDefaults是轻量级的property List存储。
通过standardUserDefaults方法来存取。
常用方法
- (void)setDouble:(double)aDouble forKey:(NSString *)key;
- (NSInteger)integerForKey:(NSString *)key; // NSInteger is a typedef to 32 or 64 bit int
- (void)setObject:(id)obj forKey:(NSString *)key; // obj must be a Property List
- (NSArray *)arrayForKey:(NSString *)key; // will return nil if value for key is not
用[[NSUserDefaults standardUserDefaults] synchronize];方法来同步到去存储,任何操作后都要存储一下,开销不大。
第四课 Views 视图
第二部分,Views
view的内容
这个是全新的课程。1、View是屏幕上一个矩形的空间
2、View处理两件事:画出矩形控件,并处理其中的事件
3、view组织架构:View是层结构的,View只有superView,可以有多个subView。
子view的顺序和数组中的位置有关系,数字越大,越显示在后面。
4、UIWindow ,iOS中,UIWindow没有那么重要了。交给view,viewcontroller处理。
views 组织架构
可以在通过工具来管理view的组织架构,也可以通过代码:-(void)addSubView:(UIView *)aView;
-(void)removeFromSuperview;
需要注意点的是:
通过父view添加子view
通过子view自己移除自己
view的坐标系统
单位:CGFloat ,是个float数字,在obj-c里就要用这个单位
CGPoint,是个C结构体,CGPoint p = CGPointMake(33.2.22.3); 表示位置。
CGSize, 是个结构体,表示大小。
CGRect :由一个 CGPoint和一个CGSize组成
用来描述view的主要四种类型。
坐标:
左上角是坐标的原点。
不用关心一个的点有都少像素,系统会自动适配。如果有需要获取一个点是多少像素,通过这个属性:@property CGFloat contentScaleFactor。
view有三个属性和它的位置大小有关:
CGRect bounds 自己内部的绘制空间。
下面两个属性是父类用来定位你的view的属性。
CGRect center
CGRect frame
为什么bounds和frame 不一样呢?因为view是可以伸缩,可以旋转的,看下图:
创建views
继承UIView。通过alloc init 创建view .例子:
CGRect labelRect = CGRectMake(20, 20, 50, 30);
UILabel *label = [[UILabel alloc] initWithFrame:labelRect];
label.text = @”Hello!”;
[self.view addSubview:label];
每个controller都有一个顶级的view,其他view都放在这个view上。
什么时候需要自定义view呢?当需要特殊的图形,或控制触摸事件的时候
通常不要继承内置的控件。
drawRect
怎么绘图呢?覆盖一个方法:-(void)drawRect:(CGRect)aRect;红色警告:决不能自己调用drawRect:。系统调用这个方法。如果你需要重绘怎么办?发送这两个消息
- (void)setNeedsDisplay;
- (void)setNeedsDisplayInRect:(CGRect)aRect;
绘制开销很大如何利用drawRect呢?调用核心图形框架,它是C的接口,不是面向对象的。
Core Graphics framework的基本概念是,你创建一个环境,然后创建一些轨迹,比如直线和弧线,再设置他们都字体颜色样式等并描边或填充到轨迹里。这就是绘图的过程。
绘制图片和文字是主要的,文字和轨迹是一回事,它有很多精细的弧线组成。
绘制图片是赋值二进制码。
context(环境) ,决定了你要在哪绘制。
每次drawRect是的环境都是不一样的,所以不要缓存context。
获取环境的代码:
CGContextRef context = UIGraphicsGetCurrentContext();
几乎所有的drawRect都把这个放在第一行。
[cpp] view
plaincopy
CGContextBeginPath(context);
CGContextMoveToPoint(context, 75, 10);
CGContextAddLineToPoint(context, 160, 150);
CGContextAddLineToPoint(context, 10, 150);
[[UIColor greenColor] setFill];
[[UIColor redColor] setStroke];
CGContextDrawPath(context,kCGPathFillStroke); //kCGPathFillStroke is a constant
上面代码:绘制的过程,先开始一个轨迹,移动轨迹的点,添加线,填充绿色,描边是红色, 颜色不需要指定context,默认就是当前的context。
调用 CGContextDrawpath在屏幕上画出来。
可以定义一个轨迹保存,在其他环境重用。
透明:
@property CGFloat alpha
@property BOOL opaque
alpha 1,不透明, 0透明。
@property (nonatomic) BOOL hidden;
隐藏view。
画文字
用UILabel用UIFont设置字体 大小
UIFont *myFont = [UIFont systemFontOfSize:12.0];
UIFont *theFont = [UIFont fontWithName:@“Helvetica” size:36.0];
NSArray *availableFonts = [UIFont familyNames];
最后一个获取可用的字体。
用NSString 来画文字
NSString *text = ...;
[text drawAtPoint:(CGPoint)p withFont:theFont]; // NSString instance method
因为UIKit,所以NSString也能实现UI上的功能,用了categories .
画图像
UIImageView通过下面的方式后去图像:
UIImage *image = [UIImage imageNamed:@“foo.jpg”];
二进制,网络
UIImage *image = [[UIImage alloc] initWithContentsOfFile:(NSString *)fullPath];
UIImage *image = [[UIImage alloc] initWithData:(NSData *)imageData];
通过CGContext函数
UIGraphicsBeginImageContext(CGSize);
// draw with CGContext functions
UIImage *myImage = UIGraphicsGetImageFromCurrentContext();
UIGraphicsEndImageContext();
在环境里画出来
[image drawAtPoint:(CGPoint)p];
[image drawInRect:(CGRect)r];
[image drawAsPatternInRect:(CGRect)patRect;
drawAtPoint 会按原大小画出来
drawInRect会缩放。
drawAsPatternInRect会重复绘制来甜蜜指定的区域。
第五课Protocols,手势识别
第五课内容: 自动旋转、 Protocols、 手势识别、一个自定义UIView的Demo
1、自动旋转
[objc] viewplaincopy
- (BOOL)shouldAutorotateToInterfaceOrientation:(UIInterfaceOrientation)orientation
{
return UIInterfaceOrientationIsPortrait(orientation); // only support portrait
return YES; // support all orientations
return (orientation != UIInterfaceOrientationPortraitUpsideDown); // anything but
}
当旋转的时候,view的bounds会改变,子view的frame,子view的子view也会改变。
改变的规则是:struts和springs。
当view的bound改变时,drawRect不会默认调用
红色的I就是struts,中间的红色箭头就是springs。
右边红白色的显示屏似的就是用动画告诉你view如何改变。白色的是父view,红色的是你选中的view。
这个控制在iPhone上一般使用不到,因为屏幕太小了。
幸运的是,有UIView有这么个属性来控制
三种控制方式:
1、
[objc] view
plaincopy
@property (nonatomic) UIViewContentMode contentMode;
UIViewContentMode{Left,Right,Top,Right,BottomLeft,BottomRight,TopLeft,TopRight}
2、缩放的控制属性:UIViewContentModeScale{ToFill,AspectFill,AspectFit} // bit stretching/shrinking
分别是填充,内容填充,内容适应。 toFill是默认的模式,它会自动缩放像素点填满新的空间,可能会造成图形扭曲。
3、
@property (nonatomic) CGRect contentStretch;
指定某一个区域拉伸
初始化一个UIView.
2、协议procotol
[objc] viewplaincopy
@protocol Foo <Other, NSObject> // implementors must implement Other and NSObject too
- (void)doSomething; // implementors must implement this (methods are @required by default)
@optional
- (int)getSomething; // implementors do not have to implement this
- (void)doSomethingOptionalWithArgument:(NSString *)argument; // also optional
@required
- (NSArray *)getManySomethings:(int)howMany; // back to being “must implement”
@property (nonatomic, strong) NSString *fooProp; // note that you must specify strength
@end
可以定义在自己的头文件里,也可以定义在其他类的头文件中。
实现协议,并使用的语法:
[objc] view
plaincopy
#import “Foo.h” // importing the header file that declares the Foo @protocol
@interface MyClass : NSObject <Foo> // MyClass is saying it implements the Foo @protocol
...
@en
[objc] view
plaincopy
id <Foo> obj = [[MyClass alloc] init];
[objc] view
plaincopy
@property (nonatomic, weak) id <Foo> myFooProperty; // properties too!
协议的主要作用:
实现委托和数据源。
委托几乎都是weak的,因为被设置为委托的对象通常都是委托对象的所有者或创建者。
比如controller通常把自己设置成view的委托或数据源,你不要它们相互的strong指针指向。
scrollView例子
[objc] view
plaincopy
@protocol UIScrollViewDelegate
@optional
- (UIView *)viewForZoomingInScrollView:(UIScrollView *)sender;
- (void)scrollViewDidEndDragging:(UIScrollView *)sender willDecelerate:(BOOL)decelerate;
@end
@interface UIScrollView : UIView
@property (nonatomic, weak) id <UIScrollViewDelegate> delegate;
@end
@interface MyViewController : UIViewController <UIScrollViewDelegate>
@property (nonatomic, weak) IBOutlet UIScrollView *scrollView;
@end
@implementation MyViewController
- (void)setScrollView:(UIScrollView *)scrollView {
_scrollView = scrollView;
self.scrollView.delegate = self; // compiler won’t complain
}
- (UIView *)viewForZoomingInScrollView:(UIScrollView *)sender { return ... };
@end
3、手势识别
如何获得触摸事件呢?
得到触摸时间的通知相应预定义好的手势
UIGestureRecognizer类,它是个抽象类,需要实现。
使用手势识别有两步骤:
先创建一个手势,把它附到UIView上,然后当手势被识别时进行处理。第一步由controller来完成
第二步由UIView自己完成
从controller添加一个手势到UIView:
[objc] view
plaincopy
- (void)setPannableView:(UIView *)pannableView
{
_pannableView = pannableView;
UIPanGestureRecognizer *pangr =
[[UIPanGestureRecognizer alloc] initWithTarget:pannableView action:@selector(pan:)];
[pannableView addGestureRecognizer:pangr];
}
target 是手势识别之后的处理者,这里就是view本身。
UIPangestureRecognizer的三个方法:
[objc] viewplaincopy
- (CGPoint)translationInView:(UIView *)aView;
- (CGPoint)velocityInView:(UIView *)aView;
- (void)setTranslation:(CGPoint)translation inView:(UIView *)aView;
第一个告诉移动的距离
第二个告诉移动的速度
第三个是重新设置
手势识别的状态机
@property (readonly) UIGestureRecognizerState state;状态从possible
如果手势比较短:recognized
如果持续:Began - Changed ,
最后Ended
还有Failed 和 Cancelled状态,取消或其他操作中断时会有这个情况。
pan:是什么样的呢:
[objc] view
plaincopy
- (void)pan:(UIPanGestureRecognizer *)recognizer
{
if ((recognizer.state == UIGestureRecognizerStateChanged) ||
(recognizer.state == UIGestureRecognizerStateEnded)) {
CGPoint translation = [recognizer translationInView:self];
// move something in myself (I’m a UIView) by translation.x and translation.y
// for example, if I were a graph and my origin was set by an @property called origin
self.origin = CGPointMake(self.origin.x+translation.x, self.origin.y+translation.y);
[recognizer setTranslation:CGPointZero inView:self];
}
}
其他实例的手势:
UIPinchGestureRecognizer 缩放UIRotationGestureRecognizer 旋转手势,两个手指按下,然后旋转,是个弧度,不是角度。
UISwipeGestureRecognizer 滑动手势, 一个或多个手指滑动,
UITapGestureRecognizer 点击手势
第六课 主要内容:多个MVC的程序和故事版、UINavigationController、 Segues
1、多个MVC
前面的程序都是一个MVC,多个View时,怎么办,那就需要多个Controller。一个MVC只能控制一屏幕或更小的区域。
那如何切换两个MVC呢,用控制器群里的控制器:UINavigationController。
2、UINavigationController是个控制器
也是继承于UIVIewController。UINavigationController的长相如下图:中间有个title。
它是个特殊的controller,因为它有一个Outlet只向一另外一个MVC,就是它的rootViewController。
rootViewController就是出现在白色区域的。原来的rootViewController放到UINavigationController后,它 的bounds高度会变小一些。
通过执行一个segues,可以跳转到另外一个MVC上。就是把新的MVC push都屏幕上,点返回,把当前的MVC pop出来。
3、segues
segues有三种方式:push
model
custom
4、添加Navigation Controller
选中你要嵌入的view Controllser,然后通过Editor的 Embed in包含进来一个Navigation Controller。或者直接拖动到一个viewController连接;
这个箭头表示程序的开始。
5、pop一个ViewController的方法:
- (void)popViewControllerAnimated:(BOOL)animated;
6、两个关于segues非常重要的方法
跳转前准备的方法
[objc] viewplaincopy
- (void)prepareForSegue:(UIStoryboardSegue *)segue sender:(id)sender
{
if ([segue.identifier isEqualToString:@“DoAParticularThing”]) {
UIViewController *newController = segue.destinationViewController;
}
}
可以决定你是否跳转到这个页面,获取到即将跳转页面的controller的实例,这样可以提前去设置它的属性。
通过Identifier跳转的方法:
[objc] viewplaincopy
- (void)performSegueWithIdentifier:(NSString *)segueId sender:(id)sender;
例子:
[objc] view
plaincopy
- (IBAction)rentEquipment
{
if (self.snowTraversingTalent == Skiing) {
[self performSegueWithIdentifier:@“AskAboutSkis” sender:self];
} else {
[self performSegueWithIdentifier:@“AskAboutSnowboard” sender:self];
}
}
7、通过故事版来实例化一个ViewController的方法
NSString *vcid = @“something”;UIViewController *controller = [storyboard instantiateViewControllerWithIdentifier:vcid];
self.storyboard是一个ViewController的属性。
例子:
[objc] view
plaincopy
- (IBAction)doit
{
DoitViewController *doit =
[self.storyboard instantiateViewControllerWithIdentifier:@”doit1”];
doit.infoDoitNeeds = self.info;
[self.navigationController pushViewController:doit animated:YES];
}
获取后,把它push到navigationController展示。
8、一个StoryBoard和Segues的Demo
主要内容:
在两个viewController之间创建segue把ViewController内嵌到NavigationController中去。
segue有两个很重要的属性
这两个属性在跳转时经常用到identifier
destinationViewController
第七课的主要内容:iPad 和iPhone的通用程序
1、UIToolbar上面放的都是UIBarButtonItem
可以参考iOS学习之UINavigationController详解与使用(三)ToolBar这节课的Demo是把UIToolbar拖放到iPad的故事版的顶部来使用。
2、UISplitViewController
UISplitViewController只能在iPad的storyboard使用。3、UISplitViewControllerDelegate
Showing and Hiding View Controllers– splitViewController:shouldHideViewController:inOrientation:
-splitViewController:willHideViewController:withBarButtonItem:forPopoverController:
– splitViewController:willShowViewController:invalidatingBarButtonItem:
– splitViewController:popoverController:willPresentViewController:
这几个代理方法会用到。
有了这些理论知识后,
按command+ ->改变模拟器的方向,上面的的button显示不大好看,改一下 spring&structs。
这样在app水平放下时按钮自动缩放了。
开始通用程序的修改吧
略。。。。
第八课viewController生命周期
1、View Controller Lifecycle
creation通过 一个segue或故事版的instantiateViewControllerWithIdentifer:实例化。
一般情况不要自己定义UIViewController的初始化方法。
awakeFromNib 可选的,awakeFromNib是view的方法,有很多方法可以替代awakeFromNib放置。
awakeFromNib很早期就被调用了,那时候outlet还没连起来。那时候viewController还没完全构建完毕,不过可能有一些事情比如设置 split view delegate需要在非常早的时间完成。
- (void)viewDidLoad;
在实例化和outlet-setting后, viewDidload被调用。
在viewController已经构建完毕,只是没显示出来。
可以放置大部分的初始化的代码,
但是不能放置关于设置view大小的代码。
view 是controller的一个property,是指在视图中最顶层的矩形区域,是你在故事版中编辑的最顶层的那个东西。
view的尺寸放在下个方法。
- (void)viewWillAppear:(BOOL)animated;
在view准备要显示的时候调用。
另外一个合适在viewWillAppear里做的就是 laziy do stuff 缓式动作。
比如lazy init.
viewWillAppear是做那些很费资源的事情的地方
不过太费时的话就得开启新线程来搞。
总之 viewWillAppear适合做两件事:
1.最后时刻延时加载高开销的操作,
2.改变view的几何特性。
- (void)viewWillDisappear:(BOOL)animated
当你的视图将要在屏幕上消失的时候调用
可以在这里记录你view的状态,数据。一般要写到磁盘里,下次进来的时候
[objc] view
plaincopy
- (void)viewWillDisappear:(BOOL)animated
{
[super viewWillDisappear:animated]; // 这个要写
 [self rememberScrollPosition]; // 记住滚动的位置
[self saveDataToPermanentStore]; // maybe do in did instead?
// 注意不要在这里进行比耗时的操作,界面更流畅。
}
Did版本的两个方法。
- (void)viewDidAppear:(BOOL)animated; //可以在显示之后做一些操作,比如动画之类的。
- (void)viewDidDisappear:(BOOL)animated;
都需要调用 super版本方法。在你的操作之前之后都行,看自己的需求。
Frame 改变,如果 struts and spring 不足够的话就用
[objc] view
plaincopy
- (void)view{Will,Did}LayoutSubviews;
- (void)willRotateToInterfaceOrientation:(UIInterfaceOrientation)anOrientation
duration:(NSTimeInterval)seconds;
- (void)willAnimateRotationToInterfaceOrientation:(UIInterfaceOriention)orient
duration:(NSTimeInterval)seconds;
- (void)didRotateFromInterfaceOrientation:(UIInterfaceOrientation)anOrientation;
@property UIInterfaceOrientation interfaceOrientati
viewDidUnload
当内存不足的时候系统会卸载你的view.
最好在这里试着outlet为nil
[objc] view
plaincopy
- (void)viewDidUnload
{
self.faceView = nil;
}
view controller的初始化:
从.xib创建一个UIViewController。那是4.x才创建方式。
用alloc init 创建 ,初始化方法的设计。
从代码创建UIViewController:
覆盖方法- (void)loadView和 设置 self.view
如果从故事版和.xib创建那么请遵守下面几个原则:
不要是实现loadview方法。
不要设置self.view.除了loadview能设置self.view之外,其他都不能设置。
没有设置self.view的话就不要实现Loadview。
尽量不要使用awakeFromNib。
UIView's frame
谁来设置UIView的 frame呢?
答案是:把view放到view组织架构里的那个对象。一般情况下对象是谁啊? 是故事版。
2、UIImageView
- (id)initWithImage:(UIImage *)image; // 他是个UIView,@property (nonatomic, strong) UIImage *image; // will not adjust frame size
记住UIView’s contentMode property
Top Left ScaleToFit 等属性。设置image的在UIImageView的边界缩放等。
3、UIWebView
一个内置在UIView的完整的浏览器。基于Webkit,一个HTML的开源的渲染框架。
支持javascript
重要的属性:
@property (nonatomic) BOOL scalesPagesToFit;
设置是否缩放到合适尺寸。YES就缩放到合适尺寸,如果NO,则保持原网页大小不变。
@property (nonatomic, readonly, strong) UIScrollView *scrollView;
控制滚动。
加载HTML的三个方法:
[objc] view
plaincopy
- (void)loadRequest:(NSURLRequest *)request;
- (void)loadHTMLString:(NSString *)string baseURL:(NSURL *)baseURL;
- (void)loadData:(NSData *)data
MIMEType:(NSString *)MIMEtype
textEncodingName:(NSString *)encodingName
baseURL:(NSURL *)baseURL;
可以指定文件类型,比如pdf来显示。
NSURLRequest
[objc] view
plaincopy
NSURLRequest
+ (NSURLRequest *)requestWithURL:(NSURL *)url;
+ (NSURLRequest *)requestWithURL:(NSURL *)url
cachePolicy:(NSURLRequestCachePolicy)policy
timeoutInterval:(NSTimeInterval)timeoutInterval;
NSURL 基本和NSString类似,一个好的 格式而已,比如 :file:// http:// 上面两个方法的区别主要是缓存策略,超时的设置。如果不指定,那就是默认的。
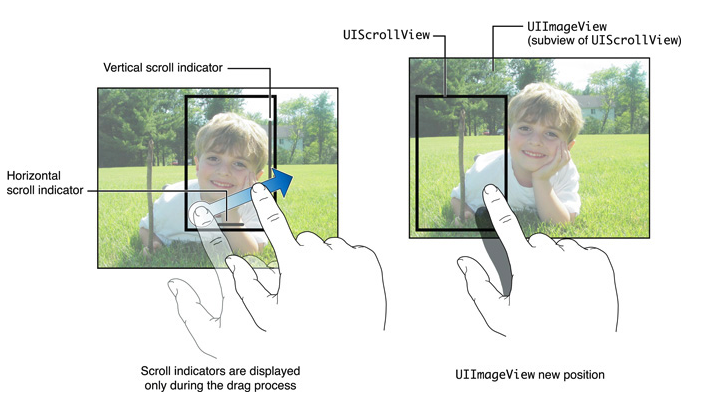
4、ScrollView
ScrollView设计的两个作用是:1、让用户拖拽到想展示的内容区域
2、让用户可以放大缩小内容的区域
我自己找了张手机里的图片,用代码实现scrollview:
[objc] view
plaincopy
UIImage *image = [UIImage imageNamed:@"bigimage"];
UIImageView *iv = [[UIImageView alloc] initWithImage:image];
iv.frame = CGRectMake(0, 0, image.size.width, image.size.height) ;
CGRect fullScreenRect=[[UIScreen mainScreen] applicationFrame];
UIScrollView *scrollView=[[UIScrollView alloc] initWithFrame:fullScreenRect];
[scrollView addSubview:iv];
scrollView.contentSize=CGSizeMake(2592 ,1952);
[self.view addSubview:scrollView];
下图中的方法可以这样是测试:
[objc] view
plaincopy
scrollViewWillEndDragging:withVelocity:targetContentOffset是UIScrollViewDelegate的方法。
-(void)scrollViewWillEndDragging:(UIScrollView *)scrollView withVelocity:(CGPoint)velocity targetContentOffset:(inout CGPoint *)targetContentOffset{
CGPoint upperLeftOfVisible = scrollView.contentOffset;
NSLog(@"x:%f, y:%f", upperLeftOfVisible.x, upperLeftOfVisible.y);
}
放大缩小:
在.h文件实现
[objc] view
plaincopy
UIScrollViewDelegate协议,
UIImage *image = [UIImage imageNamed:@"bigimage"];
imageView = [[UIImageView alloc] initWithImage:image];
imageView.frame = CGRectMake(0, 0, image.size.width, image.size.height) ;
CGRect fullScreenRect=[[UIScreen mainScreen] applicationFrame];
UIScrollView *scrollView=[[UIScrollView alloc] initWithFrame:fullScreenRect];
scrollView.delegate = self;
scrollView.minimumZoomScale = 0.2;
scrollView.maximumZoomScale = 2.0;
[scrollView addSubview:imageView];
scrollView.contentSize=CGSizeMake(2592 ,1952);
[self.view addSubview:scrollView];
- (UIView *)viewForZoomingInScrollView:(UIScrollView *)scrollView
{
return imageView;
}
这样就可<span style="font-family: Arial; background-color: rgb(255, 255, 255);">以放大缩小了。</span>

相关文章推荐
- iOS Animation 主流炫酷动画框架(特效)收集整理
- iOS8学习笔记-构建多视图应用程序
- 瀑布流+图片缩放+一个小问题
- iOS NavigationController NavigationBar设置透明
- [iOS]iOS下实现RTMP直播
- ios自用学习笔记-触摸事件与手势识别
- IOS - 首页横幅修改
- 适配 iOS尺寸
- iOS8—LanuchImage的设置方法
- ios开发中的字符串常量如何处理
- iOS 9_适配
- ios7 兼容之前版本
- 【iOS学习笔记】之block回调函数浅析
- iOS开发-ios7下拉刷新,上提加载快速集成
- actionSheet报错的问题及解决方法
- ios警告框中加入其它控件的方法
- iOS开发笔记—— 获取音频的专辑图与视频的缩略图
- 关于OC的内存管理-01
- IOS OC objc_msgSend的作用
- IOS OC 消息转发机制