IOS学习实例之五---三级控制器
2015-06-26 17:41
567 查看
本实例主要涉及自定义标签栏,三种不同的控制器协调实现导航。
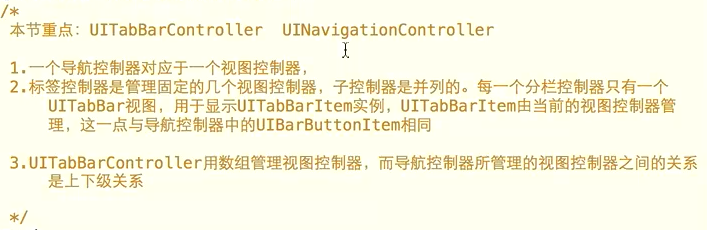
重点:三级控制器,自定义标签
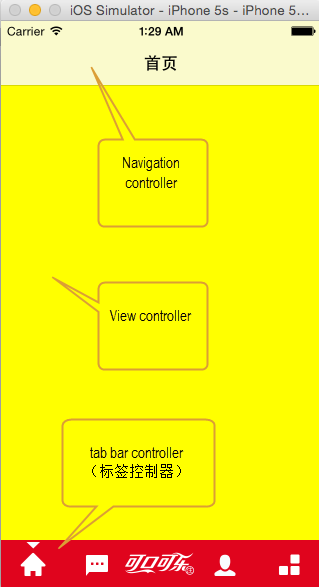
三级控制器: 标签控制器(主控制器),导航控制器,视图控制器
UITabBarController, UINavigationController, UIViewController
源码:
https://github.com/ianzhengnan/TabBar
极客学院视频:
http://www.jikexueyuan.com/course/431.html
实例使用描述:
点击底部标签栏可以实现不同视图的跳转,点击导航栏上的按钮可以跳入新的视图,点击dismiss按钮返回。
点击首页的push按钮跳入新的视图,点击pop返回。
两种导航方式:
1. 模态方式: 这种方式是从视图控制器出发,返回方式是dismiss
2. push方式: 这种方式是从导航控制器出发,返回方式是pop
效果图:
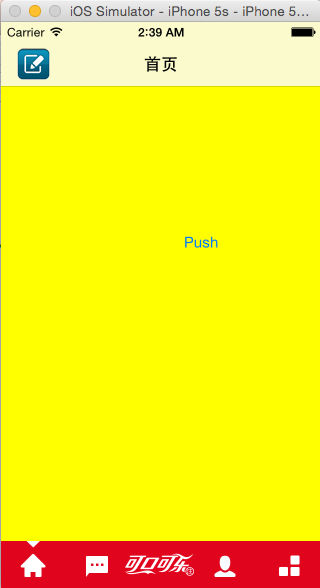
点击push

点击pop返回
重点:
实现步骤:
1. 新建项目,导入素材图片,添加类RootViewController 继承自UITabBarController
2. 在AppDelegate.m中的didFinishLaunchingWithOptions添加如下代码,设置主视图
3. 分别创建五个视图控制器用来对应底部标签栏的五个按钮
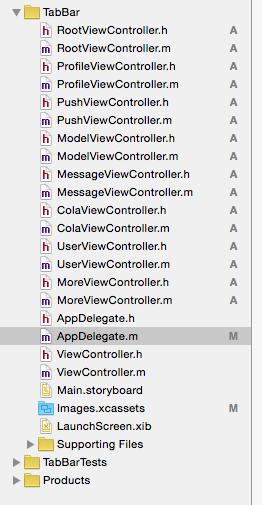
4. 在RootViewController中初始化这几个视图控制器,并把它们的实例放入数组。
5. 自定义标签栏:确定标签栏的位置,背景颜色以及分别创建上面的按钮。并把它添加到主视图中。
6. 设置标签栏每个按钮的点击事件相应方法
7. 在首页视图中实现模态方式跳转
1)自定义导航栏按钮
注意:这里添加按钮的方式有变化,不是addSubview了。
而必须使用UIBarButtonItem的方式
2)实现模态方式跳转
3)使用dismiss方式实现返回。
8. 实现push方式跳转
1)自定义push按钮
2)push方式跳转
3)pop方式返回
重点:三级控制器,自定义标签
三级控制器: 标签控制器(主控制器),导航控制器,视图控制器
UITabBarController, UINavigationController, UIViewController
源码:
https://github.com/ianzhengnan/TabBar
极客学院视频:
http://www.jikexueyuan.com/course/431.html
实例使用描述:
点击底部标签栏可以实现不同视图的跳转,点击导航栏上的按钮可以跳入新的视图,点击dismiss按钮返回。
点击首页的push按钮跳入新的视图,点击pop返回。
两种导航方式:
1. 模态方式: 这种方式是从视图控制器出发,返回方式是dismiss
2. push方式: 这种方式是从导航控制器出发,返回方式是pop
效果图:
点击push
点击pop返回
重点:
实现步骤:
1. 新建项目,导入素材图片,添加类RootViewController 继承自UITabBarController
2. 在AppDelegate.m中的didFinishLaunchingWithOptions添加如下代码,设置主视图
- (BOOL)application:(UIApplication *)application didFinishLaunchingWithOptions:(NSDictionary *)launchOptions {
// Override point for customization after application launch.

self.window = [[UIWindow alloc] initWithFrame:[UIScreen mainScreen].bounds];
self.window.backgroundColor = [UIColor whiteColor];
[self.window makeKeyAndVisible];

RootViewController *rootVC = [[RootViewController alloc] init];

//权限最高的给根视图控制器: 标签控制器---控制---导航控制器---控制---视图控制器
self.window.rootViewController = rootVC;

return YES;
}
3. 分别创建五个视图控制器用来对应底部标签栏的五个按钮
4. 在RootViewController中初始化这几个视图控制器,并把它们的实例放入数组。
//initial view controller
- (void)initViewController{

ProfileViewController *profileVC = [[ProfileViewController alloc] init];
MessageViewController *messageVC = [[MessageViewController alloc] init];
ColaViewController *colaVC = [[ColaViewController alloc] init];
UserViewController *userVC = [[UserViewController alloc] init];
MoreViewController *moreVC = [[MoreViewController alloc] init];
//store view controllers
NSArray *vcArray = @[profileVC, messageVC, colaVC, userVC, moreVC];
//store navigation controllers
NSMutableArray *tabArray = [[NSMutableArray alloc] initWithCapacity:vcArray.count];

for (int i=0; i < vcArray.count; i++) {
UINavigationController *navCtrl = [[UINavigationController alloc] initWithRootViewController:vcArray[i]];
[tabArray addObject:navCtrl];
}
//assign navigation controllers to tabbar controller
self.viewControllers = tabArray;
}
5. 自定义标签栏:确定标签栏的位置,背景颜色以及分别创建上面的按钮。并把它添加到主视图中。
//customize tab bar
- (void)initTabBarView{
//initial tab bar view
_tabBarView = [[UIView alloc] initWithFrame:CGRectMake(0, kScreenHeight - tabViewHeight, kScreenWidth, tabViewHeight)];
_tabBarView.backgroundColor = [UIColor colorWithPatternImage:[UIImage imageNamed:@"mask_navbar"]];
[self.view addSubview:_tabBarView];

//add a array and get the images
NSArray *imageArray = @[@"home_tab_icon_1",@"home_tab_icon_2",@"home_tab_icon_3",@"home_tab_icon_4",@"home_tab_icon_5"];

//create buttons
for (int i = 0; i < imageArray.count; i++) {
UIButton *btn = [UIButton buttonWithType:UIButtonTypeCustom];

[btn setBackgroundImage:[UIImage imageNamed:imageArray[i]] forState:UIControlStateNormal];

btn.frame = CGRectMake(btnWidth * i, (tabViewHeight - btnHeight)/2, btnWidth, btnHeight);

//set tag for button, and make sure tag is great than 100 since the number less than 100 has been reserved by system
btn.tag = 100 + i;
//add click event for button
[btn addTarget:self action:@selector(btnAction:) forControlEvents:UIControlEventTouchUpInside];

[self.tabBarView addSubview:btn];
}
//initial selected imageview
_selectView = [[UIImageView alloc] initWithFrame:CGRectMake(0, 0, btnWidth, btnHeight)];
_selectView.image = [UIImage imageNamed:@"home_bottom_tab_arrow"];
[_tabBarView addSubview:_selectView];
}
6. 设置标签栏每个按钮的点击事件相应方法
#pragma mark - UIButtonAction
- (void)btnAction:(UIButton *)button{
//get current index by tag value
self.selectedIndex = button.tag - 100;

//add a animation for selected image
[UIView animateWithDuration:0.2 animations:^{
_selectView.center = button.center;
} completion:nil];

}
7. 在首页视图中实现模态方式跳转
1)自定义导航栏按钮
注意:这里添加按钮的方式有变化,不是addSubview了。
而必须使用UIBarButtonItem的方式
//customize navigation bar button
- (void)initNavButton{

UIButton *writeBtn = [UIButton buttonWithType:UIButtonTypeCustom];

writeBtn.frame = CGRectMake(0, 0, writeButtonWidth, writeButtonHeight);
[writeBtn setBackgroundImage:[UIImage imageNamed:@"write"] forState:UIControlStateNormal];
[writeBtn addTarget:self action:@selector(presentAction) forControlEvents:UIControlEventTouchUpInside];
//add the btn to navigation bar
UIBarButtonItem *item = [[UIBarButtonItem alloc] initWithCustomView:writeBtn];
self.navigationItem.leftBarButtonItem = item;
}
2)实现模态方式跳转
- (void)presentAction{

ModelViewController *modelVC = [[ModelViewController alloc] init];
//模态视图的方式, 从视图控制器出发,返回方式是dismiss
[self presentViewController:modelVC animated:YES completion:nil];
}
3)使用dismiss方式实现返回。
- (void)viewDidLoad {
[super viewDidLoad];
// Do any additional setup after loading the view.
self.view.backgroundColor = [UIColor blueColor];

UIButton *pushButton = [UIButton buttonWithType:UIButtonTypeRoundedRect];
pushButton.frame = CGRectMake(100, 200, 200, 40);
[pushButton setTitle:@"Dismiss" forState:UIControlStateNormal];
[pushButton addTarget:self action:@selector(dismissAction) forControlEvents:UIControlEventTouchUpInside];

[self.view addSubview:pushButton];
}

- (void)dismissAction{

[self dismissViewControllerAnimated:YES completion:nil];
}

- (void)didReceiveMemoryWarning {
[super didReceiveMemoryWarning];
// Dispose of any resources that can be recreated.
}
8. 实现push方式跳转
1)自定义push按钮
//customize push button
- (void)initPushButton{

UIButton *pushButton = [UIButton buttonWithType:UIButtonTypeRoundedRect];

pushButton.frame = CGRectMake(100, 200, 200, 40);
//[pushButton setImage:<#(UIImage *)#> forState:<#(UIControlState)#>]
//title and image cannot appear together
[pushButton setTitle:@"Push" forState:UIControlStateNormal];
[pushButton addTarget:self action:@selector(pushAction) forControlEvents:UIControlEventTouchUpInside];

[self.view addSubview:pushButton];

}
2)push方式跳转
- (void)pushAction{
//push方式,从导航控制器出发,返回方式是pop
PushViewController *pushVC = [[PushViewController alloc] init];
[self.navigationController pushViewController:pushVC animated:YES];
RootViewController *rootVC = (RootViewController *)self.tabBarController;

[rootVC showTabBar:NO];

// the new method to show view controller
//[self.navigationController showViewController:<#(UIViewController *)#> sender:<#(id)#>]
}
3)pop方式返回
- (void)viewDidLoad {
[super viewDidLoad];
// Do any additional setup after loading the view.
self.view.backgroundColor = [UIColor greenColor];

UIButton *pushButton = [UIButton buttonWithType:UIButtonTypeRoundedRect];
pushButton.frame = CGRectMake(100, 200, 200, 40);
[pushButton setTitle:@"Pop" forState:UIControlStateNormal];
[pushButton addTarget:self action:@selector(popAction) forControlEvents:UIControlEventTouchUpInside];

[self.view addSubview:pushButton];
}

- (void)popAction{
[self.navigationController popViewControllerAnimated:YES];
}

- (void)didReceiveMemoryWarning {
[super didReceiveMemoryWarning];
// Dispose of any resources that can be recreated.
}

相关文章推荐
- PHP的栏目导航程序
- javascript实现当前页导航激活的方法
- 基于jquery固定于顶部的导航响应浏览器滚动条事件
- jquery实现导航固定顶部的效果仿蘑菇街
- jQuery实现带滚动线条导航效果的方法
- jQuery制作的别致导航有阴影背景高亮模式窗口
- iOS开发之路--微博“更多”页面
- Mono for Android 实现高效的导航(Effective Navigation)
- js实现多选项切换导航菜单的方法
- Objective-C的内省(Introspection)用法小结
- php可应用于面包屑导航的递归寻找家谱树实现方法
- js+css实现导航效果实例
- 一款基jquery超炫的动画导航菜单可响应单击事件
- Objective-C中常用的结构体NSRange,NSPoint,NSSize(CGSize),NSRect实例分析
- iOS开发之路--微博骨架搭建
- IOS开发代码分享之获取启动画面图片的string
- Objective-C中NSLog输出格式大全
- Swift调用Objective-C编写的API实例
- Swift、Objective-C、Cocoa混合编程设置指南
- Objective-c代码如何移植为Swift代码 Objective-c代码转移到Swift过程介绍