Mac下搭建 Jenkins+Github+蒲公英/fir.im 持续集成环境(iOS自动打包)
2015-06-25 16:37
639 查看
看了几篇关于使用jenkins持续集成的博客,记录一下自己搭建的过程,顺便做一些更新
1. 安装Jenkins直接下载安装包:http://jenkins-ci.org
或者使用命令行安装
1. 安装Jenkins直接下载安装包:http://jenkins-ci.org
或者使用命令行安装
//安装jenkins $ brew install jenkins //启动jenkins $ jenkins //卸载jenkins $ brew uninstall jenkins //brew无效? 哦 安装homebrew $ ruby -e "$(curl -fsSL https://raw.githubusercontent.com/Homebrew/install/master/install)”[/code]
2.启动Jenkins后使用浏览器访问:http://localhost:8080/
使用安装包安装后会自动打开,如果端口冲突那么请修改端口defaults write /Library/Preferences/org.jenkins-ci httpPort 7070
3.安装插件:系统管理->插件管理 安装Xcode integration;git plugin;PostBuildScript Plugin ; github plugin
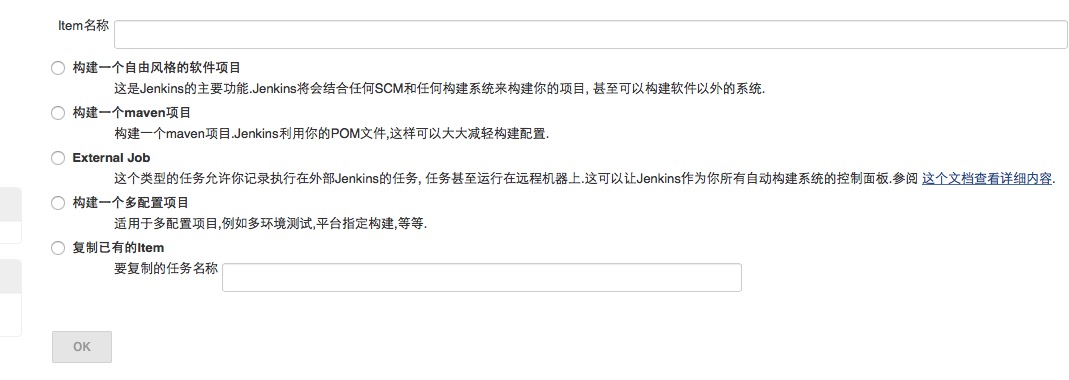
点击左侧工具栏“新建”,选择第一项“构建一个自由风格的软件项目”
5.配置
源码管理
Private项目需要配置ssh key多说几句,本人比较笨踩了坑,写一下jenkin配置ssh key的过程
使用安装包安装,默认装在Users/Shared/Jenkins 所以首先为jenkins用户创建一个密码$ sudo dscl . passwd /Users/jenkins **you pass** //切换到jenkins用户 $ su jenkins //生成SSH KEY $ ssh-keygen -t rsa -b 4096 -C "your_email@example.com" //打开id_rsa.pub 手动复制一下 添加到gitHub $ vi ~/.ssh/id_rsa.pub //测试一下 $ ssh -T git@github.com Hi ***! You've successfully authenticated, but GitHub does not provide shell access.
SSH参考设置链接
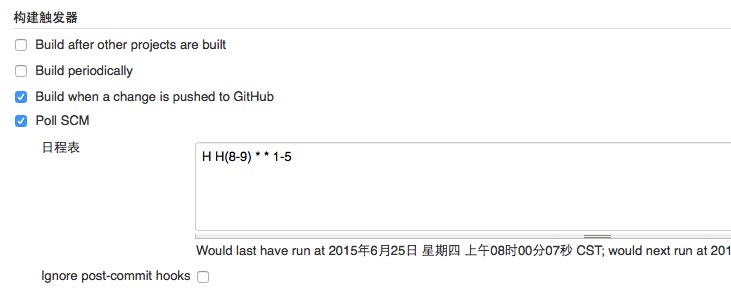
构建触发器
这里就是告诉jenkins什么时候自动构建,如果开始安装了github plugin插件的话就会有Build when a change is pushed to GitHub选项,这里我同时设置了每周一到周五在每天的8点到9点之间执行一次
构建
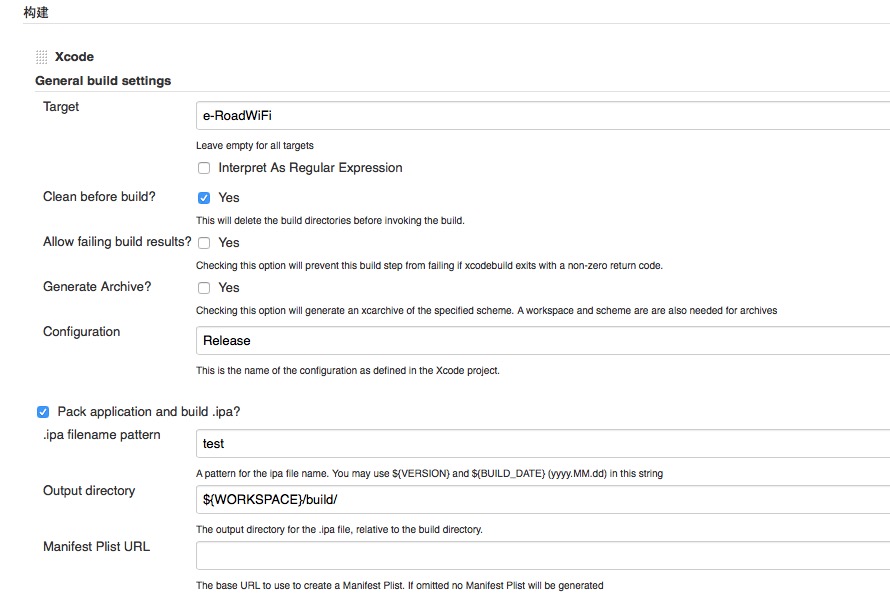
增加构建步骤 -> Xcode
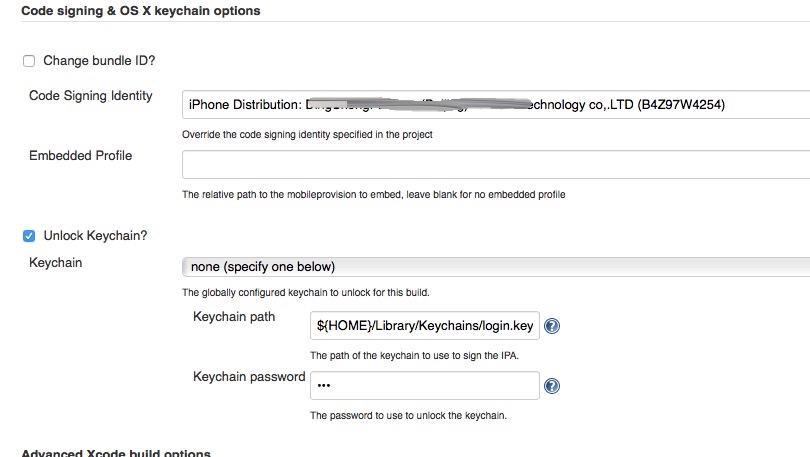
关于证书
如果在构建中出现了”Code Sign error: There are no valid certificate/private key pairs in the default keychain”这个错误,到你的钥匙串串中,把有关iPhone开发的证书从“登录”便签复制一份到“系统”标签里面。
这个问题解决以后你会遇到下一个错误 “Code Sign error: Provisioning profile ‘xxxxx-xxxx-xxxx-xxxxx’ can’t be found”
解决这个问题也很简单,找到相应的.mobileprovision文件,将其复制到/Users/Shared/Jenkins/Library/MobileDevice/Provisioning Profile就可以了
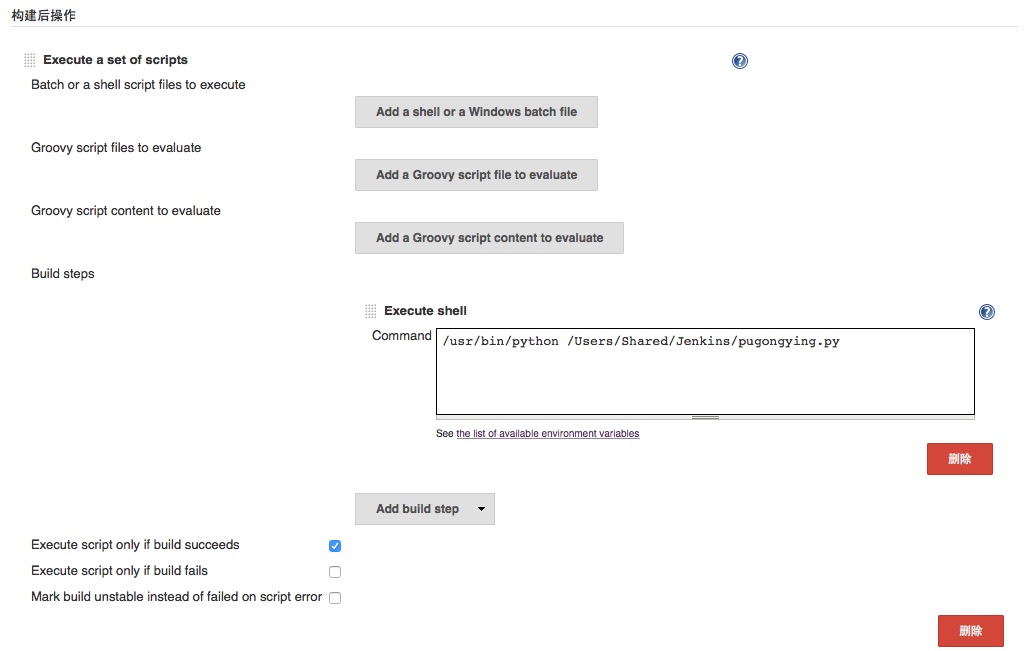
构建后操作
增加构建后操作步骤->Execute a set of scripts->Add build step->Execute shell
点击保存,Job设置完成。
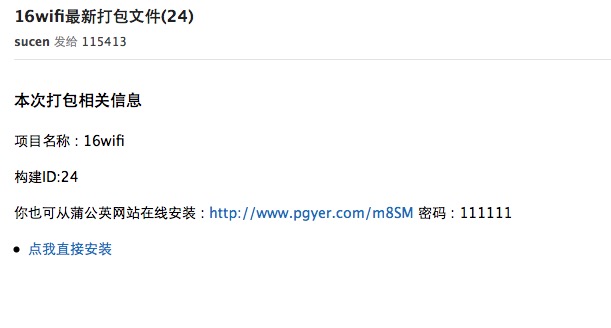
Command里脚本pugongying.py代码如下,需要说明的是,这份代码的原作者是@answer-huang 源码在gitHub 本文的大部分内容参考answer_huang的《我是怎么慢慢变懒的 : Jenkins + 蒲公英》import time import urllib2 import time import json import mimetypes import os import smtplib from email.MIMEText import MIMEText from email.MIMEMultipart import MIMEMultipart #蒲公英应用上传地址 url = 'http://www.pgyer.com/apiv1/app/upload' #蒲公英提供的 用户Key uKey = '**********' #上传文件的文件名(这个可随便取,但一定要以 ipa 结尾) file_name = 'test.ipa' #蒲公英提供的 API Key _api_key = '**********' #安装应用时需要输入的密码,这个可不填 installPassword = '111111' # 运行时环境变量字典 environsDict = os.environ #此次 jenkins 构建版本号 jenkins_build_number = environsDict['BUILD_NUMBER'] #项目名称,用在 拼接 tomcat 文件地址 project_name = '***' #获取 ipa 文件路径 def get_ipa_file_path(): #工作目录下面的 ipa 文件 ipa_file_workspace_path = '/Users/Shared/Jenkins/Home/workspace/' + project_name + '/build/'+file_name return ipa_file_workspace_path # while get_ipa_file_path() is None: # time.sleep(5) #ipa 文件路径 ipa_file_path = get_ipa_file_path() print ipa_file_path #请求字典编码 def _encode_multipart(params_dict): boundary = '----------%s' % hex(int(time.time() * 1000)) data = [] for k, v in params_dict.items(): data.append('--%s' % boundary) if hasattr(v, 'read'): filename = getattr(v, 'name', '') content = v.read() decoded_content = content.decode('ISO-8859-1') data.append('Content-Disposition: form-data; name="%s"; filename="kangda.ipa"' % k) data.append('Content-Type: application/octet-stream\r\n') data.append(decoded_content) else: data.append('Content-Disposition: form-data; name="%s"\r\n' % k) data.append(v if isinstance(v, str) else v.decode('utf-8')) data.append('--%s--\r\n' % boundary) return '\r\n'.join(data), boundary #处理 蒲公英 上传结果 def handle_resule(result): json_result = json.loads(result) print json_result if json_result['code'] is 0: send_Email(json_result) #发送邮件 def send_Email(json_result): appName = json_result['data']['appName'] appKey = json_result['data']['appKey'] appVersion = json_result['data']['appVersion'] appBuildVersion = json_result['data']['appBuildVersion'] appShortcutUrl = json_result['data']['appShortcutUrl'] #邮件接受者 mail_receiver = ['***@***.com'] #根据不同邮箱配置 host,user,和pwd mail_host = 'smtp.126.com' mail_user = '***@**.com' mail_pwd = '****' mail_to = ','.join(mail_receiver) mail_title = project_name + '最新打包文件' + '(' +jenkins_build_number + ')' msg = MIMEMultipart() environsString = '<h3>本次打包相关信息</h3><p>' environsString += '<p>项目名称 : '+ project_name + '<p>' environsString += '<p>构建ID:' + jenkins_build_number +'<p>' environsString += '<p>你也可从蒲公英网站在线安装 : ' + 'http://www.pgyer.com/' + str(appShortcutUrl) + ' 密码 : ' + installPassword + '<p>' environsString += '<li><a href="itms-services://?action=download-manifest&url=https://ssl.pgyer.com/app/plist/' + str(appKey) + '">点我直接安装</a></li>' message = environsString body = MIMEText(message, _subtype='html', _charset='utf-8') msg.attach(body) msg['To'] = mail_to msg['from'] = mail_user msg['subject'] =mail_title try: s = smtplib.SMTP() s.connect(mail_host) s.login(mail_user, mail_pwd) s.sendmail(mail_user, mail_receiver, msg.as_string()) s.close() print 'success' except Exception, e: print e ############################################################# #请求参数字典 params = { 'uKey': uKey, '_api_key': _api_key, 'file': open(ipa_file_path, 'rb'), 'publishRange': '2', 'password': installPassword } coded_params, boundary = _encode_multipart(params) req = urllib2.Request(url, coded_params.encode('ISO-8859-1')) req.add_header('Content-Type', 'multipart/form-data; boundary=%s' % boundary) try: resp = urllib2.urlopen(req) body = resp.read().decode('utf-8') handle_resule(body) except urllib2.HTTPError as e: print(e.fp.read())
OK 最后 点击 立即构建
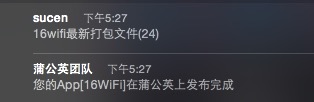
稍等几分钟收到邮件
这种方法适合做日常测试,或者让产品经理更好的了解进度。如果做上线测试建议使用iTunes Connect +Testflight, 保证提交审核的版本跟测试最后看到的版本是同一个包!介绍的文章有很多了 随便 来一个吧 《如何使用TestFlight进行Beta测试》
Jenkins相关:《Jenkins+Github+Testflight在Mac下搭建持续集成环境》
《我是怎么慢慢变懒的 : Jenkins + 蒲公英》
补充遇到的问题
1.构建失败提示:–resource-rules has been deprecated in mac os x >= 10.10
解决:选择 project > Targets > Select your target > Build Settings >
Code Signing Resource Rules Path 添加 $(SDKROOT)/ResourceRules.plist
2.构建失败提示:
FATAL: Build directory does not exist at /Users/Shared/Jenkins/Home/**. Potential configuration issue.
Build step ‘Xcode’ marked build as failure
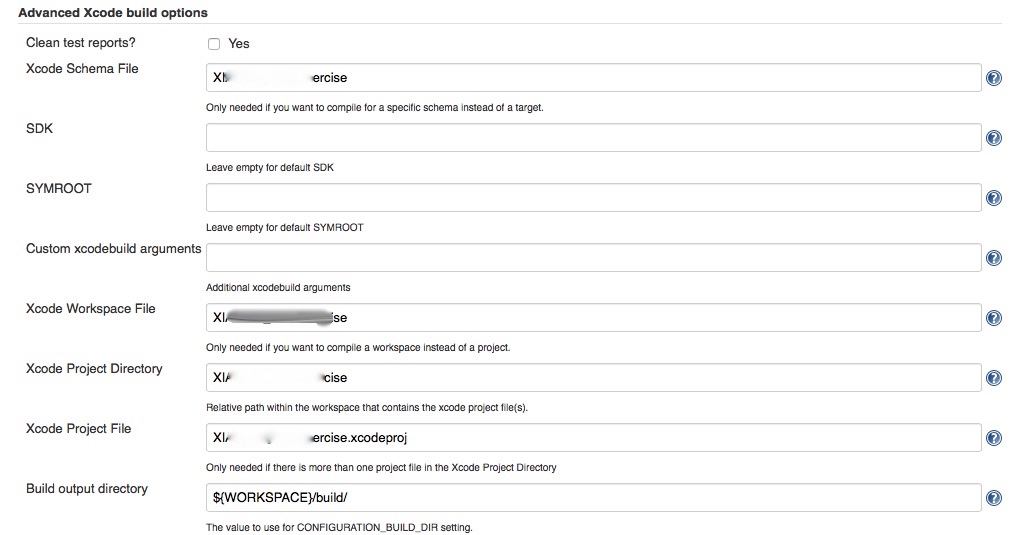
看了jenkins论坛,上面发了相识问题也没有,仔细检查一下发现 Advanced Xcode build options 少配置了一项,Build output directory设置为${WORKSPACE}/build/ OK解决!
3.注意:Schemes 勾选shared
4.在Xcode配置 Advanced Xcode build options -
Custom xcodebuild arguments 填写:CODE_SIGN_RESOURCE_RULES_PATH=$(SDKROOT)/ResourceRules.plist


相关文章推荐
- 峰回路转,Firefox 浏览器即将重返 iOS 平台
- 峰回路转,Firefox 浏览器即将重返 iOS 平台
- 关于Jenkins在Linux快速搭建持续集成环境
- 不可修补的 iOS 漏洞可能导致 iPhone 4s 到 iPhone X 永久越狱
- iOS 12.4 系统遭黑客破解,漏洞危及数百万用户
- 每日安全资讯:NSO,一家专业入侵 iPhone 的神秘公司
- [转][源代码]Comex公布JailbreakMe 3.0源代码
- 用photoshop制作逼真的蒲公英步骤第1/2页
- js判断客户端是iOS还是Android等移动终端的方法
- IOS开发环境windows化攻略
- .net平台推送ios消息的实现方法
- 探讨Android与iOS,我们将何去何从?
- Android、iOS和Windows Phone中的推送技术详解
- IOS 改变键盘颜色代码
- Android和IOS的浏览器中检测是否安装某个客户端的方法
- javascript实现阻止iOS APP中的链接打开Safari浏览器
- iOS开发之路--微博OAuth授权_取得用户授权的accessToken
- ios通过按钮点击异步加载图片
- ios中图像进行压缩方法汇总