【Android开发】网络编程及Internet应用-使用HttpClient访问网络
2015-06-08 16:37
627 查看
前面介绍了使用java.net包中的HttpURLConnection类来访问网络,在一般情况下,如果只需要到某个简单页面提交请求并获取服务器的响应,完全可以使用该技术来实现。不过,对于比较复杂的联网操作,使用HttpURLConnection类就不一定能满足要求,这时,可以使用Apache组织提供的HttpClient项目来实现。在Android中,已经成功的集成了HttpClient,所以可以直接在Android中使用HttpClient来访问网络。
HttpClient实际上是对Java提供的访问网络的方法进行了封装。HttpURLConnection类中的输入\输出流操作,在HttpClient中被统一封装成了HttpGet、HttpPost和HttpResponse类,这样就简化了操作。其中,HttpGet类代表发送GET请求;HttpPost类代表发送POST请求;HttpResponse类代表处理响应的对象。
同使用HttpURLConnection类一样,使用HttpClient发送HTTP请求也可以分为发送GET请求和POST请求两种,下面分别进行介绍。
1.发送GET请求
需要以下几个步骤
(1)创建HttpClient对象
(2)创建HttpGet对象
(3)如果需要发送请求参数,可以直接将要发送的参数连接到URL地址中,也可以调用HttpGet的setParams()方法来添加请求参数
(4)调用HttpClient对象的execute()方法发送请求。执行该方法将返回一个HttpResponse对象。
(5)调用HttpResponse的getEntity()方法,可获得包含服务器相应内容的HttpEntity对象,通过该对象可以获得服务器的相应内容。
下面通过一个实例来说明如何使用HttpClient来发送GET请求
界面:有一个"发送Get请求"的按钮和一个文本区域,点击按钮可以在文本区查看服务器端返回的数据
res/layout/main.xml:
界面图略
主界面
MainActivity:
在安卓的配置文件AndroidManifest.xml中别忘记加入访问网络的权限:
在JAVAEE工作台(或MyEclipse)中创建一个名为"WenXinTest"的Web应用,在index.jsp中写下如下关键代码:
接着将应用部署至tomcat,启动tomcat进行测试。
客户端测试结果如图
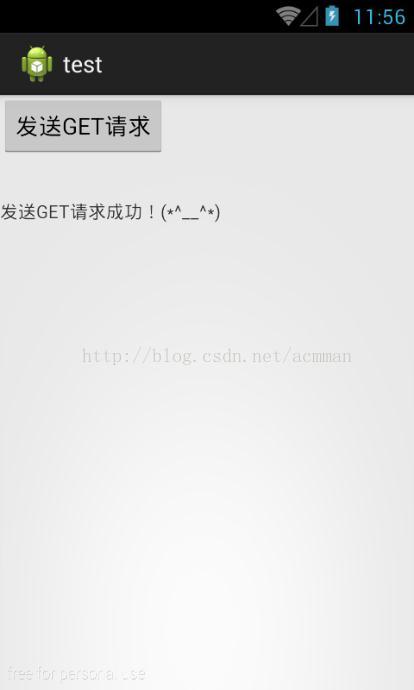
证明数据已经由客户端发至Web应用,然后经由服务端处理后发回客户端
2.发送POST请求
同使用HttpURLConnection类发送请求一样,对于复杂的请求数据,也需要使用POST方式发送,使用HttpClient发送POST请求大致可以分为以下几个步骤:
(1)创建HttpClient对象
(2)创建HttpPost对象
(3)如果需要发送请求参数,可以调用HttpPost的setParam()方法来添加请求参数,也可以调用setEntity()方法来设置请求参数。
(4)调用HttpClient对象的execute()方法发送请求,该方法将返回一个HttpResponse对象
(5)调用HttpResponse的getEntity()方法,可以获得包含服务器相应内容的HttpEntity对象,通过该对象可以获取服务器的响应内容。
下面通过一个实例来说明如何使用HttpClient来发送POST请求
界面:一个编辑框用来填写昵称和微博信息,一个按钮用来实现发布,下面的文本框显示服务器返回的信息。
res/layout/main.xml:
界面图略
主界面
MainActivity:
在安卓的配置文件AndroidManifest.xml中别忘记加入访问网络的权限:
在JAVAEE工作台(或MyEclipse)中创建一个名为"WenXinTest"的Web应用,在index.jsp中写下如下关键代码:
接着将应用部署至tomcat,启动tomcat进行测试。
客户端测试结果如图
证明数据已经由客户端发至Web应用,然后经由服务端处理后发回客户端
转载请注明出处:http://blog.csdn.net/acmman/article/details/46414549
HttpClient实际上是对Java提供的访问网络的方法进行了封装。HttpURLConnection类中的输入\输出流操作,在HttpClient中被统一封装成了HttpGet、HttpPost和HttpResponse类,这样就简化了操作。其中,HttpGet类代表发送GET请求;HttpPost类代表发送POST请求;HttpResponse类代表处理响应的对象。
同使用HttpURLConnection类一样,使用HttpClient发送HTTP请求也可以分为发送GET请求和POST请求两种,下面分别进行介绍。
1.发送GET请求
需要以下几个步骤
(1)创建HttpClient对象
(2)创建HttpGet对象
(3)如果需要发送请求参数,可以直接将要发送的参数连接到URL地址中,也可以调用HttpGet的setParams()方法来添加请求参数
(4)调用HttpClient对象的execute()方法发送请求。执行该方法将返回一个HttpResponse对象。
(5)调用HttpResponse的getEntity()方法,可获得包含服务器相应内容的HttpEntity对象,通过该对象可以获得服务器的相应内容。
下面通过一个实例来说明如何使用HttpClient来发送GET请求
界面:有一个"发送Get请求"的按钮和一个文本区域,点击按钮可以在文本区查看服务器端返回的数据
res/layout/main.xml:
<?xml version="1.0" encoding="utf-8"?>
<LinearLayout xmlns:android="http://schemas.android.com/apk/res/android"
xmlns:tools="http://schemas.android.com/tools"
android:id="@+id/ll1"
android:layout_width="fill_parent"
android:layout_height="fill_parent"
android:orientation="vertical" >

<Button android:id="@+id/button"
android:layout_width="wrap_content"
android:layout_height="wrap_content"
android:text="发送GET请求"/>

<TextView android:id="@+id/textView1"
android:layout_width="wrap_content"
android:layout_height="wrap_content"/>

</LinearLayout>
界面图略
主界面
MainActivity:
package com.example.test;

import java.io.IOException;

import org.apache.http.HttpResponse;
import org.apache.http.HttpStatus;
import org.apache.http.client.ClientProtocolException;
import org.apache.http.client.HttpClient;
import org.apache.http.client.methods.HttpGet;
import org.apache.http.impl.client.DefaultHttpClient;
import org.apache.http.util.EntityUtils;

import android.app.Activity;
import android.os.Bundle;
import android.os.Handler;
import android.os.Message;
import android.view.View;
import android.view.View.OnClickListener;
import android.view.Window;
import android.widget.Button;
import android.widget.TextView;

public class MainActivity extends Activity{
private Button button;//声明一个"发送GET请求"按钮对象
private Handler handler;//声明一个Handler对象
private String result="";//声明一个代表显示结果的字符串
private TextView resultTV;//声明一个显示结果的文本框对象
@Override
public void onCreate(Bundle savedInstanceState) {
super.onCreate(savedInstanceState);
setContentView(R.layout.main);

resultTV=(TextView)findViewById(R.id.textView1);
button=(Button)findViewById(R.id.button);
//为按钮添加单击事件监听
button.setOnClickListener(new OnClickListener() {

@Override
public void onClick(View arg0) {
//创建一个新线程,用于发送并获取GET请求
new Thread(new Runnable() {

@Override
public void run() {
send();
Message m=handler.obtainMessage();
handler.sendMessage(m);
}
}).start();

}
});

handler=new Handler(){

@Override
public void handleMessage(Message msg) {
if(result!=null){
resultTV.setText(result);
}
super.handleMessage(msg);
}

};
}

public void send() {
String target="http://192.168.1.113:8080/WeiXinTest/index.jsp?param=get";//要提交的目标地址
HttpClient httpclient=new DefaultHttpClient();
HttpGet httpRequest=new HttpGet(target);
HttpResponse httpResponse;
try {
httpResponse=httpclient.execute(httpRequest);
if(httpResponse.getStatusLine().getStatusCode()==HttpStatus.SC_OK){
result=EntityUtils.toString(httpResponse.getEntity());
}else{
result="请求失败";
}
} catch (ClientProtocolException e) {
e.printStackTrace();
} catch (IOException e) {
e.printStackTrace();
}

}
}
在安卓的配置文件AndroidManifest.xml中别忘记加入访问网络的权限:
<!-- 添加链接网络的权限 -->
<uses-permission android:name="android.permission.INTERNET"/>
在JAVAEE工作台(或MyEclipse)中创建一个名为"WenXinTest"的Web应用,在index.jsp中写下如下关键代码:
<%@ page language="java" import="java.util.*" pageEncoding="UTF-8" contentType="text/html"%>

<%
String param=request.getParameter("param");//获取参数值
if(!"".equals(param)||param!=null){
if("get".equals(param)){
out.print("发送GET请求成功!(*^__^*) ");
}
}
%>
接着将应用部署至tomcat,启动tomcat进行测试。
客户端测试结果如图
证明数据已经由客户端发至Web应用,然后经由服务端处理后发回客户端
2.发送POST请求
同使用HttpURLConnection类发送请求一样,对于复杂的请求数据,也需要使用POST方式发送,使用HttpClient发送POST请求大致可以分为以下几个步骤:
(1)创建HttpClient对象
(2)创建HttpPost对象
(3)如果需要发送请求参数,可以调用HttpPost的setParam()方法来添加请求参数,也可以调用setEntity()方法来设置请求参数。
(4)调用HttpClient对象的execute()方法发送请求,该方法将返回一个HttpResponse对象
(5)调用HttpResponse的getEntity()方法,可以获得包含服务器相应内容的HttpEntity对象,通过该对象可以获取服务器的响应内容。
下面通过一个实例来说明如何使用HttpClient来发送POST请求
界面:一个编辑框用来填写昵称和微博信息,一个按钮用来实现发布,下面的文本框显示服务器返回的信息。
res/layout/main.xml:
<?xml version="1.0" encoding="utf-8"?>
<LinearLayout xmlns:android="http://schemas.android.com/apk/res/android"
xmlns:tools="http://schemas.android.com/tools"
android:id="@+id/ll1"
android:layout_width="fill_parent"
android:layout_height="fill_parent"
android:orientation="vertical" >

<EditText android:id="@+id/editView1"
android:layout_width="match_parent"
android:layout_height="wrap_content"/>

<Button android:id="@+id/button"
android:layout_width="wrap_content"
android:layout_height="wrap_content"
android:text="发送POST请求"/>

<TextView android:id="@+id/textView1"
android:layout_width="wrap_content"
android:layout_height="wrap_content"/>

</LinearLayout>
界面图略
主界面
MainActivity:
package com.example.test;

import java.io.IOException;
import java.io.UnsupportedEncodingException;
import java.util.ArrayList;
import java.util.List;

import org.apache.http.HttpResponse;
import org.apache.http.HttpStatus;
import org.apache.http.NameValuePair;
import org.apache.http.client.ClientProtocolException;
import org.apache.http.client.HttpClient;
import org.apache.http.client.entity.UrlEncodedFormEntity;
import org.apache.http.client.methods.HttpPost;
import org.apache.http.impl.client.DefaultHttpClient;
import org.apache.http.message.BasicNameValuePair;
import org.apache.http.util.EntityUtils;

import android.app.Activity;
import android.os.Bundle;
import android.os.Handler;
import android.os.Message;
import android.view.View;
import android.view.View.OnClickListener;
import android.widget.Button;
import android.widget.EditText;
import android.widget.TextView;
import android.widget.Toast;

public class MainActivity extends Activity{
private EditText nickname;//获取一个输入昵称的编辑框对象
private EditText content; //获取一个输入文本内容的编辑框对象
private Button button;//声明一个"发送POST请求"按钮对象
private Handler handler;//声明一个Handler对象
private String result="";//声明一个代表显示结果的字符串
private TextView resultTV;//声明一个显示结果的文本框对象
@Override
public void onCreate(Bundle savedInstanceState) {
super.onCreate(savedInstanceState);
setContentView(R.layout.main);

nickname=(EditText)findViewById(R.id.nickname);
content=(EditText)findViewById(R.id.content);
resultTV=(TextView)findViewById(R.id.textView1);
button=(Button)findViewById(R.id.button);
//为按钮添加单击事件监听
button.setOnClickListener(new OnClickListener() {

@Override
public void onClick(View arg0) {
if("".equals(content.getText().toString())){
Toast.makeText(MainActivity.this,"请输入要发表的内容", Toast.LENGTH_SHORT).show();
return;
}
//创建一个新线程,用于发送并获取GET请求
new Thread(new Runnable() {

@Override
public void run() {
send();
Message m=handler.obtainMessage();//获取一个Message
handler.sendMessage(m);//发送消息
}
}).start();//开启线程

}
});

handler=new Handler(){

@Override
public void handleMessage(Message msg) {
if(result!=null){
resultTV.setText(result);
content.setText("");//清空内容编辑框
nickname.setText("");//清空昵称编辑框
}
super.handleMessage(msg);
}

};
}

public void send() {
String target="http://192.168.1.113:8080/WeiXinTest/index.jsp";//要提交的目标地址
HttpClient httpclient=new DefaultHttpClient();
HttpPost httpRequest=new HttpPost(target);
//将要传递的参数保存到List集合中
List<NameValuePair> params=new ArrayList<NameValuePair>();
//NameValuePair类似于Java.util.HashMap,有一个键值对
params.add(new BasicNameValuePair("param","post"));//标记参数
params.add(new BasicNameValuePair("nickname",nickname.getText().toString()));//昵称
params.add(new BasicNameValuePair("content",content.getText().toString()));//内容

try {
httpRequest.setEntity(new UrlEncodedFormEntity(params,"utf-8"));//设置编码方式
HttpResponse httpResponse=httpclient.execute(httpRequest);//执行HttpClient请求
if(httpResponse.getStatusLine().getStatusCode()==HttpStatus.SC_OK){//如果请求成功
result+=EntityUtils.toString(httpResponse.getEntity());//获取返回的字符串
}else{
result="请求失败";
}
} catch (UnsupportedEncodingException e1) {
e1.printStackTrace();
} catch (ClientProtocolException e) {
e.printStackTrace();
} catch (IOException e) {
e.printStackTrace();
}

}
}
在安卓的配置文件AndroidManifest.xml中别忘记加入访问网络的权限:
<!-- 添加链接网络的权限 -->
<uses-permission android:name="android.permission.INTERNET"/>
在JAVAEE工作台(或MyEclipse)中创建一个名为"WenXinTest"的Web应用,在index.jsp中写下如下关键代码:
<pre name="code" class="html"><%@ page language="java" import="java.util.*" pageEncoding="UTF-8" contentType="text/html"%>

<%
String param=request.getParameter("param");//获取参数值
if(!"".equals(param)||param!=null){
if("get".equals(param)){
out.print("发送GET请求成功!(*^__^*) ");
}else if("post".equals(param)){
String content=request.getParameter("content");
String nickname=request.getParameter("nickname");
if(content!=null&&nickname!=null){
nickname=new String(nickname.getBytes("iso-8859-1"),"utf-8");
content=new String(content.getBytes("iso-8859-1"),"utf-8");
String date=new java.util.Date().toLocaleString();
out.println("["+nickname+"]于"+date+"发表一条微博,内容如下:");
out.println(content);
}
}
}
%>
接着将应用部署至tomcat,启动tomcat进行测试。
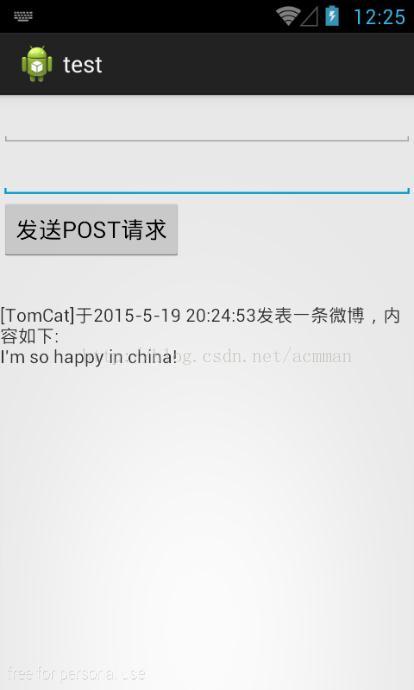
客户端测试结果如图
证明数据已经由客户端发至Web应用,然后经由服务端处理后发回客户端
转载请注明出处:http://blog.csdn.net/acmman/article/details/46414549

相关文章推荐
- Restful Web Service - Http应用层的协议
- TCP close_wait 状态的解释
- 【Android开发】网络编程及Internet应用-通过HTTP访问网络
- 金融数据中心—容灾备份传输解决方案
- 安卓通过网络获得北京时间
- SNMP MIB完整手册
- ACE中网络通讯编程基本架构
- 黑马程序员 - 技术 blog13 之 网络编程 by 八戒
- TCP 和 UDP 绑定同一端口通信的解释
- HTTP请求方法及响应码详解(http get post head)
- tcp_tw_reuse、tcp_tw_recycle 使用场景及注意事项
- 手把手教你玩转网络编程模型之完成例程(Completion Routine)
- lua http
- iOS 判断网络是否链接 、 AFNetworking请求超时和请求失败
- iOS安全系列之一:HTTPS
- JasperException: absolute uri: http://java.sun.com/jsp/jstl/core cannot be resolved
- java http 链接超时判断(转)
- 弱网络下通讯研究
- python网络协议
- vb在线获取网络时间