自定义微博小尾巴(源码+解析)
2015-06-04 13:27
381 查看
前言:
自王思聪发布了那条小尾巴是 iPhone6 的微博后, 越来越多的人跟风, 把小尾巴改成了iPhone6. 但是, 没多久, 新浪就把原先的办法给和谐了。原先的办法很简单, 就是通过网页发布窗, 手动设置app_url(也就是每个型号手机对应的key), 在这里发布微博, 就能实现修改微博小尾巴。比如, 下面的是iPhone5S的代码!!
http://widget.weibo.com/dialog/PublishWeb.php?mid=&default_text=&language=zh_cn&app_src=http://widget.weibo.com/dialog/PublishWeb.php?mid=&default_text=&language=zh_cn&app_src=3G5oUM&tag=&title=%E5%8F%91%E5%B8%83%E5%BE%AE%E5%8D%9A&button=publish&re
我之前说过了. 这个方法已经被和谐了, 现在使用这个, 发出来的都是 "来自 发布窗"。
但是总是有解决办法的。 花了两天时间, 我写了这个基于iOS平台的 APP, 来实现自定义修改微博小尾巴。
效果图:


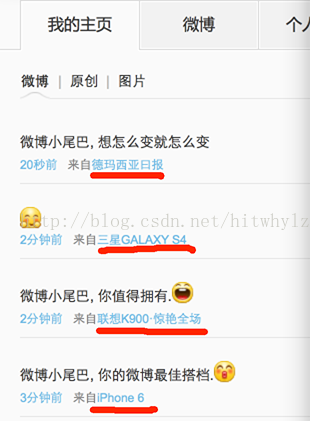
看到这里, 如果你还想继续学习实现方法。 欢迎继续往下面看。 应该会有所收获。建议先下载源码, 对应着看。 (源码是基于iOS的。 但是实现方法, 相应接口和数据,都是通用的)
当然, 这个接口是新浪的。所以, 什么时候会被和谐掉. 谁也不知道。 总之, 现在能用就对了。
源码下载链接: https://github.com/colin1994/weiboTail.git
内容包括:
微博接口分析UITableView + UISearchBar 使用
UITableView分级菜单
有米广告嵌入
一。 微博接口分析
我们观察微博尾巴, 可以得到两大类:手机型号和应用名称。 并不存在类似QQ空间那样, 黄砖特权的自定义。 并且, 它的蓝色链接都是有效的。
手机型号, 我们正常发微博的时候, 如果是手机, 它会根据设备硬件信息, 自动显示对应尾巴。 每个设备, 新浪都会为它分配一个app_url, 这个是唯一的, 包括新上市的iPhone 6 也有其对应的app_url。
应用名称, 就是各个在微博开发平台注册过的应用, 每个应用都有独立的分享链接, 在应用中分享, 就会带上对应的尾巴。而区区分各个应用的,就是对应的appKey。
好了,分析完了。下面具体看看我们实现这个功能需要做的。
1. 获取各个手机型号的app_url。
这个我已经收集好了。 当然, 并不是全部的。 只是罗列的比较常用的。 当然, iPhone的几种都是包括了... 装逼必备嘛。可以直接使用。文件格式是.plist. iOS可以直接打开, 但是其他系统上,需要自己去读,它的数据格式是XML。 读取应该是没有问题的。 至于如何获取, 方法如下: 1, 百度收集。 2.右键微博, 查看链接。
2. 手机型号调用方法。
之前的方法, 是调用发布窗, 但是这个已经被和谐了。 同样的, 我尝试调用“话题窗”,发现这个功能还是可以的,可以正常自定义尾巴。并且,我们可以自定义一个话题, 这样,使用《微博小尾巴》这个应用所有人发的微博,都会在这里显示,也是比较方便的。具体调用方法如下:
[objc]
view plaincopy
webView.webStr = [NSString stringWithFormat:@"http://widget.weibo.com/topics/topic_vote_base.php?tag=来自微博小尾巴&isshowright=0&language=zh_cn&dup=1&antispam=1&isOutTopicSearch=2&border=0&version=base&footbar=0&app_src=%@", appKey];
这里的webStr 是一个NSStirng字符串, 用来保存对应的URL。 appKey根据选择的手机型号, 从plist中获取。
webStr传入后, 继续调用显示。
[objc]
view plaincopy
webView = [[UIWebView alloc]initWithFrame:CGRectMake(0, 64, 320, Screen_height-64)];
request =[NSURLRequest requestWithURL:[NSURL URLWithString:[webStr stringByAddingPercentEscapesUsingEncoding:NSUTF8StringEncoding]]];
[webView setDelegate:self];
[self.view addSubview: webView];
[webView loadRequest:request];
这样的话, 就可以通过网页形式发布微博。 然后显示你所喜欢的小尾巴了。 很简单吧。
3. 应用appKey获取和使用
同样的, 我也收集了100多个应用名称, 都挺有意思的。获取方法: 进入微博应用广场----> 选择某个应用----->显示页面源码------>搜索appKey。 即可获取。
调用方法:
[objc]
view pla
122a7
incopy
webView.webStr = [NSString stringWithFormat:@"http://v.t.sina.com.cn/share/share.php?appkey=%@&;content=utf8", appKey];
二。UITableView + UISearchBar 使用
[objc]view plaincopy
//添加列表
myTableView = [[UITableView alloc]initWithFrame:CGRectMake(0, 104, 320, Screen_height - 154)];
myTableView.delegate = self;
myTableView.dataSource = self;
//背景颜色
myTableView.backgroundColor = [UIColor colorWithPatternImage:[UIImage imageNamed:@"eyeBackground.jpg"]];
[self.view addSubview:myTableView];
//初始化搜索列表bar
filteredArr = [[NSMutableArray alloc]init];
searchBarReagion = [[UISearchBar alloc] initWithFrame:CGRectMake(0,64,320,44)];
searchBarReagion.placeholder = @"搜索";
searchBarReagion.delegate = self;
[self.view addSubview:searchBarReagion];
[objc]
view plaincopy
#pragma mark
#pragma mark SearchBar Delegate
- (void) searchBarTextDidBeginEditing: (UISearchBar*) searchBar
{
[searchBarReagion setShowsCancelButton: YES animated: YES];
}
- (void)searchBar:(UISearchBar *)searchBar textDidChange:(NSString *)searchText
{
isSearchActiveDM = TRUE;
[filteredArr removeAllObjects];
for (int i=0; i<resultArr.count; i++)
{
NSDictionary *countryDictinary = [resultArr objectAtIndex:i];
NSRange result=[[countryDictinary objectForKey:@"appName"] rangeOfString:searchText options:NSCaseInsensitiveSearch];
if(result.length>0)
{
[filteredArr addObject:countryDictinary];
}
}
[myTableView reloadData];
}
- (void)searchBarSearchButtonClicked:(UISearchBar *)searchBar
{
[searchBarReagion resignFirstResponder];
[searchBarReagion setShowsCancelButton: NO animated: YES];
}
- (void)searchBarCancelButtonClicked:(UISearchBar *) searchBar
{
isSearchActiveDM = FALSE;
searchBarReagion.text = @"";
[searchBarReagion setShowsCancelButton: NO animated: YES];
[searchBarReagion resignFirstResponder];
[myTableView reloadData];
}
[objc]
view plaincopy
- (NSInteger)tableView:(UITableView *)tableView numberOfRowsInSection:(NSInteger)section
{
if (isSearchActiveDM)
{
return [filteredArr count];
}
return [resultArr count];
}
通过上面的代码, 可以看出, 其实, UITableView 和 UISearchBar 没有直接联系的。 都实现各自的方法。
只是, 在搜索框输入内容后, 标记为 isSearchActiveDM。 然后在UITableView需要实现的各个方法中, 通过判断是否处于isSearchActiveDM, 来显示不同的数据。
从而达到动态搜索的效果。
三。 UITableView分级菜单
这里, 我在code4app中发现了一个不错的demo。已经被我整合到应用中了。源文件在NavigationStackResource这个文件夹中。
调用方法:
[objc]
view plaincopy
//Initialize the controller data
NSString* plistPath = [[NSBundle mainBundle] pathForResource: @"NavStackControllerData"
ofType: @"plist"];
// Build the array from the plist
self.jsonDictionary = [[NSDictionary alloc] initWithContentsOfFile:plistPath];
//customizing..
[self setHeaderLabelFont:[UIFont fontWithName:@"HelveticaNeue-Light" size:20.0f]];
[self setHeaderLabelColor:[UIColor blackColor]];
[self setHeaderBackGroundColor:[UIColor whiteColor]];
[self setSelectedHeaderLabelFont:[UIFont fontWithName:@"HelveticaNeue-Bold" size:20.0f]];
[self setSelectedHeaderLabelColor:[UIColor blackColor]];
[self setSelectedHeaderBackGroundColor:[UIColor whiteColor]];
[self setHeaderSeparatorColor:[UIColor lightGrayColor]];
选择各个cell响应方法:
[objc]
view plaincopy
- (void)tableView:(UITableView *)tableView didSelectRowAtIndexPath:(NSIndexPath *)indexPath
{
appKey = [[[[self.jsonDictionary objectForKey:self.clickedCountryName]objectForKey:@"subheadingArr"]objectAtIndex:indexPath.row]objectForKey:@"subheadingKey"];
appName = [[[[self.jsonDictionary objectForKey:self.clickedCountryName]objectForKey:@"subheadingArr"]objectAtIndex:indexPath.row]objectForKey:@"subheadingName"];
[self performSegueWithIdentifier:@"phonePushToWeb" sender:self];
}
四。有米广告的植入
1. 注册应用,申请ID
1)请登陆到 http://www.youmi.net/register 注册一个开发者账号2)点击
创建应用进行新应用创建。
3)查看
应用详情,获取发布ID和应用密钥,在后续初始化中使用。(
注意:一个appid只能严格对应一个bundle
id。如果有特殊需要得联系客服
)
2. 下载YouMiSDK iOS 压缩包
你下载的压缩包解压后包含了下面几个文件: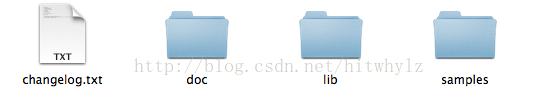
doc文件夹中的doc.html为中文教程,doc_en.html是英文教程。
lib文件夹就是要添加到你的工程的文件夹,里面包含了libYouMi.a静态文件和头文件。
samples文件夹YouMiSDK的程序例子。
3. 往工程导入头文件, 静态库文件
积分墙必须的头文件为YouMiConfig.h
YouMiWall.h
YouMiWallAppModel.h
YouMiPointsManager.h (用于查询积分)
静态库文件为
libYouMi.a
4. 为工程添加系统自带的Frameworks
Security.frameworkSystemConfiguration.framework
CFNetwork.framework
QuartzCore.framework
libsqlite3.dylib
StoreKit.framework 这个framework要改为Optional,其他都为Required
5. 到AppDelegate.m文件中初始化YouMiSDK
1)在AppDelegate.m文件中添加下面这个语句#import "YouMiConfig.h"
2) 在AppDelegate.m自动生成的
- (BOOL)application:(UIApplication *)application didFinishLaunchingWithOptions:(NSDictionary *)launchOptions
的函数里面添加下面代码
[YouMiConfig setUserID:id_you_define]; // [可选] 例如开发者的应用是有登录功能的,则可以使用登录后的用户账号来替代有米为每台机器提供的标识(有米会为每台设备生成的唯一标识符)。
[YouMiConfig setUseInAppStore:YES];  // [可选]开启内置appStore,详细请看YouMiSDK常见问题解答
[YouMiConfig launchWithAppID:@"[Your AppID]" appSecret:@"[Your AppSecret]"];
注意替换:Your AppID和Your AppSecret为你的
appid和
appSecret
本文档的代码片段在SDK相应的头文件中都有比较详细的介绍,对于本文档的代码有什么疑问,请查看头文件
3)设置显示全屏广告(如积分墙)的全屏UIWindow(可选,推荐设置)
对于使用UIKit编写的APP可以在application:didFinishLaunchingWithOptions:中的[self.window makeKeyAndVisible]之后设置:
[self.window makeKeyAndVisible];
// 设置显示全屏广告的window
[YouMiConfig setFullScreenWindow:self.window];
这里, 我的demo里面只用到了简单的 广告条, 至于其他的积分墙什么的,需要的可以自己参考文档。
调用广告条
在需要用到广告条的地方创建广告条并添加
// 创建广告条
adView = [[YouMiView alloc] initWithContentSizeIdentifier:YouMiBannerContentSizeIdentifier320x50 delegate:nil];

//可以设置委托[可选]
adView.delegate = self;
//设置文字广告的属性[可选]
adView.indicateTranslucency = YES;
adView.indicateRounded = NO;
//添加对应的关键词 [可选]
[adView addKeyword:@"女性"];

// 开始请求广告
[adView start];

// 把广告条添加到特定的view中 [例如]
[self.view addSubview:adView];
原作者;Colin丶 原连接;http://blog.csdn.net/hitwhylz/article/details/39345147

相关文章推荐
- 【CF应用开发大赛】微博社交简历
- 峰回路转,Firefox 浏览器即将重返 iOS 平台
- 微博回应“用户信息被出售”事件:已上报司法机关
- 峰回路转,Firefox 浏览器即将重返 iOS 平台
- 我是运营,我没有假期
- 不可修补的 iOS 漏洞可能导致 iPhone 4s 到 iPhone X 永久越狱
- iOS 12.4 系统遭黑客破解,漏洞危及数百万用户
- 每日安全资讯:NSO,一家专业入侵 iPhone 的神秘公司
- [转][源代码]Comex公布JailbreakMe 3.0源代码
- [网络资讯]新浪微博新版三栏布局开放公测
- 开始我觉得新浪微博傻,现在才慢慢明白新浪微博的高瞻远瞩
- 我的iPhone桌面
- jQuery+PHP+ajax实现微博加载更多内容列表功能
- 三种检测iPhone/iPad设备方向的方法
- nodejs开发微博实例
- js判断客户端是iOS还是Android等移动终端的方法
- IOS开发环境windows化攻略
- 微博和今日头条的短视频功能浅析