iOS facebook PoP 初体验
2015-06-01 16:16
357 查看
说到pop,我学到了很多。第一次使用了,cocopods工具,因为不熟悉操作,昨天弄了好久,终于给掌握了。从安装到运行。为了给更多的人能够学到pop,我今天写一个完全版的从cocopods运用到pop动画简单介绍。
1.cocopods的安装。打开终端输入这个命令: gem sources --remove https://rubygems.org/ 等有反应后再输入: gem sources -a http://ruby.taobao.org/ 最好输入 gem sources -l
查看是否有

有了这个我们就可以安装cocopods了。然后在终端中输入 sudo gem install cocoapods 下载,这时候你可以喝杯茶,等它自动下载完成。下载完成后你就可以使用了。我们先创建一个工程。然后重新打开终端。先用命令行进入所在文件夹我是放在桌面上(cd ~/Desktop/ 文件名)再终端中输入 touch podfile 这时你会看见有个红箭头指向的文件。然后现在你利用mac自带的文本编辑器打开它在里面输入:
platform :ios, '7.0'
pod 'pop', '~> 1.0'
这样就ok了。然后,我们再终端中输入:pod install 它会下载,下载完成后问价夹里面会多处如下几个文件:
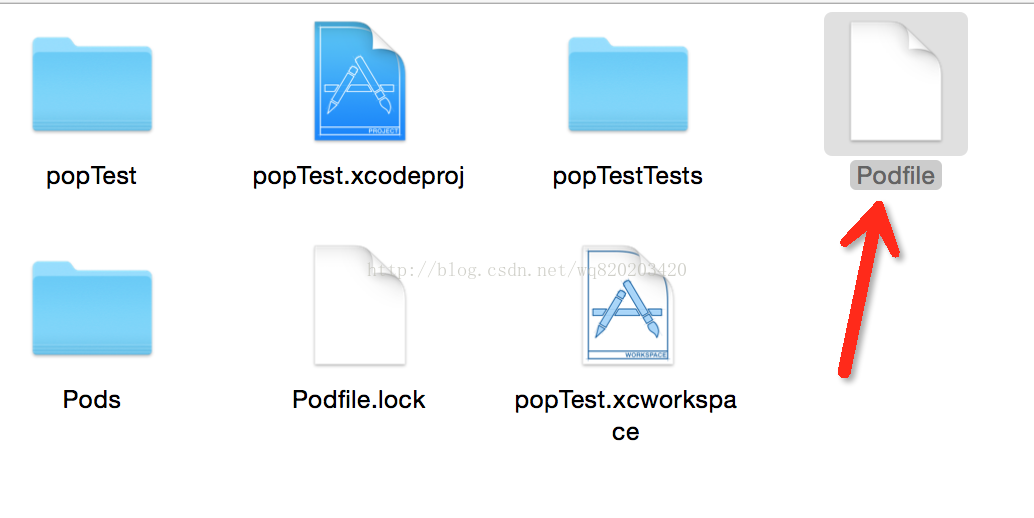
你现在要打开的是xcworkspace,运行,不必去打开原来的那个xocde了。运行后,检查下有没有错误,没有恭喜你,可以接下去做事情了。
我们先来看下我的代码:
#import "ViewController.h"
#import <pop/POP.h>
@interface ViewController ()
{
UIButton *_btn;
UIImageView *_imageView;
BOOL _isOpened;
}
@end
@implementation ViewController
- (void)viewDidLoad {
[super viewDidLoad];
self.view.backgroundColor = [UIColor whiteColor];
[self createBtn];
}
-(void)createBtn
{
_btn = [UIButton buttonWithType:UIButtonTypeSystem];
_btn.frame = CGRectMake(100, 100, 100, 100);
[_btn setTitle:@"wq" forState:UIControlStateNormal];
[_btn setTitleColor:[UIColor whiteColor] forState:UIControlStateNormal];
_btn.backgroundColor = [UIColor redColor];
[_btn addTarget:self action:@selector(playAction) forControlEvents:UIControlEventTouchUpInside];
[self.view addSubview:_btn];
_imageView= [[UIImageView alloc]init];
_imageView.backgroundColor = [UIColor blueColor];
_imageView.frame = CGRectMake(100, 200, 200, 200);
_imageView.userInteractionEnabled = YES;
//拖动
UIPanGestureRecognizer *pan = [[UIPanGestureRecognizer alloc]initWithTarget:self action:@selector(handlePan:)];
[_imageView addGestureRecognizer:pan];
[self.view addSubview:_imageView];
//点击手势
UITapGestureRecognizer *gestureForSpring = [[UITapGestureRecognizer alloc]init];
[gestureForSpring addTarget:self action:@selector(changsSize:)];
[self.view addGestureRecognizer:gestureForSpring];
self.navigationItem.rightBarButtonItem = [[UIBarButtonItem alloc]initWithTitle:@"+" style:UIBarButtonItemStyleDone target:self action:@selector(showPop)];
}
//出现的时候
-(void)showPop
{
if (_isOpened) {
[self hidePop];
return;
}
_isOpened = YES;
POPSpringAnimation *positionAnimation = [POPSpringAnimation animationWithPropertyNamed:kPOPViewFrame];
positionAnimation.fromValue = [NSValue valueWithCGRect:CGRectMake(300, 0, 0, 0)];
positionAnimation.toValue = [NSValue valueWithCGRect:CGRectMake(300, 100, 100, 100)];
positionAnimation.springBounciness = 15.0;
positionAnimation.springSpeed = 20.0;
[_imageView pop_addAnimation:positionAnimation forKey:@"frameAnimation"];
}
//隐藏的时候
-(void)hidePop
{
POPBasicAnimation *positionAnimation = [POPBasicAnimation animationWithPropertyNamed:kPOPViewFrame];
positionAnimation.fromValue = [NSValue valueWithCGRect:CGRectMake(300, 10, 0, 0)];
positionAnimation.toValue =[NSValue valueWithCGRect:CGRectMake(300, 0, 0, 0)];
//key一样就会用后面的动画覆盖之前的
[_imageView pop_addAnimation:positionAnimation forKey:@"frameAnimation"];
_isOpened = NO;
}
-(void)changsSize:(UITapGestureRecognizer *)tap
{
// //改变imgaeview的size
// POPSpringAnimation *springAnimation = [POPSpringAnimation animationWithPropertyNamed:kPOPLayerSize];
//
// CGRect rect = _imageView.frame;
// if (rect.size.width == 100) {
// springAnimation.toValue = [NSValue valueWithCGSize:CGSizeMake(300, 300)];
// }
// else
// {
// springAnimation.toValue = [NSValue valueWithCGSize:CGSizeMake(100, 100)];
// }
//
//
// springAnimation.springBounciness = 20.0;
// springAnimation.springSpeed = 20.0;
//
// [_imageView.layer pop_addAnimation:springAnimation forKey:@"changsize"];
//
//改变position
POPSpringAnimation *springAnimation = [POPSpringAnimation animationWithPropertyNamed:kPOPLayerPosition];
CGPoint point = _imageView.center;
if (point.y==300) {
springAnimation.toValue = [NSValue valueWithCGPoint:CGPointMake(point.x, -230)];
}
else{
springAnimation.toValue = [NSValue valueWithCGSize:CGSizeMake(point.x, 300)];
}
//弹性值
springAnimation.springBounciness = 20.0;
//弹性速度
springAnimation.springSpeed = 20.0;
[_imageView pop_addAnimation:springAnimation forKey:@"changeposition"];
}
////拖动手势
//-(void)handlePan:(UIPanGestureRecognizer *)recognizer
//{
// POPSpringAnimation *anim = [POPSpringAnimation animationWithPropertyNamed:kPOPLayerPositionY];
// //速度
// anim.velocity = @2000;
// //反弹--影响动画作用的参数变化幅度
// anim.springBounciness = 20;
// //动态晃动率
// anim.dynamicsMass = 5;
// anim.springSpeed = 12;
// // [anim setCompletionBlock:^(POPAnimation *anim, BOOL finished) {
// //
// //
// // }];
//
// [_imageView.layer pop_addAnimation:anim forKey:@"anim"];
//}
//左右摇摆
-(void)playAction
{
// POPSpringAnimation *anim = [POPSpringAnimation animationWithPropertyNamed:kPOPLayerPositionX];
// //速度
// anim.velocity = @2000;
// //反弹--影响动画作用的参数变化幅度
// anim.springBounciness = 20;
// //动态晃动率
// anim.dynamicsMass = 5;
// anim.springSpeed = 12;
//// [anim setCompletionBlock:^(POPAnimation *anim, BOOL finished) {
////
////
//// }];
//
// [_btn.layer pop_addAnimation:anim forKey:@"anim"];
//
//
}
@end
也可以直接到我的gihob网址下载:https://github.com/wang820203420/popTest

1.cocopods的安装。打开终端输入这个命令: gem sources --remove https://rubygems.org/ 等有反应后再输入: gem sources -a http://ruby.taobao.org/ 最好输入 gem sources -l
查看是否有
有了这个我们就可以安装cocopods了。然后在终端中输入 sudo gem install cocoapods 下载,这时候你可以喝杯茶,等它自动下载完成。下载完成后你就可以使用了。我们先创建一个工程。然后重新打开终端。先用命令行进入所在文件夹我是放在桌面上(cd ~/Desktop/ 文件名)再终端中输入 touch podfile 这时你会看见有个红箭头指向的文件。然后现在你利用mac自带的文本编辑器打开它在里面输入:
platform :ios, '7.0'
pod 'pop', '~> 1.0'
这样就ok了。然后,我们再终端中输入:pod install 它会下载,下载完成后问价夹里面会多处如下几个文件:
你现在要打开的是xcworkspace,运行,不必去打开原来的那个xocde了。运行后,检查下有没有错误,没有恭喜你,可以接下去做事情了。
我们先来看下我的代码:
#import "ViewController.h"
#import <pop/POP.h>
@interface ViewController ()
{
UIButton *_btn;
UIImageView *_imageView;
BOOL _isOpened;
}
@end
@implementation ViewController
- (void)viewDidLoad {
[super viewDidLoad];
self.view.backgroundColor = [UIColor whiteColor];
[self createBtn];
}
-(void)createBtn
{
_btn = [UIButton buttonWithType:UIButtonTypeSystem];
_btn.frame = CGRectMake(100, 100, 100, 100);
[_btn setTitle:@"wq" forState:UIControlStateNormal];
[_btn setTitleColor:[UIColor whiteColor] forState:UIControlStateNormal];
_btn.backgroundColor = [UIColor redColor];
[_btn addTarget:self action:@selector(playAction) forControlEvents:UIControlEventTouchUpInside];
[self.view addSubview:_btn];
_imageView= [[UIImageView alloc]init];
_imageView.backgroundColor = [UIColor blueColor];
_imageView.frame = CGRectMake(100, 200, 200, 200);
_imageView.userInteractionEnabled = YES;
//拖动
UIPanGestureRecognizer *pan = [[UIPanGestureRecognizer alloc]initWithTarget:self action:@selector(handlePan:)];
[_imageView addGestureRecognizer:pan];
[self.view addSubview:_imageView];
//点击手势
UITapGestureRecognizer *gestureForSpring = [[UITapGestureRecognizer alloc]init];
[gestureForSpring addTarget:self action:@selector(changsSize:)];
[self.view addGestureRecognizer:gestureForSpring];
self.navigationItem.rightBarButtonItem = [[UIBarButtonItem alloc]initWithTitle:@"+" style:UIBarButtonItemStyleDone target:self action:@selector(showPop)];
}
//出现的时候
-(void)showPop
{
if (_isOpened) {
[self hidePop];
return;
}
_isOpened = YES;
POPSpringAnimation *positionAnimation = [POPSpringAnimation animationWithPropertyNamed:kPOPViewFrame];
positionAnimation.fromValue = [NSValue valueWithCGRect:CGRectMake(300, 0, 0, 0)];
positionAnimation.toValue = [NSValue valueWithCGRect:CGRectMake(300, 100, 100, 100)];
positionAnimation.springBounciness = 15.0;
positionAnimation.springSpeed = 20.0;
[_imageView pop_addAnimation:positionAnimation forKey:@"frameAnimation"];
}
//隐藏的时候
-(void)hidePop
{
POPBasicAnimation *positionAnimation = [POPBasicAnimation animationWithPropertyNamed:kPOPViewFrame];
positionAnimation.fromValue = [NSValue valueWithCGRect:CGRectMake(300, 10, 0, 0)];
positionAnimation.toValue =[NSValue valueWithCGRect:CGRectMake(300, 0, 0, 0)];
//key一样就会用后面的动画覆盖之前的
[_imageView pop_addAnimation:positionAnimation forKey:@"frameAnimation"];
_isOpened = NO;
}
-(void)changsSize:(UITapGestureRecognizer *)tap
{
// //改变imgaeview的size
// POPSpringAnimation *springAnimation = [POPSpringAnimation animationWithPropertyNamed:kPOPLayerSize];
//
// CGRect rect = _imageView.frame;
// if (rect.size.width == 100) {
// springAnimation.toValue = [NSValue valueWithCGSize:CGSizeMake(300, 300)];
// }
// else
// {
// springAnimation.toValue = [NSValue valueWithCGSize:CGSizeMake(100, 100)];
// }
//
//
// springAnimation.springBounciness = 20.0;
// springAnimation.springSpeed = 20.0;
//
// [_imageView.layer pop_addAnimation:springAnimation forKey:@"changsize"];
//
//改变position
POPSpringAnimation *springAnimation = [POPSpringAnimation animationWithPropertyNamed:kPOPLayerPosition];
CGPoint point = _imageView.center;
if (point.y==300) {
springAnimation.toValue = [NSValue valueWithCGPoint:CGPointMake(point.x, -230)];
}
else{
springAnimation.toValue = [NSValue valueWithCGSize:CGSizeMake(point.x, 300)];
}
//弹性值
springAnimation.springBounciness = 20.0;
//弹性速度
springAnimation.springSpeed = 20.0;
[_imageView pop_addAnimation:springAnimation forKey:@"changeposition"];
}
////拖动手势
//-(void)handlePan:(UIPanGestureRecognizer *)recognizer
//{
// POPSpringAnimation *anim = [POPSpringAnimation animationWithPropertyNamed:kPOPLayerPositionY];
// //速度
// anim.velocity = @2000;
// //反弹--影响动画作用的参数变化幅度
// anim.springBounciness = 20;
// //动态晃动率
// anim.dynamicsMass = 5;
// anim.springSpeed = 12;
// // [anim setCompletionBlock:^(POPAnimation *anim, BOOL finished) {
// //
// //
// // }];
//
// [_imageView.layer pop_addAnimation:anim forKey:@"anim"];
//}
//左右摇摆
-(void)playAction
{
// POPSpringAnimation *anim = [POPSpringAnimation animationWithPropertyNamed:kPOPLayerPositionX];
// //速度
// anim.velocity = @2000;
// //反弹--影响动画作用的参数变化幅度
// anim.springBounciness = 20;
// //动态晃动率
// anim.dynamicsMass = 5;
// anim.springSpeed = 12;
//// [anim setCompletionBlock:^(POPAnimation *anim, BOOL finished) {
////
////
//// }];
//
// [_btn.layer pop_addAnimation:anim forKey:@"anim"];
//
//
}
@end
也可以直接到我的gihob网址下载:https://github.com/wang820203420/popTest

相关文章推荐
- 峰回路转,Firefox 浏览器即将重返 iOS 平台
- 峰回路转,Firefox 浏览器即将重返 iOS 平台
- 不可修补的 iOS 漏洞可能导致 iPhone 4s 到 iPhone X 永久越狱
- iOS 12.4 系统遭黑客破解,漏洞危及数百万用户
- Facebook's New Real-time Messaging System: HBase to Store 135+ Billion Messages a Month
- 每日安全资讯:NSO,一家专业入侵 iPhone 的神秘公司
- [转][源代码]Comex公布JailbreakMe 3.0源代码
- Gifski:一个跨平台的高质量 GIF 编码器
- Facebook获得TechCrunch Crunchies 2009最佳奖
- 模仿动画的放大缩小容器
- php判断GIF图片是否为动画的方法
- js排序动画模拟-插入排序
- jQuery动画特效实例教程
- JQuery动画和停止动画实例代码
- JQuery动画与特效实例分析
- Jquery 自定义动画概述及示例
- 网页上facebook分享功能具体实现
- 基于jquery的动画效果代码
- JSONP获取Twitter和Facebook文章数的具体步骤