nginx博客:基于nginx构建LNMP服务
2015-05-31 15:43
435 查看
一、nginx简介
Nginx是俄罗斯人编写的十分轻量级的HTTP服务器,Nginx,它的发音为“engine X”, 是一个高性能的HTTP和反向代理服务器,同时也是一个IMAP/POP3/SMTP 代理服务器
专为性能优化而开发,性能是其最重要的考量,实现上非常注重效率。
目前nginx在大陆主要有两个分支:Tengine(淘宝)、Registry
nginx工作时,先启动一个master进程,然后由master进程生成一个或多个worker进程(自己设置),每个worker线程响应n个用户请求。
主进程主要完成如下工作:
1. 读取并验正配置信息;
2. 创建、绑定及关闭套接字;
3. 启动、终止及维护worker进程的个数;
4. 无须中止服务而重新配置工作特性;
5. 控制非中断式程序升级,启用新的二进制程序并在需要时回滚至老版本;
6. 重新打开日志文件,实现日志滚动;
7. 编译嵌入式perl脚本;
worker进程主要完成的任务包括:
1. 接收、传入并处理来自客户端的连接;
2. 提供反向代理及过滤功能;
3. nginx任何能完成的其它任务;
事件处理机制采用的是事件驱动机制:由于支持linux的epoll(边缘触发)、BSD的kqueue, solaris的/dev/poll三种事件触发机制,复用器采用select、poll、 rt signal,支持sendfile, sendfile64,采用非阻塞异步IO,支持mmap,因此,nginx在处理高并发的静态页面时具有极高的处理性能,经过优化配置后能经受高负载的考验,有报告表明能支持高达50,000个并发连接数,实际生产环境中支持30000个是不成问题的。保持10,000个没有活动的连接,它只占2.5M内存
此外,nginx支持热部署,在不停机的情况下而更新配置文件、日志文件滚动、升级程序版本,从而为实现7*24服务提供可能。
nginx是个高度模块化设计,编写模块相对简单,模块组成有下面几类:
① 核心模块
② Standard HTTP modules
③ Optional HTTP modules
④ Mail modules
⑤ 3rd party modules
nginx自带前4种,第五种模块需要我们手动编译使用。
nginx现在最高的稳定版本是nginx-1.8.0,经典版最高的是nginx-1.6.3,可到nginx官网 nginx.org下载编译安装使用。
二、nginx的安装使用
本次试验是目标是构建lnmp,并提供wordpress服务。
lnmp构建顺序为: 编译并配置好nginx --> 安装并配置mariadb --> 编译安装php --> 整合nginx和php --> 安装xcache加速器提升动态页面处理性能 --> 安装提供 wordpress 服务 。
(一)编译并配置好nginx
主程序包:nginx-1.6.2.tar.gz
1、依赖关系:
编译安装事先都需要安装开发包组"Development Tools"和 "Server Platform Development",同时,nginx的编译安装还需要安装pcre-devel开发包
pcre-devel简介:
PCRE(Perl Compatible Regular Expressions,perl语言兼容正则表达式)是一个用C语言编写的正则表达式函数库,由菲利普.海泽(Philip Hazel)编写。PCRE是一个轻量级的函数库,比Boost之类的正则表达式库小得多。PCRE十分易用,同时功能也很强大,性能超过了POSIX正则表达式库和一些经典的正则表达式库 。
和另一个经典的Boost正则表达式库的比较显示,双方的性能相差无几,PCRE在匹配简单字符串时更快,Boost则在匹配较长字符串时胜出。但两者差距很小,考虑到PCRE的大小和易用性,我们可以认为PCRE更值得考虑。
PCRE被广泛使用在许多开源软件之中,最著名的莫过于Apache HTTP服务器和PHP脚本语言、R脚本语言,此外,正如从其名字所能看到的,同时也是perl语言的缺省正则库。
2、编译安装nginx
先添加用户nginx,实现以之运行nginx服务进程
从官网或安全途径下载nginx主程序包,然后编译安装:
正常编译末尾出现的是:

3、提供SysV init服务脚本:
添加如下内容:
为此脚本赋予执行权限:
提供执行程序环境路径:
启动服务验证:
(二)编译安装mariadb
主程序包:mariadb-5.5.43-linux-x86_64.tar.gz
1、准备数据存放的文件系统
新建一个逻辑卷(系统类型需要调整为8e),并将其挂载至特定目录即可。这里不再给出过程。
这里假设其逻辑卷的挂载目录为/mydata,而后需要创建/mydata/data目录做为mysql数据的存放目录。
2、新建用户以安全方式运行进程:
4、输出mysql的man手册至man命令的查找路径:
编辑/etc/man.config,添加如下行即可:
5、输出mysql的头文件至系统头文件路径/usr/include:
6、输出mysql的库文件给系统库查找路径:
而后让系统重新载入系统库:
7、修改PATH环境变量,让系统可以直接使用mysql的相关命令。
8、启动服务测试使用
但出现了如下问题:
提供服务脚本就好了!!其他什么都没有修改!!!!
但是过了半天时间重新接着做时,重新服务,又是failed,无法,用“ rm -rf ”删除了/usr/local下的所有mariadb文件,从ftp上重新下载后在解压初始化,然后好了。
推测,应该是以前安装过mysql或者mariadb,文件没有删除干净导致。
(三)编译安装php
1、解决依赖关系
①
③
这些依赖关系都是在./configure 过程中一次次试出来的,只要根据提示一步一步完善安装相应的开发包就可以了。
2、编译安装php-5.4.4
说明:如果php和mariadb不再统一主机上,则还需要添加“--with-mysql=mysqlnd --with-pdo-mysql=mysqlnd --with-mysqli=mysqlnd”。
为php提供配置文件:
为php-fpm提供Sysv init脚本,并将其添加至服务列表:
为php-fpm提供配置文件:
接下来就可以启动php-fpm了:
使用如下命令来验正(如果此命令输出有中几个php-fpm进程就说明启动成功了):
(四)整合nginx和php5
1、编辑/etc/nginx/nginx.conf,启用如下选项:
如果有后面能正常打开html页面时,而打开php页面有问题时,tail日志提示找不到路径,则可以将倒数第二行改为“fastcgi_param SCRIPT_FILENAME $document_root$fastcgi_script_name;”。
2、编辑/etc/nginx/fastcgi_params,将其内容更改为如下内容:
最终/etc/nginx/nginx.conf的配置为:
而后重新载入nginx的配置文件:
# service nginx reload
3、新建index.php的测试页面,测试php是否能正常工作:
接着就可以通过浏览器访问此测试页面了。
测试连接htnl和php网页是否正常
先在主机上使用curl命令获取网页:
[root@aunt-s ~]# curl http://172.16.20.150/index.html <h1>www.cat.com</h1>
查看错误日志:
所以先检查两个地址:
① 检查/etc/nginx/fastcgi_params
内容为上面所写,检查结果没问题
② 检查/etc/nginx/nginx.conf
根据参考网页的内容做修改,还是无效的。
参考网页 :http://lovelace.blog.51cto.com/1028430/1314565
重新检查每一项的设置,发现是在定义网页的根目录对应本地文件系统目录时除了错,将root html 改为 root /var/www/htnl就好了:
4、 测试php连接mariadb是否正常:
编辑 /var/www/html/index.php ,修改为下面的内容:
注:一定要注意是否启动了mariadb服务。
(五)安装xcache,为php加速
程序包:xcache-3.2.0.tar.bz2
1、安装
xcache应该以php插件的形式运行,需要运行php中的phpize检查环境并生成xcache的configure配置工具
结尾出现如下行,第2步需要用到 :
Installing shared extensions: /usr/local/php/lib/php/extensions/no-debug-non-zts-20131226/
2、编辑php.ini,整合php和xcache
首先将xcache的源码目录中提供的样例配置导入php.ini,并在该文件中添加如下行:
注:xcache3 已经不支持zend扩展了,直接extension扩展即可
3、测试效果:
启动xcache前可以用ab测试一下页面:
(测试时把php主页设置成phpinfo()效果更明显)
启动xcache后测试效果:
(六)安装使用wordpress
程序包wordpress-3.3.1-zh_CN.zip
1、解压缩程序包到网站根目录下
3、在本主机上给用户wp授权使用数据库的权限:
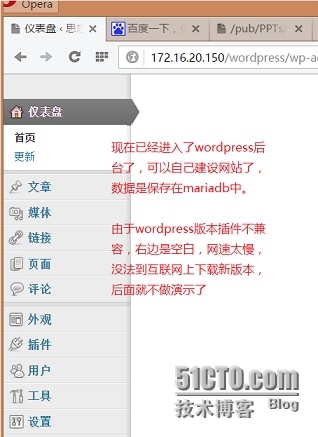
4、在浏览器上登录后台进行网站建设
Nginx是俄罗斯人编写的十分轻量级的HTTP服务器,Nginx,它的发音为“engine X”, 是一个高性能的HTTP和反向代理服务器,同时也是一个IMAP/POP3/SMTP 代理服务器
专为性能优化而开发,性能是其最重要的考量,实现上非常注重效率。
目前nginx在大陆主要有两个分支:Tengine(淘宝)、Registry
nginx工作时,先启动一个master进程,然后由master进程生成一个或多个worker进程(自己设置),每个worker线程响应n个用户请求。
主进程主要完成如下工作:
1. 读取并验正配置信息;
2. 创建、绑定及关闭套接字;
3. 启动、终止及维护worker进程的个数;
4. 无须中止服务而重新配置工作特性;
5. 控制非中断式程序升级,启用新的二进制程序并在需要时回滚至老版本;
6. 重新打开日志文件,实现日志滚动;
7. 编译嵌入式perl脚本;
worker进程主要完成的任务包括:
1. 接收、传入并处理来自客户端的连接;
2. 提供反向代理及过滤功能;
3. nginx任何能完成的其它任务;
事件处理机制采用的是事件驱动机制:由于支持linux的epoll(边缘触发)、BSD的kqueue, solaris的/dev/poll三种事件触发机制,复用器采用select、poll、 rt signal,支持sendfile, sendfile64,采用非阻塞异步IO,支持mmap,因此,nginx在处理高并发的静态页面时具有极高的处理性能,经过优化配置后能经受高负载的考验,有报告表明能支持高达50,000个并发连接数,实际生产环境中支持30000个是不成问题的。保持10,000个没有活动的连接,它只占2.5M内存
此外,nginx支持热部署,在不停机的情况下而更新配置文件、日志文件滚动、升级程序版本,从而为实现7*24服务提供可能。
nginx是个高度模块化设计,编写模块相对简单,模块组成有下面几类:
① 核心模块
② Standard HTTP modules
③ Optional HTTP modules
④ Mail modules
⑤ 3rd party modules
nginx自带前4种,第五种模块需要我们手动编译使用。
nginx现在最高的稳定版本是nginx-1.8.0,经典版最高的是nginx-1.6.3,可到nginx官网 nginx.org下载编译安装使用。
二、nginx的安装使用
本次试验是目标是构建lnmp,并提供wordpress服务。
lnmp构建顺序为: 编译并配置好nginx --> 安装并配置mariadb --> 编译安装php --> 整合nginx和php --> 安装xcache加速器提升动态页面处理性能 --> 安装提供 wordpress 服务 。
(一)编译并配置好nginx
# uname -r
2.6.32-504.el6.x86_64
系统是64位的,以下所有程序包都需要下载64位的。
主程序包:nginx-1.6.2.tar.gz
1、依赖关系:
编译安装事先都需要安装开发包组"Development Tools"和 "Server Platform Development",同时,nginx的编译安装还需要安装pcre-devel开发包
# yum groupinstall -y "Development Tools"  "Server Platform Development"
# yum -y install pcre-devel
pcre-devel.x86_64 0:7.8-6.el6
pcre-devel简介:
PCRE(Perl Compatible Regular Expressions,perl语言兼容正则表达式)是一个用C语言编写的正则表达式函数库,由菲利普.海泽(Philip Hazel)编写。PCRE是一个轻量级的函数库,比Boost之类的正则表达式库小得多。PCRE十分易用,同时功能也很强大,性能超过了POSIX正则表达式库和一些经典的正则表达式库 。
和另一个经典的Boost正则表达式库的比较显示,双方的性能相差无几,PCRE在匹配简单字符串时更快,Boost则在匹配较长字符串时胜出。但两者差距很小,考虑到PCRE的大小和易用性,我们可以认为PCRE更值得考虑。
PCRE被广泛使用在许多开源软件之中,最著名的莫过于Apache HTTP服务器和PHP脚本语言、R脚本语言,此外,正如从其名字所能看到的,同时也是perl语言的缺省正则库。
2、编译安装nginx
先添加用户nginx,实现以之运行nginx服务进程
# id nginx
id: nginx: No such user
# groupadd -r nginx
# useradd -r -g nginx nginx
从官网或安全途径下载nginx主程序包,然后编译安装:
# tar xf nginx-1.6.2.tar.gz
# cd nginx-1.6.2
# ./configure --prefix=/usr/local/nginx --conf-path=/etc/nginx/nginx.conf --user=nginx --group=nginx --error-log-path=/var/log/nginx/error.log --http-log-path=/var/log/nginx/access.log --pid-path=/var/run/nginx/nginx.pid --lock-path=/var/lock/nginx.lock --with-http_ssl_module --with-http_stub_status_module --with-http_gzip_static_module --with-http_flv_module --with-http_mp4_module --http-client-body-temp-path=/var/tmp/nginx/client --http-proxy-temp-path=/var/tmp/nginx/proxy --http-fastcgi-temp-path=/var/tmp/nginx/fastcgi --http-uwsgi-temp-path=/var/tmp/nginx/uwsgi  --sbin-path=/usr/local/nginx/sbin/nginx  --http-scgi-temp-path=/var/tmp/nginx/scgi   --with-pcre
正常编译末尾出现的是:
Configuration summary
+ using system PCRE library
+ using system OpenSSL library
+ md5: using OpenSSL library
+ sha1: using OpenSSL library
+ using system zlib library
nginx path prefix: "/usr/local/nginx"
nginx binary file: "/usr/local/nginx/sbin/nginx"
nginx configuration prefix: "/etc/nginx"
nginx configuration file: "/etc/nginx/nginx.conf"
nginx pid file: "/var/run/nginx/nginx.pid"
nginx error log file: "/var/log/nginx/error.log"
nginx http access log file: "/var/log/nginx/access.log"
nginx http client request body temporary files: "/var/tmp/nginx/client"
nginx http proxy temporary files: "/var/tmp/nginx/proxy"
nginx http fastcgi temporary files: "/var/tmp/nginx/fastcgi"
nginx http uwsgi temporary files: "/var/tmp/nginx/uwsgi"
nginx http scgi temporary files: "/var/tmp/nginx/scgi"
# make && make install为上面编译配置提供文件路径(否则第一次启动服务时会提示 “chown: missing operand after `/var/tmp/nginx/scgi'”等信息):
# mkdir -pv /var/tmp/nginx/{client,proxy,uwsgi}3、提供SysV init服务脚本:
添加如下内容:
# vim /etc/rc.d/init.d/nginx
#!/bin/sh
#
# nginx - this script starts and stops the nginx daemon
#
# chkconfig:   - 85 15
# description:  Nginx is an HTTP(S) server, HTTP(S) reverse \
#               proxy and IMAP/POP3 proxy server
# processname: nginx
# config:      /etc/nginx/nginx.conf
# config:      /etc/sysconfig/nginx
# pidfile:     /var/run/nginx.pid
# Source function library.
. /etc/rc.d/init.d/functions
# Source networking configuration.
. /etc/sysconfig/network
# Check that networking is up.
[ "$NETWORKING" = "no" ] && exit 0
nginx="/usr/local/nginx/sbin/nginx"
prog=$(basename $nginx)
NGINX_CONF_FILE="/etc/nginx/nginx.conf"
[ -f /etc/sysconfig/nginx ] && . /etc/sysconfig/nginx
lockfile=/var/lock/nginx.lock
make_dirs() {
# make required directories
user=`nginx -V 2>&1 | grep "configure arguments:" | sed 's/[^*]*--user=\([^ ]*\).*/\1/g' -`
options=`$nginx -V 2>&1 | grep 'configure arguments:'`
for opt in $options; do
if [ `echo $opt | grep '.*-temp-path'` ]; then
value=`echo $opt | cut -d "=" -f 2`
if [ ! -d "$value" ]; then
# echo "creating" $value
mkdir -p $value && chown -R $user $value
fi
fi
done
}

start() {
[ -x $nginx ] || exit 5
[ -f $NGINX_CONF_FILE ] || exit 6
make_dirs
echo -n $"Starting $prog: "
daemon $nginx -c $NGINX_CONF_FILE
retval=$?
echo
[ $retval -eq 0 ] && touch $lockfile
return $retval
}

stop() {
echo -n $"Stopping $prog: "
killproc $prog -QUIT
retval=$?
echo
[ $retval -eq 0 ] && rm -f $lockfile
return $retval
}

restart() {
configtest || return $?
stop
sleep 1
start
}

reload() {
configtest || return $?
echo -n $"Reloading $prog: "
killproc $nginx -HUP
RETVAL=$?
echo
}

force_reload() {
restart
}

configtest() {
$nginx -t -c $NGINX_CONF_FILE
}

rh_status() {
status $prog
}

rh_status_q() {
rh_status >/dev/null 2>&1
}

case "$1" in
start)
rh_status_q && exit 0
$1
;;
stop)
rh_status_q || exit 0
$1
;;
restart|configtest)
$1
;;
reload)
rh_status_q || exit 7
$1
;;
force-reload)
force_reload
;;
status)
rh_status
;;
condrestart|try-restart)
rh_status_q || exit 0
;;
*)
echo $"Usage: $0 {start|stop|status|restart|condrestart|try-restart|reload|force-reload|configtest}"
exit 2
esac
为此脚本赋予执行权限:
# chmod +x /etc/rc.d/init.d/nginx添加至服务管理列表,并让其开机自动启动:
# chkconfig --add nginx
# chkconfig nginx on
# chkconfig  | grep nginx
nginx          0:off1:off2:on3:on4:on5:on6:off
提供执行程序环境路径:
# vim /etc/profile.d/nginx.sh
export PATH=/usr/local/nginx/sbin:$PATH
# . /etc/profile.d/nginx.sh
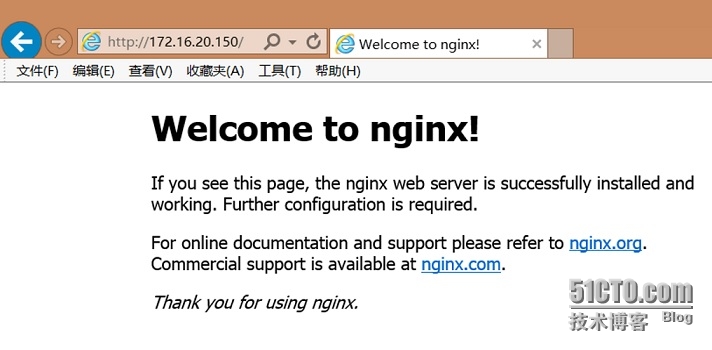
启动服务验证:
# service nginx start
Starting nginx:                                            [  OK  ]
# ss -tnlp | grep nginx
LISTEN 0 128 *:80 *:* users:(("nginx",35686,6),("nginx",35688,6)) 浏览器查看,nginx正常启动:(二)编译安装mariadb
主程序包:mariadb-5.5.43-linux-x86_64.tar.gz
1、准备数据存放的文件系统
新建一个逻辑卷(系统类型需要调整为8e),并将其挂载至特定目录即可。这里不再给出过程。
这里假设其逻辑卷的挂载目录为/mydata,而后需要创建/mydata/data目录做为mysql数据的存放目录。
# fdisk  /dev/sda
# partx -a /dev/sda
# partx -a /dev/sda
# mke2fs -t ext4 /dev/sda5
# mkdir /mydata
# mount /dev/sda5 /mydata
# mount
……
/dev/sda5 on /mydata type ext4 (rw)
# mkdir /mydata/data
2、新建用户以安全方式运行进程:
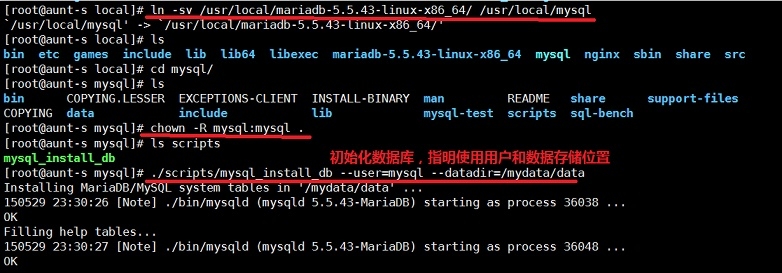
# groupadd -r mysql
# useradd -g mysql -r -s /sbin/nologin -M -d /mydata/data mysql
# chown -R mysql:mysql /mydata/data
3、安装并初始化mysql-5.5.43
# tar xf mariadb-5.5.43-linux-x86_64.tar.gz   -C /usr/local
# ln -sv /usr/local/mariadb-5.5.43-linux-x86_64/ /usr/local/mysql
`/usr/local/mysql' -> `/usr/local/mariadb-5.5.43-linux-x86_64/'
# cd /usr/local/mysql
# chown -R root:mysql .
# chown -R mysql:mysql /mydata/data
# ./scripts/mysql_install_db --user=mysql --datadir=/mydata/data
# chown -R root .
# cp support-files/my-large.cnf /etc/my.cnf
# vim /etc/my.cnf
修改或添加如下几项:
thread_concurrency = 2
datadir = /mydata/data
innodb_file_per_table = on
skip_name_resolve = on
4、输出mysql的man手册至man命令的查找路径:
编辑/etc/man.config,添加如下行即可:
MANPATH /usr/local/mysql/man
5、输出mysql的头文件至系统头文件路径/usr/include:
# ln -sv /usr/local/mysql/include  /usr/include/mysql
`/usr/include/mysql' -> `/usr/local/mysql/include'
6、输出mysql的库文件给系统库查找路径:
# echo '/usr/local/mysql/lib' > /etc/ld.so.conf.d/mysql.conf
而后让系统重新载入系统库:
# ldconfig
7、修改PATH环境变量,让系统可以直接使用mysql的相关命令。
# vim /etc/profile.d/mysql.sh
export PATH=/usr/local/mysql/bin:$PATH
# . /etc/profile.d/mysql.sh
8、启动服务测试使用
# service mysqld start
Starting MySQL...                                          [  OK  ]
[root@aunt-s mysql]# mysql
Welcome to the MariaDB monitor.  Commands end with ; or \g.
Your MariaDB connection id is 2
Server version: 5.5.43-MariaDB-log MariaDB Server
Copyright (c) 2000, 2015, Oracle, MariaDB Corporation Ab and others.
Type 'help;' or '\h' for help. Type '\c' to clear the current input statement.
MariaDB [(none)]> show databases;
+--------------------+
| Database           |
+--------------------+
| information_schema |
| mysql              |
| performance_schema |
| test               |
+--------------------+
4 rows in set (0.00 sec)
MariaDB [(none)]>
但出现了如下问题:
[root@aunt-s ~]# /usr/local/mysql/bin/mysqld
150530  9:40:29 [Warning] 'THREAD_CONCURRENCY' is deprecated and will be removed in a future release.
150530  9:40:29 [Note] /usr/local/mysql/bin/mysqld (mysqld 5.5.43-MariaDB-log) starting as process 2610 ...
150530  9:40:29 [ERROR] Fatal error: Please consult the Knowledge Base to find out how to run mysqld as root!
150530  9:40:29 [ERROR] Aborting
150530  9:40:29 [Note] /usr/local/mysql/bin/mysqld: Shutdown complete
[root@aunt-s ~]# vim /etc/my.cnf
[root@aunt-s ~]# ll  /etc/rc.d/init.d/mysqld
ls: cannot access /etc/rc.d/init.d/mysqld: No such file or directory
[root@aunt-s ~]# ll  /etc/rc.d/init.d/mysql
ls: cannot access /etc/rc.d/init.d/mysql: No such file or directory
[root@aunt-s ~]# cp /usr/local/mysql/support-files/mysql
mysqld_multi.server  mysql-log-rotate     mysql.server
[root@aunt-s ~]# cp /usr/local/mysql/support-files/mysql.server /etc/rc.d/init.d/mysqld
[root@aunt-s ~]# vim /etc/rc.d/init.d/mysqld
[root@aunt-s ~]# chmod +x /etc/rc.d/init.d/mysqld
[root@aunt-s ~]# ll  /etc/rc.d/init.d/mysql
ls: cannot access /etc/rc.d/init.d/mysql: No such file or directory
[root@aunt-s ~]# ll  /etc/rc.d/init.d/mysqld
-rwxr-xr-x 1 root root 12196 May 30 09:46 /etc/rc.d/init.d/mysqld
[root@aunt-s ~]# service mysqld start
Starting MySQL..                                           [  OK  ]
[root@aunt-s ~]#
提供服务脚本就好了!!其他什么都没有修改!!!!
但是过了半天时间重新接着做时,重新服务,又是failed,无法,用“ rm -rf ”删除了/usr/local下的所有mariadb文件,从ftp上重新下载后在解压初始化,然后好了。
推测,应该是以前安装过mysql或者mariadb,文件没有删除干净导致。
(三)编译安装php
1、解决依赖关系
①
# yum install -y libxml2-devel
Installed:
libxml2-devel.x86_64 0:2.7.6-14.el6_5.2
Complete!
②
# yum install -y bzip2-devel
Installed:
bzip2-devel.x86_64 0:1.0.5-7.el6_0
Complete!
③
# yum install -y libcurl-devel
Installed:
libcurl-devel.x86_64 0:7.19.7-37.el6_5.3
Dependency Installed:
libidn-devel.x86_64 0:1.18-2.el6
Complete!
④
# yum install -y libmcrypt libmcrypt-devel
Installed:
libmcrypt.x86_64 0:2.5.8-9.el6                           libmcrypt-devel.x86_64 0:2.5.8-9.el6
Complete!
⑤
# yum install -y net-snmp-devel
Installed:
net-snmp-devel.x86_64 1:5.5-49.el6_5.3
Dependency Installed:
elfutils-devel.x86_64 0:0.158-3.2.el6                    elfutils-libelf-devel.x86_64 0:0.158-3.2.el6
file-devel.x86_64 0:5.04-21.el6                          lm_sensors-devel.x86_64 0:3.1.1-17.el6
lm_sensors-libs.x86_64 0:3.1.1-17.el6                    net-snmp-libs.x86_64 1:5.5-49.el6_5.3
popt-devel.x86_64 0:1.13-7.el6                           rpm-devel.x86_64 0:4.8.0-37.el6
tcp_wrappers-devel.x86_64 0:7.6-57.el6
Complete!
这些依赖关系都是在./configure 过程中一次次试出来的,只要根据提示一步一步完善安装相应的开发包就可以了。
2、编译安装php-5.4.4
# ./configure --prefix=/usr/local/php --with-mysql=/usr/local/mysql --with-config-file-path=/etc --with-config-file-scan-dir=/etc/php.d --with-mysqli=/usr/local/mysql/bin/mysql_config --with-openssl --enable-fpm --enable-sockets --enable-sysvshm --enable-mbstring --with-freetype-dir --with-jpeg-dir --with-png-dir --with-zlib-dir --with-libxml-dir=/usr --enable-xml --with-mhash --with-mcrypt --with-bz2 --with-curl --with-snmp
说明:如果php和mariadb不再统一主机上,则还需要添加“--with-mysql=mysqlnd --with-pdo-mysql=mysqlnd --with-mysqli=mysqlnd”。
# make && make intall
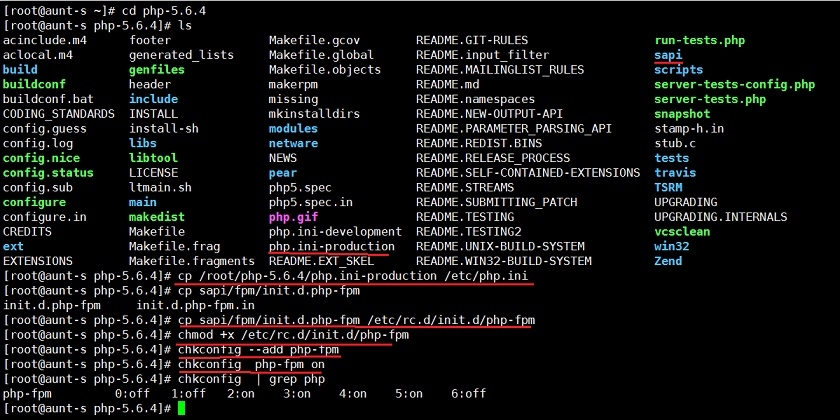
为php提供配置文件:
# cp php.ini-production /etc/php.ini
为php-fpm提供Sysv init脚本,并将其添加至服务列表:
# cp sapi/fpm/init.d.php-fpm  /etc/rc.d/init.d/php-fpm
# chmod +x /etc/rc.d/init.d/php-fpm
# chkconfig --add php-fpm
# chkconfig php-fpm on
为php-fpm提供配置文件:
# cp /usr/local/php/etc/php-fpm.conf.default /usr/local/php/etc/php-fpm.conf编辑php-fpm的配置文件:
# vim /usr/local/php/etc/php-fpm.conf配置fpm的相关选项为你所需要的值,并启用pid文件(如下最后一行):
pm.max_children = 150
pm.start_servers = 8
pm.min_spare_servers = 5
pm.max_spare_servers = 10
pid = /usr/local/php/var/run/php-fpm.pid
接下来就可以启动php-fpm了:
# service php-fpm start
使用如下命令来验正(如果此命令输出有中几个php-fpm进程就说明启动成功了):
# ps aux | grep php-fpm
root      25441  0.0  0.6 190812  6088 ?        Ss   23:13   0:00 php-fpm: master process (/usr/local/php/etc/php-fpm.conf)
nobody    25442  0.0  0.5 190812  5184 ?        S    23:13   0:00 php-fpm: pool www
nobody    25443  0.0  0.5 190812  5184 ?        S    23:13   0:00 php-fpm: pool www
nobody    25444  0.0  0.5 190812  5184 ?        S    23:13   0:00 php-fpm: pool www
nobody    25445  0.0  0.5 190812  5184 ?        S    23:13   0:00 php-fpm: pool www
nobody    25446  0.0  0.5 190812  5184 ?        S    23:13   0:00 php-fpm: pool www
nobody    25447  0.0  0.5 190812  5184 ?        S    23:13   0:00 php-fpm: pool www
nobody    25448  0.0  0.5 190812  5184 ?        S    23:13   0:00 php-fpm: pool www
nobody    25449  0.0  0.5 190812  5184 ?        S    23:13   0:00 php-fpm: pool www
root      25463  0.0  0.0 103252   836 pts/1    S+   23:13   0:00 grep php-fpm
(四)整合nginx和php5
1、编辑/etc/nginx/nginx.conf,启用如下选项:
location ~ \.php$ {
root           html;
fastcgi_pass   127.0.0.1:9000;
fastcgi_index  index.php;
fastcgi_param  SCRIPT_FILENAME  /scripts$fastcgi_script_name;
include        fastcgi_params;
}
如果有后面能正常打开html页面时,而打开php页面有问题时,tail日志提示找不到路径,则可以将倒数第二行改为“fastcgi_param SCRIPT_FILENAME $document_root$fastcgi_script_name;”。
2、编辑/etc/nginx/fastcgi_params,将其内容更改为如下内容:
fastcgi_param  GATEWAY_INTERFACE  CGI/1.1;
fastcgi_param  SERVER_SOFTWARE    nginx;
fastcgi_param  QUERY_STRING       $query_string;
fastcgi_param  REQUEST_METHOD     $request_method;
fastcgi_param  CONTENT_TYPE       $content_type;
fastcgi_param  CONTENT_LENGTH     $content_length;
fastcgi_param  SCRIPT_FILENAME    $document_root$fastcgi_script_name;
fastcgi_param  SCRIPT_NAME        $fastcgi_script_name;
fastcgi_param  REQUEST_URI        $request_uri;
fastcgi_param  DOCUMENT_URI       $document_uri;
fastcgi_param  DOCUMENT_ROOT      $document_root;
fastcgi_param  SERVER_PROTOCOL    $server_protocol;
fastcgi_param  REMOTE_ADDR        $remote_addr;
fastcgi_param  REMOTE_PORT        $remote_port;
fastcgi_param  SERVER_ADDR        $server_addr;
fastcgi_param  SERVER_PORT        $server_port;
fastcgi_param  SERVER_NAME        $server_name;
最终/etc/nginx/nginx.conf的配置为:
worker_processes  1;
events {
worker_connections  1024;
}
http {
include       mime.types;
default_type  application/octet-stream;
log_format  main  '$remote_addr - $remote_user [$time_local] "$request" '
'$status $body_bytes_sent "$http_referer" '
'"$http_user_agent" "$http_x_forwarded_for"';
sendfile        on;
keepalive_timeout  65;
server {
listen       80;
server_name  www.cat.com;
access_log  /var/log/nginx/cat.access.log  main;
error_log  /var/log/nginx/cat.error.log  notice;
location / {
root   html;
index  index.php index.html index.htm;     #主页面格式中添加php格式的主页
}
location ~ \.php$ {
root           /var/www/html;
fastcgi_pass   127.0.0.1:9000;
fastcgi_index  index.php;
fastcgi_param  SCRIPT_FILENAME  $document_root$fastcgi_script_name;
include        /etc/nginx/fastcgi_params;
}
}
}
而后重新载入nginx的配置文件:
# service nginx reload
3、新建index.php的测试页面,测试php是否能正常工作:
# mkdir /var/www/html -p
# cat > /var/www/html/index.php << EOF
> <?php
> phpinfo();
> ?>
> EOF
# cat /var/www/html/index.php
<?php
phpinfo();
?>
# nginx -s reload
接着就可以通过浏览器访问此测试页面了。
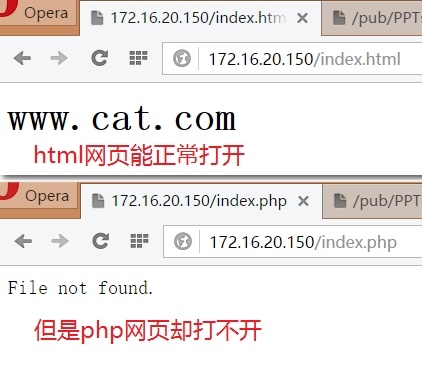
测试连接htnl和php网页是否正常
先在主机上使用curl命令获取网页:
[root@aunt-s ~]# curl http://172.16.20.150/index.html <h1>www.cat.com</h1>
查看错误日志:
# tail /var/log/nginx/cat.error.log
……
2015/05/31 10:54:28 [error] 26185#0: *1 FastCGI sent in stderr: "Primary script unknown" while reading response header from upstream, client: 172.16.250.248, server: www.cat.com, request: "GET /index.php HTTP/1.1", upstream: "fastcgi://127.0.0.1:9000", host: "172.16.20.150"
2015/05/31 10:54:28 [error] 26185#0: *1 FastCGI sent in stderr: "Primary script unknown" while reading response header from upstream, client: 172.16.250.248, server: www.cat.com, request: "GET /index.php HTTP/1.1", upstream: "fastcgi://127.0.0.1:9000", host: "172.16.20.150"
从错误日志的说明及html能正常打开的情况来看,应该是识别php网页中的脚本到php转换是出了错。
所以先检查两个地址:
① 检查/etc/nginx/fastcgi_params
内容为上面所写,检查结果没问题
② 检查/etc/nginx/nginx.conf
根据参考网页的内容做修改,还是无效的。
参考网页 :http://lovelace.blog.51cto.com/1028430/1314565
重新检查每一项的设置,发现是在定义网页的根目录对应本地文件系统目录时除了错,将root html 改为 root /var/www/htnl就好了:
location / {
root   html;
index  index.php index.html index.htm;
}
4、 测试php连接mariadb是否正常:
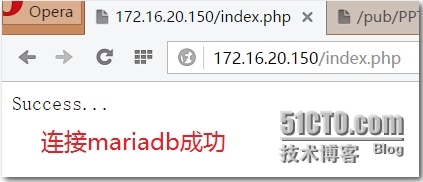
编辑 /var/www/html/index.php ,修改为下面的内容:
# vim /var/www/html/index.php
<?php
$link = mysql_connect('127.0.0.1','root','');
if ($link)
echo "Success...";
else
echo "Failure...";
mysql_close();
?> 重新刷新网页:注:一定要注意是否启动了mariadb服务。
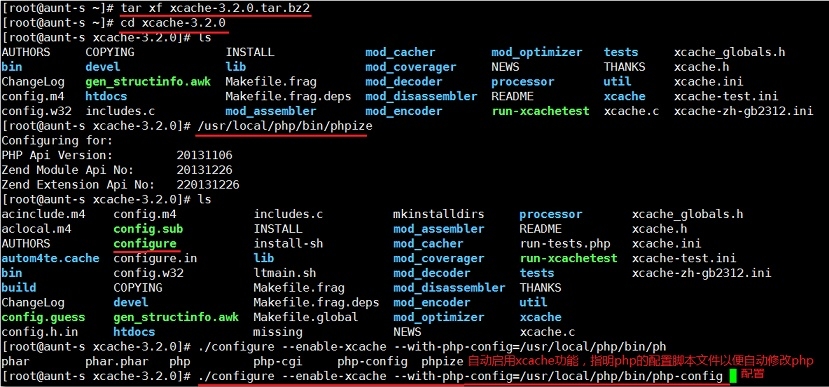
(五)安装xcache,为php加速
程序包:xcache-3.2.0.tar.bz2
1、安装
xcache应该以php插件的形式运行,需要运行php中的phpize检查环境并生成xcache的configure配置工具
# tar xf xcache-3.2.0.tar.bz2
# cd xcache-3.2.0
# /usr/local/php/bin/phpize
# ./configure --enable-xcache --with-php-config=/usr/local/php/bin/php-config
# make && make install
结尾出现如下行,第2步需要用到 :
Installing shared extensions: /usr/local/php/lib/php/extensions/no-debug-non-zts-20131226/
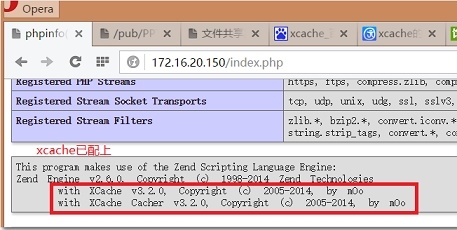
2、编辑php.ini,整合php和xcache
首先将xcache的源码目录中提供的样例配置导入php.ini,并在该文件中添加如下行:
# mkdir /etc/php.d
# cp /root/xcache-3.2.0/xcache.ini /etc/php.d/
# vim /etc/php.d/xcache.ini
extension =  /usr/local/php/lib/php/extensions/no-debug-non-zts-20131226/xcache.so
注:xcache3 已经不支持zend扩展了,直接extension扩展即可
3、测试效果:
启动xcache前可以用ab测试一下页面:
(测试时把php主页设置成phpinfo()效果更明显)
# ab -n 10000 -c 300 http://172.16.20.150/index.php ……
Time taken for tests:   14.202 seconds
Complete requests:      10000
Failed requests:        983
(Connect: 0, Receive: 0, Length: 983, Exceptions: 0)
Write errors:           0
Total transferred:      683568917 bytes
HTML transferred:       681958917 bytes
Requests per second:    704.11 [#/sec] (mean)
Time per request:       426.069 [ms] (mean)
Time per request:       1.420 [ms] (mean, across all concurrent requests)
Transfer rate:          47002.80 [Kbytes/sec] received
Connection Times (ms)
min  mean[+/-sd] median   max
Connect:        0  196 515.0      0    7001
Processing:     9  210 141.1    185    3291
Waiting:        7  210 141.0    185    3291
Total:         31  406 536.2    189    7202
Percentage of the requests served within a certain time (ms)
50%    189
66%    199
75%    207
80%    223
90%   1186
95%   1203
98%   1424
99%   3180
100%   7202 (longest request)
启动xcache后测试效果:
# service php-fpm restart
Gracefully shutting down php-fpm . done
Starting php-fpm  done
# ab -n 10000 -c 300 http://172.16.20.150/index.php ……
Concurrency Level:      300
Time taken for tests:   15.397 seconds
Complete requests:      10000
Failed requests:        978
(Connect: 0, Receive: 0, Length: 978, Exceptions: 0)
Write errors:           0
Total transferred:      721118913 bytes
HTML transferred:       719508913 bytes
Requests per second:    649.49 [#/sec] (mean)
Time per request:       461.899 [ms] (mean)
Time per request:       1.540 [ms] (mean, across all concurrent requests)
Transfer rate:          45738.42 [Kbytes/sec] received
Connection Times (ms)
min  mean[+/-sd] median   max
Connect:        0  190 540.0      0    7021
Processing:    10  244 311.8    197    8314
Waiting:        8  244 311.7    197    8314
Total:         34  434 663.8    200    9321
Percentage of the requests served within a certain time (ms)
50%    200
66%    211
75%    228
80%    276
90%   1197
95%   1217
98%   3087
99%   3212
100%   9321 (longest request)
从结果看出,速度没有怎么提升,反而有所下降,但xcache确实加载成功。这可能是我现行环境中,php页面的编译步骤不是瓶颈,而是磁盘IO或者数据库查找读取是瓶颈。如果是php编译内容所占时间是瓶颈,那么安装xcache后可以看到明显提速效果。
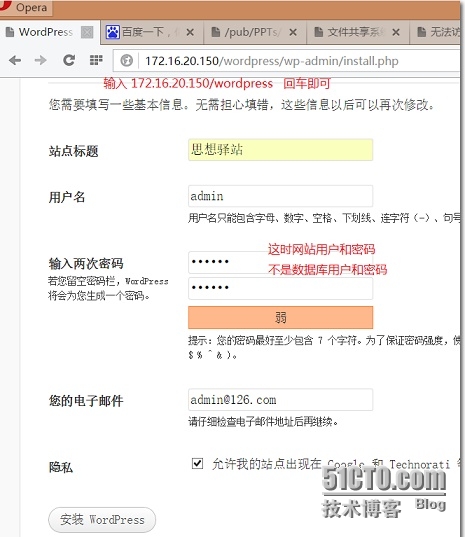
(六)安装使用wordpress
程序包wordpress-3.3.1-zh_CN.zip
1、解压缩程序包到网站根目录下
# unzip -d /var/www/html/ wordpress-3.3.1-zh_CN.zip
# cd /var/www/html/wordpress/
# ls
index.php        wp-admin              wp-config-sample.php  wp-links-opml.php  wp-pass.php      wp-trackback.php
license.txt      wp-app.php            wp-content            wp-load.php        wp-register.php  xmlrpc.php
readme.html      wp-blog-header.php    wp-cron.php           wp-login.php       wp-settings.php
wp-activate.php  wp-comments-post.php  wp-includes           wp-mail.php        wp-signup.php
2、提供wordpress的配置文件
# cp wp-config-sample.php wp-config.php
# vim wp-config.php
修改下面几项:
define('DB_NAME', 'wpdb');
/** MySQL 数据库用户名 */
define('DB_USER', 'wp');
/** MySQL 数据库密码 */
define('DB_PASSWORD', '123');
/** MySQL 主机 */
define('DB_HOST', 'localhost')
3、在本主机上给用户wp授权使用数据库的权限:
# mysql
……
MariaDB [(none)]> CREATE DATABASE wpdb;
Query OK, 1 row affected (0.09 sec)
MariaDB [(none)]> GRANT ALL ON wpdb.* TO wp@localhost IDENTIFIED BY '123';
Query OK, 0 rows affected (0.15 sec)
MariaDB [(none)]> FLUSH PRIVILEGES;
Query OK, 0 rows affected (0.03 sec)
MariaDB [(none)]> \q
Bye
[root@aunt-s wordpress]#
4、在浏览器上登录后台进行网站建设

相关文章推荐
- 开发shell脚本检查Nginx实战分享
- 开发shell脚本检查Nginx实战分享
- CentOS 6.6编译安装Nginx1.6.2+MySQL5.6.21+PHP5.6.3
- Nginx(1)------- Nginx支持热部署的原理
- nginx rewrite例子
- nginx rewrite 参数和例子
- nginx-gridfs Benchmarking Raw Results
- 通过Nginx访问后端应用,ERR_CONTENT_LENGTH_MISMATCH 问题的解决
- Fedora 下nginx和php的安装
- Mac 下 Nginx、MySQL、PHP-FPM 的安装配置
- Nginx 日志文件切割
- Linux下搭建Nginx环境的搭建
- linux安装nginx
- linux(centos7)搭建nginx服务器
- nginx + gridfs 实现图片的分布式存储(一) 安装
- nginx 与traffic server
- linux部署nginx-1.7.0流媒体服务器
- nginx中的ngx_command_t结构中的set方法在何时调用
- nginx和php-fpm优化
- django+apache2+nginx+mod_wsgi