zabbix监控nginx,Mysqld,Php状态,MySQL主从复制状态
2015-04-28 20:40
1201 查看
http://xianglinhu.blog.51cto.com/5787032/1633016
https://www.centos.bz/2015/01/zabbix-monitor-memcached-php-fpm-tomcat-mysql-nginx-log/
/article/4405064.html
zabbix监控nginx状态
Nginx自带监控模块ngx_http_stub_status_module提供Nginx的基本信息
在编译安装Nginx时加参数 --with-http_stub_status_module
安装好以后可以通过nginx -V|grep http_stub_status_module 查看状态模块是否已安装
首先,在nginx的配置文件中添加如下一段代码
保存之后重启nginx
Active connections
The current number of active client connections including
活跃客户端连接数,包括处于等待状态的连接数
The total number of accepted client connections.
接收到的客户端连接总数
The total number of handled connections. Generally, the parameter value is the same as
处理请求的总数。通常情况下,这个值和accepts的值相同。除非达到了一些资源限制。例如设置worker_connections 1024; 设置一个worker进程能够打开的最大并发连接数。
The total number of client requests.
客户端请求总数
The current number of connections where nginx is reading the request header.
当前Nginx正在读取请求头的连接数量
The current number of connections where nginx is writing the response back to the client.
当前Nginx正在将响应写回到客户端的连接数量
The current number of idle client connections waiting for a request.
当前正在等待请求的闲置客户端连接数量
在zabbix脚本目录下编写Nginx状态信息获取脚本nginx_status.sh
然后修改该文件的属主和属组为zabbix,并且具有执行权限chown zabbix.zabbix /data/zabbix/sbin/nginx_status.shchmod 755 /data/zabbix/sbin/nginx_status.sh然后在zabbix_agentd.conf配置文件中添加zabbix的子配置文件
nginx_status_zabbix.conf
zabbix监控mysql数据库状态
Zabbix自己提供的模板可以监控mysql slow queries,mysqlversion,uptime,alive等。
1.Zabbix官方提供的监控mysql的模板Template AppMySQL,可以看到相关的Items和key。
2.把该模板Template App MySQL Link到相关的主机上面,发现Item的Status是不可用的,因为key的值是通过Mysql用户查看"showglobal status"信息或者用mysqladmin命令查看status或extended-status的信息而取的值。
cat check_mysql_performance.sh
4.在Zabbix_agentd.conf里面添加UserParameter,格式如下,对于Zabbix来说,脚本其实就是一个插件。
5.重启agentd服务器,然后在zabbix server中添加模板Template AppMySQL。
这时候可以连接zabbix自带的Templete app mysql 模板了进行监控,这里我将这个模板改了下名称放在附件里面提供下载。要是使用我这个模板只需要导入模板即可,就可以看到Template MySQL Porformance模板。
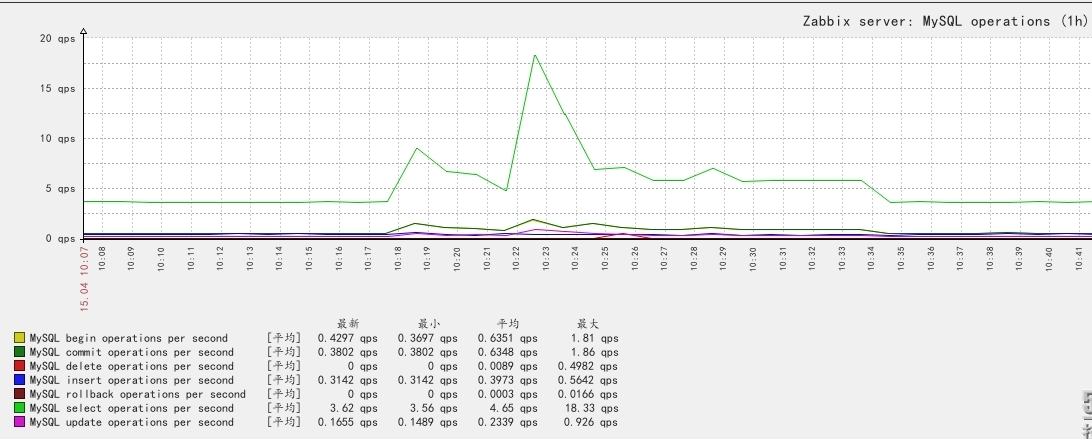
6.在zabbix前端可以实时查看SQL语句每秒钟的操作次数。
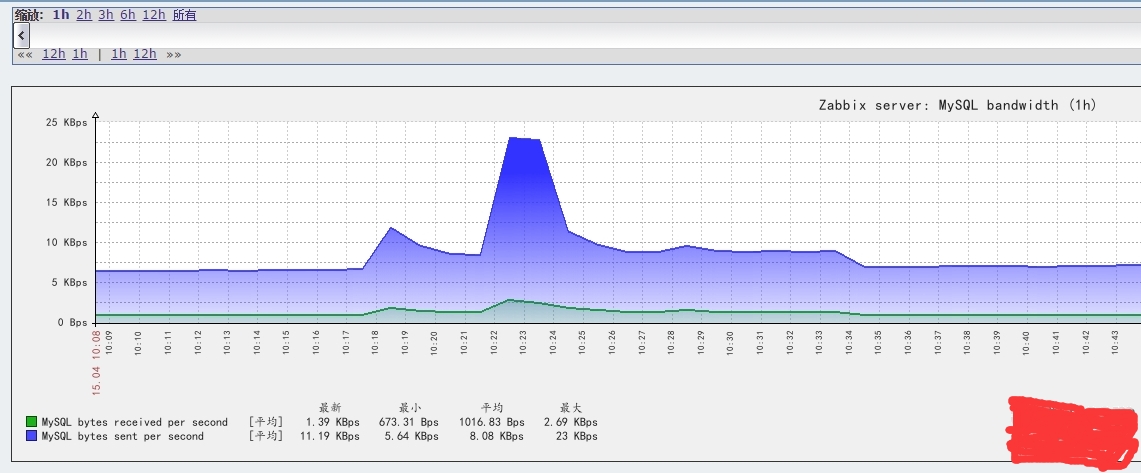
7.在zabbix前端可以实时查看mysql发送接收的字节数。其中bytes received表示从所有客户端接收到的字节数,bytes sent表示发送给所有客户端的字节数。
总结
把该脚本放到要监控的服务器上面(Modifymysql user and password),修改UserParameter的参数并重启agentd,Link官方提供的Template App MySQL模板即可。
我这里是测试环境用root账号,线上服务器安全期间可以给mysql用户授权readonly权限。
根据实际的需求,除了监控上述监控项之外,还可以监控mysqlprocesslist,Innodb等。
zabbix监控php状态
http://www.ttlsa.com/zabbix/zabbix-monitor-php-fpm-status/
方法一:
通过nginx调用php-fpm来查询php的状态信息首先,在php的配置文件中添加一行vim /usr/local/php/etc/php-fpm.confpm.status_path = /phpfpmstatus保存后重启php-fpm在nginx配置文件中添加代码server { listen 80; server_name localhost;location /nginxstatus { stub_status on; access_log off; allow 127.0.0.1; allow 10.6.0.187; deny all; }location ~ ^/(phpfpmstatus)$ {
include fastcgi_params;
fastcgi_pass unix:/tmp/php-fcgi.sock;
fastcgi_param SCRIPT_FILENAME /usr/local/nginx/html$fastcgi_script_name;
}
}
保存后重启nginx服务然后使用curl -s http://localhost/phpfpmstatus查看是否能够获取到php状态信息。
然后,在zabbix的脚本目录里面编辑执行脚本
方法二:
1. 启用php-fpm状态功能
# cat /usr/local/php-5.5.10/etc/php-fpm.conf | grep status_path
pm.status_path = /status
默认情况下为/status,当然也可以改成其他的,例如/ttlsa_status等等。
2. nginx配置
在默认主机里面加上location或者你希望能访问到的主机里面。
location ~ ^/(phpfpm_status)$ {
root /usr/local/nginx/html;
include fastcgi_params;
fastcgi_pass 127.0.0.1:9000;
fastcgi_param SCRIPT_FILENAME $document_root$fastcgi_script_name;
}
3. 重启nginx/php-fpm
请依照你的环境重启你的nginx和php-fpm
# service nginx restart
# service php-fpm restart
4. 打开status页面
# curl http://www.ttlsa.com/status pool: www
process manager: dynamic
start time: 14/May/2014:22:40:15 +0800
start since: 58508
accepted conn: 33
listen queue: 0
max listen queue: 8
listen queue len: 0
idle processes: 2
active processes: 1
total processes: 3
max active processes: 5
max children reached: 0
slow requests: 2091
5. php-fpm status详解
pool – fpm池子名称,大多数为www
process manager – 进程管理方式,值:static, dynamic or ondemand. dynamic
start time – 启动日期,如果reload了php-fpm,时间会更新
start since – 运行时长
accepted conn – 当前池子接受的请求数
listen queue – 请求等待队列,如果这个值不为0,那么要增加FPM的进程数量
max listen queue – 请求等待队列最高的数量
listen queue len – socket等待队列长度
idle processes – 空闲进程数量
active processes – 活跃进程数量
total processes – 总进程数量
max active processes – 最大的活跃进程数量(FPM启动开始算)
max children reached - 大道进程最大数量限制的次数,如果这个数量不为0,那说明你的最大进程数量太小了,请改大一点。
slow requests – 启用了php-fpm slow-log,缓慢请求的数量
# cat zabbix_agentd.conf | grep 'php-fpm'
UserParameter=php-fpm.status[*],/usr/bin/curl -s "http://127.0.0.1/status?xml" | grep "<$1>" | awk -F'>|<' '{ print $$3}'
在此没有额外使用脚本,比网络上的其他脚本要精练不少!
重启zabbix客户端
# /etc/init.d/zabbix_agentd restart
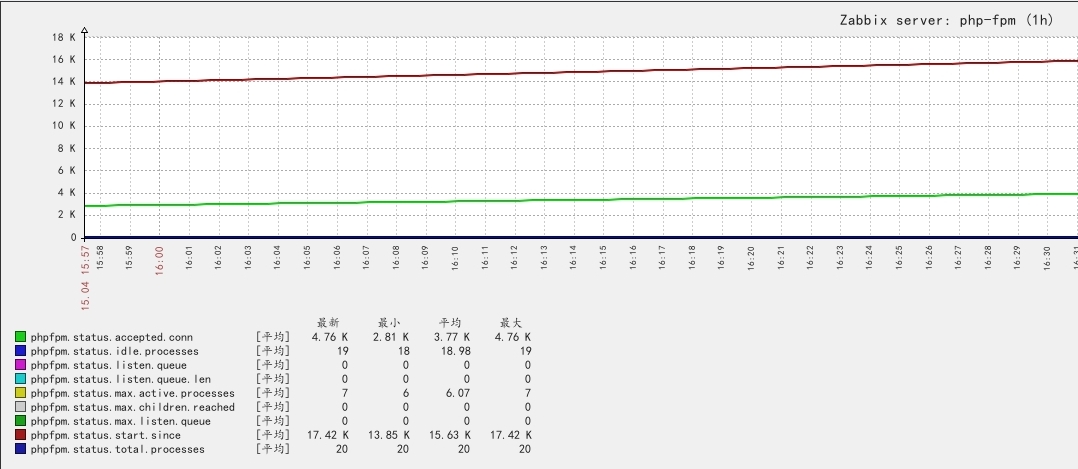
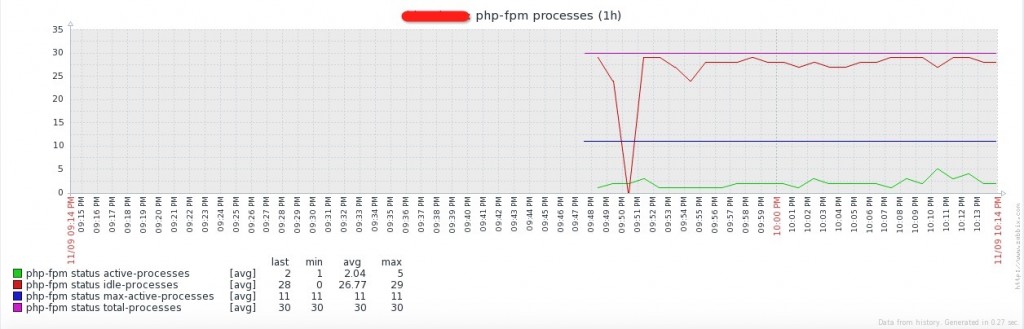
效果展示如下:
慢日志数量
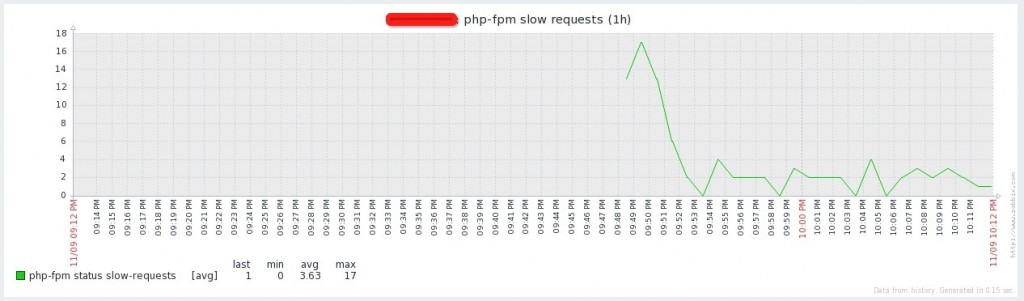
php-fpm process
在大多数公司生产环境中,MySQL数据库都会做主从复制,以便出现故障及时切换,也可以起到数据备份的作用。那么主从同步状态是否正常,就成了运维人员的一个很重要的工作。如果是手动去检查的话,那么需要进入数据库的从库执行show slave status\G , 如果IO和SQL线程都是YES那么则证明MySQL主从同步正常。
创建监控项
定义监控项

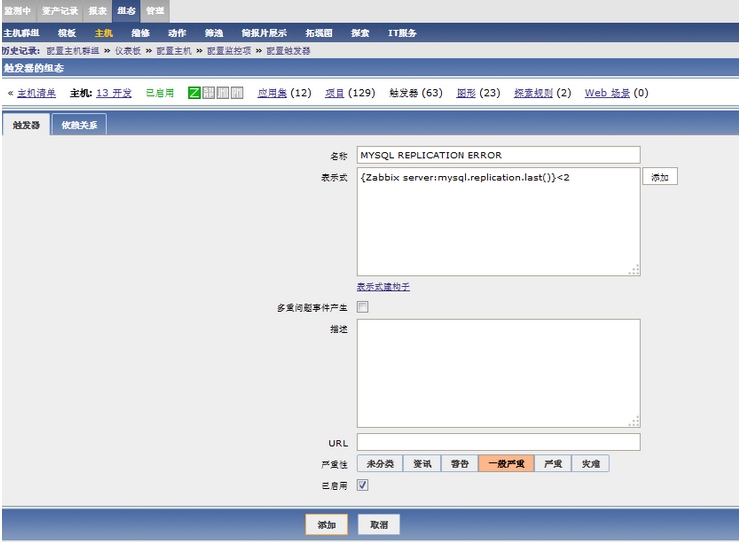
添加监控项之后创建触发器
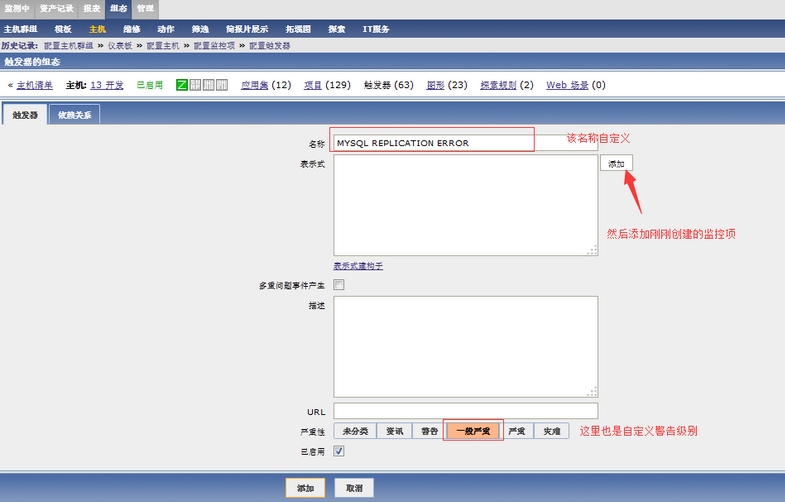
配置触发条件
最后添加触发器创建成功
接下来我们将从服务器的slave关闭一下看zabbix是否有报警

看到报警,则Zabbix监控MySQL主从状态成功。测试成功之后,记得把主从同步.http://www.linuxpai.com/zabbix-jk-mysqlab.html http://lihuipeng.blog.51cto.com/3064864/1081562 监控mysql主从方法二下面是监控效果图:1、Mysql Slave Status of 3306 Port
使用low level
discovery进行监控,并且已经跟之前的lld监控mysql的模板合成了一个模板(所以我本文就只介绍mysql主从状态,其他的性能,这样使用
一个模板既能监控mysql性能,又能自动的监控mysql主从状态,如果io或者sql任何一个状态不为yew,就会报警。如何实现:一、客户端
1、监控内容的json化
在客户端里,需要把监控的内容json化展示,然后服务端可以通过正则来过滤出结果下面在是我的json监控mysql的json展示
脚本内容如下:

2、修改zabbix_agentd.conf文件在zabbix_agentd.conf最后添加以下内容
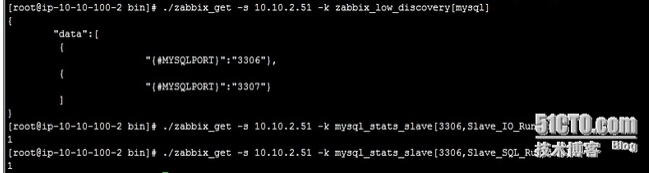
如果你能通过/usr/local/zabbix/bin/zabbix_get -s 127.0.0.1 -k zabbix_low_discovery[mysql]与/usr/local/zabbix/bin/zabbix_get -s 127.0.0.1 -k mysql_stats_slave[3306,Slave_IO_Running]、/usr/local/zabbix/bin/zabbix_get -s 127.0.0.1 -k mysql_stats_slave[3306,Slave_SQL_Running]命令获取数据就代表没问题,下面是我的测试结果
4、mysql授权
1、模板导入
把Template Mysql Auto Discovery导入到zabbix里(模板在附件),具体操作不介绍。2、设置正则在“管理”=》“一般”=》“正则表达式”里,选择“新的正则表达式”然后设置类似如下

我这是运行3301到3309这9个mysql实例3、主机关联模板
把需要监控mysql实例的主机管理模板即可监控,默认是3600秒后自动更新,如下图
为什么设置3600秒?原因是如果设置时间过短,比如你设置60s,一个是服务器的压力大,一个是如果你检测的端口突然当掉了,还没有来的急报警,主机通
过json来获取不到这个信息,就认为没有这个端口,模板里会自动关闭这个监控项的内容(默认保留30天,然后自动删除),这样报警功能就基本没有了,所
以还是发现的间隔时间长一些比较好。Template Mysql Auto Discovery模板 在附件里面。/article/4122657.html
Monitor MySQL环境:操作系统CentOS7
Zabbix版本2.4.3
MySql版本5.6.23
zabbix_agent安装目录/usr/local/zabbix/
被监控端配置
下载监控模版 percona-monitoring-plugins-1.1.4.tar.gz
wget http://dl.cactifans.org/template/percona-monitoring-plugins-1.1.4.tar.gz
tar zxvf percona-monitoring-plugins-1.1.4.tar.gz
建立对应目录
mkdir -p /var/lib/zabbix/percona/scripts/
拷贝参数文件到agentd的配置文件目录(一般为zabbix_agent安装目录下的etc下的zabbix_agentd.conf.d目录)
cd /usr/local/zabbix/etc/zabbix_agentd.conf.d/
cp /opt/percona-monitoring-plugins-1.1.4/zabbix/templates/userparameter_percona_mysql.conf .
修改zabbix_agentd.conf启用参数文件文件
vi /usr/local/zabbix/etc/zabbix_agentd.conf
253行,取消注释
Include=/usr/local/zabbix/etc/zabbix_agentd.conf.d/*.conf
修改后,重启agentd
service zabbix-agent restart
配置mysql数据连接,我直接用root用户进行连接
cd /var/lib/zabbix/percona/scripts/
cp /opt/percona-monitoring-plugins-1.1.4/zabbix/scripts/* .
编辑mysql连接信息,修改为你数据库的实际参数
cd /var/lib/zabbix/percona/scripts/
vi ss_get_mysql_stats.php
$mysql_user = 'root';
$mysql_pass = '123456';
$mysql_port = 3306;
修改好后测试一下,如果出现数据说明链接数据没有问题
[root@proxy scripts]# /var/lib/zabbix/percona/scripts/get_mysql_stats_wrapper.sh gg
9
配置调用,编辑
vi /home/zabbix/.my.cnf
[client]
user = root
password = 123456
测试一下,如果返回“1”或者“0”,表明成功
[root@canghai ~]# sudo -u zabbix -H /var/lib/zabbix/percona/scripts/get_mysql_stats_wrapper.sh running-slave
0
设置权限
chown -R zabbix:zabbix /tmp/localhost-mysql_cacti_stats.txt
注意事项:此方法被监控端必须安装php
服务端配置
下载percona-monitoring-plugins-1.1.4.tar.gz 包,并解压,
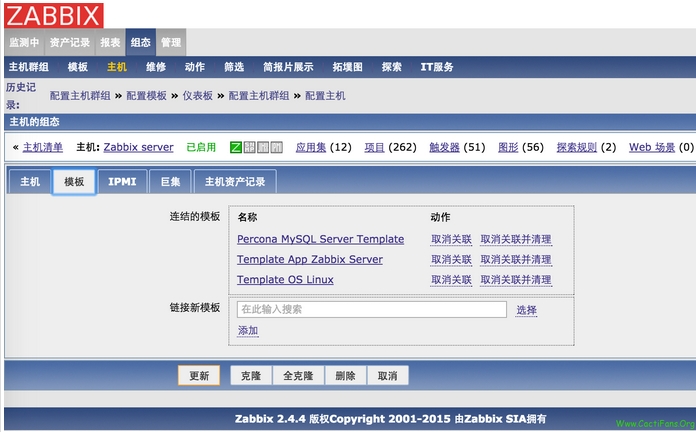
在zabbix_web页面选择导入模版,选择percona-monitoring-plugins-1.1.4包里zabbix目录templates目录下的zabbix_agent_template_percona_mysql_server_ht_2.0.9-sver1.1.4.xml
模版文件
并关联模版到主机
过一会,便可以看到数据已经过来
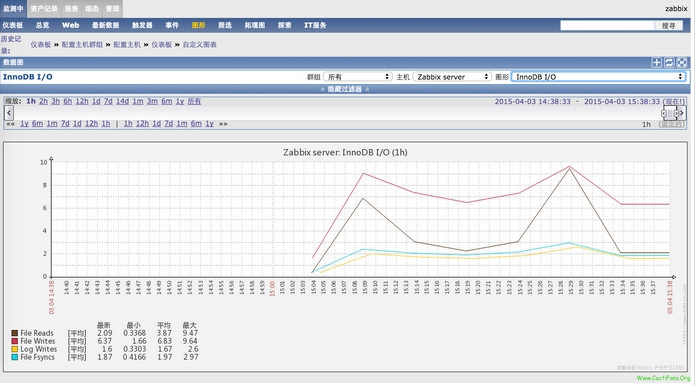
InnoDB I/O
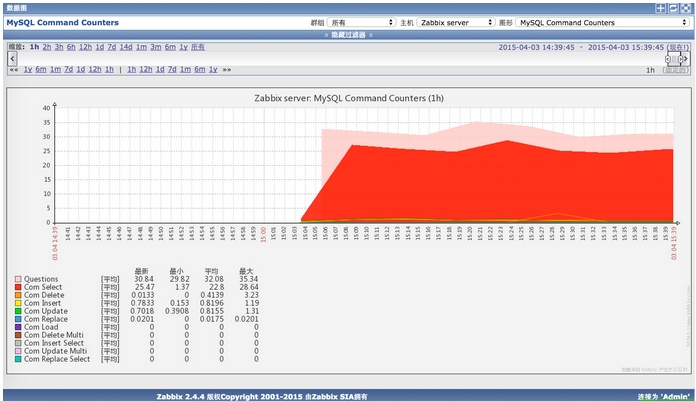
Command Counters
https://www.centos.bz/2015/01/zabbix-monitor-memcached-php-fpm-tomcat-mysql-nginx-log/
/article/4405064.html
zabbix监控nginx状态
Nginx自带监控模块ngx_http_stub_status_module提供Nginx的基本信息
在编译安装Nginx时加参数 --with-http_stub_status_module
安装好以后可以通过nginx -V|grep http_stub_status_module 查看状态模块是否已安装
首先,在nginx的配置文件中添加如下一段代码
server
{
listen 88;
server_name localhost;
location /nginxstatus {
stub_status on;
access_log off;
allow 127.0.0.1;
allow 192.168.1.165;
deny all;
}
location /php-fpm_status {
fastcgi_pass 127.0.0.1:9000;
fastcgi_param SCRIPT_FILENAME $document_root$fastcgi_script_name;
include fastcgi_params;
}
}
}
保存之后重启nginx
Active connections
The current number of active client connections including
Waitingconnections.
活跃客户端连接数,包括处于等待状态的连接数
accepts
The total number of accepted client connections.
接收到的客户端连接总数
handled
The total number of handled connections. Generally, the parameter value is the same as
acceptsunless some resource limits have been reached
处理请求的总数。通常情况下,这个值和accepts的值相同。除非达到了一些资源限制。例如设置worker_connections 1024; 设置一个worker进程能够打开的最大并发连接数。
requests
The total number of client requests.
客户端请求总数
Reading
The current number of connections where nginx is reading the request header.
当前Nginx正在读取请求头的连接数量
Writing
The current number of connections where nginx is writing the response back to the client.
当前Nginx正在将响应写回到客户端的连接数量
Waiting
The current number of idle client connections waiting for a request.
当前正在等待请求的闲置客户端连接数量
在zabbix脚本目录下编写Nginx状态信息获取脚本nginx_status.sh
#!/bin/bash
#check nginx status
#ip=$(ifconfig eth0|grep "inet addr"|sed  's/^.*addr://'|awk '{print $1}')
#echo $ip
ip=127.0.0.1
port=88
#echo $ip:$port
function active()  {
/usr/bin/curl http://$ip:$port/nginx_status 2>/dev/null|grep "Active"|awk '{print $NF}'
}

function reading() {
/usr/bin/curl http://$ip:$port/nginx_status 2>/dev/null|grep "Reading"|awk '{print $2}'
}

function writing() {
/usr/bin/curl http://$ip:$port/nginx_status 2>/dev/null|grep "Writing"|awk '{print $4}'
}

function waiting() {

/usr/bin/curl http://$ip:$port/nginx_status 2>/dev/null|grep "Waiting"|awk '{print $6}'
}

function accepts() {
/usr/bin/curl http://$ip:$port/nginx_status 2>/dev/null|awk 'NR==3{print $1}'

}

function handled() {

/usr/bin/curl http://$ip:$port/nginx_status 2>/dev/null|awk 'NR==3{print $2}'
}

function requests(){

/usr/bin/curl http://$ip:$port/nginx_status 2>/dev/null|awk 'NR==3{print $3}'
}

case $1 in
active)
active
;;
reading)
reading
;;
writing)
writing
;;
waiting)
waiting
;;
accepts)
accepts
;;
handled)
handled
;;
requests)
requests
;;
*)
exit 1
;;
esac
然后修改该文件的属主和属组为zabbix,并且具有执行权限chown zabbix.zabbix /data/zabbix/sbin/nginx_status.shchmod 755 /data/zabbix/sbin/nginx_status.sh然后在zabbix_agentd.conf配置文件中添加zabbix的子配置文件
nginx_status_zabbix.conf
### Option: UserParameter
#       User-defined parameter to monitor. There can be several user-defined parameters.
#       Format: UserParameter=<key>,<shell command>
#       See 'zabbix_agentd' directory for examples.
#
# Mandatory: no
# Default:
# UserParameter=
# /data/zabbix/sbin/nginx_status.sh
UserParameter=nginx.accepts,/usr/local/zabbix/bin/nginx_status.sh accepts
UserParameter=nginx.handled,/usr/local/zabbix/bin/nginx_status.sh handled
UserParameter=nginx.requests,/usr/local/zabbix/bin/nginx_status.sh requests
UserParameter=nginx.connections.active,/usr/local/zabbix/bin/nginx_status.sh active
UserParameter=nginx.connections.reading,/usr/local/zabbix/bin/nginx_status.sh reading
UserParameter=nginx.connections.writing,/usr/local/zabbix/bin/nginx_status.sh writing
UserParameter=nginx.connections.waiting,/usr/local/zabbix/bin/nginx_status.sh waiting
创建好了之后就可以在web页面配置item监控项了,模板在附件。
zabbix监控mysql数据库状态
Zabbix自己提供的模板可以监控mysql slow queries,mysqlversion,uptime,alive等。
1.Zabbix官方提供的监控mysql的模板Template AppMySQL,可以看到相关的Items和key。
2.把该模板Template App MySQL Link到相关的主机上面,发现Item的Status是不可用的,因为key的值是通过Mysql用户查看"showglobal status"信息或者用mysqladmin命令查看status或extended-status的信息而取的值。
mysql> show global status;
mysql> show status;
3.结合官方提供的key编写Shell脚本,从数据库中取出Items的key的值。
cat check_mysql_performance.sh
#!/bin/bash
host=loclhost
MYSQL_SOCK="/var/lib/mysql/mysql.sock"
MYSQL_PWD="9kdbserver123"
ARGS=1
if [ $# -ne "$ARGS" ];then
echo "Please input onearguement:"
fi
case $1 in
Uptime)
result=`mysqladmin -uroot -p${MYSQL_PWD} -S $MYSQL_SOCK status|cut -f2 -d ":" |cut -f1 -d "T"`
echo $result
;;
Com_update)
result=`mysqladmin -uroot -p${MYSQL_PWD} -S $MYSQL_SOCK extended-status |grep -w "Com_update"|cut -d "|" -f3`
echo $result
;;
Slow_queries)
result=`mysqladmin -uroot -p${MYSQL_PWD} -S $MYSQL_SOCK status |cut -f5 -d ":" |cut -f1 -d "O"`
echo $result
;;
Com_select)
result=`mysqladmin -uroot -p${MYSQL_PWD} -S $MYSQL_SOCK extended-status |grep -w "Com_select"| cut -d "|" -f3`
echo $result
;;
Com_rollback)
result=`mysqladmin -uroot -p${MYSQL_PWD} -S $MYSQL_SOCK extended-status |grep -w "Com_rollback"| cut -d "|" -f3`
echo $result
;;
Questions)
result=`mysqladmin -uroot -p${MYSQL_PWD} -S $MYSQL_SOCK status|cut -f4 -d ":"|cut -f1 -d "S"`
echo $result
;;
Com_insert)
esult=`mysqladmin -uroot -p${MYSQL_PWD} -S $MYSQL_SOCK extended-status |grep -w "Com_insert"|cut -d "|" -f3`
echo $result
;;
Com_delete)
result=`mysqladmin -uroot -p${MYSQL_PWD} -S $MYSQL_SOCK extended-status |grep -w "Com_delete"|cut -d "|" -f3`
echo $result
;;
Com_commit)
result=`mysqladmin -uroot -p${MYSQL_PWD} -S $MYSQL_SOCK extended-status |grep -w "Com_commit"|cut -d "|" -f3`
echo $result
;;
Bytes_sent)
result=`mysqladmin -uroot -p${MYSQL_PWD} -S $MYSQL_SOCK extended-status |grep -w "Bytes_sent"|cut -d "|" -f3`
echo $result
;;
Bytes_received)
result=`mysqladmin -uroot -p${MYSQL_PWD} -S $MYSQL_SOCK extended-status |grep -w "Bytes_received" |cut -d "|" -f3`
echo $result
;;
Com_begin)
result=`mysqladmin -uroot -p${MYSQL_PWD} -S $MYSQL_SOCK extended-status |grep -w "Com_begin"|cut -d "|" -f3`
echo $result
;;

*)
echo"Usage:$0(Uptime|Com_update|Slow_queries|Com_select|Com_rollback|Questions|Com_insert|Com_delete|Com_commit|Bytes_sent|Bytes_received|Com_begin)"
;;
esac修改权限chmod 755 /data/zabbix/sbin/check_mysql_performance.sh4.在Zabbix_agentd.conf里面添加UserParameter,格式如下,对于Zabbix来说,脚本其实就是一个插件。
UserParameter=mysql.version,mysql -V
UserParameter=mysql.ping,mysqladmin -uroot -pxxxxxx -S /tmp/mysql.sock ping | grep -c alive
UserParameter=mysql.status[*],/data/zabbix/sbin/check_mysql_performance.sh $1 $2
5.重启agentd服务器,然后在zabbix server中添加模板Template AppMySQL。
这时候可以连接zabbix自带的Templete app mysql 模板了进行监控,这里我将这个模板改了下名称放在附件里面提供下载。要是使用我这个模板只需要导入模板即可,就可以看到Template MySQL Porformance模板。
6.在zabbix前端可以实时查看SQL语句每秒钟的操作次数。
7.在zabbix前端可以实时查看mysql发送接收的字节数。其中bytes received表示从所有客户端接收到的字节数,bytes sent表示发送给所有客户端的字节数。
总结
把该脚本放到要监控的服务器上面(Modifymysql user and password),修改UserParameter的参数并重启agentd,Link官方提供的Template App MySQL模板即可。
我这里是测试环境用root账号,线上服务器安全期间可以给mysql用户授权readonly权限。
根据实际的需求,除了监控上述监控项之外,还可以监控mysqlprocesslist,Innodb等。
zabbix监控php状态
http://www.ttlsa.com/zabbix/zabbix-monitor-php-fpm-status/
方法一:
通过nginx调用php-fpm来查询php的状态信息首先,在php的配置文件中添加一行vim /usr/local/php/etc/php-fpm.confpm.status_path = /phpfpmstatus保存后重启php-fpm在nginx配置文件中添加代码server { listen 80; server_name localhost;location /nginxstatus { stub_status on; access_log off; allow 127.0.0.1; allow 10.6.0.187; deny all; }location ~ ^/(phpfpmstatus)$ {
include fastcgi_params;
fastcgi_pass unix:/tmp/php-fcgi.sock;
fastcgi_param SCRIPT_FILENAME /usr/local/nginx/html$fastcgi_script_name;
}
}
保存后重启nginx服务然后使用curl -s http://localhost/phpfpmstatus查看是否能够获取到php状态信息。
然后,在zabbix的脚本目录里面编辑执行脚本
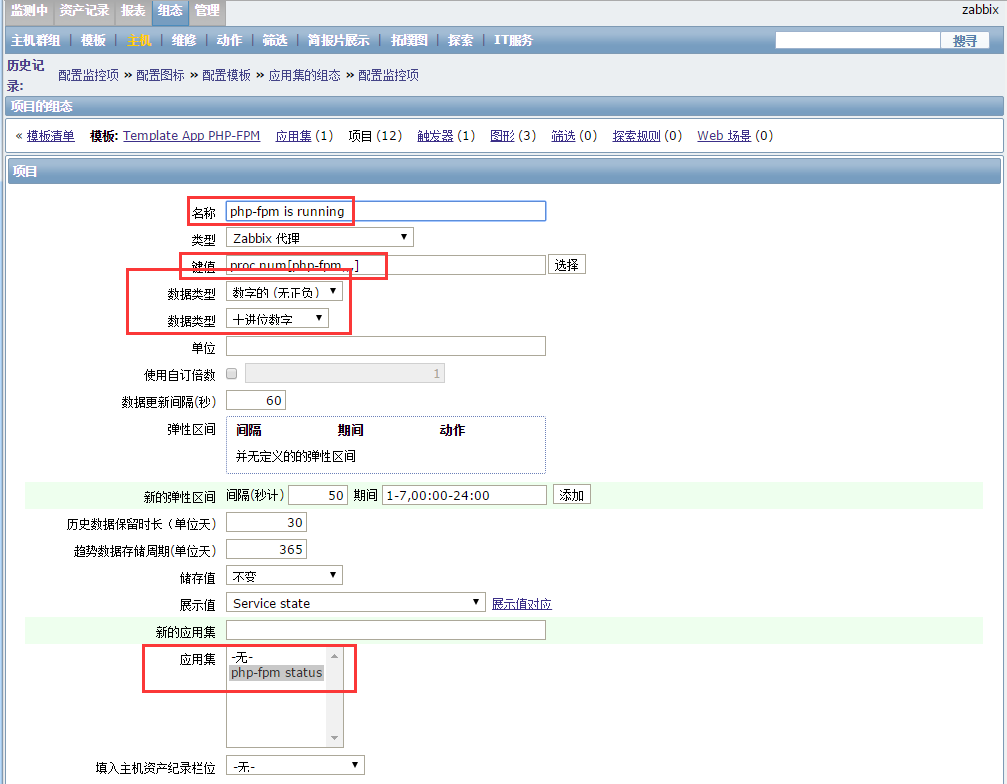
#!/bin/bash
#monitor php-fpm status from zabbix

source /etc/bashrc >/dev/null 2>&1
source /etc/profile >/dev/null 2>&1

LOG=/data/zabbix/sbin/phpfpmstatus.log
curl -s http://localhost/phpfpmstatus >$LOG

pool(){
awk '/pool/ {print $NF}' $LOG
}

process_manager(){
awk '/process manager/ {print $NF}' $LOG
}

start_since(){
awk '/start since:/ {print $NF}' $LOG
}

accepted_conn(){
awk '/accepted conn:/ {print $NF}' $LOG
}
listen_queue(){
awk '/^(listen queue:)/ {print $NF}' $LOG
}

max_listen_queue(){
awk '/max listen queue:/ {print $NF}' $LOG
}

listen_queue_len(){
awk '/listen queue len:/ {print $NF}' $LOG
}

idle_processes(){
awk '/idle processes:/ {print $NF}' $LOG
}

active_processes(){
awk '/^(active processes:)/ {print $NF}' $LOG
}

total_processes(){
awk '/total processes:/ {print $NF}' $LOG
}

max_active_processes(){
awk '/max active processes:/ {print $NF}' $LOG
}

max_children_reached(){
awk '/max children reached:/ {print $NF}' $LOG
}
case "$1" in
pool)
pool
;;
process_manager)
process_manager
;;
start_since)
start_since
;;
accepted_conn)
accepted_conn
;;
listen_queue)
listen_queue
;;
max_listen_queue)
max_listen_queue
;;
listen_queue_len)
listen_queue_len
;;
idle_processes)
idle_processes
;;
active_processes)
active_processes
;;
total_processes)
total_processes
;;
max_active_processes)
max_active_processes
;;
max_children_reached)
max_children_reached
;;
*)
echo "Usage: $0 {pool|process_manager|start_since|accepted_conn|listen_queue|max_listen_queue|listen_queue_len|idle_processes|active_processes|total_processes|max_active_processes|max_children_reached}"
esac

保存后退出,修改权限为
-rwxr-xr-x 1 zabbix zabbix 1770 4月  15 14:50 phpstatus.sh

然后编辑zabbix_agentd.conf文件,在最后添加上下面这段代码,并重启zabbix_agentd服务
#to monitor php-fpmstatus
UserParameter=phpfpm.status.pool,/data/zabbix/sbin/phpstatus.sh pool
UserParameter=phpfpm.status.process.manager,/data/zabbix/sbin/phpstatus.sh process_manager
UserParameter=phpfpm.status.start.since,/data/zabbix/sbin/phpstatus.sh start_since
UserParameter=phpfpm.status.accepted.conn,/data/zabbix/sbin/phpstatus.sh accepted_conn
UserParameter=phpfpm.status.listen.queue,/data/zabbix/sbin/phpstatus.sh listen_queue
UserParameter=phpfpm.status.max.listen.queue,/data/zabbix/sbin/phpstatus.sh max_listen_queue
UserParameter=phpfpm.status.listen.queue.len,/data/zabbix/sbin/phpstatus.sh listen_queue_len
UserParameter=phpfpm.status.idle.processes,/data/zabbix/sbin/phpstatus.sh idle_processes
UserParameter=phpfpm.status.active.processes,/data/zabbix/sbin/phpstatus.sh active_processes
UserParameter=phpfpm.status.total.processes,/data/zabbix/sbin/phpstatus.sh total_processes
UserParameter=phpfpm.status.max.active.processes,/data/zabbix/sbin/phpstatus.sh max_active_processes
UserParameter=phpfpm.status.max.children.reached,/data/zabbix/sbin/phpstatus.sh max_children_reached
然后就可以在web端配置item监控php状态了
方法二:
1. 启用php-fpm状态功能
# cat /usr/local/php-5.5.10/etc/php-fpm.conf | grep status_path
pm.status_path = /status
默认情况下为/status,当然也可以改成其他的,例如/ttlsa_status等等。
2. nginx配置
在默认主机里面加上location或者你希望能访问到的主机里面。
location ~ ^/(phpfpm_status)$ {
root /usr/local/nginx/html;
include fastcgi_params;
fastcgi_pass 127.0.0.1:9000;
fastcgi_param SCRIPT_FILENAME $document_root$fastcgi_script_name;
}
3. 重启nginx/php-fpm
请依照你的环境重启你的nginx和php-fpm
# service nginx restart
# service php-fpm restart
4. 打开status页面
# curl http://www.ttlsa.com/status pool: www
process manager: dynamic
start time: 14/May/2014:22:40:15 +0800
start since: 58508
accepted conn: 33
listen queue: 0
max listen queue: 8
listen queue len: 0
idle processes: 2
active processes: 1
total processes: 3
max active processes: 5
max children reached: 0
slow requests: 2091
5. php-fpm status详解
pool – fpm池子名称,大多数为www
process manager – 进程管理方式,值:static, dynamic or ondemand. dynamic
start time – 启动日期,如果reload了php-fpm,时间会更新
start since – 运行时长
accepted conn – 当前池子接受的请求数
listen queue – 请求等待队列,如果这个值不为0,那么要增加FPM的进程数量
max listen queue – 请求等待队列最高的数量
listen queue len – socket等待队列长度
idle processes – 空闲进程数量
active processes – 活跃进程数量
total processes – 总进程数量
max active processes – 最大的活跃进程数量(FPM启动开始算)
max children reached - 大道进程最大数量限制的次数,如果这个数量不为0,那说明你的最大进程数量太小了,请改大一点。
slow requests – 启用了php-fpm slow-log,缓慢请求的数量
zabbix客户端配置
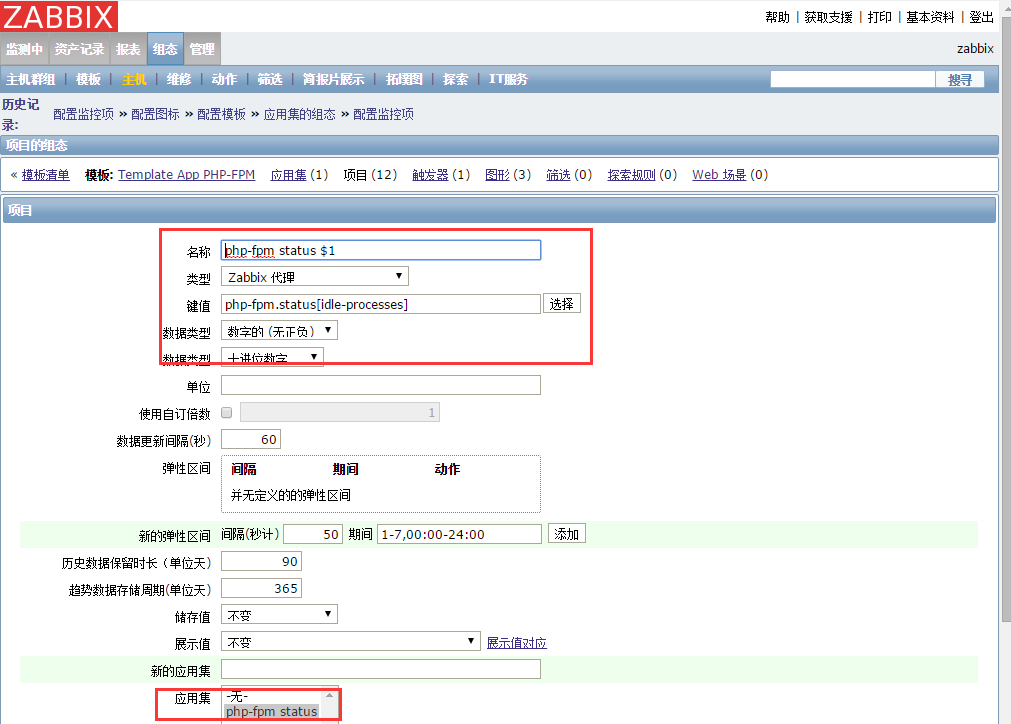
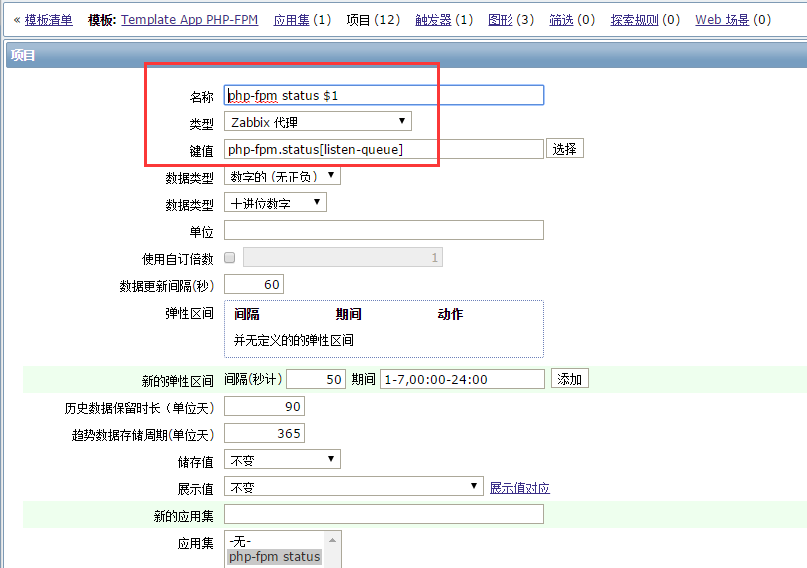
增加自定义key# cat zabbix_agentd.conf | grep 'php-fpm'
UserParameter=php-fpm.status[*],/usr/bin/curl -s "http://127.0.0.1/status?xml" | grep "<$1>" | awk -F'>|<' '{ print $$3}'
在此没有额外使用脚本,比网络上的其他脚本要精练不少!
重启zabbix客户端
# /etc/init.d/zabbix_agentd restart
zabbix管理后台配置
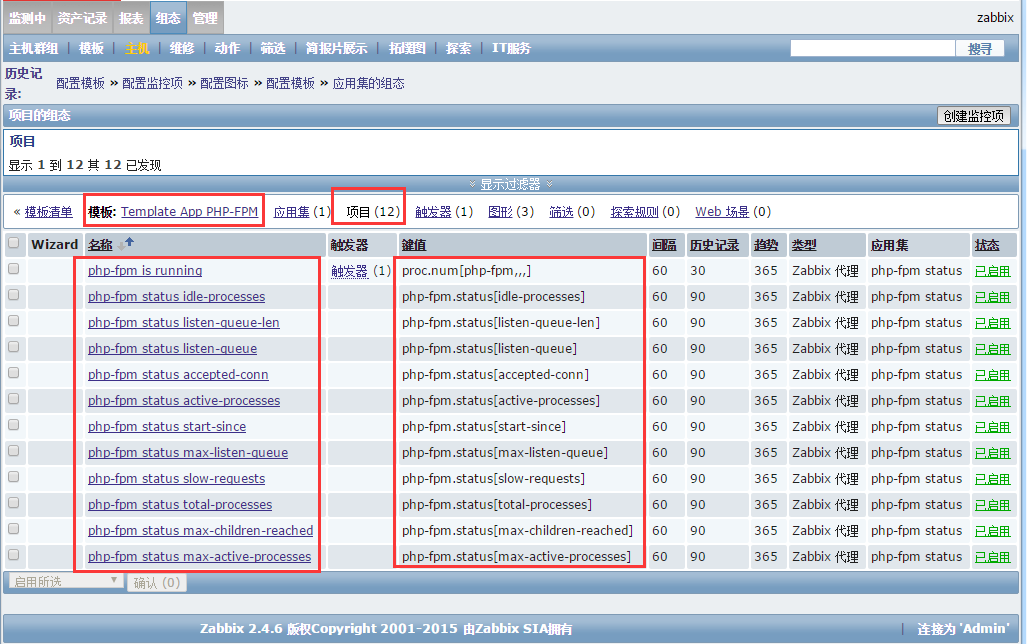
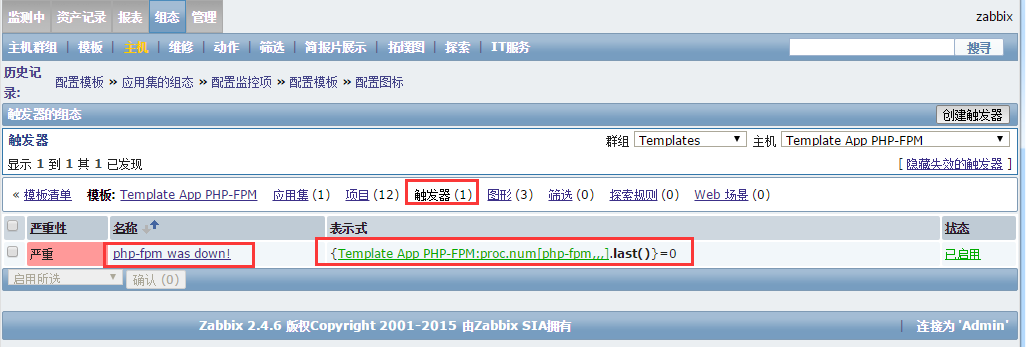
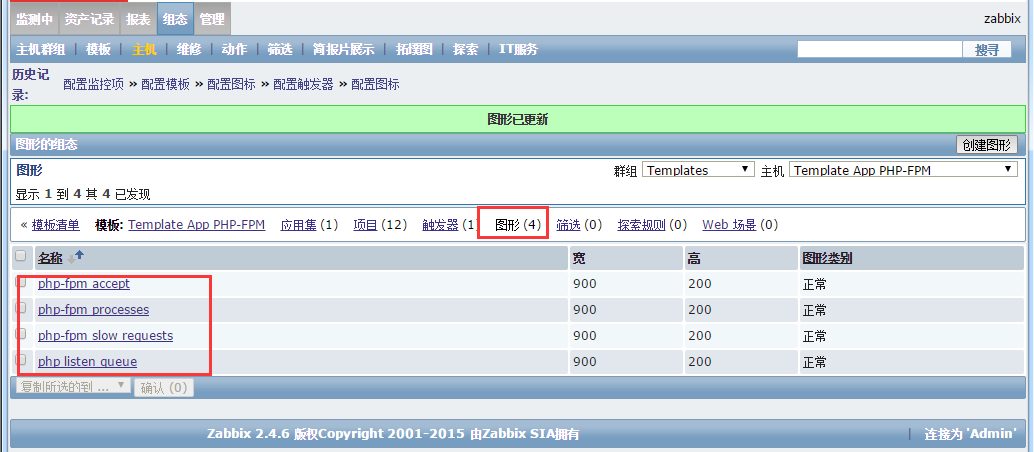
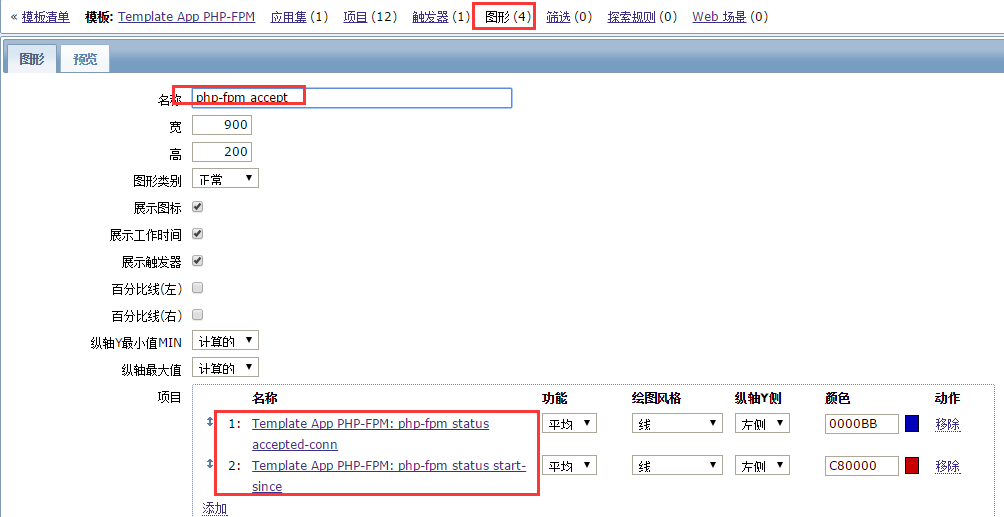
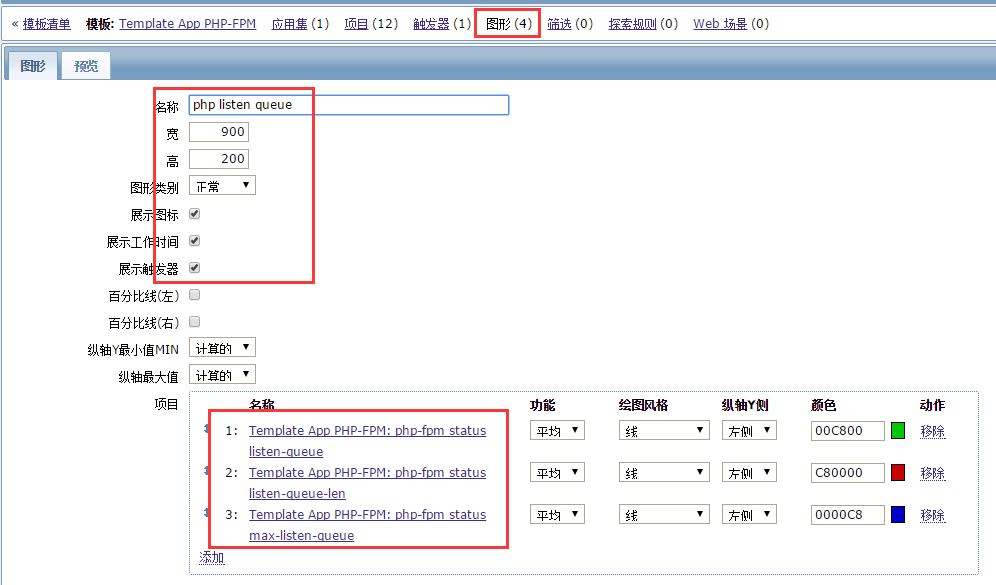
导入php-fpm模板 , 相关模板在附件里面。效果展示如下:
慢日志数量
php-fpm process
Zabbix监控MySQL主从复制状态
/article/4122657.html/article/6288758.html
/article/4405079.html在大多数公司生产环境中,MySQL数据库都会做主从复制,以便出现故障及时切换,也可以起到数据备份的作用。那么主从同步状态是否正常,就成了运维人员的一个很重要的工作。如果是手动去检查的话,那么需要进入数据库的从库执行show slave status\G , 如果IO和SQL线程都是YES那么则证明MySQL主从同步正常。
# mysql -uroot -p -e 'show slave status\G'
*************************** 1. row *************************** Slave_IO_State: Waiting for master to send event Master_Host: 192.168.1.16 Master_User: repl Master_Port: 14433 Connect_Retry: 60 Master_Log_File: mysql-bin.000002 Read_Master_Log_Pos: 93460707 Relay_Log_File: relay-log.000015 Relay_Log_Pos: 403969 Relay_Master_Log_File: mysql-bin.000002 Slave_IO_Running: Yes Slave_SQL_Running: Yes Replicate_Do_DB: Replicate_Ignore_DB: Replicate_Do_Table: Replicate_Ignore_Table: Replicate_Wild_Do_Table: Replicate_Wild_Ignore_Table: Last_Errno: 0 Last_Error: Skip_Counter: 0下面我们将结合Zabbix实现MySQL主从同步状态的自动监控如果还未安装Zabbix的朋友可以参考linux zabbix安装教程 http://www.linuxpai.com/zabbix-install.html 首先我们需要授权一个账号给予replication client 权限,能够让它执行’show slave status\G’mysql> grant replication client on *.* to 'test'@'%';mysql> flush privileges我们先测试一下是否能执行成功
# mysql -utest -e 'show slave status\G'
*************************** 1. row ***************************
Slave_IO_State: Waiting for master to send event
Master_Host: 192.168.1.16
Master_User: repl
Master_Port: 14433
Connect_Retry: 60
Master_Log_File: mysql-bin.000002
Read_Master_Log_Pos: 93587333
Relay_Log_File: relay-log.000015
Relay_Log_Pos: 530595
Relay_Master_Log_File: mysql-bin.000002
Slave_IO_Running: Yes
Slave_SQL_Running: Yes
Replicate_Do_DB:
Replicate_Ignore_DB:
Replicate_Do_Table:
Replicate_Ignore_Table:
Replicate_Wild_Do_Table:
Replicate_Wild_Ignore_Table:
···································
然后我们创建一个shell脚本做判断# vim check_mysql_replication.sh
#!/bin/bash
/usr/local/mysql/bin/mysql -utest -e 'show slave status\G' |grep -E "Slave_IO_Running|Slave_SQL_Running"|awk '{print $2}'|grep -c Yes
# chmod +x check_mysql_replication.sh # vim /usr/local/zabbix/etc/zabbix_agentd.conf
UnsafeUserParameters=1
UserParameter=mysql.replication,/shell/check_mysql_replication.sh
#在最后一行添加以上配置
重启zabbix_agentd 服务
# /etc/init.d/zabbix_agentd restart在zabbix server上面测试运行脚本
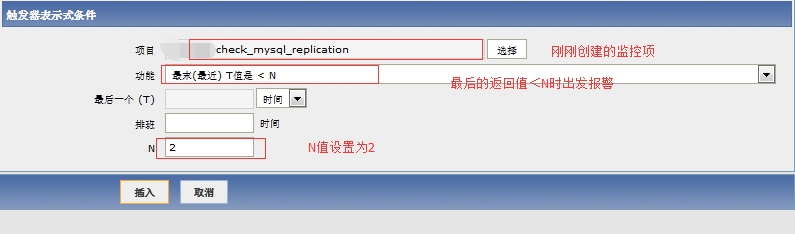
# /usr/local/zabbix/bin/zabbix_get -s 127.0.0.1 -k "mysql.replication得到的返回值为2则证明MySQL主从复制正常添加监控项目
创建监控项
定义监控项
添加监控项之后创建触发器
配置触发条件
最后添加触发器创建成功
接下来我们将从服务器的slave关闭一下看zabbix是否有报警
mysql> stop slave;
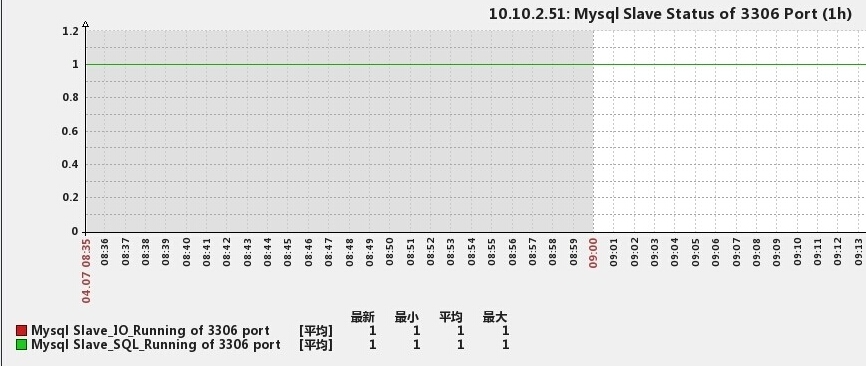
看到报警,则Zabbix监控MySQL主从状态成功。测试成功之后,记得把主从同步.http://www.linuxpai.com/zabbix-jk-mysqlab.html http://lihuipeng.blog.51cto.com/3064864/1081562 监控mysql主从方法二下面是监控效果图:1、Mysql Slave Status of 3306 Port
使用low level
discovery进行监控,并且已经跟之前的lld监控mysql的模板合成了一个模板(所以我本文就只介绍mysql主从状态,其他的性能,这样使用
一个模板既能监控mysql性能,又能自动的监控mysql主从状态,如果io或者sql任何一个状态不为yew,就会报警。如何实现:一、客户端
1、监控内容的json化
在客户端里,需要把监控的内容json化展示,然后服务端可以通过正则来过滤出结果下面在是我的json监控mysql的json展示
脚本内容如下:
#!/bin/bash
#Fucation:mysql low-level discovery
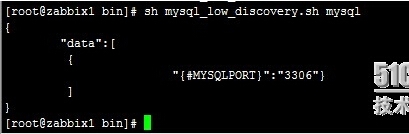
#Script_name mysql_low_discovery.sh
mysql() {
port=($(sudo netstat -tpln | awk -F "[ :]+" '/[m]ysql/ && /0.0.0.0/ {print $5}'))
printf '{\n'
printf '\t"data":[\n'
for key in ${!port[@]}
do
if [[ "${#port[@]}" -gt 1 && "${key}" -ne "$((${#port[@]}-1))" ]];then
socket=`ps aux|grep ${port[${key}]}|grep -v grep|awk -F '=' '{print $10}'|cut -d ' ' -f 1`
printf '\t {\n'
printf "\t\t\t\"{#MYSQLPORT}\":\"${port[${key}]}\"},\n"
else [[ "${key}" -eq "((${#port[@]}-1))" ]]
socket=`ps aux|grep ${port[${key}]}|grep -v grep|awk -F '=' '{print $10}'|cut -d ' ' -f 1`
printf '\t {\n'
printf "\t\t\t\"{#MYSQLPORT}\":\"${port[${key}]}\"}\n"
fi
done
printf '\t ]\n'
printf '}\n'
}
$1把此文件存放到/usr/local/zabbix/bin里,然后给与755权限,并修改用户与组为zabbix,同时允许zabbix用户无密码运行netstatecho "zabbix ALL=(root) NOPASSWD:/bin/netstat">>/etc/sudoers#Disable requiretty
sed -i 's/^Defaults.*.requiretty/#Defaults requiretty/' /etc/sudoers不关闭的话,会无法获取数据,并且zabbix日志里报
2、修改zabbix_agentd.conf文件在zabbix_agentd.conf最后添加以下内容
UserParameter=zabbix_low_discovery[*],/bin/bash /usr/local/zabbix/bin/mysql_low_discovery.sh $1
UserParameter=mysql_stats[*],mysql -h localhost -P $1 -uzabbix -pzabbix -e "show global status"|grep "\<$2\>"|cut  -f2
UserParameter=mysql_stats_slave[*],mysql -h localhost -P $1 -uzabbix -pzabbix -e "show slave status\G"|grep "\<$2\>"|awk '{if($NF=="Yes")3、测试如果你能通过/usr/local/zabbix/bin/zabbix_get -s 127.0.0.1 -k zabbix_low_discovery[mysql]与/usr/local/zabbix/bin/zabbix_get -s 127.0.0.1 -k mysql_stats_slave[3306,Slave_IO_Running]、/usr/local/zabbix/bin/zabbix_get -s 127.0.0.1 -k mysql_stats_slave[3306,Slave_SQL_Running]命令获取数据就代表没问题,下面是我的测试结果
4、mysql授权
GRANT PROCESS,REPLICATION CLIENT ON *.* TO 'zabbix'@'localhost' identified BY 'zabbix';
Flush privileges;
5、重启zabbix服务service zabbix restart二、服务端
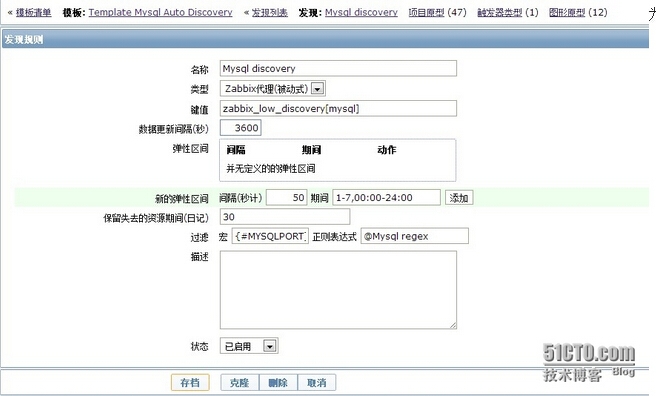
1、模板导入
把Template Mysql Auto Discovery导入到zabbix里(模板在附件),具体操作不介绍。2、设置正则在“管理”=》“一般”=》“正则表达式”里,选择“新的正则表达式”然后设置类似如下
我这是运行3301到3309这9个mysql实例3、主机关联模板
把需要监控mysql实例的主机管理模板即可监控,默认是3600秒后自动更新,如下图
为什么设置3600秒?原因是如果设置时间过短,比如你设置60s,一个是服务器的压力大,一个是如果你检测的端口突然当掉了,还没有来的急报警,主机通
过json来获取不到这个信息,就认为没有这个端口,模板里会自动关闭这个监控项的内容(默认保留30天,然后自动删除),这样报警功能就基本没有了,所
以还是发现的间隔时间长一些比较好。Template Mysql Auto Discovery模板 在附件里面。/article/4122657.html
Monitor MySQL环境:操作系统CentOS7
Zabbix版本2.4.3
MySql版本5.6.23
zabbix_agent安装目录/usr/local/zabbix/
被监控端配置
下载监控模版 percona-monitoring-plugins-1.1.4.tar.gz
wget http://dl.cactifans.org/template/percona-monitoring-plugins-1.1.4.tar.gz
tar zxvf percona-monitoring-plugins-1.1.4.tar.gz
建立对应目录
mkdir -p /var/lib/zabbix/percona/scripts/
拷贝参数文件到agentd的配置文件目录(一般为zabbix_agent安装目录下的etc下的zabbix_agentd.conf.d目录)
cd /usr/local/zabbix/etc/zabbix_agentd.conf.d/
cp /opt/percona-monitoring-plugins-1.1.4/zabbix/templates/userparameter_percona_mysql.conf .
修改zabbix_agentd.conf启用参数文件文件
vi /usr/local/zabbix/etc/zabbix_agentd.conf
253行,取消注释
Include=/usr/local/zabbix/etc/zabbix_agentd.conf.d/*.conf
修改后,重启agentd
service zabbix-agent restart
配置mysql数据连接,我直接用root用户进行连接
cd /var/lib/zabbix/percona/scripts/
cp /opt/percona-monitoring-plugins-1.1.4/zabbix/scripts/* .
编辑mysql连接信息,修改为你数据库的实际参数
cd /var/lib/zabbix/percona/scripts/
vi ss_get_mysql_stats.php
$mysql_user = 'root';
$mysql_pass = '123456';
$mysql_port = 3306;
修改好后测试一下,如果出现数据说明链接数据没有问题
[root@proxy scripts]# /var/lib/zabbix/percona/scripts/get_mysql_stats_wrapper.sh gg
9
配置调用,编辑
vi /home/zabbix/.my.cnf
[client]
user = root
password = 123456
测试一下,如果返回“1”或者“0”,表明成功
[root@canghai ~]# sudo -u zabbix -H /var/lib/zabbix/percona/scripts/get_mysql_stats_wrapper.sh running-slave
0
设置权限
chown -R zabbix:zabbix /tmp/localhost-mysql_cacti_stats.txt
注意事项:此方法被监控端必须安装php
服务端配置
下载percona-monitoring-plugins-1.1.4.tar.gz 包,并解压,
在zabbix_web页面选择导入模版,选择percona-monitoring-plugins-1.1.4包里zabbix目录templates目录下的zabbix_agent_template_percona_mysql_server_ht_2.0.9-sver1.1.4.xml
模版文件
并关联模版到主机
过一会,便可以看到数据已经过来
InnoDB I/O
Command Counters

相关文章推荐
- Zabbix监控mysql主从复制状态
- ZABBIX最全MYSQL自定义监控多实例mysql与主从复制状态没有之一
- 使用zabbix监控mysql主从状态 推荐
- Zabbix调用python脚本监控mysql主从状态
- 在CentOS 7 64位操作系统环境下搭建LNMP(Linux+Nginx+MySQL+PHP)来运行Zabbix监控程序
- zabbix监控mysql各项性能,主从复制
- 使用zabbix监控mysql主从状态
- zabbix通过自定义脚本监控nginx,php-fpm和mysql占用内存数和进程的个数
- zabbix监控mysql主从复制
- zabbix监控mysql主从复制
- zabbix用low level discovery监控磁盘吞吐量与iops zabbix监控nginx,php-fpm和mysql占用内存和进程个数
- Zabbix 监控Mysql 主从状态(Python脚本)
- Zabbix监控Memcached PHP-FPM Tomcat Nginx MySQL 网站日志
- zabbix监控mysql主从状态
- Zabbix 监控Mysql 主从状态的Python脚本
- zabbix自定义监控mysql主从状态,并做邮件告警(详细解说)
- 【SHELL】监控Nginx运行,Mysql主从运行,主从复制延迟
- zabbix监控mysql主从复制
- zabbix监控nginx、php-fpm的状态
- Zabbix监控Nginx 和PHP-FPM状态