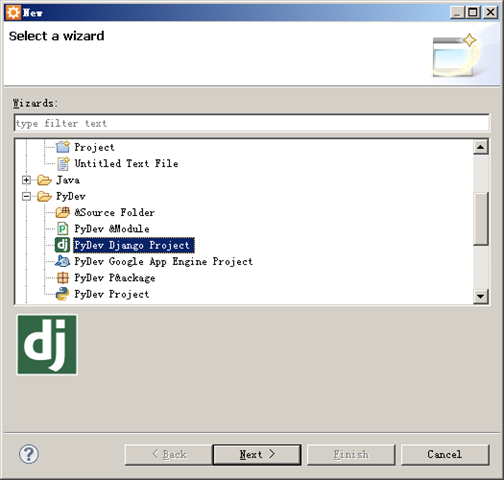
基于Aptana3+Django开发blog的示例
2015-03-04 10:58
176 查看
http://my.oschina.net/u/1412027/blog/197781
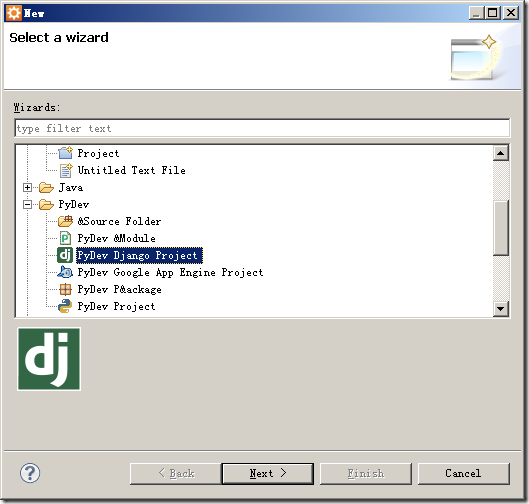
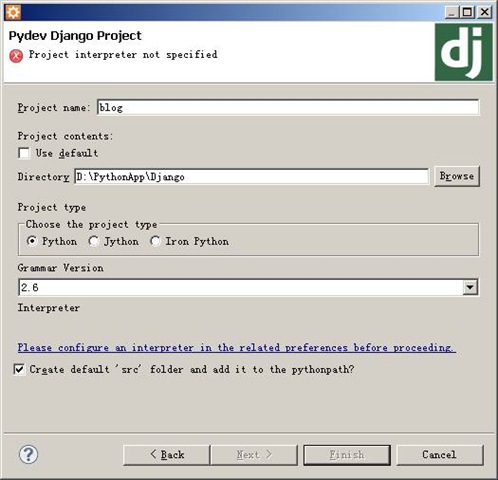
1、建立一个Django Project
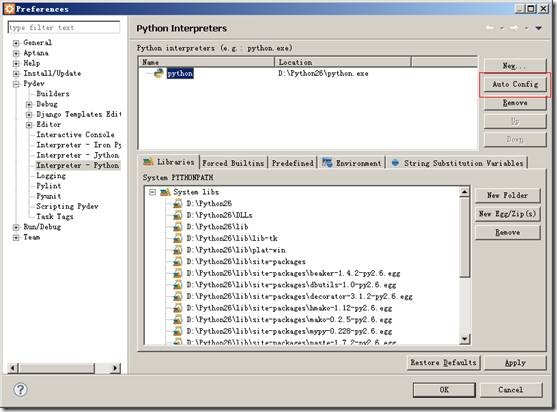
2、配置IDE的环境


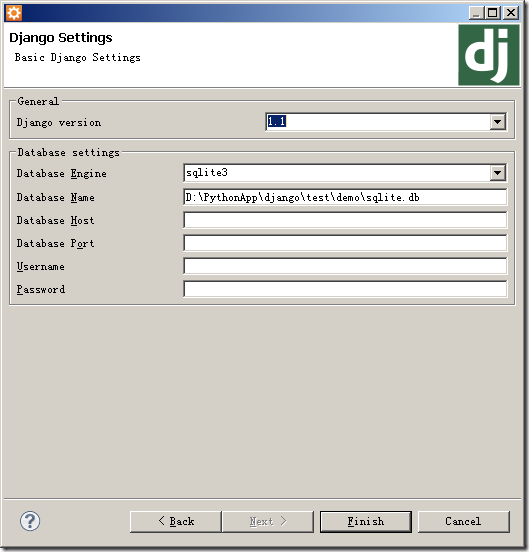
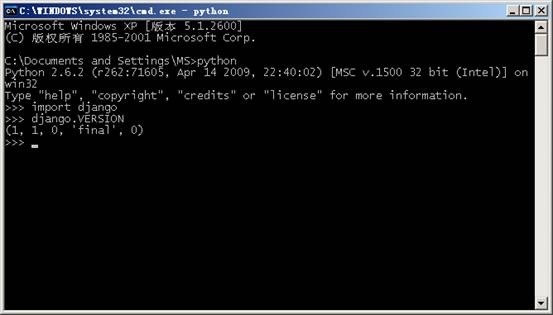
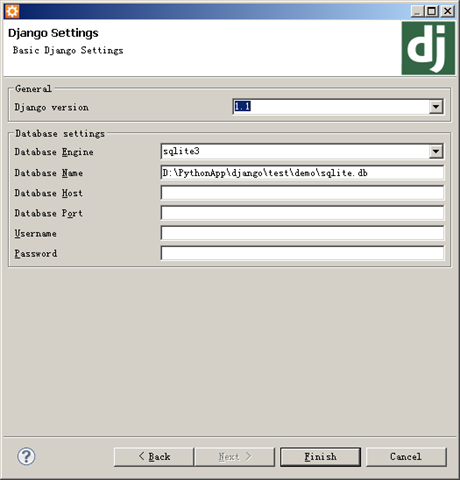
3、选择django的版本号,先查看当前系统中的django版本号(IDE默认选择1.2 or later)

这里默认使用sqlite,先使用默认的进行处理(有兴趣的可以改为mysql试试)
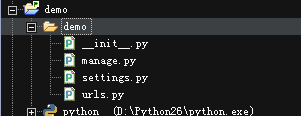
默认生成的4个文件:

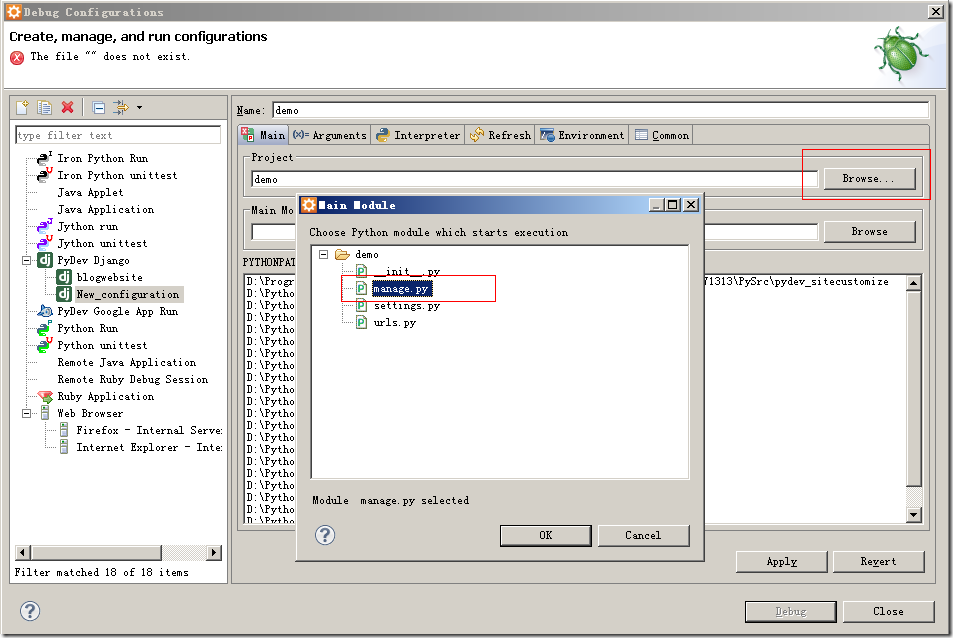
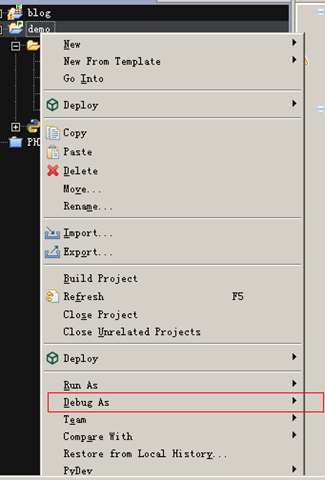
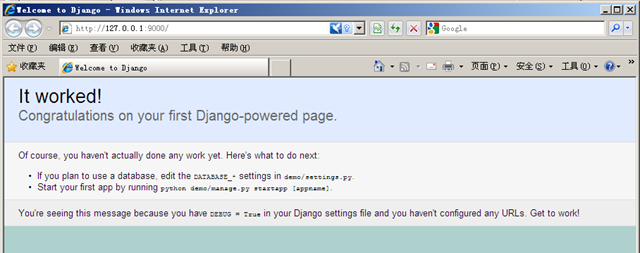
先跑起来看一下效果:

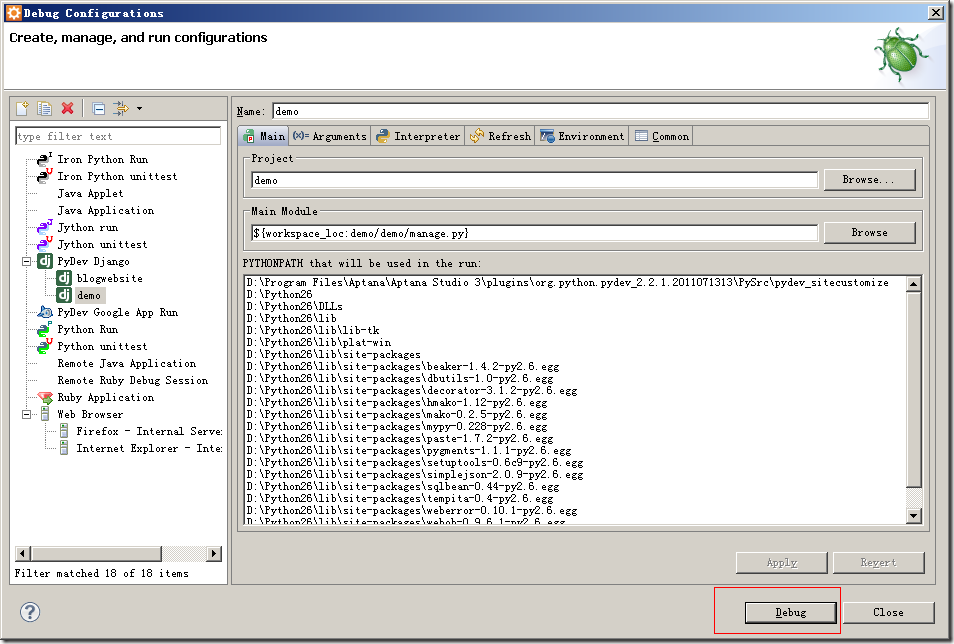
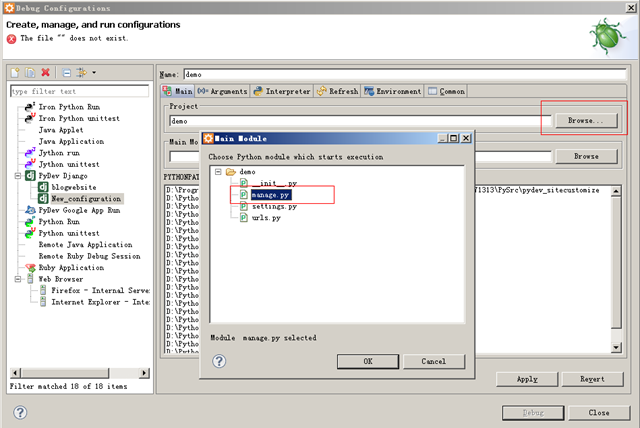
注意选择Debug Configurations,选择要运行的项目和主模块(选择项目根目录下的manage.py即可)
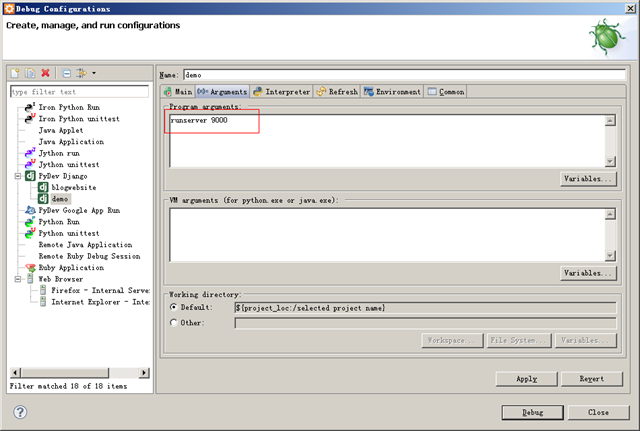
默认监听的是8000,这里修改为9000

控制台上的信息:
pydev debugger: starting

4、修改配置文件settings.py
找到TIME_ZONE,修改为TIME_ZONE = 'Asia/Shanghai'
找到LANGUAGE_CODE修改为LANGUAGE_CODE = 'zh-CN'
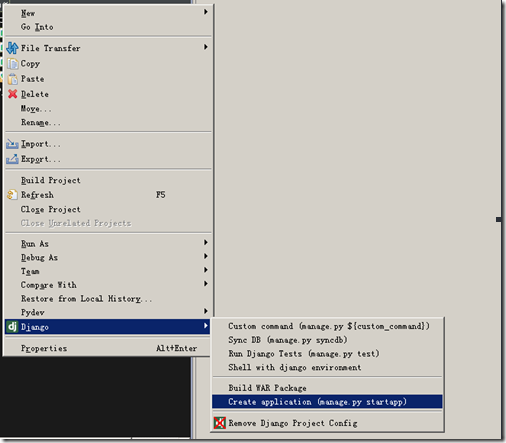
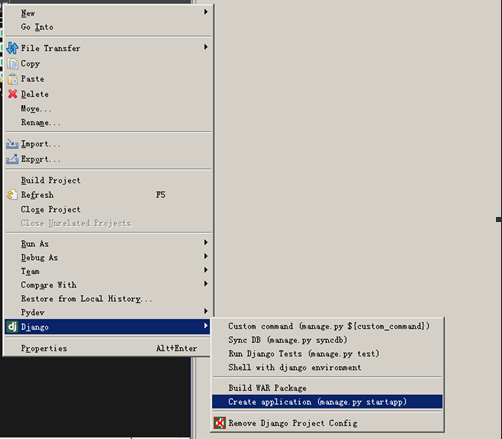
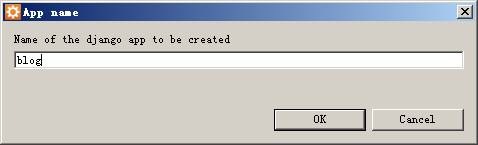
5、建立一个blog app应用(也可以在项目的windows中的目录使用命令,效果是一样)

6、修改settings.py,添加对blog的引用
找到INSTALLED_APPS,在尾部添加一行“demo.blog”(项目为demo、应用为blog)
INSTALLED_APPS = (
'django.contrib.auth',
'django.contrib.contenttypes',
'django.contrib.sessions',
'django.contrib.sites',
'demo.blog',
)
7、打开blog/models.py,添加一个文章类:
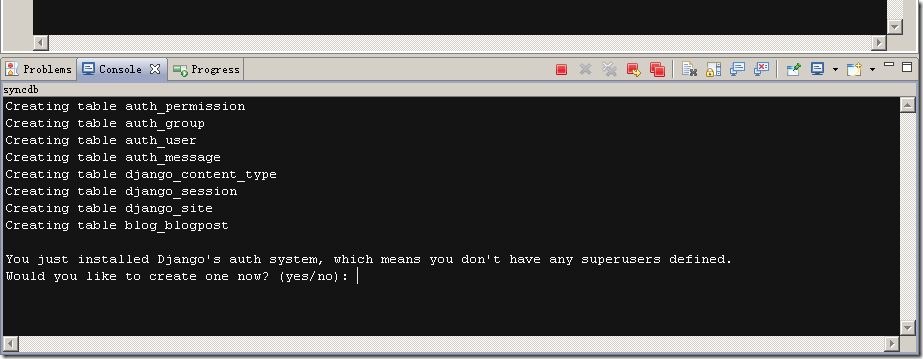
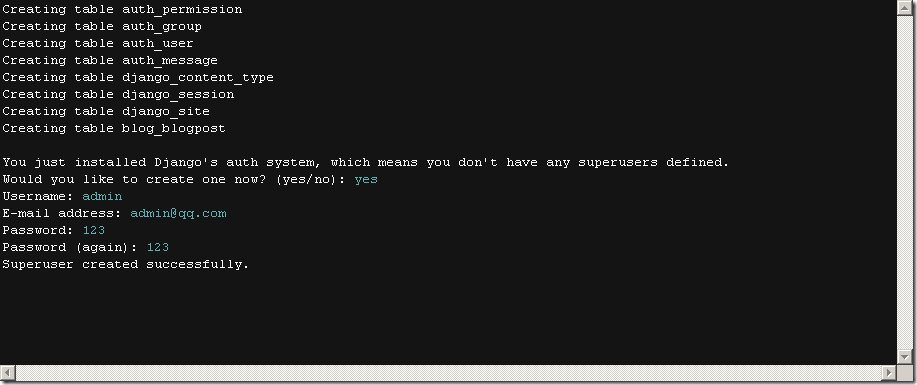
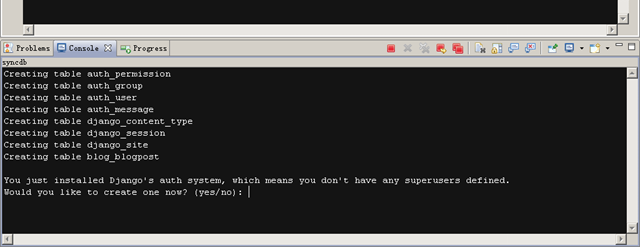
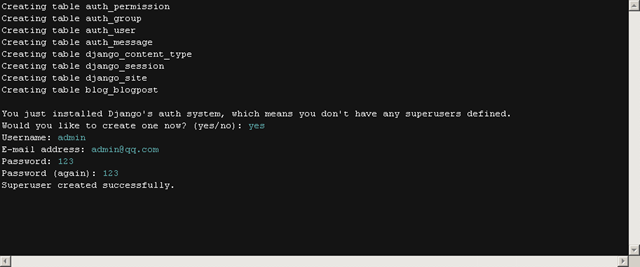
8、右击项目,执行sync DB,在控制台上可看到如下信息

9、修改settings.py,添加admin app
找到INSTALLED_APPS,在django.contrib.auth下一行添加'django.contrib.admin',
INSTALLED_APPS = (
'django.contrib.auth',
'django.contrib.admin',
'django.contrib.contenttypes',
'django.contrib.sessions',
'django.contrib.sites',
'demo.blog',
)
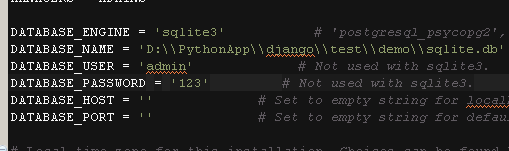
修改数据库的连接(工程根目录下的settings.py):

再执行一个sync DB

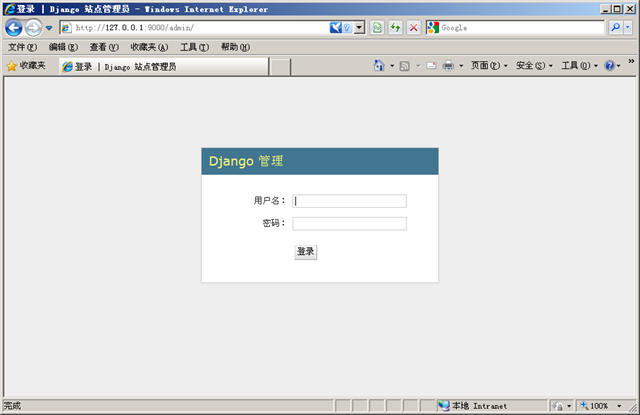
10、修改项目根目录下的urls.py,去掉urlpatterns中最后一项对admin的注释
(r'^admin/', include(admin.site.urls)),
---将最前面的“#”去掉即可,需要引入包“from django.contrib import admin” 在admin后面按下alt+/就可以自动导入包了
在blog/models.py中,添加一行
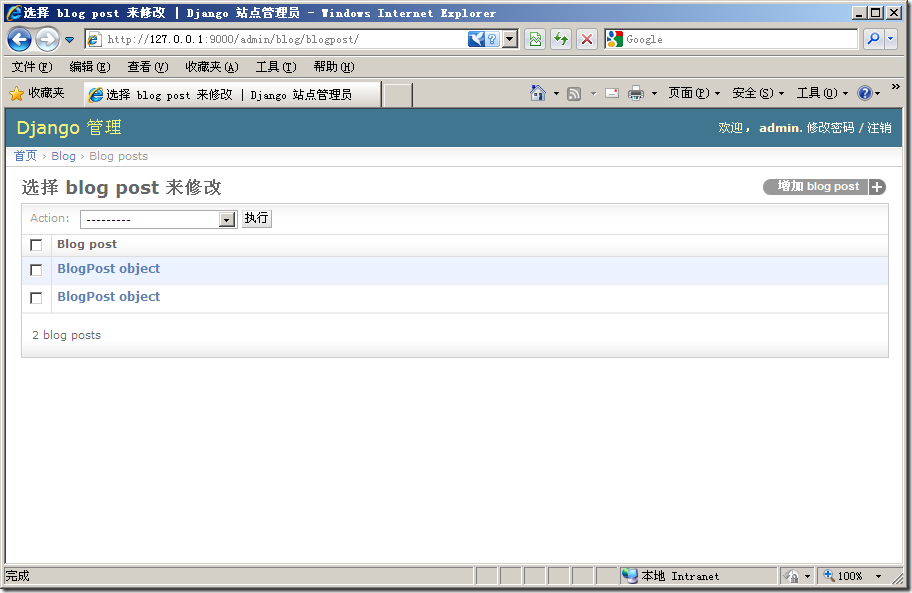
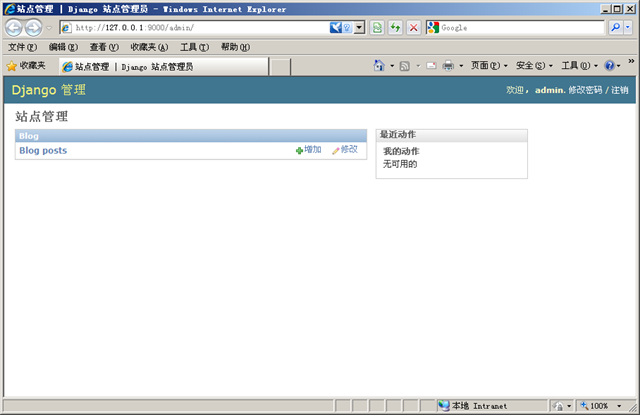
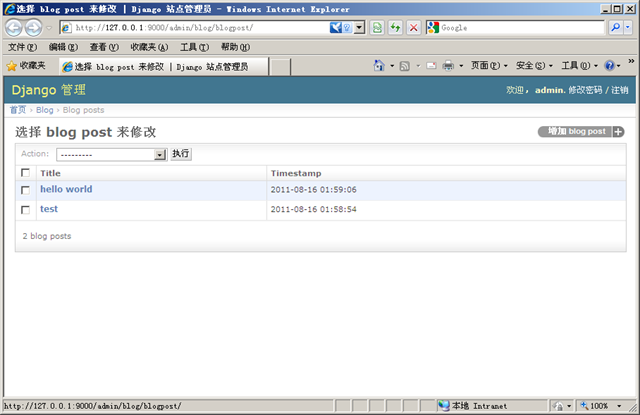
admin.site.register(BlogPost)
查看一下项目运行的效果:


添加两条数据后的效果显示,有一些难看,待会进行修改
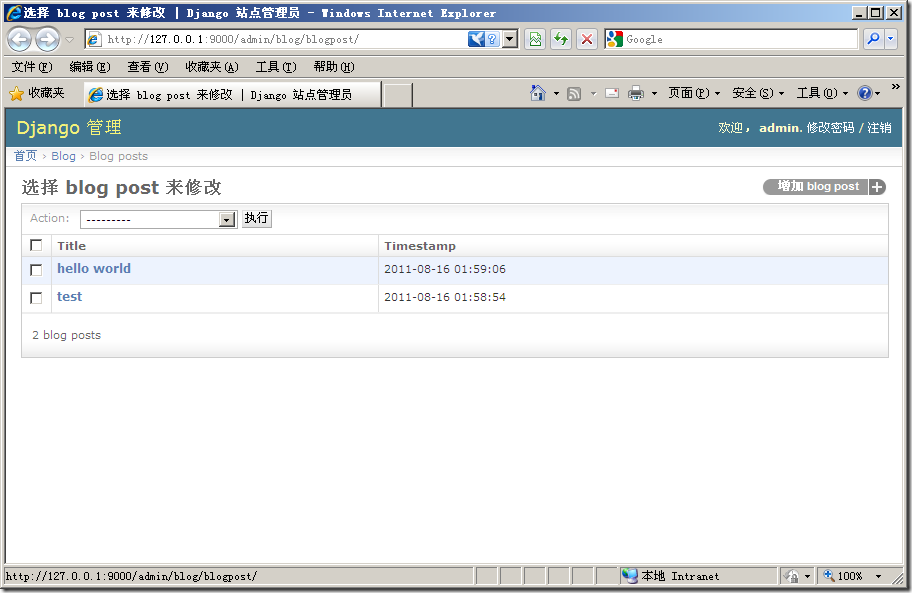
在blog/models.py添加一个ModelAdmin类
刷新页面,就变成下面这样子了
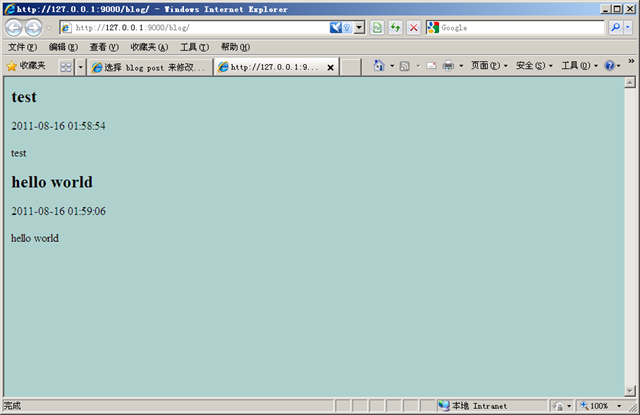
11、使用模板,显示添加的数据
在blog目录下建立一个名为templates的目录,在此目录下建立一个名为archive.html(demo/blog/templates/archive.html),输入如下内容:
12、打开blog的views.py,添加对视图的控制
13、在主urls.py中添加对blog的url匹配,在最后一行添加(r'^blog/',
include('demo.blog.urls')),
14、在blog中新建立一个urls.py文件,添加如下内容
现在的运行效果:
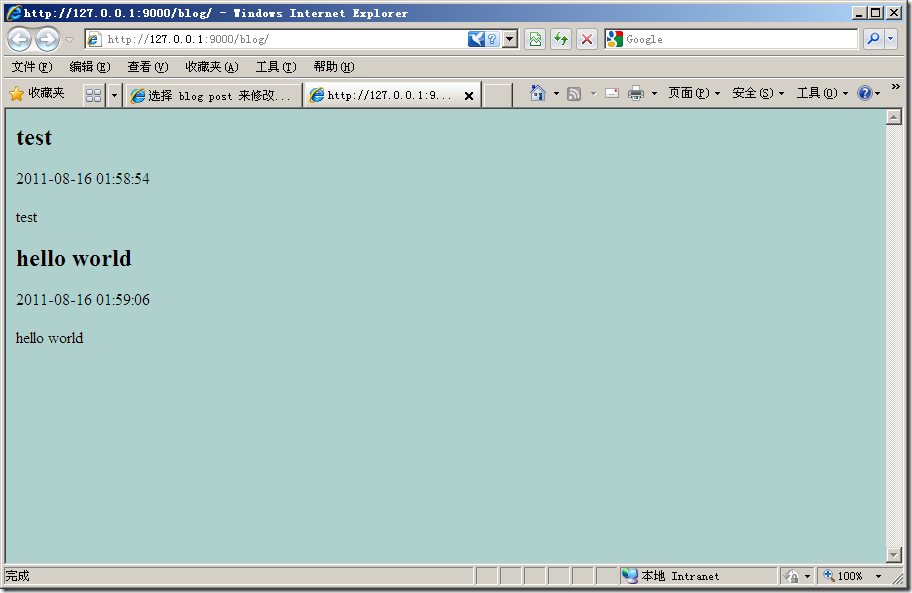
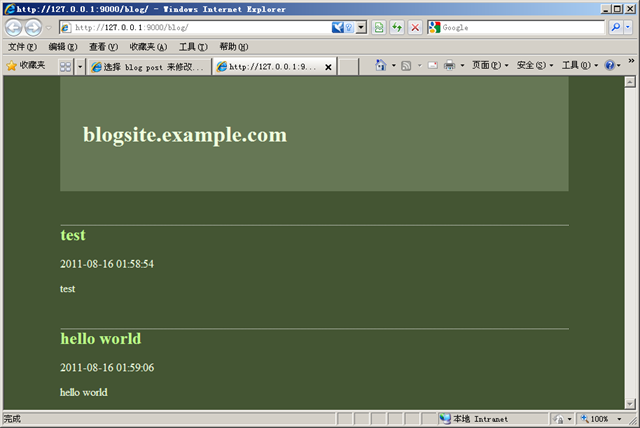
这个页面有两个问题:
1、没有按发表的时间降序排列文章
2、界面太简单,需要修饰一下
改进:
在blog/templates目录下建立一个名为base.html的页面
修改archive.html页面
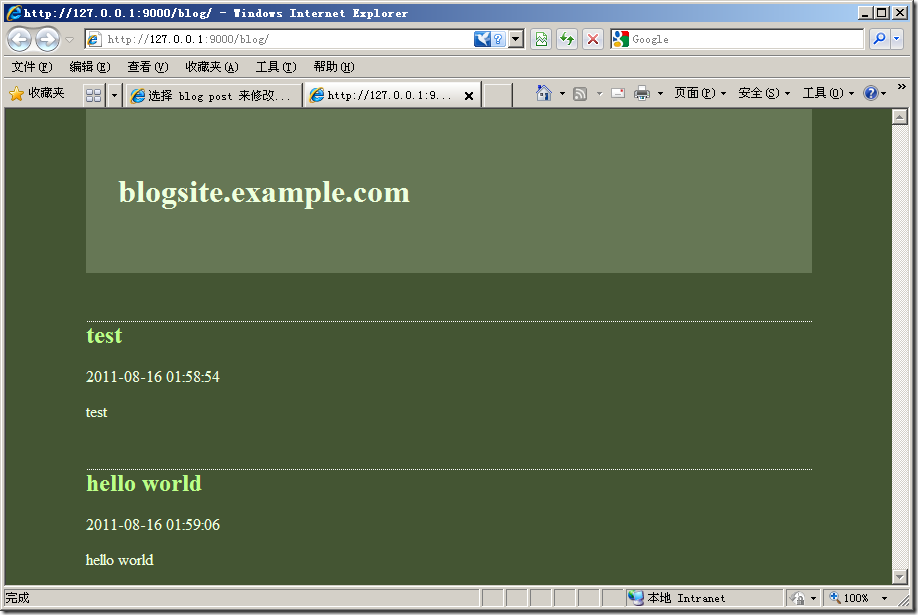
现在的界面漂亮一些了
修改<p>{{ post.timestamp }}</p>为<p>{{ post.timestamp|date:"l, F jS" }}</p>
在blog/views.py中,将文章按时间降序排列(加一个”-”,不加则为升序,还可以添加按标题排序等)

1、建立一个Django Project
2、配置IDE的环境


3、选择django的版本号,先查看当前系统中的django版本号(IDE默认选择1.2 or later)
这里默认使用sqlite,先使用默认的进行处理(有兴趣的可以改为mysql试试)
默认生成的4个文件:
先跑起来看一下效果:
注意选择Debug Configurations,选择要运行的项目和主模块(选择项目根目录下的manage.py即可)
默认监听的是8000,这里修改为9000

控制台上的信息:
pydev debugger: starting
4、修改配置文件settings.py
找到TIME_ZONE,修改为TIME_ZONE = 'Asia/Shanghai'
找到LANGUAGE_CODE修改为LANGUAGE_CODE = 'zh-CN'
# Django settings for demo project.

DEBUG = True
TEMPLATE_DEBUG = DEBUG

ADMINS = (
# ('Your Name', 'your_email@example.com'),
)

MANAGERS = ADMINS

DATABASES = {
'default': {
'ENGINE': 'django.db.backends.sqlite3',  # Add 'postgresql_psycopg2', 'postgresql', 'mysql', 'sqlite3' or 'oracle'.
'NAME': 'XXXXXXXXXXXXXXXXXX',  # Or path to database file if using sqlite3.
'USER': 'XXXXXXXXX',  # Not used with sqlite3.
'PASSWORD': 'XXXXXXXX',  # Not used with sqlite3.
'HOST': '',  # Set to empty string for localhost. Not used with sqlite3.
'PORT': '',  # Set to empty string for default. Not used with sqlite3.
}
}

# Local time zone for this installation. Choices can be found here:
# http://en.wikipedia.org/wiki/List_of_tz_zones_by_name # although not all choices may be available on all operating systems.
# On Unix systems, a value of None will cause Django to use the same
# timezone as the operating system.
# If running in a Windows environment this must be set to the same as your
# system time zone.
TIME_ZONE = 'Asia/Shanghai'

# Language code for this installation. All choices can be found here:
# http://www.i18nguy.com/unicode/language-identifiers.html LANGUAGE_CODE = 'zh-CN'
SITE_ID = 1

# If you set this to False, Django will make some optimizations so as not
# to load the internationalization machinery.
USE_I18N = True

# If you set this to False, Django will not format dates, numbers and
# calendars according to the current locale
USE_L10N = True

# Absolute filesystem path to the directory that will hold user-uploaded files.
# Example: "/home/media/media.lawrence.com/media/"
MEDIA_ROOT = ''

# URL that handles the media served from MEDIA_ROOT. Make sure to use a
# trailing slash.
# Examples: "http://media.lawrence.com/media/", "http://example.com/media/"
MEDIA_URL = ''

# Absolute path to the directory static files should be collected to.
# Don't put anything in this directory yourself; store your static files
# in apps' "static/" subdirectories and in STATICFILES_DIRS.
# Example: "/home/media/media.lawrence.com/static/"
STATIC_ROOT = ''

# URL prefix for static files.
# Example: "http://media.lawrence.com/static/"
STATIC_URL = '/static/'

# URL prefix for admin static files -- CSS, JavaScript and images.
# Make sure to use a trailing slash.
# Examples: "http://foo.com/static/admin/", "/static/admin/".
ADMIN_MEDIA_PREFIX = '/static/admin/'

# Additional locations of static files
STATICFILES_DIRS = (
# Put strings here, like "/home/html/static" or "C:/www/django/static".
# Always use forward slashes, even on Windows.
# Don't forget to use absolute paths, not relative paths.
)

# List of finder classes that know how to find static files in
# various locations.
STATICFILES_FINDERS = (
'django.contrib.staticfiles.finders.FileSystemFinder',
'django.contrib.staticfiles.finders.AppDirectoriesFinder',
#    'django.contrib.staticfiles.finders.DefaultStorageFinder',
)

# Make this unique, and don't share it with anybody.
SECRET_KEY = 'e1=wpjck+9x5tppagmj78m!lep%h+g4z))$%=f&cl)_qihn(c!'

# List of callables that know how to import templates from various sources.
TEMPLATE_LOADERS = (
'django.template.loaders.filesystem.Loader',
'django.template.loaders.app_directories.Loader',
#     'django.template.loaders.eggs.Loader',
)

MIDDLEWARE_CLASSES = (
'django.middleware.common.CommonMiddleware',
'django.contrib.sessions.middleware.SessionMiddleware',
'django.middleware.csrf.CsrfViewMiddleware',
'django.contrib.auth.middleware.AuthenticationMiddleware',
'django.contrib.messages.middleware.MessageMiddleware',
)

ROOT_URLCONF = 'demo.urls'

TEMPLATE_DIRS = (
# Put strings here, like "/home/html/django_templates" or "C:/www/django/templates".
# Always use forward slashes, even on Windows.
# Don't forget to use absolute paths, not relative paths.
)

INSTALLED_APPS = (
'django.contrib.auth',
'django.contrib.admin',
'django.contrib.contenttypes',
'django.contrib.sessions',
'django.contrib.sites',
'django.contrib.messages',
'django.contrib.staticfiles',
'demo.blog',
# Uncomment the next line to enable the admin:
# 'django.contrib.admin',
# Uncomment the next line to enable admin documentation:
# 'django.contrib.admindocs',
)

# A sample logging configuration. The only tangible logging
# performed by this configuration is to send an email to
# the site admins on every HTTP 500 error.
# See http://docs.djangoproject.com/en/dev/topics/logging for
# more details on how to customize your logging configuration.
LOGGING = {
'version': 1,
'disable_existing_loggers': False,
'handlers': {
'mail_admins': {
'level': 'ERROR',
'class': 'django.utils.log.AdminEmailHandler'
}
},
'loggers': {
'django.request': {
'handlers': ['mail_admins'],
'level': 'ERROR',
'propagate': True,
},
}
}
5、建立一个blog app应用(也可以在项目的windows中的目录使用命令,效果是一样)
6、修改settings.py,添加对blog的引用
找到INSTALLED_APPS,在尾部添加一行“demo.blog”(项目为demo、应用为blog)
INSTALLED_APPS = (
'django.contrib.auth',
'django.contrib.contenttypes',
'django.contrib.sessions',
'django.contrib.sites',
'demo.blog',
)
7、打开blog/models.py,添加一个文章类:
from django.db import models
from django.contrib import admin

# Create your models here.
class BlogPost(models.Model):
title = models.CharField(max_length=150)
body = models.TextField()
timestamp = models.DateTimeField()

class BlogPostAdmin(admin.ModelAdmin):
list_display = ('title', 'timestamp')

admin.site.register(BlogPost, BlogPostAdmin)
8、右击项目,执行sync DB,在控制台上可看到如下信息

9、修改settings.py,添加admin app
找到INSTALLED_APPS,在django.contrib.auth下一行添加'django.contrib.admin',
INSTALLED_APPS = (
'django.contrib.auth',
'django.contrib.admin',
'django.contrib.contenttypes',
'django.contrib.sessions',
'django.contrib.sites',
'demo.blog',
)
修改数据库的连接(工程根目录下的settings.py):
再执行一个sync DB

10、修改项目根目录下的urls.py,去掉urlpatterns中最后一项对admin的注释
(r'^admin/', include(admin.site.urls)),
---将最前面的“#”去掉即可,需要引入包“from django.contrib import admin” 在admin后面按下alt+/就可以自动导入包了
在blog/models.py中,添加一行
admin.site.register(BlogPost)
查看一下项目运行的效果:
添加两条数据后的效果显示,有一些难看,待会进行修改

在blog/models.py添加一个ModelAdmin类
from django.db import models
from django.contrib import admin

# Create your models here.
class BlogPost(models.Model):
title = models.CharField(max_length=150)
body = models.TextField()
timestamp = models.DateTimeField()

class BlogPostAdmin(admin.ModelAdmin):
list_display = ('title', 'timestamp')

admin.site.register(BlogPost, BlogPostAdmin)
刷新页面,就变成下面这样子了
11、使用模板,显示添加的数据
在blog目录下建立一个名为templates的目录,在此目录下建立一个名为archive.html(demo/blog/templates/archive.html),输入如下内容:
{% for post in posts %}
{{ post.title }}
{{ post.timestamp }}
{{ post.body }}
{% endfor %}
12、打开blog的views.py,添加对视图的控制
# Create your views here.
from django.template import loader, Context
from django.http import HttpResponse
from demo.blog.models import BlogPost

def archive(request):
posts = BlogPost.objects.all().order_by("-timestamp")
t = loader.get_template("archive.html")
c = Context({ 'posts': posts })
return HttpResponse(t.render(c))
13、在主urls.py中添加对blog的url匹配,在最后一行添加(r'^blog/',
include('demo.blog.urls')),
from django.conf.urls.defaults import patterns, include
# Uncomment the next two lines to enable the admin:
from django.contrib import admin
admin.autodiscover()

urlpatterns = patterns('',
# Examples:
# url(r'^$', 'demo.views.home', name='home'),
# url(r'^demo/', include('demo.foo.urls')),

# Uncomment the admin/doc line below to enable admin documentation:
# url(r'^admin/doc/', include('django.contrib.admindocs.urls')),

# Uncomment the next line to enable the admin:
#      url(r'^admin/', include(admin.site.urls)),
#      (r'^blog/', include('demo.blog.urls')),
(r'^admin/', include(admin.site.urls)),
(r'^blog/', include('demo.blog.urls')),
)
14、在blog中新建立一个urls.py文件,添加如下内容
from django.conf.urls.defaults import *
from demo.blog.views import archive

urlpatterns = patterns('',
url(r'^$', archive),
)
现在的运行效果:
这个页面有两个问题:
1、没有按发表的时间降序排列文章
2、界面太简单,需要修饰一下
改进:
在blog/templates目录下建立一个名为base.html的页面
<html>
<head>
<style type="text/css">
body {
color: #efd;
background: #453;
padding: 0 5em;
margin: 0
}

h1 {
padding: 2em 1em;
background: #675
}

h2 {
color: #bf8;
border-top: 1px dotted #fff;
margin-top: 2em
}

p {
margin: 1em 0
}
</style>
</head>
<body>
<h1>markGao's BLOG</h1>
{%block content%} {%endblock%}
</body>
</html>
修改archive.html页面
{% extends "base.html" %} {% block content %} {% for post in posts %}
<h2>{{ post.title }}</h2>
<p>{{ post.timestamp|date:"l, F jS" }}</p>
<p>{{ post.body }}</p>
{% endfor %} {% endblock %}
现在的界面漂亮一些了
修改<p>{{ post.timestamp }}</p>为<p>{{ post.timestamp|date:"l, F jS" }}</p>
在blog/views.py中,将文章按时间降序排列(加一个”-”,不加则为升序,还可以添加按标题排序等)
posts = BlogPost.objects.all().order_by("-timestamp")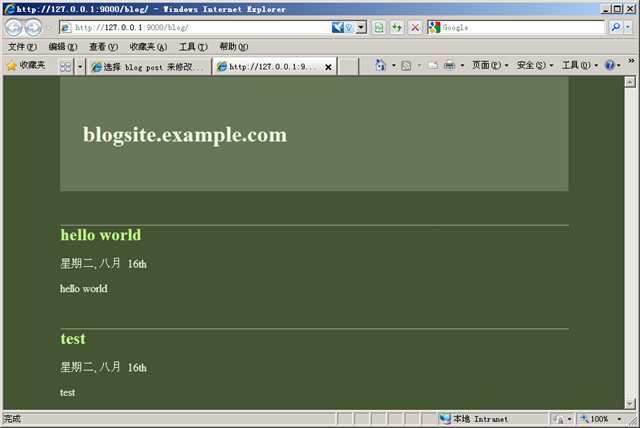

相关文章推荐
- 基于Aptana3+Django开发blog的示例
- 基于Aptana3+Django开发blog的示例
- vmaig_blog 一个基于 Django1.8 跟 Bootstrap3 开发的 博客系统
- 玩聚网目前也是基于Python的Django框架开发
- 玩聚网目前也是基于Python的Django框架开发
- myeclipse6.5上基于JAX-WS开发Webservice(中文示例)
- 基于 Django 框架的敏捷 Web 开发
- 译文:myeclipse6.5上基于JAX-WS开发Webservice(中文示例)
- 开发调试基于WinCE下的ActiveX控件的基本步骤 选择自 w8u 的 Blog
- 关于使用Aptana+Pydev构建Python开发环境的更新(Django)
- 关于使用Aptana+Pydev构建Python开发环境(Django)
- 基于Django框架的敏捷Web开发
- 玩聚网目前也是基于Python的Django框架开发
- 玩聚网目前也是基于Python的Django框架开发
- 基于ExtJS开发的单用户Blog系统文档及源码下载
- 基于python、Django做Web开发
- 基于J2EE的Blog平台开发
- 玩聚网目前也是基于Python的Django框架开发
- 基于 Django 框架的敏捷 Web 开发
- 基于OSGI做真正面向接口的开发-转自BlueDavy之技术Blog