GDI+学习及代码总结之------文本与字体
2015-02-11 13:35
549 查看
字体、字体系列基本概念与构造
字体系列GDI+中将具有相同字样、包括不同风格的字体称为字体系列。字体从其系列中获得名称、重量(如粗体、规则、加亮)以及风格。例如Arial字体系列包含了下列4种字体:
Arial Regular(规则)、Arial Bold(黑体)、Arial Italic(斜体)、Arial Bold Italic(粗斜体);
在GDI+中输出文本之前,需要构造一个FontFamily对象和一个Font对象。FontFamily类的构造函数如下:
[cpp] view
plaincopy
FontFamily()
FontFamily(name, fontCollection)
name:字体系列名。
fontCollection:指向一个FontCollection对象(字体集),表明字体系列所属的私有字体集,默认为NULL
示例(定义一个Arial Regular字体对象font)
[cpp] view
plaincopy
FontFamily fontFamily(L"Arial");
Font font(&fontFamily,16,FontStyleRegular,UnitPixel);
看几个结构类型
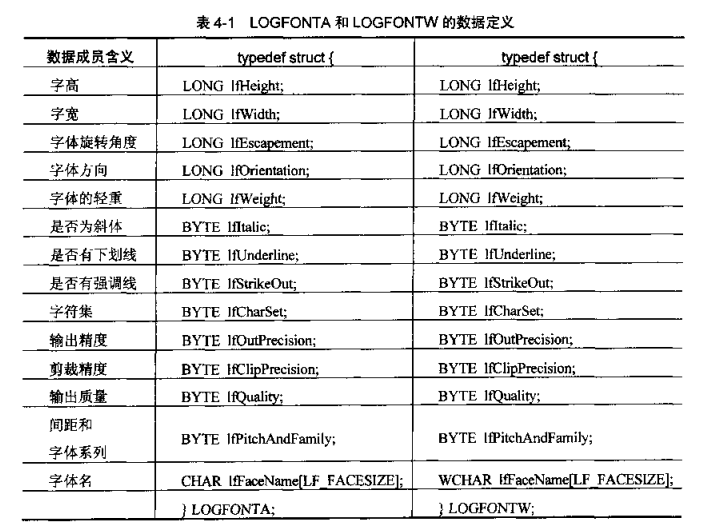
1、LOGFONTA和LOGFONTW
两个都是一样的,只是一个用于ASCII编码,一个用于UNICODE编码
字体大小单位枚举(Unit)
[cpp] view
plaincopy
enum Unit{
UnitWorld,//世界坐标,非物理上的单位
UnitDisplay,//使用和输出设备相同的单位,如输出设备为显示器,其单位为像素
UnitPixel,//像素
UnitPoint,//点(磅),1点等于1/72英寸
UnitInch,//英寸
UnitDocument,//1/300英寸
UnitMillimeter//毫米
};
字体风格枚举(FontStyle)
[cpp] view
plaincopy
enum FontStyle{
FontStyleRegular = 0,//常规
FontStyleBold = 1,//加粗
FontStyleItalic = 2,//斜体
FontStyleBoldItalic = 3,//粗斜
FontStyleUnderline = 4,//下划线
FontStyleStrikeout = 8//强调线,即在字体中部划线
};
注意:在这几个样式中,常规、加粗、倾斜、粗斜不能同时使用。下划线和强调线风格可以同时使用,也就是说,字体风格由两部分组成,一部分与字体外形有关,另一部分是附加的线条风格(下划线和强调线),这两部分可以配合使用组成字体的整体风格。
例如,要描述一个带下划线和强调线的粗斜体风格的字体,可以使用下面的组合来完成:
[cpp] view
plaincopy
FontStyleBoldItalic |FontStyleUnderline |FontStyleStrikeout
列举系统目前安装的字体信息
我们可以通过InstalledFontCollection类的成员函数GetFamilies枚举安装在计算机上的所有字体。GetFamilies函数返回的是一个FontFamily对象的数组。所以,在使用GetFamilies前,应该为FontFamily数组分配足够的内存空间。GetFamilies函数:
[cpp] view
plaincopy
Status GetFamilies(
INT numSought,
FontFamily* gpfamilies,
INT* numFound
) const;
numSought:[in]字体集中的字体系列总数,通过InstalledFontCollection::GetFamilyCount()获取
gpfamilies:[out]存储返回的已安装的字体系列的数组;
numFound:[out]存储返回的字体系列总数,数值与numSought一样;
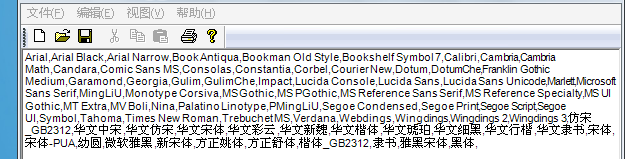
应用:列举出系统中的所有字体:
[cpp] view
plaincopy
SolidBrush solidbrush(Color::Black);
FontFamily fontfamily(L"Arial");
Font font(&fontfamily,8,FontStyleRegular,UnitPoint);
int count=0;
int found=0;
WCHAR familyName[100];//这里为了简化程序,分配足够大的空间
WCHAR *familyList=NULL;
FontFamily pFontFamily[500];//同样,分配足够大的空间
CRect rect;
this->GetClientRect(&rect);
RectF r(0,0,rect.Width(),rect.Height());
InstalledFontCollection installedFontCollection;
count=installedFontCollection.GetFamilyCount();
installedFontCollection.GetFamilies(count,pFontFamily,&found);
familyList=new WCHAR[count*sizeof(familyName)];
wcscpy(familyList,L"");//先清空familyList,wcscpy实现对宽字节的复制操作
for(int j=0;j<count;j++){
pFontFamily[j].GetFamilyName(familyName);
wcscat(familyList,familyName);//把familyName添加到familyList的最后
wcscat(familyList,L",");//wcscat实现对宽字节字符的添加操作
}
graphics.DrawString(familyList,-1,&font,r,NULL,&solidbrush);
delete[] familyList;
注意:wcscpy\wcscat函数分别实现了对双字节字符(宽字符)的复制、添加操作,在ASCII码中对应strcpy、strcat;
字体边沿平滑处理
大家都知道,当字体过大时,就会出现失真,边缘会出现锯齿,GDI+对字体边缘有一套自己的处理方式,是通过SetTextRenderingHint来实现的;
[cpp] view
plaincopy
Status SetTextRenderingHint(
TextRenderingHint newMode
);
其中TextRenderingHint是个枚举类,枚举了几种处理边缘的方式
[cpp] view
plaincopy
enum TextRenderingHint{
TextRenderingHintSystemDefault = 0,//使用与系统相同的处理方式
TextRenderingHintSingleBitPerPixelGridFit,//不消除锯齿,使用网格匹配
TextRenderingHintSingleBitPerPixel,//不消除锯齿,不使用网格匹配
TextRenderingHintAntiAliasGridFit,//消除锯齿,使用网格匹配
TextRenderingHintAntiAlias,//消除锯齿,不使用网格匹配
TextRenderingHintClearTypeGridFit //在液晶显示器上使用ClearType技术增强字体清晰度
};
看示例:
[cpp] view
plaincopy
FontFamily fontfamily(L"宋体");
Font font(&fontfamily,60,FontStyleRegular,UnitPixel);
//使用与系统相同的处理方式
graphics.SetTextRenderingHint(TextRenderingHintSystemDefault);
graphics.DrawString(L"什么玩意",-1,&font,PointF(0,0),&SolidBrush(Color::Green));
//不消除锯齿,使用网格匹配
graphics.TranslateTransform(0,font.GetHeight(0.0f));
graphics.SetTextRenderingHint(TextRenderingHintSingleBitPerPixelGridFit );
graphics.DrawString(L"什么玩意",-1,&font,PointF(0,0),&SolidBrush(Color::Green));
//不消除锯齿,不使用网格匹配
graphics.TranslateTransform(0,font.GetHeight(0.0f));
graphics.SetTextRenderingHint(TextRenderingHintSingleBitPerPixel );
graphics.DrawString(L"什么玩意",-1,&font,PointF(0,0),&SolidBrush(Color::Green));
//消除锯齿,使用网格匹配
graphics.TranslateTransform(0,font.GetHeight(0.0f));
graphics.SetTextRenderingHint(TextRenderingHintAntiAliasGridFit );
graphics.DrawString(L"什么玩意",-1,&font,PointF(0,0),&SolidBrush(Color::Green));
//消除锯齿,不使用网格匹配
graphics.TranslateTransform(0,font.GetHeight(0.0f));
graphics.SetTextRenderingHint(TextRenderingHintAntiAlias );
graphics.DrawString(L"什么玩意",-1,&font,PointF(0,0),&SolidBrush(Color::Green));
//在液晶显示器上使用ClearType技术增强字体清晰度
graphics.TranslateTransform(0,font.GetHeight(0.0f));
graphics.SetTextRenderingHint(TextRenderingHintClearTypeGridFit );
graphics.DrawString(L"什么玩意",-1,&font,PointF(0,0),&SolidBrush(Color::Green));
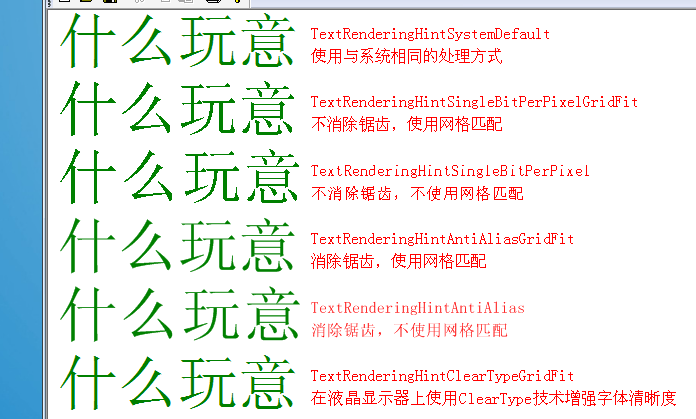
从上面可以看出,列出的这六种边缘处理方式中,最后一种枚举成员TextRenderingHintClearTypeGridFit的处理效果最好。这种处理方式使用了Microsoft特有的ClearType技术。是专在液晶显示器上使用的一种增强字体清晰度的技术。但这种技术有时会出现问题,用投影仪投射到白色墙壁上,会出出字体显示不正常的情况,而且对于老式的CRT显示器是根本不支持的。操作系统也必须是XP及以上的系统才行。所以一般用第一个参数,与系统处理方式相同就好。让系统决定我们适合哪种技术。
FontFamily和Font
在GDI+中输出文本之前,需要构造一个FontFamily对象和一个Font对象。FontFamily类的构造函数如下:
[cpp] view
plaincopy
FontFamily()
FontFamily(name, fontCollection)
name:字体系列名。
fontCollection:指向一个FontCollection对象(字体集),表明字体系列所属的字体集,默认为NULL
再看看Font类的构造函数(先看这四个):
[cpp] view
plaincopy
Font(hdc)
Font(HDC hdc, LOGFONTA* logfont)
Font(HDC hdc, LOGFONTW* logfont)
Font(hdc, hfont)
这四个都是GDI中的构造函数,这里就全不讲了,只说说最后两个纯正的GDI+中的Font构造函数
[cpp] view
plaincopy
Font(family, emSize, style, unit) ;//一般用这个
Font(familyName, emSize, style, unit, fontCollection) ;//当用到私有字体集时,才会用这个构造
family、familyName:fontFamily对象
style:字体样式,是规则、粗体、斜体、粗斜体、下划线、强调线的枚举类,我们上面说过了
unit:字体大小
fontCollection:字体所属的字体集,这个是用来添加私有字体集的,下面我们将讲私有字体集。
构造私有字体集(PrivateFontCollection)
我们平时使用的字体集,只有在系统中注册过才能直接调用,但当我们使用一个别人系统中可能不存在的字体集时,我们可以从我们的字体文件中加载这个字体集,然后给用户使用,从文件中加载系统中没有注册的字体集的过程,就是创建私有字体集的过程。创建私有字体集用PrivateFontCollection类来实现,这里就不讲了,想了解的话,看《精通GDI+编程》P139。
Font的构造函数中的最后一个参数fontCollection就是从文件中加载的私有字体集;
字体尺寸、字体系列尺寸
字体尺寸和字体系统尺寸不是同一个概念,我们先看一下他们的共同部分,字体在几个距离上的概念:
几个概念:
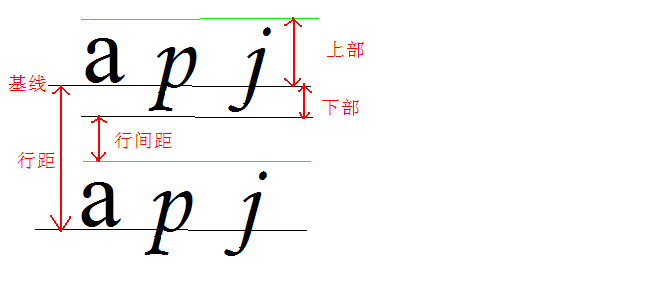
基线:在英文中,会有基线的概念,这是个抽象的概念,所以GDI+并不支持对基线的设置,是指在四线格中的第三条线,这条线把字母分为上部和下部,如图中所示。
上部:是指从基线到上行字母顶部之间的距离。
下部:是从基线到下行字母底部的距离。
行距:是指上下两行基线之间的距离,包括基线之上的上部值、基线之下的下部值以及在上部之外的一些额外空间(通常用于形成行间距,对于这部分空间,GDI+也不提供函数直接访问操作。)
字体系列的尺寸(FontFamily)
字体系列尺寸,与实际显示的字体大小无关,它只与设计时的尺寸有关,获取函数有:
[cpp] view
plaincopy
FontFamily::GetEmHeight(style)//获取字体高度的设计单位;
FontFamily::GetCellAscent(style) //获取字体上部距离的设计单位数;
FontFamily::GetCellDescent(style)//获取字体下部距离的设计单位数;
FontFamily::GetLineSpacing(style)//获取行距的设计单位数;
它们返回的并不是一个具体的物理尺寸,这些返回值并不被转换成具体的长度值。这些函数返回的只是一个抽像的大小,在GDI+中被称为设计单位(Desin Units)。对于一个设计单位,它的大小是固定的,它不会随着字体大小的改变而改变。从名称上就可以看出,设计单位是字体设计人员在设计字体时所使用的一种相对的坐标计量单位。
字体尺寸(Font)
字体尺寸是指在显示器上实际的尺寸(显示尺寸),它的操作函数的返回值与字体的大小成正比;获取函数有:
[cpp] view
plaincopy
Font::GetHeight(dpi)//获取字体高度,返回值以像素为单位;
Font::GetSize();//获取字体尺寸,返回值是em,1em=12dpi;1em称为1倍卡,对于倍卡的来义,参看《精通GDI+编程》P145
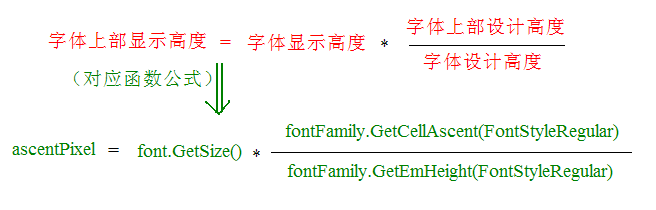
虽然这里的API只提供了对字体高度值的获取,但我们可以通过计算得出上部显示高度,下部显示高度、行距;
看获取上部显示高度公式,其它都类似;
看代码示例:
[cpp] view
plaincopy
SolidBrush solidBrush(Color::Green);
PointF pointf(0.0f,0.0f);
WCHAR infoString[100]=L"";
REAL FontHeightPixel;
UINT ascent;
REAL ascentPixel;
UINT desent;
REAL descentPixel;
UINT lineSpacing;
REAL lineSpacingPixel;
FontFamily fontFamily(L"Arial");
Font font(&fontFamily,16,FontStyleRegular,UnitPixel);
//显示字体显示大小
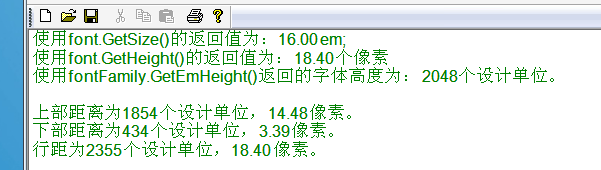
swprintf(infoString,L"使用font.GetSize()的返回值为:%.2fem;",font.GetSize());
graphics.DrawString(infoString,wcslen(infoString),&font,pointf,&solidBrush);
//获取字体显示高度
pointf.Y+=font.GetHeight(0.0);
swprintf(infoString,L"使用font.GetHeight()的返回值为:%.2f个像素",font.GetHeight(0.0));
graphics.DrawString(infoString,wcslen(infoString),&font,pointf,&solidBrush);
//获取字体设计高度
pointf.Y+=font.GetHeight(0.0);
swprintf(infoString,L"使用fontFamily.GetEmHeight()返回的字体高度为:%d个设计单位。",fontFamily.GetEmHeight(FontStyleRegular));
graphics.DrawString(infoString,-1,&font,pointf,&solidBrush);
//获取字体上部显示高度,----in 像素
pointf.Y+=2.0f*font.GetHeight(0.0f);
ascent=fontFamily.GetCellAscent(FontStyleRegular);
ascentPixel=font.GetSize()*ascent/fontFamily.GetEmHeight(FontStyleRegular);
swprintf(infoString,L"上部距离为%d个设计单位,%.2f像素。",ascent,ascentPixel);
graphics.DrawString(infoString,-1,&font,pointf,&solidBrush);
//获取字体下部显示高度---in 像素
pointf.Y+=font.GetHeight(0.0f);
desent=fontFamily.GetCellDescent(FontStyleRegular);
descentPixel=font.GetSize()*desent/fontFamily.GetEmHeight(FontStyleRegular);
swprintf(infoString,L"下部距离为%d个设计单位,%.2f像素。",desent,descentPixel);
graphics.DrawString(infoString,-1,&font,pointf,&solidBrush);
//获取显示行距,---in 像素
pointf.Y+=font.GetHeight(0.0f);
lineSpacing=fontFamily.GetLineSpacing(FontStyleRegular);
lineSpacingPixel=font.GetSize()*lineSpacing/fontFamily.GetEmHeight(FontStyleRegular);
swprintf(infoString,L"行距为%d个设计单位,%.2f像素。",lineSpacing,lineSpacingPixel);
graphics.DrawString(infoString,-1,&font,pointf,&solidBrush);
注意:由于在中文中没有基线的概念,所以本节中提到的文本尺寸不一定适合中文。
写字
一、测量字符串显示宽度在实际绘图中,有一个问题很值得我们考虑,我们怎么知道我们指定的RECT区域能否容得下我们要绘制的文字?如何确保我们的文字在所设置的区域内能够完整的显示?当然GDI+为我们提供了测量函数MeasureString,我们看下它的调用格式:
[cpp] view
plaincopy
MeasureString(string, length, font, layoutRect, boundingBox)
MeasureString(string, length, font, layoutRect, stringFormat, boundingBox, codepointsFitted, linesFilled)
MeasureString(string, length, font, layoutRectSize, stringFormat, size, codepointsFitted, linesFilled)
MeasureString(string, length, font, origin, boundingBox)
MeasureString(string, length, font, origin, stringFormat, boundingBox)
参数说明:
string:[in]所在绘制的字符串
length:[in]字符串里字符个数,-1表示字符串以空白结尾。
font:[in]字符串输出时使用的字体;
origin:[in]输出原点
stringFormat: [in]输出所用格式;
layoutRect、layoutRectSize:[in]指定的文本输出区域
boundingBox、size:[out]计算后的文本输出的限制矩形(注意中详细讲解)
linesFilled:[out]计算出的在指定区域中能够显示的字符行数;
codepointsFitted:[out]计算出的在指定区域中能够显示的字符个数;
注意:boundingBox的计算法则:
1、当layoutRect的width 、height都不为0时;
boundingBox的值是输出文本所需要的区域与layoutRect的区域的交集,也就是说,在这种情况下,boundingBox的值始终小于等于layoutRect的值;
2、当layoutRect的width为0时,height!=0;
boundingBox.height=layoutRect.height;
boundingBox.width的值为在layoutRect.height;这个高度上,要显示所有文字所需要的宽度;
3、当layoutRect的width!=0,height==0;
boundingBox.width=layoutRect.width;
boundingBox.height的值为在layoutRect.width;这个宽度上,要显示所有文字所需要的高度;
示例:
[cpp] view
plaincopy
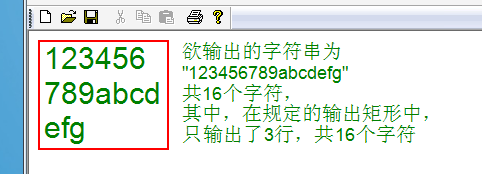
WCHAR string[256]={0};
wcscpy(string,L"123456789abcdefg");
FontFamily fontfamily(L"Arial");
Font font1(&fontfamily,30,FontStyleRegular,UnitPixel);
Font font2(&fontfamily,18,FontStyleRegular,UnitPixel);
RectF layoutRect(10,10,130,0);//高度为0,让其自动计算高度
SolidBrush brush(Color::Green);
RectF boundRect;
INT codePointsFitted=0;
INT linesFitted=0;
int strlen=wcslen(string);
graphics.MeasureString(string,strlen,&font1,layoutRect,NULL,&boundRect,&codePointsFitted,&linesFitted);
CString tmp;
CString s(string);
tmp.Format(L"欲输出的字符串为\n\"%s\"\n共%d个字符,\n其中,在规定的输出矩形中,\n只输出了%d行,共%d个字符",s,s.GetLength(),linesFitted,codePointsFitted);
graphics.DrawRectangle(&Pen(Color::Red,2),layoutRect);
graphics.DrawRectangle(&Pen(Color::Red,2),boundRect);
graphics.DrawString(string,-1,&font1,boundRect,NULL,&brush);
graphics.DrawString(tmp,-1,&font2,PointF(150,10),NULL,&brush);
二、字符串去尾
字符串去尾,是指,当字符串在指定的RECT中无法全部显示时,如何去文本进行截取,以适应目标区域大小。我们暂时把这种截取操作称为“去尾”,去尾方式,是通过StringFormat类中的SetTrimming函数来设置的,其函数格式如下:
[cpp] view
plaincopy
Status SetTrimming(
StringTrimming trimming
);
其中StringTrimming是个枚举类,枚举了GDI+中所支持的去尾方式;
[cpp] view
plaincopy
enum StringTrimming{
StringTrimmingNone = 0,//不使用去尾
StringTrimmingCharacter = 1,//以字符为单位去尾
StringTrimmingWord = 2,//以单词为单位去尾
StringTrimmingEllipsisCharacter = 3,//以字符为单位去尾,略去部分使用省略号表示
StringTrimmingEllipsisWord = 4,//以单词为单位去尾,略去部分使用省略号表示
StringTrimmingEllipsisPath = 5//略去字符串中间部分,保证字符的首尾都能够显示
};
看下他们的去尾效果(为保证效果,把字符串中的six去掉了):

使用方法,代码示例:
[cpp] view
plaincopy
SolidBrush solidBrush(Color::Green);
FontFamily fontFamily(L"宋体");
Font font(&fontFamily,25,FontStyleRegular,UnitPixel);
Pen pen(Color::YellowGreen,2);
//为了看到效果,故意把six去掉了;
WCHAR text[]=L"one two three four five seven eight nine ten";
StringFormat stringformat;
stringformat.SetTrimming(StringTrimmingCharacter);
graphics.DrawRectangle(&pen,10,30,200,60);
graphics.DrawString(text,-1,&font,RectF(10,30,200,60),&stringformat,&solidBrush);

三、格式化文本输出(StringFormat类)
1、StringFormat::SetFormatFlags()
在使用DrawString函数输出文本时,可以控制文本输出的格式。这些输出格式包括文本对齐方式、文本的输出方向、文本是否自动换行、使用制表符定制文本列及文本是否剪裁等。这些操作都是使用StringFormat类实现的,先看它其中的一个比较重要的设置文本格式的函数:SetFormatFlags
[cpp] view
plaincopy
Status SetFormatFlags(
INT flags
);
其中flags是个枚举类(可以混合使用),枚举了几个格式用于设置,这里只讲解几个比较常用的,其它就不讲解了,如果需要可以查查相关资料;
[cpp] view
plaincopy
enum StringFormatFlags{
StringFormatFlagsDirectionRightToLeft = 0x00000001,//从右至左输出文本
StringFormatFlagsDirectionVertical = 0x00000002,//垂直方向输出文本
StringFormatFlagsNoFitBlackBox = 0x00000004,
StringFormatFlagsDisplayFormatControl = 0x00000020,
StringFormatFlagsNoFontFallback = 0x00000400,
StringFormatFlagsMeasureTrailingSpaces = 0x00000800,
StringFormatFlagsNoWrap = 0x00001000,//输出时不使用自动换行功能
StringFormatFlagsLineLimit = 0x00002000,
StringFormatFlagsNoClip = 0x00004000//不使用裁剪
};
看StringFormatFlagsDirectionRightToLeft和StringFormatFlagsDirectionVertical使用示例:
[cpp] view
plaincopy
CStringW temp(L"人生得意须尽欢,莫使金樽空对月!天生我材必有用,千金散尽还复来。");
FontFamily fontfamily(L"幼圆");
Font font(&fontfamily,20,FontStyleBold,UnitPixel);
SolidBrush brush(Color::Red);
RectF f(10,10,120,font.GetHeight(0.0f)*8);
StringFormat strformat;
strformat.SetFormatFlags(StringFormatFlagsDirectionRightToLeft |StringFormatFlagsDirectionVertical );
strformat.SetAlignment(StringAlignmentCenter);
strformat.SetLineAlignment(StringAlignmentCenter);
graphics.DrawRectangle(&Pen(Color::Green,2),f);
graphics.DrawString(temp,-1,&font,f,&strformat,&brush);

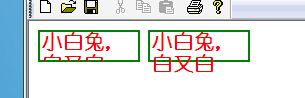
StringFormatFlagsNoClip示例:
[cpp] view
plaincopy
CStringW temp(L"小白兔,白又白");
FontFamily fontfamily(L"幼圆");
Font font(&fontfamily,20,FontStyleBold,UnitPixel);
SolidBrush brush(Color::Red);
StringFormat strformat;
//使用默认,剪裁
graphics.DrawRectangle(&Pen(Color::Green,2),RectF(10,10,100,30));
graphics.DrawString(temp,-1,&font,RectF(10,10,100,30),&strformat,&brush);
//使用StringFormatFlagsNoClip标识,不剪裁
strformat.SetFormatFlags(StringFormatFlagsNoClip );
graphics.DrawRectangle(&Pen(Color::Green,2),RectF(120,10,100,30));
graphics.DrawString(temp,-1,&font,RectF(120,10,100,30),&strformat,&brush);
2、设置文本对齐方式(StringFormat::SetAlignment(align))
提起“对齐”,大家可能会马上联想到“左对齐”、“右对齐”、“居中”之类的常用对齐方法。GDI+中通过stringFormat类下的下列两个成员函数来设置文本在水平和垂直方向上的对齐方式:
[cpp] view
plaincopy
StringFormat::SetAlignment(align)//设置水平对齐方式
StringFormat::SetLineAlignment(align)//设置垂直方向上的对齐方式
其中align是StringAlignment枚举类中的成员:
[cpp] view
plaincopy
enum StringAlignment{
StringAlignmentNear = 0,//靠近,对水平对齐来言是居左对齐,对垂直而言是居上
StringAlignmentCenter = 1,//靠中,对水平和垂直而言都是居中
StringAlignmentFar = 2//靠远,对水平而言是居右,对垂直而言是居下
};
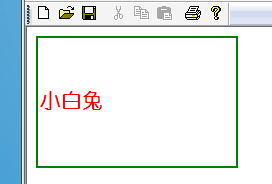
简单示例(水平居左,垂直居中):
[cpp] view
plaincopy
CStringW temp(L"小白兔");
FontFamily fontfamily(L"幼圆");
Font font(&fontfamily,20,FontStyleBold,UnitPixel);
SolidBrush brush(Color::Red);
StringFormat strformat;
strformat.SetAlignment(StringAlignmentNear);//水平居左
strformat.SetLineAlignment(StringAlignmentCenter );//垂直居中
graphics.DrawRectangle(&Pen(Color::Green,2),RectF(10,10,200,130));
graphics.DrawString(temp,-1,&font,RectF(10,10,200,130),&strformat,&brush);
最终
由于构建DrawString时用的是brush,这就出现了有趣的地方,由于brush分为纯色画刷、影线画刷、纹理画刷、渐变画刷,所以我们可以用这几个画刷来写字,写出的字也具有了画刷所示的效果,这里就不再一一列举了,在《精通GDI+编程》中P178-P182演示了这几种画刷写字的示例,有兴趣的可以看看。

相关文章推荐
- GDI+学习及代码总结之------文本与字体
- GDI+学习及代码总结之------文本与字体
- GDI+学习及代码总结之------文本与字体
- GDI+学习及代码总结之------文本与字体
- GDI+学习及代码总结之------画刷Brush .
- GDI+学习及代码总结之------色彩与图像
- GDI+学习及代码总结之------画线、区域填充、写字
- GDI+学习及代码总结之-----画笔
- GDI+学习及代码总结之------图像的基本处理
- GDI+学习及代码总结之-----坐标变换、矩阵变换及色彩变换
- GDI+学习及代码总结之------区域
- GDI+学习及代码总结之------画刷Brush
- GDI+学习及代码总结之------图像的基本处理
- GDI+学习及代码总结之------区域
- 【IOS 开发学习总结-OC-44】★★ios开发之UI控件——文本框与多行文本控件(彩蛋——上拉刷新一般实现代码)
- GDI+学习及代码总结之------图像的编码与解码
- GDI+学习及代码总结之------画线、区域填充、写字
- GDI+学习及代码总结之------图像的基本处理
- GDI+学习及代码总结之------区域
- GDI+学习及代码总结之-----坐标变换、矩阵变换及色彩变换