实战Nginx负载均衡高冗余高可用WEB架构 推荐
2015-02-10 16:52
429 查看
最近公司主力网站之一改版完成终于上线了,牵扯了我大半年的时间,现在终于有时间坐下来写点东西,总结沉淀一下自己的技术心得。此次,根据服务器的数量和质量,我采用负载均衡高冗余的架构,考虑单点故障,WEB也抛弃了apache,而使用的是nginx,数据库还是使用主、从架构。该架构目前承载80W的PV,没有大的压力。
这里简单谈一下web的选择疑问,是使用nginx还是apache,很多朋友在规划网站的时候都出现难以选择的问题,甚至有朋友在建设初用apache后期改成nginx。接下来我说一下我的规划选择,WEB究竟是使用Apache还是nginx,我认为两者各自之间优缺点非常明显,最终决定是要根据你的网站自身情况来确定,如网页的主要内容、网站类型(电商还是门户等等)。总之,在考虑过网站内容、类型等方面后还是无法选择,这时,大并发量我就选择nginx,而动态请求非常频繁的且并发量不大的网站我就使用apache。而我的这个网站是门户网站,内容基本都生成静态页,动态页面不多并且过不了多长时间就会生成html,所以我选择使用nginx做web。 首先声明,此架构适合场景:中小型网站场景,粗略预估100W PV左右。
应用环境
主nginx:192.168.1.158
Web服务器一:192.168.1.163
Web服务器二:192.168.1.162
主数据库服务器:192.168.1.159
从数据库+备nginx:192.168.1.161
Nginx虚拟IP:192.168.1.160
操作系统:centos 6.4
系统的架构图,如下:

一、YUM和编译安装软件方式的小分享
编译安装还是yum安装软件的争议,现在这个时代了还有人去争论。我认为这个事情没必要争论,也不可能争论出结果,完全看个人的工作习惯,我想说YUM真的很节省时间,YUM安装软件简单、快捷,还有点好处可以培养新人的linux兴趣。编译安装可以很好订制化,将不需要的功能关闭掉,减少安全隐患等。YUM安装只要关闭不需要的功能结果和编译安装一样的,而编译安装过程中你很详细的掌握了软件的安装路径等,真是各有优缺点,没必要这上面去浪费心思。而我是按照所需时间来选择,基本上我是个没时间的人,所以我大多数都使用yum 方式安装软件。二、主、从mysql安装及同步 挺简单的配置,如果感兴趣的朋友可以参看我上篇文章《mysql linux下高可用架构的简析及主、从复制的实战(一)》
三、PHP安装
在两台WEB上分别安装PHP,安装过程非常简单。
1、 yum install php*
service php-fpm start 启动php-fpm2、 调整PHP时区
要注意先调整一下php的时区和时间,如果不调整会出现PHP与系统时间不对应的错误。在php.ini找到;Date.timezone = 并将;去掉,改成下图

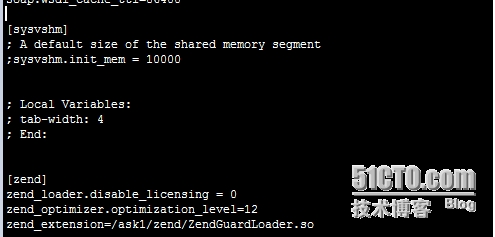
3、安装zend加速一定要安装,php加速确实能提高PHP的运行速度,不装ZEND也至少装一种加速软件。之前安装过ZEND包,所以我直接拿来用,上传后解压在规定目录内。打开php.ini配置文件,在最后添加zend的配置代码
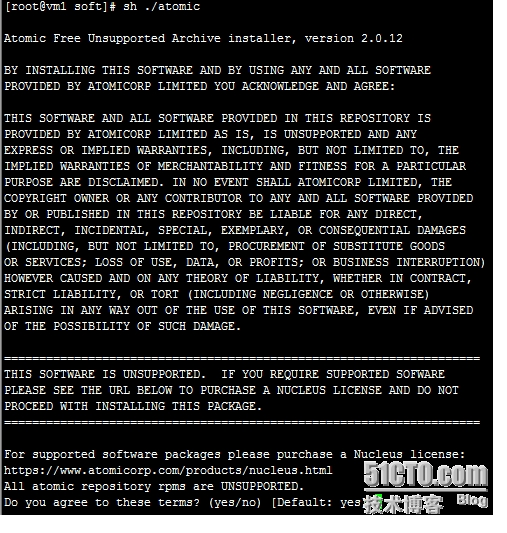
重启php生效,service php-fpm restart四、web服务器的安装因为我是个时间紧张的人,所以我采用Yum安装。Centos 6.4本身的yum源是没有nginx安装包的,所以我先换源换成atomic的源,再yum安装。wget http://www.atomicorp.com/installers/atomic,直接下载1、换源Sh ./atomic
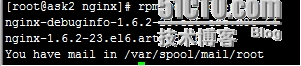
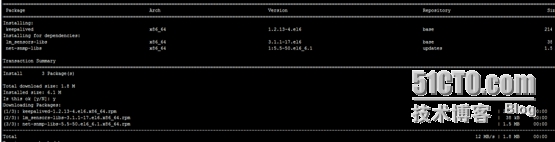
默认安装就可以,装完后会看到/etc/yum.repos.d/ 会有atomic.repo 为让更换源立即生效,输入yum check-update 让YUM自己check。2、安装nginx Yum install nginx 安装后nginx版本是1.6.2-23,正是我想装的 1.6。
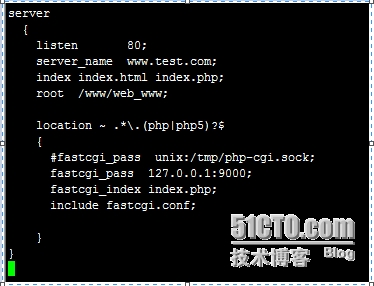
修改配置mv /etc/nginx/nginx.conf /etc/nginx/nginx.bak,建立虚拟主机目录mkdir –p /etc/nginx/vhosts/将这段调整好的代码写入新的nginx.conf ################################################################ This is the main Nginx configuration file. ## More information about the configuration options is available on # * the English wiki - http://wiki.nginx.org/Main# * the Russian documentation - http://sysoev.ru/nginx/######################################################################## #----------------------------------------------------------------------# Main Module - directives that cover basic functionality## http://wiki.nginx.org/NginxHttpMainModule##---------------------------------------------------------------------- user root root; worker_processes 8; error_log /var/log/nginx/error.log;pid /var/run/nginx.pid; #Specifies the value for maximum file descriptors that can be opened by this process. worker_rlimit_nofile 65535; events { use epoll; worker_connections 65535;} http { include /etc/nginx/mime.types; default_type application/octet-stream; ssi on; ssi_silent_errors on; ssi_types test/shtml; #charset gb2312; server_names_hash_bucket_size 128; client_header_buffer_size 32k; large_client_header_buffers 4 32k; client_max_body_size 8m; sendfile on; tcp_nopush on; keepalive_timeout 60; tcp_nodelay on; fastcgi_connect_timeout 300; fastcgi_send_timeout 300; fastcgi_read_timeout 300; fastcgi_buffer_size 64k; fastcgi_buffers 4 64k; fastcgi_busy_buffers_size 128k; fastcgi_temp_file_write_size 128k; fastcgi_intercept_errors on; gzip on; gzip_min_length 1k; gzip_buffers 4 16k; gzip_http_version 1.0; gzip_comp_level 2; gzip_types text/plain application/x-javascript text/css application/xml; gzip_vary on; log_format main '$remote_addr - $remote_user [$time_local] "$request" ' '$status $body_bytes_sent "$http_referer" ' '"$http_user_agent" "$http_x_forwarded_for"'; access_log /var/log/nginx/access.log main; include /etc/nginx/vhosts/*.conf;} 3、在/etc/nginx/vhosts/ 创建网站站点Vi www.confserver { listen 80; server_name www.test.com; index index.html index.php; root /www/web_www; location ~ .*\.(php|php5)?$ { #fastcgi_pass unix:/tmp/php-cgi.sock; fastcgi_pass 127.0.0.1:9000; fastcgi_index index.php; include fastcgi.conf; }}
两台WEB服务器做一样的配置。 五、负载均衡的实现 nginx做负载均衡还是很稳定,甚至不需要脚本来监控nginx进程存活情况,我维护的几个站基本一年有不了一、两次,所以没有编写也没有采用别人写的监控进程脚本,但是提醒各位朋友,因网站而异,没有什么该有什么不该有,适合自己的就是最好、最稳定的。1、负载均衡nginx的安装及配置
两台nginx分别安装nginx,过程简单就不再详细说明,贴出配置文件供各位朋友参考。user root root; worker_processes 8; pid /var/run/nginx.pid;worker_rlimit_nofile 65535;events { use epoll; worker_connections 65535; } http{ include mime.types;default_type application/octet-stream;server_names_hash_bucket_size 128;client_header_buffer_size 32k;large_client_header_buffers 4 32k;client_max_body_size 8m;sendfile on;tcp_nopush on;keepalive_timeout 60; tcp_nodelay on; fastcgi_connect_timeout 300;fastcgi_send_timeout 300;fastcgi_read_timeout 300;fastcgi_buffer_size 64k;fastcgi_buffers 4 64k;fastcgi_busy_buffers_size 128k;fastcgi_temp_file_write_size 128k;gzip on;gzip_min_length 1k;gzip_buffers 4 16k;gzip_http_version 1.0;gzip_comp_level 2;gzip_types text/plain application/x-javascript text/css application/xml;gzip_vary on; log_format main '$remote_addr - $remote_user [$time_local] "$request" ' '$status $body_bytes_sent "$http_referer" ' '"$http_user_agent" $http_x_forwarded_for'; access_log /var/log/nginx/access.log main; upstream backend { server 192.168.1.162; server 192.168.1.163;} server { listen 80;server_name www.test.cn; location / { root /var/www ;index index.htm index.html index.php index.shtml;proxy_redirect off; proxy_set_header Host $host;proxy_set_header X-Real-IP $remote_addr; proxy_set_header X-Forwarded-For $proxy_add_x_forwarded_for; proxy_pass http://backend; } } } 2、yum 安装keepalivedYum install keepalived
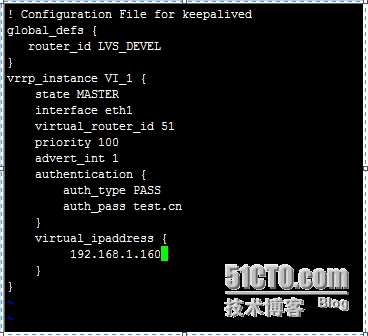
3、主keepalived的配置Vi /etc/keepalived/keepalived.conf! Configuration File for keepalivedglobal_defs { router_id LVS_DEVEL } vrrp_instance VI_1 { state MASTER interface eth1 virtual_router_id 51 priority 99 advert_int 1 authentication { auth_type PASS auth_pass test.cn } virtual_ipaddress { 192.168.1.160 } }
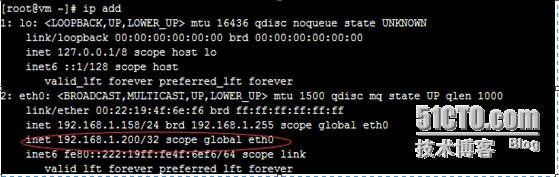
Service keepalived start 后ip add 的结果如下,出现global ip 就成功了。
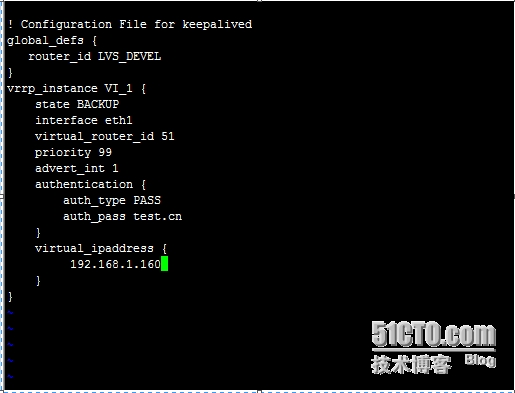
4、副keepalived的配置
! Configuration File for keepalivedglobal_defs { router_id LVS_DEVEL } vrrp_instance VI_1 { state BACKUP interface eth1 virtual_router_id 51 priority 99 advert_int 1 authentication { auth_type PASS auth_pass test.cn } virtual_ipaddress { 192.168.1.160 } }
测试过程如下:1、分别重启主nginx和备nginx服务器,观察网站访问情况,也通过ping 虚拟IP地址192.168.1.160来观察,看能否正常访问网站。
通过ping是比较直观的,只丢失1个包,网站是能正常打开。2、分别重启web1和web2服务器,观察网站访问情况。
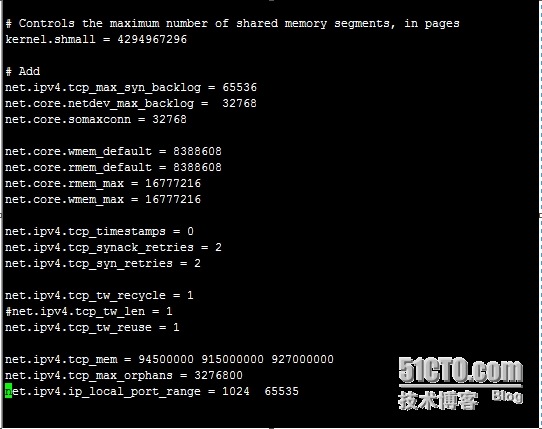
检查个站点打开情况,打开完整的。 结果:如果两步测试结果都不影响网站的正常访问,说明负载均衡架构是成功的,恭喜你,是不是有种建设成功后的小喜悦。注意点:1、两台web服务器的nginx都设置了worker_connections 65535; 必须优化centos的内核,否则是起不到作用的。vi /etc/sysctl.conf在sysctl.conf代码的最后面加入# Addnet.ipv4.tcp_max_syn_backlog = 65536net.core.netdev_max_backlog = 32768net.core.somaxconn = 32768 net.core.wmem_default = 8388608net.core.rmem_default = 8388608net.core.rmem_max = 16777216net.core.wmem_max = 16777216 net.ipv4.tcp_timestamps = 0net.ipv4.tcp_synack_retries = 2net.ipv4.tcp_syn_retries = 2 net.ipv4.tcp_tw_recycle = 1#net.ipv4.tcp_tw_len = 1net.ipv4.tcp_tw_reuse = 1 net.ipv4.tcp_mem = 94500000 915000000 927000000net.ipv4.tcp_max_orphans = 3276800net.ipv4.ip_local_port_range = 1024 65535
重启服务器或/sbin/sysctl –p 2、nginx日志切分,要是你使用我的nginx日志部分的配置,就不用再去更改,每晚凌晨会自动切分,不过log日志路径要放在/var/log/nginx目录下。

这里简单谈一下web的选择疑问,是使用nginx还是apache,很多朋友在规划网站的时候都出现难以选择的问题,甚至有朋友在建设初用apache后期改成nginx。接下来我说一下我的规划选择,WEB究竟是使用Apache还是nginx,我认为两者各自之间优缺点非常明显,最终决定是要根据你的网站自身情况来确定,如网页的主要内容、网站类型(电商还是门户等等)。总之,在考虑过网站内容、类型等方面后还是无法选择,这时,大并发量我就选择nginx,而动态请求非常频繁的且并发量不大的网站我就使用apache。而我的这个网站是门户网站,内容基本都生成静态页,动态页面不多并且过不了多长时间就会生成html,所以我选择使用nginx做web。 首先声明,此架构适合场景:中小型网站场景,粗略预估100W PV左右。
应用环境
主nginx:192.168.1.158
Web服务器一:192.168.1.163
Web服务器二:192.168.1.162
主数据库服务器:192.168.1.159
从数据库+备nginx:192.168.1.161
Nginx虚拟IP:192.168.1.160
操作系统:centos 6.4
系统的架构图,如下:
一、YUM和编译安装软件方式的小分享
编译安装还是yum安装软件的争议,现在这个时代了还有人去争论。我认为这个事情没必要争论,也不可能争论出结果,完全看个人的工作习惯,我想说YUM真的很节省时间,YUM安装软件简单、快捷,还有点好处可以培养新人的linux兴趣。编译安装可以很好订制化,将不需要的功能关闭掉,减少安全隐患等。YUM安装只要关闭不需要的功能结果和编译安装一样的,而编译安装过程中你很详细的掌握了软件的安装路径等,真是各有优缺点,没必要这上面去浪费心思。而我是按照所需时间来选择,基本上我是个没时间的人,所以我大多数都使用yum 方式安装软件。二、主、从mysql安装及同步 挺简单的配置,如果感兴趣的朋友可以参看我上篇文章《mysql linux下高可用架构的简析及主、从复制的实战(一)》
三、PHP安装
在两台WEB上分别安装PHP,安装过程非常简单。
1、 yum install php*
service php-fpm start 启动php-fpm2、 调整PHP时区
要注意先调整一下php的时区和时间,如果不调整会出现PHP与系统时间不对应的错误。在php.ini找到;Date.timezone = 并将;去掉,改成下图
3、安装zend加速一定要安装,php加速确实能提高PHP的运行速度,不装ZEND也至少装一种加速软件。之前安装过ZEND包,所以我直接拿来用,上传后解压在规定目录内。打开php.ini配置文件,在最后添加zend的配置代码
重启php生效,service php-fpm restart四、web服务器的安装因为我是个时间紧张的人,所以我采用Yum安装。Centos 6.4本身的yum源是没有nginx安装包的,所以我先换源换成atomic的源,再yum安装。wget http://www.atomicorp.com/installers/atomic,直接下载1、换源Sh ./atomic
默认安装就可以,装完后会看到/etc/yum.repos.d/ 会有atomic.repo 为让更换源立即生效,输入yum check-update 让YUM自己check。2、安装nginx Yum install nginx 安装后nginx版本是1.6.2-23,正是我想装的 1.6。
修改配置mv /etc/nginx/nginx.conf /etc/nginx/nginx.bak,建立虚拟主机目录mkdir –p /etc/nginx/vhosts/将这段调整好的代码写入新的nginx.conf ################################################################ This is the main Nginx configuration file. ## More information about the configuration options is available on # * the English wiki - http://wiki.nginx.org/Main# * the Russian documentation - http://sysoev.ru/nginx/######################################################################## #----------------------------------------------------------------------# Main Module - directives that cover basic functionality## http://wiki.nginx.org/NginxHttpMainModule##---------------------------------------------------------------------- user root root; worker_processes 8; error_log /var/log/nginx/error.log;pid /var/run/nginx.pid; #Specifies the value for maximum file descriptors that can be opened by this process. worker_rlimit_nofile 65535; events { use epoll; worker_connections 65535;} http { include /etc/nginx/mime.types; default_type application/octet-stream; ssi on; ssi_silent_errors on; ssi_types test/shtml; #charset gb2312; server_names_hash_bucket_size 128; client_header_buffer_size 32k; large_client_header_buffers 4 32k; client_max_body_size 8m; sendfile on; tcp_nopush on; keepalive_timeout 60; tcp_nodelay on; fastcgi_connect_timeout 300; fastcgi_send_timeout 300; fastcgi_read_timeout 300; fastcgi_buffer_size 64k; fastcgi_buffers 4 64k; fastcgi_busy_buffers_size 128k; fastcgi_temp_file_write_size 128k; fastcgi_intercept_errors on; gzip on; gzip_min_length 1k; gzip_buffers 4 16k; gzip_http_version 1.0; gzip_comp_level 2; gzip_types text/plain application/x-javascript text/css application/xml; gzip_vary on; log_format main '$remote_addr - $remote_user [$time_local] "$request" ' '$status $body_bytes_sent "$http_referer" ' '"$http_user_agent" "$http_x_forwarded_for"'; access_log /var/log/nginx/access.log main; include /etc/nginx/vhosts/*.conf;} 3、在/etc/nginx/vhosts/ 创建网站站点Vi www.confserver { listen 80; server_name www.test.com; index index.html index.php; root /www/web_www; location ~ .*\.(php|php5)?$ { #fastcgi_pass unix:/tmp/php-cgi.sock; fastcgi_pass 127.0.0.1:9000; fastcgi_index index.php; include fastcgi.conf; }}
两台WEB服务器做一样的配置。 五、负载均衡的实现 nginx做负载均衡还是很稳定,甚至不需要脚本来监控nginx进程存活情况,我维护的几个站基本一年有不了一、两次,所以没有编写也没有采用别人写的监控进程脚本,但是提醒各位朋友,因网站而异,没有什么该有什么不该有,适合自己的就是最好、最稳定的。1、负载均衡nginx的安装及配置
两台nginx分别安装nginx,过程简单就不再详细说明,贴出配置文件供各位朋友参考。user root root; worker_processes 8; pid /var/run/nginx.pid;worker_rlimit_nofile 65535;events { use epoll; worker_connections 65535; } http{ include mime.types;default_type application/octet-stream;server_names_hash_bucket_size 128;client_header_buffer_size 32k;large_client_header_buffers 4 32k;client_max_body_size 8m;sendfile on;tcp_nopush on;keepalive_timeout 60; tcp_nodelay on; fastcgi_connect_timeout 300;fastcgi_send_timeout 300;fastcgi_read_timeout 300;fastcgi_buffer_size 64k;fastcgi_buffers 4 64k;fastcgi_busy_buffers_size 128k;fastcgi_temp_file_write_size 128k;gzip on;gzip_min_length 1k;gzip_buffers 4 16k;gzip_http_version 1.0;gzip_comp_level 2;gzip_types text/plain application/x-javascript text/css application/xml;gzip_vary on; log_format main '$remote_addr - $remote_user [$time_local] "$request" ' '$status $body_bytes_sent "$http_referer" ' '"$http_user_agent" $http_x_forwarded_for'; access_log /var/log/nginx/access.log main; upstream backend { server 192.168.1.162; server 192.168.1.163;} server { listen 80;server_name www.test.cn; location / { root /var/www ;index index.htm index.html index.php index.shtml;proxy_redirect off; proxy_set_header Host $host;proxy_set_header X-Real-IP $remote_addr; proxy_set_header X-Forwarded-For $proxy_add_x_forwarded_for; proxy_pass http://backend; } } } 2、yum 安装keepalivedYum install keepalived
3、主keepalived的配置Vi /etc/keepalived/keepalived.conf! Configuration File for keepalivedglobal_defs { router_id LVS_DEVEL } vrrp_instance VI_1 { state MASTER interface eth1 virtual_router_id 51 priority 99 advert_int 1 authentication { auth_type PASS auth_pass test.cn } virtual_ipaddress { 192.168.1.160 } }
Service keepalived start 后ip add 的结果如下,出现global ip 就成功了。
4、副keepalived的配置
! Configuration File for keepalivedglobal_defs { router_id LVS_DEVEL } vrrp_instance VI_1 { state BACKUP interface eth1 virtual_router_id 51 priority 99 advert_int 1 authentication { auth_type PASS auth_pass test.cn } virtual_ipaddress { 192.168.1.160 } }
测试过程如下:1、分别重启主nginx和备nginx服务器,观察网站访问情况,也通过ping 虚拟IP地址192.168.1.160来观察,看能否正常访问网站。
通过ping是比较直观的,只丢失1个包,网站是能正常打开。2、分别重启web1和web2服务器,观察网站访问情况。
检查个站点打开情况,打开完整的。 结果:如果两步测试结果都不影响网站的正常访问,说明负载均衡架构是成功的,恭喜你,是不是有种建设成功后的小喜悦。注意点:1、两台web服务器的nginx都设置了worker_connections 65535; 必须优化centos的内核,否则是起不到作用的。vi /etc/sysctl.conf在sysctl.conf代码的最后面加入# Addnet.ipv4.tcp_max_syn_backlog = 65536net.core.netdev_max_backlog = 32768net.core.somaxconn = 32768 net.core.wmem_default = 8388608net.core.rmem_default = 8388608net.core.rmem_max = 16777216net.core.wmem_max = 16777216 net.ipv4.tcp_timestamps = 0net.ipv4.tcp_synack_retries = 2net.ipv4.tcp_syn_retries = 2 net.ipv4.tcp_tw_recycle = 1#net.ipv4.tcp_tw_len = 1net.ipv4.tcp_tw_reuse = 1 net.ipv4.tcp_mem = 94500000 915000000 927000000net.ipv4.tcp_max_orphans = 3276800net.ipv4.ip_local_port_range = 1024 65535
重启服务器或/sbin/sysctl –p 2、nginx日志切分,要是你使用我的nginx日志部分的配置,就不用再去更改,每晚凌晨会自动切分,不过log日志路径要放在/var/log/nginx目录下。

相关文章推荐
- 实战Nginx负载均衡高冗余高可用WEB架构
- mysql linux下高可用架构的简析及主、从复制的实战(一) 推荐
- 【NoSQL】Mongodb高可用架构—Replica Set 集群实战 推荐
- lvs + keepalived + httpd DR模式web层高可用方案架构 推荐
- 【APP & Web架构】企业web高可用集群实战之haproxy篇(一) 推荐
- 【APP & Web架构】构建高可用MFS分布式文件存储架构 推荐
- 【MySQL运维】MySQL双主高可用架构之MMM实战 推荐
- QX项目实战-13.基础架构试验四:JavaWeb消息平台
- 【APP & Web架构】企业web高可用集群实战之haproxy篇续(二)
- 学习大规模高并发Web系统架构及开发推荐书籍
- 企业级高可用Web架构之HAProxy+Keepalived 推荐
- 构建Oracle高可用环境HA rac:企业级高可用数据库架构、实战与经验总结
- 10月第2周安全回顾 Web安全认证架构成型 PDF阅读器存漏洞 推荐
- 电子书下载:Web开发新体验ASP.NET 3.5 MVC架构与实战
- RedHat 5.4下Web服务器架构之源码构建LNMP环境(中) 推荐
- Windows 网络服务架构系列课程详解(三) ---------Web站点的部署方案 推荐
- 架构Web Service:实战Web服务
- Keepalived架构高可用Mysql(一) 推荐
- Lvs+heartbeat高可用高性能web站点的搭建 推荐