搭建Nginx 反向代理服务器
2015-02-04 15:39
615 查看
一、什么是反向代理:
反向代理(Reverse Proxy)是指把Nginx服务器放在互联网接口,负责接收处理用户客户端的请求,然后把请求发往后端的Web server上,返回给用户的数据也要先经过Nginx服务器在发给用户,Nginx可以实现负载均衡和缓存的功能,从而减轻服务器的访问压力。
二、示例图:

三、Nginx服务器配置:
编译安装:
1、tar xvf nginx-1.4.7.tar.gz
2、cd nginx-1.4.7
3../configure --prefix=/usr --sbin-path=/usr/sbin/nginx --conf-path=/etc/nginx/nginx.conf --error-log-path=/var/log/nginx/error.log --http-log-path=/var/log/nginx/access.log --pid-path=/var/run/nginx/nginx.pid --lock-path=/var/lock/nginx.lock --user=nginx --group=nginx --with-http_ssl_module --with-http_flv_module --with-http_stub_status_module --with-http_gzip_static_module --http-client-body-temp-path=/var/tmp/nginx/client/ --http-proxy-temp-path=/var/tmp/nginx/proxy/ --http-fastcgi-temp-path=/var/tmp/nginx/fcgi/ --http-uwsgi-temp-path=/var/tmp/nginx/uwsgi --http-scgi-temp-path=/var/tmp/nginx/scgi --with-pcre
4、make && make install | tee /tmp/a.txt
5、vim /etc/rc.d/init.d/nginx
#!/bin/sh
#
# nginx - this script starts and stops the nginx daemon
#
# chkconfig: - 85 15
# description: Nginx is an HTTP(S) server, HTTP(S) reverse \
# proxy and IMAP/POP3 proxy server
# processname: nginx
# config: /etc/nginx/nginx.conf
# config: /etc/sysconfig/nginx
# pidfile: /var/run/nginx.pid
# Source function library.
. /etc/rc.d/init.d/functions
# Source networking configuration.
. /etc/sysconfig/network
# Check that networking is up.
[ "$NETWORKING" = "no" ] && exit 0
nginx="/usr/sbin/nginx"
prog=$(basename $nginx)
NGINX_CONF_FILE="/etc/nginx/nginx.conf"
[ -f /etc/sysconfig/nginx ] && . /etc/sysconfig/nginx
lockfile=/var/lock/subsys/nginx
make_dirs() {
# make required directories
user=`nginx -V 2>&1 | grep "configure arguments:" | sed 's/[^*]*--user=\([^ ]*\).*/\1/g' -`
options=`$nginx -V 2>&1 | grep 'configure arguments:'`
for opt in $options; do
if [ `echo $opt | grep '.*-temp-path'` ]; then
value=`echo $opt | cut -d "=" -f 2`
if [ ! -d "$value" ]; then
# echo "creating" $value
mkdir -p $value && chown -R $user $value
fi
fi
done
}
start() {
[ -x $nginx ] || exit 5
[ -f $NGINX_CONF_FILE ] || exit 6
make_dirs
echo -n $"Starting $prog: "
daemon $nginx -c $NGINX_CONF_FILE
retval=$?
echo
[ $retval -eq 0 ] && touch $lockfile
return $retval
}
stop() {
echo -n $"Stopping $prog: "
killproc $prog -QUIT
retval=$?
echo
[ $retval -eq 0 ] && rm -f $lockfile
return $retval
}
restart() {
configtest || return $?
stop
sleep 1
start
}
reload() {
configtest || return $?
echo -n $"Reloading $prog: "
killproc $nginx -HUP
RETVAL=$?
echo
}
force_reload() {
restart
}
configtest() {
$nginx -t -c $NGINX_CONF_FILE
}
rh_status() {
status $prog
}
rh_status_q() {
rh_status >/dev/null 2>&1
}
case "$1" in
start)
rh_status_q && exit 0
$1
;;
stop)
rh_status_q || exit 0
$1
;;
restart|configtest)
$1
;;
reload)
rh_status_q || exit 7
$1
;;
force-reload)
force_reload
;;
status)
rh_status
;;
condrestart|try-restart)
rh_status_q || exit 0
;;
*)
echo $"Usage: $0 {start|stop|status|restart|condrestart|try-restart|reload|force-reload|configtest}"
exit 2
esac
6、配置nginx没有高亮显示,添加高亮显示功能: http://www.vim.org/scripts/script.php?script_id=1886 #下载脚本页面到/root/.vim/syntax/
[root@node3 nginx]# mkdir -pv .vim/syntax
[root@node3 nginx]# cd /root/.vim/syntax/
[root@node3 syntax]# ls
nginx.vim
[root@node3 syntax]# vim .vim/filetype.vim #添加如下信息,然后在打开nginx配置文件即可显示高亮:
au BufRead,BufNewFile /etc/nginx/*,/usr/local/nginx/conf/* if &ft == '' | setfiletype nginx | endif
7、配置Nginx服务器实现代理、缓存和负载均衡功能:
[root@node3 webcache]# grep -v "#" /etc/nginx/nginx.conf
worker_processes 1;
events {
worker_connections 1024;
}
http {
include mime.types;
default_type application/octet-stream;
sendfile on;
keepalive_timeout 5;
upstream webservers {
server 192.168.10.205 weight=3 max_fails=3 fail_timeout=2s;
server 192.168.10.206 weight=1 max_fails=3 fail_timeout=2s;
}
proxy_cache_path /cahce/webcache levels=1:2 keys_zone=web:100m max_size=1g inactive=12h;
server {
listen 80;
server_name www.a.com;
location / {
proxy_pass http://192.168.10.206; proxy_cache web;
proxy_cache_valid 200 2h;
proxy_cache_valid 301 302 10m;
proxy_cache_valid any 1m;
}
error_page 500 502 503 504 /50x.html;
location = /50x.html {
root html;
}
}
server {
listen 80;
server_name www.c.com;
add_header X-Via $server_addr;
add_header X-Cache $upstream_cache_status;
location / {
proxy_pass http://192.168.10.205; proxy_cache web;
proxy_cache_valid 200 2h;
proxy_cache_valid 301 302 10m;
proxy_cache_valid any 1m;
proxy_set_header X-Real-IP $remote_addr;
}
location ~* \.(jpg|jpeg|png|gif)$ {
proxy_pass http://192.168.10.206; proxy_cache web;
proxy_cache_valid 200 2h;
proxy_cache_valid 301 302 10m;
proxy_cache_valid any 1m;
}
}
8、在192.168.10.206和205服务器的/var/www/html目录存放一个1.jpg的图像和一个index.html
在Nginx服务器创建爱你缓存目录/cahce/webcache
mkdir -pv /cahce/webcache
现在是把图片请求都转发给192.168.10.206,吧文本请求转发到192.168.10.205,并缓存到Nginx服务器,如下用客户端查看:
访问 之前需确保本地能解析访问的域名,如www.c.com要写入本地的hosts文件,请求可以正常访问:

9、访问图片测试:
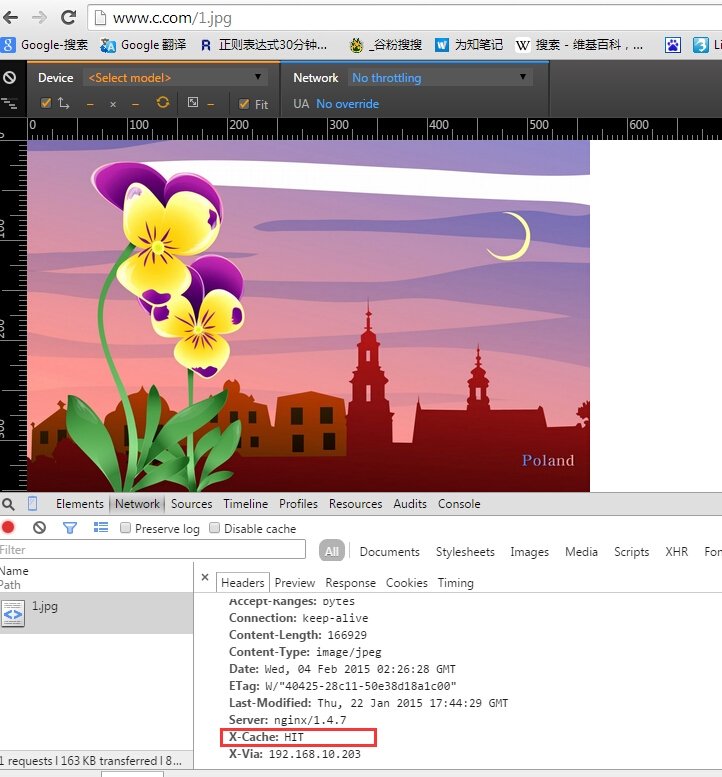
第一次访问可以正常转发的192.168.10.206的后端服务器,但是第一次使用缓存,因为之前没有访问过此图片,所以Nginx服务器没有缓存此图片:

10、使用ctrl+F5强制刷新再次访问此图片:
可以看到已经使用缓存了

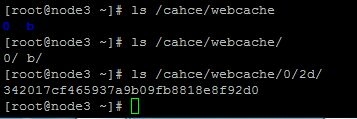
11、在Nginx服务器查看缓存目录:

已经将数据缓存到Nginx服务器,目录是在nginx.cof配置定义的两层16进制的目录,首层目录有0-F16个目录,二级目录有16x16=256的二级目录。
本文出自 “Linux” 博客,请务必保留此出处http://zhangshijie.blog.51cto.com/806066/1611489
反向代理(Reverse Proxy)是指把Nginx服务器放在互联网接口,负责接收处理用户客户端的请求,然后把请求发往后端的Web server上,返回给用户的数据也要先经过Nginx服务器在发给用户,Nginx可以实现负载均衡和缓存的功能,从而减轻服务器的访问压力。
二、示例图:

三、Nginx服务器配置:
编译安装:
1、tar xvf nginx-1.4.7.tar.gz
2、cd nginx-1.4.7
3../configure --prefix=/usr --sbin-path=/usr/sbin/nginx --conf-path=/etc/nginx/nginx.conf --error-log-path=/var/log/nginx/error.log --http-log-path=/var/log/nginx/access.log --pid-path=/var/run/nginx/nginx.pid --lock-path=/var/lock/nginx.lock --user=nginx --group=nginx --with-http_ssl_module --with-http_flv_module --with-http_stub_status_module --with-http_gzip_static_module --http-client-body-temp-path=/var/tmp/nginx/client/ --http-proxy-temp-path=/var/tmp/nginx/proxy/ --http-fastcgi-temp-path=/var/tmp/nginx/fcgi/ --http-uwsgi-temp-path=/var/tmp/nginx/uwsgi --http-scgi-temp-path=/var/tmp/nginx/scgi --with-pcre
4、make && make install | tee /tmp/a.txt
5、vim /etc/rc.d/init.d/nginx
#!/bin/sh
#
# nginx - this script starts and stops the nginx daemon
#
# chkconfig: - 85 15
# description: Nginx is an HTTP(S) server, HTTP(S) reverse \
# proxy and IMAP/POP3 proxy server
# processname: nginx
# config: /etc/nginx/nginx.conf
# config: /etc/sysconfig/nginx
# pidfile: /var/run/nginx.pid
# Source function library.
. /etc/rc.d/init.d/functions
# Source networking configuration.
. /etc/sysconfig/network
# Check that networking is up.
[ "$NETWORKING" = "no" ] && exit 0
nginx="/usr/sbin/nginx"
prog=$(basename $nginx)
NGINX_CONF_FILE="/etc/nginx/nginx.conf"
[ -f /etc/sysconfig/nginx ] && . /etc/sysconfig/nginx
lockfile=/var/lock/subsys/nginx
make_dirs() {
# make required directories
user=`nginx -V 2>&1 | grep "configure arguments:" | sed 's/[^*]*--user=\([^ ]*\).*/\1/g' -`
options=`$nginx -V 2>&1 | grep 'configure arguments:'`
for opt in $options; do
if [ `echo $opt | grep '.*-temp-path'` ]; then
value=`echo $opt | cut -d "=" -f 2`
if [ ! -d "$value" ]; then
# echo "creating" $value
mkdir -p $value && chown -R $user $value
fi
fi
done
}
start() {
[ -x $nginx ] || exit 5
[ -f $NGINX_CONF_FILE ] || exit 6
make_dirs
echo -n $"Starting $prog: "
daemon $nginx -c $NGINX_CONF_FILE
retval=$?
echo
[ $retval -eq 0 ] && touch $lockfile
return $retval
}
stop() {
echo -n $"Stopping $prog: "
killproc $prog -QUIT
retval=$?
echo
[ $retval -eq 0 ] && rm -f $lockfile
return $retval
}
restart() {
configtest || return $?
stop
sleep 1
start
}
reload() {
configtest || return $?
echo -n $"Reloading $prog: "
killproc $nginx -HUP
RETVAL=$?
echo
}
force_reload() {
restart
}
configtest() {
$nginx -t -c $NGINX_CONF_FILE
}
rh_status() {
status $prog
}
rh_status_q() {
rh_status >/dev/null 2>&1
}
case "$1" in
start)
rh_status_q && exit 0
$1
;;
stop)
rh_status_q || exit 0
$1
;;
restart|configtest)
$1
;;
reload)
rh_status_q || exit 7
$1
;;
force-reload)
force_reload
;;
status)
rh_status
;;
condrestart|try-restart)
rh_status_q || exit 0
;;
*)
echo $"Usage: $0 {start|stop|status|restart|condrestart|try-restart|reload|force-reload|configtest}"
exit 2
esac
6、配置nginx没有高亮显示,添加高亮显示功能: http://www.vim.org/scripts/script.php?script_id=1886 #下载脚本页面到/root/.vim/syntax/
[root@node3 nginx]# mkdir -pv .vim/syntax
[root@node3 nginx]# cd /root/.vim/syntax/
[root@node3 syntax]# ls
nginx.vim
[root@node3 syntax]# vim .vim/filetype.vim #添加如下信息,然后在打开nginx配置文件即可显示高亮:
au BufRead,BufNewFile /etc/nginx/*,/usr/local/nginx/conf/* if &ft == '' | setfiletype nginx | endif
7、配置Nginx服务器实现代理、缓存和负载均衡功能:
[root@node3 webcache]# grep -v "#" /etc/nginx/nginx.conf
worker_processes 1;
events {
worker_connections 1024;
}
http {
include mime.types;
default_type application/octet-stream;
sendfile on;
keepalive_timeout 5;
upstream webservers {
server 192.168.10.205 weight=3 max_fails=3 fail_timeout=2s;
server 192.168.10.206 weight=1 max_fails=3 fail_timeout=2s;
}
proxy_cache_path /cahce/webcache levels=1:2 keys_zone=web:100m max_size=1g inactive=12h;
server {
listen 80;
server_name www.a.com;
location / {
proxy_pass http://192.168.10.206; proxy_cache web;
proxy_cache_valid 200 2h;
proxy_cache_valid 301 302 10m;
proxy_cache_valid any 1m;
}
error_page 500 502 503 504 /50x.html;
location = /50x.html {
root html;
}
}
server {
listen 80;
server_name www.c.com;
add_header X-Via $server_addr;
add_header X-Cache $upstream_cache_status;
location / {
proxy_pass http://192.168.10.205; proxy_cache web;
proxy_cache_valid 200 2h;
proxy_cache_valid 301 302 10m;
proxy_cache_valid any 1m;
proxy_set_header X-Real-IP $remote_addr;
}
location ~* \.(jpg|jpeg|png|gif)$ {
proxy_pass http://192.168.10.206; proxy_cache web;
proxy_cache_valid 200 2h;
proxy_cache_valid 301 302 10m;
proxy_cache_valid any 1m;
}
}
8、在192.168.10.206和205服务器的/var/www/html目录存放一个1.jpg的图像和一个index.html
在Nginx服务器创建爱你缓存目录/cahce/webcache
mkdir -pv /cahce/webcache
现在是把图片请求都转发给192.168.10.206,吧文本请求转发到192.168.10.205,并缓存到Nginx服务器,如下用客户端查看:
访问 之前需确保本地能解析访问的域名,如www.c.com要写入本地的hosts文件,请求可以正常访问:

9、访问图片测试:
第一次访问可以正常转发的192.168.10.206的后端服务器,但是第一次使用缓存,因为之前没有访问过此图片,所以Nginx服务器没有缓存此图片:

10、使用ctrl+F5强制刷新再次访问此图片:
可以看到已经使用缓存了

11、在Nginx服务器查看缓存目录:

已经将数据缓存到Nginx服务器,目录是在nginx.cof配置定义的两层16进制的目录,首层目录有0-F16个目录,二级目录有16x16=256的二级目录。
本文出自 “Linux” 博客,请务必保留此出处http://zhangshijie.blog.51cto.com/806066/1611489
相关文章推荐
- 【大型网站技术实践】初级篇:借助Nginx搭建反向代理服务器 【转:http://www.cnblogs.com/edisonchou/p/4126742.html】
- 【大型网站技术实践】初级篇:借助Nginx搭建反向代理服务器
- 【大型网站技术实践】初级篇:借助Nginx搭建反向代理服务器
- 如何搭建web服务器 使用Nginx搭建反向代理服务器 .
- Nginx搭建反向代理服务器
- 【大型网站技术实践】初级篇:借助Nginx搭建反向代理服务器
- Nginx搭建反向代理服务器
- Nginx原理简介与 搭建反向代理服务器过程详解
- 借助nginx搭建反向代理服务器小例
- CentOS7开发环境搭建(二)——反向代理服务器nginx
- 如何搭建web服务器 使用Nginx搭建反向代理服务器
- 【大型网站技术实践】初级篇:借助Nginx搭建反向代理服务器
- Nginx搭建反向代理服务器过程详解
- 如何搭建web服务器 使用Nginx搭建反向代理服务器
- 【大型网站技术实践】初级篇:借助Nginx搭建反向代理服务器(转)
- 【大型网站技术实践】初级篇:借助Nginx搭建反向代理服务器
- 借助Nginx搭建反向代理服务器实现简单负载均衡
- 【大型网站技术实践】初级篇:借助Nginx搭建反向代理服务器
- RHEL6.4 搭建Nginx反向代理服务器
- Nginx搭建反向代理服务器过程详解
