MariaDB数据库主从复制、双主复制、半同步复制、基于SSL的安全复制实现及其功能特性介绍(二)
2015-01-27 13:57
871 查看
四.数据库主从复制
1.主节点node3配置
2.从节点node3配置:
配置简要介绍:
server_id是必须的,而且唯一。
slave没有必要开启二进制日志,但是在一些情况下,必须设置,例如,如果slave为其它slave的master,必须设置bin_log。在这里,我们开启了二进制日志,而且显示的命名(默认名称为hostname,但是,如果hostname改变则会出现问题)。
relay_log配置中继日志,log_slave_updates表示slave将复制事件写进自己的二进制日志(后面会看到它的用处)。
有些人开启了slave的二进制日志,却没有设置log_slave_updates,然后查看slave的数据是否改变,这是一种错误的配置。所以,尽量使用read_only,它防止改变数据(除了特殊的线程)。但是,read_only并不是很实用,特别是那些需要在slave上创建表的应用。
3.在Master节点node3的数据库中建立一个备份帐户:每个slave使用标准的MySQL用户名和密码连接master。进行复制操作的用户会授予REPLICATION SLAVE权限。用户名的密码都会存储在文本文件master.info中
命令如下:
4.拷贝数据
(假如是你完全新安装mysql主从服务器,这个一步就不需要。因为新安装的master和slave有相同的数据)
关停Master服务器,将Master中的数据拷贝到从服务器节点中,使得Master和slave中的数据同步,并且确保在全部设置操作结束前,禁止在Master和slave服务器中进行写操作,使得两数据库中的数据一定要相同!
我这里都是全新安装,一切写操作都未进行过;
5.重启mysqld服务器,主从节点都重启;
主节点:
从节点:
6.启动从节点的中继日志
接下来就是让slave连接master,并开始重做master二进制日志中的事件。你不应该用配置文件进行该操作,而应该使用CHANGE MASTER TO语句,该语句可以完全取代对配置文件的修改,而且它可以为slave指定不同的master,而不需要停止服务器。
命令介绍如下:使用help change master to即可查看命令选项
我们需要记录的二进制日志文件的时间点是最后的那个点,我们先去主服务器节点查看哪个时间点,因为我们是新服务器,主节点上没神马重要数据:
启动从节点的中继日志:
slave的I/O和SQL线程都已经开始运行,而且Seconds_Behind_Master不再是NULL。日志的位置增加了,意味着一些事件被获取并执行了。如果你在master上进行修改,你可以在slave上看到各种日志文件的位置的变化,同样,你也可以看到数据库中数据的变化。测试在下面进行,我们先来看看主从节点的线程的状态;
7.查看master和slave上线程的状态。在master上,你可以看到slave的I/O线程创建的连接:
在Master节点node3上输入show processlist\G;
在Slave服务器节点node4上运行该语句:
8.主从复制测试;
我们在主节点node3上进行导入数据库hellodb的操作:
我这里提供附件了,可以到附件中下载,免费的;
http://down.51cto.com/data/1978335
数据库存储引擎尽量是innodb的哦。
导入完成后我们到主节点查看:
到从节点查看复制状态,可以看出复制已经进行了;
查看从节点的数据库复制完成与否,可以查看出我们导入的数据库是存在的:
测试复制是成功的;
至此,数据库的主从复制的实验就完成了,下面进行半同步复制操作实验;
五.半同步复制
半同步复制简述
半同步意思:表示Master服务器只需要接收到其中一台Slave的返回信息,就会commit;否则需要等待直到超时时间然后切换成异步再提交;这样做的目的可以使主从数据库的数据延迟缩小,可以在损失很小的性能的前提下提高数据安全性;
1.半同步的开启,只需要在Master与Slave服务器上都安装上半同步的插件并启用即可;而插件在Mysql的安装目录中:"/usr/local/mysql/lib/plugin/"
2.在Master与Slave服务器分别安装半同步插件
在Master服务器安装半同步插件
在Slave服务器安装半同步插件
3.在主备节点查看半同步开启状态:
Master主节点:
Slave备节点:
4.在Master服务器上将前面导入的hellodb数据库删除,然后验证Slave服务器
Master节点删除数据库hellodb:
到Slave节点验证数据库是否删除:
至此,基于半同步复制的主从数据库服务器构建完毕;
注意:以上配置都不能永久生效,如果想要永久生效,将以上配置加入到配置文件重启服务即可;
六.基于SSL安全传输的主从复制的实现
基于SSL安全传输的主从复制的简要介绍:
备份数据库是生产环境中的首要任务,重中之重,有时候不得不通过网络进行数据库的复制,这样就需要保证数据在网络传输过程中的安全性,因此使用基于SSL的复制会大加强数据的安全性。
由于Mysql的主从复制是明文传送的,但如果在生产环境中跨网络我们使用主从还是明文传送的话,就保证不了数据的安全性,为了解决这一问题,我们需要加密进行传送,也就是基于SSL的加密方法进行传输数据。
1.设置Master主节点为CA证书服务器。
2.为Master节点node3创建证书申请并由CA服务器签发证书
3.为Slave节点node4创建证书申请并由CA服务器签发证书
为Slave服务器签署证书
证书在CA服务器节点签署好后,拷贝到slave服务器:
4.将CA证书拷贝到Slave服务器并为Master拷贝一份
#修改Master与Slave服务器证书属主、属组为mysql用户
5.在Master与Slave服务器修改主配置文件开启SSL加密功能
修改Master服务器配置文件:
修改Slave服务器的配置文件:
6.在Master服务器查看SSL加密是否开启;然后创建授权一个基于密钥认证的用户
7.在Slave服务器测试使用加密用户指定密钥连接Master服务器
8.查看Slave服务器SSL是否开启并连接Master服务器
可以发现,我们的slave的IO线程和SQL线程开启了,已经在开始同步了;
9.基于SSL安全传输的测试;
我们到Slave节点查看数据库hellodb存在与否:
至此,MariaDB/MySQL的基于SSL加密的复制已全部完成。
七.复制相关的文件介绍
我们到slave节点查看数据文件:
这里除了基本的数据库文件和二进制日志,还有一些与复制相关的文件。如下:
(1)mysql-bin.index
服务器一旦开启二进制日志,会产生一个与二日志文件同名,但是以.index结尾的文件。它用于跟踪磁盘上存在哪些二进制日志文件。MySQL用它来定位二进制日志文件。它的内容如下:
(2)mysql-relay-bin.index
该文件的功能与mysql-bin.index类似,但是它是针对中继日志,而不是二进制日志。内容如下:
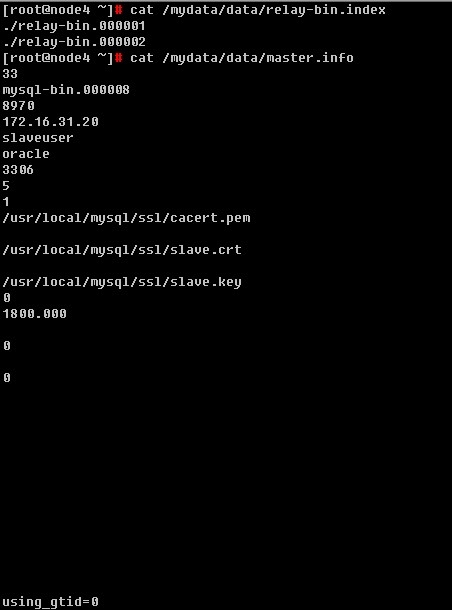
(3)master.info
保存master的相关信息。不要删除它,否则,slave重启后不能连接master。内容如图:
(4)relay-log.info
包含slave中当前二进制日志和中继日志的信息。
1.主节点node3配置
| 1 2 3 4 5 6 7 8 9 | 对master进行配置,包括打开二进制日志,指定唯一的servr ID。例如,在配置文件加入如下值: 配置/etc/my.cnf在[mysqld]这个配置段加入如下内容: [mysqld] #二进制变更日志 log-bin=mysql-bin #二进制日志格式为混合模式 binlog_format=mixed #为主服务器node3的ID值 server-id = 1 |
| 1 2 3 4 5 6 7 | 配置/etc/my.cnf在[mysqld]这个配置段加入如下内容: log-bin=mysql-bin binlog_format=mixed server-id = 10 relay-log = relay-bin log_slave_updates = 1 read_only = on |
server_id是必须的,而且唯一。
slave没有必要开启二进制日志,但是在一些情况下,必须设置,例如,如果slave为其它slave的master,必须设置bin_log。在这里,我们开启了二进制日志,而且显示的命名(默认名称为hostname,但是,如果hostname改变则会出现问题)。
relay_log配置中继日志,log_slave_updates表示slave将复制事件写进自己的二进制日志(后面会看到它的用处)。
有些人开启了slave的二进制日志,却没有设置log_slave_updates,然后查看slave的数据是否改变,这是一种错误的配置。所以,尽量使用read_only,它防止改变数据(除了特殊的线程)。但是,read_only并不是很实用,特别是那些需要在slave上创建表的应用。
3.在Master节点node3的数据库中建立一个备份帐户:每个slave使用标准的MySQL用户名和密码连接master。进行复制操作的用户会授予REPLICATION SLAVE权限。用户名的密码都会存储在文本文件master.info中
命令如下:
| 1 2 3 4 5 6 7 8 9 10 11 12 13 14 | [root@node3 ~]# mysql -u root -p Enter password: Welcome to the MariaDB monitor. Commands end with ; or \g. Your MariaDB connection id is 5 Server version: 10.0.12-MariaDB-log Source distribution Copyright (c) 2000, 2014, Oracle, SkySQL Ab and others. Type 'help;' or '\h' for help. Type '\c' to clear the current input statement. #建立一个帐户repluser,并且只能允许172.16.0.0这个网段来登陆,密码是replpass。 MariaDB [(none)]> grant replication client,replication slave on *.* to 'repluser'@'172.16.%.%' identified by 'replpass'; Query OK, 0 rows affected (0.00 sec) MariaDB [(none)]> flush privileges; Query OK, 0 rows affected (0.00 sec) MariaDB [(none)]> \q Bye |
(假如是你完全新安装mysql主从服务器,这个一步就不需要。因为新安装的master和slave有相同的数据)
关停Master服务器,将Master中的数据拷贝到从服务器节点中,使得Master和slave中的数据同步,并且确保在全部设置操作结束前,禁止在Master和slave服务器中进行写操作,使得两数据库中的数据一定要相同!
我这里都是全新安装,一切写操作都未进行过;
5.重启mysqld服务器,主从节点都重启;
主节点:
| 1 2 3 4 5 6 7 8 9 10 | [root@node3 ~]# service mysqld restart Shutting down MySQL. [ OK ] Starting MySQL. [ OK ] [root@node3 ~]# ls /mydata/data/ aria_log.00000001 multi-master.info mysql-bin.000005 performance_schema aria_log_control mysql mysql-bin.000006 relaylog binlog mysql-bin.000001 mysql-bin.000007 test ibdata1 mysql-bin.000002 mysql-bin.index ib_logfile0 mysql-bin.000003 node3.stu31.com.err ib_logfile1 mysql-bin.000004 node3.stu31.com.pid |
| 1 2 3 4 5 6 7 8 9 10 11 | [root@node4 ~]# service mysqld restart Shutting down MySQL... [ OK ] Starting MySQL. [ OK ] #数据复制还未发生,所有中继日志还是未出现的; [root@node4 ~]# ls /mydata/data/ aria_log.00000001 multi-master.info mysql-bin.000005 performance_schema aria_log_control mysql mysql-bin.000006 relaylog binlog mysql-bin.000001 mysql-bin.000007 test ibdata1 mysql-bin.000002 mysql-bin.index ib_logfile0 mysql-bin.000003 node4.stu31.com.err ib_logfile1 mysql-bin.000004 node4.stu31.com.pid |
接下来就是让slave连接master,并开始重做master二进制日志中的事件。你不应该用配置文件进行该操作,而应该使用CHANGE MASTER TO语句,该语句可以完全取代对配置文件的修改,而且它可以为slave指定不同的master,而不需要停止服务器。
命令介绍如下:使用help change master to即可查看命令选项
| 1 2 3 4 5 6 7 8 9 10 11 12 13 14 15 16 17 18 19 20 21 | CHANGE MASTER TO option [, option] ... option: MASTER_BIND = 'interface_name' | MASTER_HOST = 'host_name' 主服务器地址 | MASTER_USER = 'user_name' 有复制权限的用户名 | MASTER_PASSWORD = 'password' 用户密码 | MASTER_PORT = port_num 主服务器的端口 | MASTER_CONNECT_RETRY = interval 连接重试时间间隔 | MASTER_HEARTBEAT_PERIOD = interval 心跳检测时间间隔 | MASTER_LOG_FILE = 'master_log_name' 主服务器二进制日志文件 | MASTER_LOG_POS = master_log_pos 二进制日志文件中的位置 | RELAY_LOG_FILE = 'relay_log_name' 中继日志文件名称定义 | RELAY_LOG_POS = relay_log_pos 中继日志时间点定义 | MASTER_SSL = {0|1} 下面都都是跟SSL安全传输相关的 | MASTER_SSL_CA = 'ca_file_name' | MASTER_SSL_CAPATH = 'ca_directory_name' | MASTER_SSL_CERT = 'cert_file_name' | MASTER_SSL_KEY = 'key_file_name' | MASTER_SSL_CIPHER = 'cipher_list' | MASTER_SSL_VERIFY_SERVER_CERT = {0|1} | IGNORE_SERVER_IDS = (server_id_list) |
| 1 2 3 4 5 6 7 | MariaDB [(none)]> show master status; +------------------+----------+--------------+------------------+ | File | Position | Binlog_Do_DB | Binlog_Ignore_DB | +------------------+----------+--------------+------------------+ | mysql-bin.000007 | 326 | | | +------------------+----------+--------------+------------------+ 1 row in set (0.00 sec) |
| 1 2 3 4 5 6 7 8 9 10 11 12 13 14 15 16 17 18 19 20 21 22 23 24 25 26 27 28 29 30 31 32 33 34 35 36 37 38 39 40 41 42 43 44 45 46 47 48 49 50 51 52 53 54 55 56 57 58 59 60 61 62 63 64 65 66 67 68 69 70 71 72 73 74 75 76 77 78 79 80 81 82 83 84 85 86 87 88 | [root@node4 ~]# mysql -uroot -p Enter password: Welcome to the MariaDB monitor. Commands end with ; or \g. Your MariaDB connection id is 5 Server version: 10.0.12-MariaDB-log Source distribution Copyright (c) 2000, 2014, Oracle, SkySQL Ab and others. Type 'help;' or '\h' for help. Type '\c' to clear the current input statement. #查看只读打开与否; MariaDB [(none)]> show global variables like '%read_only%'; +------------------+-------+ | Variable_name | Value | +------------------+-------+ | innodb_read_only | OFF | | read_only | ON | | tx_read_only | OFF | +------------------+-------+ 3 rows in set (0.01 sec) #启动中继日志的命令如下; MariaDB [(none)]> change master to master_host='172.16.31.20',master_user='repluser',master_password='replpass',master_log_file='mysql-bin.000007',master_log_pos=326,master_connect_retry=5,master_heartbeat_period=2; Query OK, 0 rows affected (0.07 sec) #查看从服务器状态; MariaDB [(none)]> show slave status\G *************************** 1. row *************************** Slave_IO_State: Master_Host: 172.16.31.20 Master_User: repluser Master_Port: 3306 Connect_Retry: 5 Master_Log_File: mysql-bin.000007 Read_Master_Log_Pos: 326 Relay_Log_File: relay-bin.000001 Relay_Log_Pos: 4 Relay_Master_Log_File: mysql-bin.000007 Slave_IO_Running: No Slave_SQL_Running: No Replicate_Do_DB: Replicate_Ignore_DB: Replicate_Do_Table: Replicate_Ignore_Table: Replicate_Wild_Do_Table: Replicate_Wild_Ignore_Table: Last_Errno: 0 Last_Error: Skip_Counter: 0 Exec_Master_Log_Pos: 326 Relay_Log_Space: 248 Until_Condition: None Until_Log_File: Until_Log_Pos: 0 Master_SSL_Allowed: No Master_SSL_CA_File: Master_SSL_CA_Path: Master_SSL_Cert: Master_SSL_Cipher: Master_SSL_Key: Seconds_Behind_Master: NULL Master_SSL_Verify_Server_Cert: No Last_IO_Errno: 0 Last_IO_Error: Last_SQL_Errno: 0 Last_SQL_Error: Replicate_Ignore_Server_Ids: Master_Server_Id: 0 Master_SSL_Crl: Master_SSL_Crlpath: Using_Gtid: No Gtid_IO_Pos: 1 row in set (0.00 sec) #通过查看从服务器状态,我们知道了从服务器的IO线程和SQL线程还未开启,下面我们就开启从服务器节点的复制进程,实现主从复制; MariaDB [(none)]> start slave; Query OK, 0 rows affected (0.00 sec) #再次查看从服务器状态,主要关注IO线程和SQL线程的开启状况: MariaDB [(none)]> show slave status\G *************************** 1. row *************************** Slave_IO_State: Waiting for master to send event Master_Host: 172.16.31.20 Master_User: repluser Master_Port: 3306 Connect_Retry: 5 Master_Log_File: mysql-bin.000007 Read_Master_Log_Pos: 326 Relay_Log_File: relay-bin.000002 Relay_Log_Pos: 535 Relay_Master_Log_File: mysql-bin.000007 Slave_IO_Running: Yes #IOthread是否运行,如果为No代表slave运行不正常 Slave_SQL_Running: Yes #SQLthread是否运行,如果为No代表slave运行不正常 信息略...... Seconds_Behind_Master: 0 |
7.查看master和slave上线程的状态。在master上,你可以看到slave的I/O线程创建的连接:
在Master节点node3上输入show processlist\G;
| 1 2 3 4 5 6 7 8 9 10 11 12 13 14 15 16 17 18 19 20 21 22 23 | MariaDB [(none)]> show processlist \G *************************** 1. row *************************** Id: 5 User: repluser Host: 172.16.31.21:52875 db: NULL Command: Binlog Dump Time: 477 State: Master has sent all binlog to slave; waiting for binlog to be updated Info: NULL Progress: 0.000 *************************** 2. row *************************** Id: 6 User: root Host: localhost db: NULL Command: Query Time: 0 State: init Info: show processlist Progress: 0.000 2 rows in set (0.00 sec) 1.row为处理slave的I/O线程的连接。 |
| 1 2 3 4 5 6 7 8 9 10 11 12 13 14 15 16 17 18 19 20 21 22 23 24 25 26 27 28 29 30 31 32 33 34 | MariaDB [(none)]> show processlist \G *************************** 1. row *************************** Id: 5 User: root Host: localhost db: NULL Command: Query Time: 0 State: init Info: show processlist Progress: 0.000 *************************** 2. row *************************** Id: 6 User: system user Host: db: NULL Command: Connect Time: 587 State: Waiting for master to send event Info: NULL Progress: 0.000 *************************** 3. row *************************** Id: 7 User: system user Host: db: NULL Command: Connect Time: 587 State: Slave has read all relay log; waiting for the slave I/O thread to update it Info: NULL Progress: 0.000 3 rows in set (0.00 sec) 2.row为SQL线程状态。 3.row为I/O线程状态。 |
我们在主节点node3上进行导入数据库hellodb的操作:
| 1 2 | [root@node3 ~]# mysql -uroot -p < hellodb.sql Enter password: |
http://down.51cto.com/data/1978335
数据库存储引擎尽量是innodb的哦。
导入完成后我们到主节点查看:
| 1 2 3 4 5 6 7 8 9 10 11 12 13 14 15 16 17 18 19 20 21 22 23 24 25 26 27 28 29 30 31 32 33 34 35 36 37 | [root@node3 ~]# mysql -uroot -p Enter password: Welcome to the MariaDB monitor. Commands end with ; or \g. Your MariaDB connection id is 10 Server version: 10.0.12-MariaDB-log Source distribution Copyright (c) 2000, 2014, Oracle, SkySQL Ab and others. Type 'help;' or '\h' for help. Type '\c' to clear the current input statement. MariaDB [(none)]> show databases; +--------------------+ | Database | +--------------------+ | binlog | | hellodb | | information_schema | | mysql | | performance_schema | | relaylog | | test | +--------------------+ 7 rows in set (0.03 sec) MariaDB [(none)]> use hellodb Database changed MariaDB [hellodb]> show tables; +-------------------+ | Tables_in_hellodb | +-------------------+ | classes | | coc | | courses | | scores | | students | | teachers | | toc | +-------------------+ 7 rows in set (0.00 sec) MariaDB [hellodb]> \q Bye |
| 1 2 3 4 5 6 7 8 9 10 11 12 13 14 15 16 17 18 19 20 21 22 23 24 25 26 27 28 29 30 31 32 33 34 35 36 37 38 39 40 41 42 43 44 45 46 47 | MariaDB [(none)]> show slave status\G *************************** 1. row *************************** Slave_IO_State: Waiting for master to send event Master_Host: 172.16.31.20 Master_User: repluser Master_Port: 3306 Connect_Retry: 5 Master_Log_File: mysql-bin.000007 Read_Master_Log_Pos: 8640 Relay_Log_File: relay-bin.000002 Relay_Log_Pos: 8849 Relay_Master_Log_File: mysql-bin.000007 Slave_IO_Running: Yes Slave_SQL_Running: Yes Replicate_Do_DB: Replicate_Ignore_DB: Replicate_Do_Table: Replicate_Ignore_Table: Replicate_Wild_Do_Table: Replicate_Wild_Ignore_Table: Last_Errno: 0 Last_Error: Skip_Counter: 0 Exec_Master_Log_Pos: 8640 Relay_Log_Space: 9140 Until_Condition: None Until_Log_File: Until_Log_Pos: 0 Master_SSL_Allowed: No Master_SSL_CA_File: Master_SSL_CA_Path: Master_SSL_Cert: Master_SSL_Cipher: Master_SSL_Key: Seconds_Behind_Master: 0 Master_SSL_Verify_Server_Cert: No Last_IO_Errno: 0 Last_IO_Error: Last_SQL_Errno: 0 Last_SQL_Error: Replicate_Ignore_Server_Ids: Master_Server_Id: 1 Master_SSL_Crl: Master_SSL_Crlpath: Using_Gtid: No Gtid_IO_Pos: 1 row in set (0.00 sec) |
| 1 2 3 4 5 6 7 8 9 10 11 12 13 14 15 16 17 18 19 20 21 22 23 24 25 26 27 28 | MariaDB [(none)]> show databases; +--------------------+ | Database | +--------------------+ | binlog | | hellodb | | information_schema | | mysql | | performance_schema | | relaylog | | test | +--------------------+ 7 rows in set (0.02 sec) MariaDB [(none)]> use hellodb; Database changed MariaDB [hellodb]> show tables; +-------------------+ | Tables_in_hellodb | +-------------------+ | classes | | coc | | courses | | scores | | students | | teachers | | toc | +-------------------+ 7 rows in set (0.01 sec) |
至此,数据库的主从复制的实验就完成了,下面进行半同步复制操作实验;
五.半同步复制
半同步复制简述
半同步意思:表示Master服务器只需要接收到其中一台Slave的返回信息,就会commit;否则需要等待直到超时时间然后切换成异步再提交;这样做的目的可以使主从数据库的数据延迟缩小,可以在损失很小的性能的前提下提高数据安全性;
1.半同步的开启,只需要在Master与Slave服务器上都安装上半同步的插件并启用即可;而插件在Mysql的安装目录中:"/usr/local/mysql/lib/plugin/"
| 1 2 3 4 5 6 | MariaDB数据库提供的半同步插件如下: [root@node3 ~]# ls /usr/local/mysql/lib/plugin/ |grep '^semisync' #用于Master服务器安装的半同步插件 semisync_master.so #用于Slave服务器安装的半同步插件 semisync_slave.so |
在Master服务器安装半同步插件
| 1 2 3 4 | [root@node3 ~]# mysql MariaDB [(none)]> install plugin rpl_semi_sync_master soname 'semisync_master.so'; #安装Master半同步插件 MariaDB [(none)]> set global rpl_semi_sync_master_enabled = 1; #开启Master半同步功能 MariaDB [(none)]> set global rpl_semi_sync_master_timeout = 2000; #超时时间毫秒级 |
| 1 2 3 4 | [root@node4 ~]# mysql MariaDB [(none)]> install plugin rpl_semi_sync_slave soname 'semisync_slave.so'; #安装Slave半同步插件 MariaDB [(none)]> set global rpl_semi_sync_slave_enabled = 1; #开启Slave半同步功能 MariaDB [(none)]> stop slave io_thread;start slave io_thread; #重启IO线程生效 |
Master主节点:
| 1 2 3 4 5 6 7 8 9 10 11 12 13 14 15 16 17 18 19 20 | MariaDB [(none)]> show global status like 'rpl_semi%'; +--------------------------------------------+-------+ | Variable_name | Value | +--------------------------------------------+-------+ | Rpl_semi_sync_master_clients | 1 |#可以看出有一个半同步客户端了; | Rpl_semi_sync_master_net_avg_wait_time | 0 | | Rpl_semi_sync_master_net_wait_time | 0 | | Rpl_semi_sync_master_net_waits | 0 | | Rpl_semi_sync_master_no_times | 0 | | Rpl_semi_sync_master_no_tx | 0 | | Rpl_semi_sync_master_status | ON |#半同步状态为开启状态; | Rpl_semi_sync_master_timefunc_failures | 0 | | Rpl_semi_sync_master_tx_avg_wait_time | 0 | | Rpl_semi_sync_master_tx_wait_time | 0 | | Rpl_semi_sync_master_tx_waits | 0 | | Rpl_semi_sync_master_wait_pos_backtraverse | 0 | | Rpl_semi_sync_master_wait_sessions | 0 | | Rpl_semi_sync_master_yes_tx | 0 | +--------------------------------------------+-------+ 14 rows in set (0.00 sec) |
| 1 2 3 4 5 6 7 8 9 10 11 12 13 14 15 16 | MariaDB [(none)]> show global status like '%semi%'; +----------------------------+-------+ | Variable_name | Value | +----------------------------+-------+ | Rpl_semi_sync_slave_status | ON |#半同步状态已经开启了; +----------------------------+-------+ 1 row in set (0.00 sec) MariaDB [(none)]> show global variables like '%rpl%'; +---------------------------------+-------+ | Variable_name | Value | +---------------------------------+-------+ | rpl_recovery_rank | 0 | | rpl_semi_sync_slave_enabled | ON |#从服务器节点的半同步已经开启; | rpl_semi_sync_slave_trace_level | 32 | +---------------------------------+-------+ 3 rows in set (0.00 sec) |
Master节点删除数据库hellodb:
| 1 2 3 4 5 6 7 8 9 10 11 12 13 14 15 16 17 18 19 20 21 22 23 24 25 26 27 | [root@node3 ~]# mysql -uroot -p -e 'show databases'; Enter password: +--------------------+ | Database | +--------------------+ | binlog | | hellodb | | information_schema | | mysql | | performance_schema | | relaylog | | test | +--------------------+ [root@node3 ~]# mysql -uroot -p -e 'drop database hellodb'; Enter password: [root@node3 ~]# mysql -uroot -p -e 'show databases'; Enter password: +--------------------+ | Database | +--------------------+ | binlog | | information_schema | | mysql | | performance_schema | | relaylog | | test | +--------------------+ |
| 1 2 3 4 5 6 7 8 9 10 11 12 | [root@node4 ~]# mysql -uroot -p -e 'show databases'; Enter password: +--------------------+ | Database | +--------------------+ | binlog | | information_schema | | mysql | | performance_schema | | relaylog | | test | +--------------------+ |
注意:以上配置都不能永久生效,如果想要永久生效,将以上配置加入到配置文件重启服务即可;
六.基于SSL安全传输的主从复制的实现
基于SSL安全传输的主从复制的简要介绍:
备份数据库是生产环境中的首要任务,重中之重,有时候不得不通过网络进行数据库的复制,这样就需要保证数据在网络传输过程中的安全性,因此使用基于SSL的复制会大加强数据的安全性。
由于Mysql的主从复制是明文传送的,但如果在生产环境中跨网络我们使用主从还是明文传送的话,就保证不了数据的安全性,为了解决这一问题,我们需要加密进行传送,也就是基于SSL的加密方法进行传输数据。
1.设置Master主节点为CA证书服务器。
| 1 2 3 4 5 6 7 8 9 10 11 12 13 14 15 16 17 18 19 20 21 22 23 24 25 26 27 | [root@node3 ~]# cd /etc/pki/CA #创建私钥; [root@node3 CA]# (umask 077;openssl genrsa -out private/cakey.pem 2048) Generating RSA private key, 2048 bit long modulus ......................................................+++ .................................+++ e is 65537 (0x10001) #生成自签署证书; [root@node3 CA]# openssl req -new -x509 -key private/cakey.pem -out cacert.pem -days 3650 You are about to be asked to enter information that will be incorporated into your certificate request. What you are about to enter is what is called a Distinguished Name or a DN. There are quite a few fields but you can leave some blank For some fields there will be a default value, If you enter '.', the field will be left blank. ----- Country Name (2 letter code) [XX]:CN State or Province Name (full name) []:HA Locality Name (eg, city) [Default City]:ZZ Organization Name (eg, company) [Default Company Ltd]:magedu Organizational Unit Name (eg, section) []:ops Common Name (eg, your name or your server's hostname) []:node3.stu31.com Email Address []:admin@stu31.com 创建索引库文件和序列号文件: [root@node3 CA]# touch index.txt; echo 01 > serial; [root@node3 CA]# ls cacert.pem certs crl index.txt newcerts private serial |
| 1 2 3 4 5 6 7 8 9 10 11 12 13 14 15 16 17 18 19 20 21 22 23 24 25 26 27 28 29 30 31 32 33 34 35 36 37 38 39 40 41 42 43 44 45 46 47 48 49 50 51 52 53 54 55 56 57 58 59 60 | #为数据库服务器创建ssl证书存放路径 [root@node3 CA]# mkdir /usr/local/mysql/ssl [root@node3 CA]# cd /usr/local/mysql/ssl #创建私钥文件; [root@node3 ssl]# (umask 077;openssl genrsa -out master.key 2048) Generating RSA private key, 2048 bit long modulus ..........................+++ ..................................................................................................+++ e is 65537 (0x10001) #生成证书申请; [root@node3 ssl]# openssl req -new -key master.key -out master.csr -days 3650 You are about to be asked to enter information that will be incorporated into your certificate request. What you are about to enter is what is called a Distinguished Name or a DN. There are quite a few fields but you can leave some blank For some fields there will be a default value, If you enter '.', the field will be left blank. ----- Country Name (2 letter code) [XX]:CN State or Province Name (full name) []:HA Locality Name (eg, city) [Default City]:ZZ Organization Name (eg, company) [Default Company Ltd]:magedu Organizational Unit Name (eg, section) []:ops Common Name (eg, your name or your server's hostname) []:node3.stu31.com Email Address []:admin@stu31.com Please enter the following 'extra' attributes to be sent with your certificate request A challenge password []: An optional company name []: #CA服务器签署证书请求; [root@node3 ssl]# openssl ca -in master.csr -out master.crt -days 3650 Using configuration from /etc/pki/tls/openssl.cnf Check that the request matches the signature Signature ok Certificate Details: Serial Number: 1 (0x1) Validity Not Before: Jan 24 08:16:01 2015 GMT Not After : Jan 21 08:16:01 2025 GMT Subject: countryName = CN stateOrProvinceName = HA organizationName = magedu organizationalUnitName = ops commonName = node3.stu31.com emailAddress = admin@stu31.com X509v3 extensions: X509v3 Basic Constraints: CA:FALSE Netscape Comment: OpenSSL Generated Certificate X509v3 Subject Key Identifier: 7A:F9:82:44:C2:D2:2B:EE:48:BF:4E:02:31:7D:50:8C:C5:A1:CB:36 X509v3 Authority Key Identifier: keyid:A6:00:73:4C:AC:37:A2:C2:A8:A6:CD:D0:8C:D3:8F:37:46:8E:6A:E6 Certificate is to be certified until Jan 21 08:16:01 2025 GMT (3650 days) Sign the certificate? [y/n]:y 1 out of 1 certificate requests certified, commit? [y/n]y Write out database with 1 new entries Data Base Updated |
| 1 2 3 4 5 6 7 8 9 10 11 12 13 14 15 16 17 18 19 20 21 22 23 24 25 26 27 28 29 | #为slave节点node4的数据库服务器创建证书存放路径; [root@node4 ~]# mkdir /usr/local/mysql/ssl [root@node4 ~]# cd /usr/local/mysql/ssl #生成私钥; [root@node4 ssl]# (umask 077;openssl genrsa -out slave.key 2048) Generating RSA private key, 2048 bit long modulus .................................................................+++ .....+++ e is 65537 (0x10001) #生成证书申请文件; [root@node4 ssl]# openssl req -new -key slave.key -out slave.csr -days 3650 You are about to be asked to enter information that will be incorporated into your certificate request. What you are about to enter is what is called a Distinguished Name or a DN. There are quite a few fields but you can leave some blank For some fields there will be a default value, If you enter '.', the field will be left blank. ----- Country Name (2 letter code) [XX]:CN State or Province Name (full name) []:HA Locality Name (eg, city) [Default City]:ZZ Organization Name (eg, company) [Default Company Ltd]:magedu Organizational Unit Name (eg, section) []:ops Common Name (eg, your name or your server's hostname) []:node4.stu31.com Email Address []:root@stu31.com Please enter the following 'extra' attributes to be sent with your certificate request A challenge password []: An optional company name []: |
| 1 2 3 4 5 6 7 8 9 10 11 12 13 14 15 16 17 18 19 20 21 22 23 24 25 26 27 28 29 30 31 32 33 34 35 | #需要将slave节点的证书申请复制到CA服务器, [root@node4 ssl]# scp slave.csr node3:/tmp root@node3's password: slave.csr 100% 1037 1.0KB/s 00:00 #让CA服务器签署证书; [root@node3 ssl]# openssl ca -in /tmp/slave.csr -out /tmp/slave.crt -days 3650 Using configuration from /etc/pki/tls/openssl.cnf Check that the request matches the signature Signature ok Certificate Details: Serial Number: 2 (0x2) Validity Not Before: Jan 24 08:22:04 2015 GMT Not After : Jan 21 08:22:04 2025 GMT Subject: countryName = CN stateOrProvinceName = HA organizationName = magedu organizationalUnitName = ops commonName = node4.stu31.com emailAddress = root@stu31.com X509v3 extensions: X509v3 Basic Constraints: CA:FALSE Netscape Comment: OpenSSL Generated Certificate X509v3 Subject Key Identifier: 11:99:B6:ED:1D:E3:87:BA:28:CA:87:0C:73:28:4C:60:D8:3E:BD:CA X509v3 Authority Key Identifier: keyid:A6:00:73:4C:AC:37:A2:C2:A8:A6:CD:D0:8C:D3:8F:37:46:8E:6A:E6 Certificate is to be certified until Jan 21 08:22:04 2025 GMT (3650 days) Sign the certificate? [y/n]:y 1 out of 1 certificate requests certified, commit? [y/n]y Write out database with 1 new entries Data Base Updated |
| 1 2 3 4 5 | [root@node4 ssl]# scp node3:/tmp/slave.crt ./ root@node3's password: slave.crt 100% 4568 4.5KB/s 00:00 [root@node4 ssl]# ls slave.crt slave.csr slave.key |
| 1 2 | [root@node3 ssl]# scp /etc/pki/CA/cacert.pem node4:/usr/local/mysql/ssl/ [root@node3 ssl]# cp /etc/pki/CA/cacert.pem /usr/local/mysql/ssl/ |
| 1 2 3 4 5 6 7 8 9 10 11 12 13 14 15 16 | 主节点的权限授予: [root@node3 ssl]# chown -R mysql.mysql /usr/local/mysql/ssl/ [root@node3 ssl]# ls /usr/local/mysql/ssl/ -l total 20 -rw-r--r-- 1 mysql mysql 1391 Jan 24 16:25 cacert.pem -rw-r--r-- 1 mysql mysql 4573 Jan 24 16:16 master.crt -rw-r--r-- 1 mysql mysql 1037 Jan 24 16:14 master.csr -rw------- 1 mysql mysql 1675 Jan 24 16:11 master.key #从节点的权限授予: [root@node4 ssl]# chown -R mysql.mysql /usr/local/mysql/ssl/ [root@node4 ssl]# ls -l /usr/local/mysql/ssl/ total 20 -rw-r--r-- 1 mysql mysql 1391 Jan 24 16:25 cacert.pem -rw-r--r-- 1 mysql mysql 4568 Jan 24 16:23 slave.crt -rw-r--r-- 1 mysql mysql 1037 Jan 24 16:18 slave.csr -rw------- 1 mysql mysql 1679 Jan 24 16:17 slave.key |
修改Master服务器配置文件:
| 1 2 3 4 5 6 7 8 | [root@node3 ~]# vim /etc/my.cnf #添加如下选项 [mysqld] #在此段中添加如下配置 ssl #开启SSL功能 ssl_ca = /usr/local/mysql/ssl/cacert.pem #指定CA文件位置 ssl_cert = /usr/local/mysql/ssl/master.crt #指定证书文件位置 ssl_key = /usr/local/mysql/ssl/master.key #指定密钥所在位置 重启mysqld服务: [root@node3 ~]# service mysqld restart |
| 1 2 3 4 5 6 7 8 | [root@node4 ~]# vim /etc/my.cnf [mysqld] ssl ssl_ca = /usr/local/mysql/ssl/cacert.pem ssl_cert = /usr/local/mysql/ssl/slave.crt ssl_key = /usr/local/mysql/ssl/slave.key 重启mysqld服务: [root@node4 ~]# service mysqld restart |
| 1 2 3 4 5 6 7 8 9 10 11 12 13 14 15 16 17 18 19 20 21 22 23 24 25 26 27 28 29 30 31 32 33 34 35 36 37 38 | [root@node3 ~]# mysql -uroot -p Enter password: Welcome to the MariaDB monitor. Commands end with ; or \g. Your MariaDB connection id is 7 Server version: 10.0.12-MariaDB-log Source distribution Copyright (c) 2000, 2014, Oracle, SkySQL Ab and others. Type 'help;' or '\h' for help. Type '\c' to clear the current input statement. #SSL加密是开启的; MariaDB [(none)]> show variables like '%ssl%'; +---------------+---------------------------------+ | Variable_name | Value | +---------------+---------------------------------+ | have_openssl | YES | | have_ssl | YES | | ssl_ca | /usr/local/mysql/ssl/cacert.pem | | ssl_capath | | | ssl_cert | /usr/local/mysql/ssl/master.crt | | ssl_cipher | | | ssl_crl | | | ssl_crlpath | | | ssl_key | /usr/local/mysql/ssl/master.key | +---------------+---------------------------------+ 9 rows in set (0.00 sec) #创建授权一个基于密钥认证的用户 MariaDB [(none)]> grant replication client,replication slave on *.* to 'slaveuser'@'172.16.%.%' identified by 'oracle' require ssl; Query OK, 0 rows affected (0.01 sec) MariaDB [(none)]> flush privileges; Query OK, 0 rows affected (0.00 sec) #查看Master服务器二进制日志文件和事件位置用于Slave服务器连接从这个位置开始复制; MariaDB [(none)]> show master status; +------------------+----------+--------------+------------------+ | File | Position | Binlog_Do_DB | Binlog_Ignore_DB | +------------------+----------+--------------+------------------+ | mysql-bin.000008 | 656 | | | +------------------+----------+--------------+------------------+ 1 row in set (0.00 sec) MariaDB [(none)]> \q Bye |
| 1 2 3 4 5 6 7 8 9 10 11 12 13 14 15 16 | [root@node4 ~]# mysql -uslaveuser -poracle -h 172.16.31.20 --ssl-ca=/usr/local/mysql/ssl/cacert.pem --ssl-cert=/usr/local/mysql/ssl/slave.crt --ssl-key=/usr/local/mysql/ssl/slave.key Welcome to the MariaDB monitor. Commands end with ; or \g. Your MariaDB connection id is 8 Server version: 10.0.12-MariaDB-log Source distribution Copyright (c) 2000, 2014, Oracle, SkySQL Ab and others. Type 'help;' or '\h' for help. Type '\c' to clear the current input statement. #可以看出时间节点和上面显示的一致; MariaDB [(none)]> show master status; +------------------+----------+--------------+------------------+ | File | Position | Binlog_Do_DB | Binlog_Ignore_DB | +------------------+----------+--------------+------------------+ | mysql-bin.000008 | 656 | | | +------------------+----------+--------------+------------------+ 1 row in set (0.00 sec) MariaDB [(none)]> \q Bye |
| 1 2 3 4 5 6 7 8 9 10 11 12 13 14 15 16 17 18 19 20 21 22 23 24 25 26 27 28 29 30 31 32 33 34 35 36 37 38 39 40 41 42 43 44 45 46 47 48 49 50 51 52 53 54 55 56 57 58 59 60 61 62 63 64 65 66 67 68 69 70 71 72 73 74 75 76 77 78 79 80 | [root@node4 ~]# mysql -u root -p Enter password: Welcome to the MariaDB monitor. Commands end with ; or \g. Your MariaDB connection id is 6 Server version: 10.0.12-MariaDB-log Source distribution Copyright (c) 2000, 2014, Oracle, SkySQL Ab and others. Type 'help;' or '\h' for help. Type '\c' to clear the current input statement. #可以看出slavefuwq节点开启了SSL MariaDB [(none)]> show variables like '%ssl%'; +---------------+---------------------------------+ | Variable_name | Value | +---------------+---------------------------------+ | have_openssl | YES | | have_ssl | YES | | ssl_ca | /usr/local/mysql/ssl/cacert.pem | | ssl_capath | | | ssl_cert | /usr/local/mysql/ssl/slave.crt | | ssl_cipher | | | ssl_crl | | | ssl_crlpath | | | ssl_key | /usr/local/mysql/ssl/slave.key | +---------------+---------------------------------+ 9 rows in set (0.01 sec) #由于半同步复制时开启的slave,我们需要先关闭; MariaDB [(none)]> stop slave; Query OK, 0 rows affected (0.03 sec) #设置连接master节点; MariaDB [(none)]> change master to master_host='172.16.31.20',master_user='slaveuser',master_password='oracle',master_log_file='mysql-bin.000008',master_log_pos=656,master_ssl=1,master_ssl_ca='/usr/local/mysql/ssl/cacert.pem',master_ssl_cert='/usr/local/mysql/ssl/slave.crt',master_ssl_key='/usr/local/mysql/ssl/slave.key'; Query OK, 0 rows affected (0.09 sec) #启动slave节点的IO线程和SQL线程; MariaDB [(none)]> start slave; Query OK, 0 rows affected (0.01 sec) #查看Slave服务器状态 MariaDB [(none)]> show slave status\G *************************** 1. row *************************** Slave_IO_State: Waiting for master to send event Master_Host: 172.16.31.20 Master_User: slaveuser Master_Port: 3306 Connect_Retry: 5 Master_Log_File: mysql-bin.000008 Read_Master_Log_Pos: 656 Relay_Log_File: relay-bin.000002 Relay_Log_Pos: 535 Relay_Master_Log_File: mysql-bin.000008 Slave_IO_Running: Yes Slave_SQL_Running: Yes Replicate_Do_DB: Replicate_Ignore_DB: Replicate_Do_Table: Replicate_Ignore_Table: Replicate_Wild_Do_Table: Replicate_Wild_Ignore_Table: Last_Errno: 0 Last_Error: Skip_Counter: 0 Exec_Master_Log_Pos: 656 Relay_Log_Space: 826 Until_Condition: None Until_Log_File: Until_Log_Pos: 0 Master_SSL_Allowed: Yes Master_SSL_CA_File: /usr/local/mysql/ssl/cacert.pem Master_SSL_CA_Path: Master_SSL_Cert: /usr/local/mysql/ssl/slave.crt Master_SSL_Cipher: Master_SSL_Key: /usr/local/mysql/ssl/slave.key Seconds_Behind_Master: 0 Master_SSL_Verify_Server_Cert: No Last_IO_Errno: 0 Last_IO_Error: Last_SQL_Errno: 0 Last_SQL_Error: Replicate_Ignore_Server_Ids: Master_Server_Id: 1 Master_SSL_Crl: /usr/local/mysql/ssl/cacert.pem Master_SSL_Crlpath: Using_Gtid: No Gtid_IO_Pos: 1 row in set (0.00 sec) |
9.基于SSL安全传输的测试;
| 1 2 3 4 5 6 7 8 9 10 11 12 13 14 15 16 | 我们将删除的hellodb数据库重新导入仅Master服务器节点; [root@node3 ~]# mysql -uroot -p < hellodb.sql Enter password: [root@node3 ~]# mysql -uroot -p -e 'show databases'; Enter password: +--------------------+ | Database | +--------------------+ | binlog | | hellodb | | information_schema | | mysql | | performance_schema | | relaylog | | test | +--------------------+ |
| 1 2 3 4 5 6 7 8 9 10 11 12 13 | [root@node4 ~]# mysql -u root -p -e 'show databases'; Enter password: +--------------------+ | Database | +--------------------+ | binlog | | hellodb | | information_schema | | mysql | | performance_schema | | relaylog | | test | +--------------------+ |
七.复制相关的文件介绍
我们到slave节点查看数据文件:
| 1 2 3 4 5 6 7 8 | [root@node4 ~]# ls /mydata/data/ aria_log.00000001 master.info mysql-bin.000005 performance_schema aria_log_control multi-master.info mysql-bin.000006 relay-bin.000001 binlog mysql mysql-bin.000007 relay-bin.000002 hellodb mysql-bin.000001 mysql-bin.000008 relay-bin.index ibdata1 mysql-bin.000002 mysql-bin.index relaylog ib_logfile0 mysql-bin.000003 node4.stu31.com.err relay-log.info ib_logfile1 mysql-bin.000004 node4.stu31.com.pid test |
(1)mysql-bin.index
服务器一旦开启二进制日志,会产生一个与二日志文件同名,但是以.index结尾的文件。它用于跟踪磁盘上存在哪些二进制日志文件。MySQL用它来定位二进制日志文件。它的内容如下:
| 1 2 3 4 5 6 7 8 9 | [root@node4 ~]# cat /mydata/data/mysql-bin.index ./mysql-bin.000001 ./mysql-bin.000002 ./mysql-bin.000003 ./mysql-bin.000004 ./mysql-bin.000005 ./mysql-bin.000006 ./mysql-bin.000007 ./mysql-bin.000008 |
该文件的功能与mysql-bin.index类似,但是它是针对中继日志,而不是二进制日志。内容如下:
| 1 2 3 | [root@node4 ~]# cat /mydata/data/relay-bin.index ./relay-bin.000001 ./relay-bin.000002 |
保存master的相关信息。不要删除它,否则,slave重启后不能连接master。内容如图:
(4)relay-log.info
包含slave中当前二进制日志和中继日志的信息。
| 1 2 3 4 5 | [root@node4 ~]# cat /mydata/data/relay-log.info ./relay-bin.000002 8849 mysql-bin.000008 8970 |

相关文章推荐
- MariaDB数据库主从复制、双主复制、半同步复制、基于SSL的安全复制实现及其功能特性介绍 推荐
- MariaDB数据库主从复制、双主复制、半同步复制、基于SSL的安全复制实现及其功能特性介绍(三)
- MariaDB数据库主从复制、双主复制、半同步复制、基于SSL的安全复制实现及其功能特性介绍(一)
- mariadb-10实现半同步复制及SSL安全复制
- 基于MySQL实现数据库的半同步主从复制
- 红帽6.4 64位上实现mysql5.6的主从复制、基于GTID复制、半同步、ssl加密复制以及读写分离 推荐
- mariadb-10实现半同步复制及SSL安全复制
- mysql/mariadb 主从复制实现数据库同步
- Mariadb 主从复制、双主复制、半同步复制、基于SSL复制
- MySQL(二):主从复制结构、半同步复制、双主复制结构、利用SSL实现安全的MySQL主从复制
- 基于SSL实现MySQL的加密主从复制
- mysql主从复制实现SSL加密和半同步复制
- 基于SSL的mysql(MariaDB)主从复制
- 基于SSL的mysql(MariaDB)主从复制
- MySQL主从复制原理、主从复制(异步)、半同步复制、基于SSL复制
- MySQL互为主从模型实现基于SSL复制
- ↑mysql主从复制实现SSL加密和半同步复制↑
- 在Linux环境下单机上实现MySQL5主从数据库同步复制
- MySQL主从复制、基于SSL的主从复制、主主复制、半同步复制
- mysql的主从构架,复制,半同步,SSL加密复制的实现