Visual C# 的DirectX开发系列二了解摄像机
2015-01-22 12:14
288 查看
这里借助部分网上的文字和图片说明,让大家更清楚的了解DirectX中的摄像机。(部分内容源于肖泽云老师书中内容,最终目的是让大家更清楚了解C#中的DirectX开发)
在使用摄像机前先来了解三个概念:世界空间(world space)、摄像机空间(cameraspace)和模型空间(model space)。世界空间(world space)可以认为是客观世界空间,所有对象都位于这个世界空间中。摄像机空间(camera space)用于展示显示区域,类似于人的眼睛。模型空间(model space)为模型自身的空间坐标系,如导入某个模型之前在建模时就具有的空间。
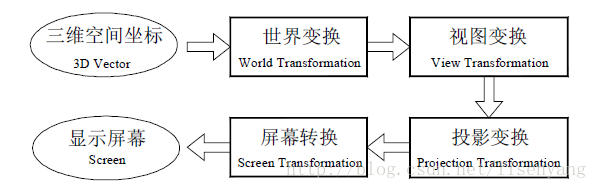
下面再介绍三个概念:View Transformation、World Transformation 和ProjectionTransformation。View Transformation(视图变换)是表示观察者位于世界空间,也称摄像机变换,把顶点转换成摄像机空间中的点。World Transformation(世界变换)是用于从模型空间转换坐标到世界坐标。Projection Transformation(投影变换)可以认为是用来控制摄像机的,有点类似于设置摄像机镜头,这也是这三种变换形式中最复杂的。其中定义视图变换和投影变换是模拟摄像机必须的,若不指定世界矩阵,默认情况下它为一个四阶单位矩阵。三维空间中的坐标,经过世界变换、视图变换(摄像机变换)、投影变换和屏幕转换,才得到二维屏幕上的坐标,其过程如下图所示:
首先我们定义视图变换:可以使用Matrix.LookAtLH 或Matrix.LookAtRH 来创建一个视图矩阵,用于表示摄像机位置和摄像机目标位置,其中Matrix.LookAtLH 用于创建左手法则的视图矩阵,Matrix.LookAtRH 用于创建右手法则的视图矩阵。创建视图矩阵代码如下:
Vector3 eye = new Vector3(0, 0, -30);
Vector3 at = new Vector3(0, 0, 0);
Vector3 up = new Vector3(0, 1, 0);
Matrix viewMatrix = Matrix.LookAtLH(eye, at, up);其中向量eye 表示摄像机位置,向量at 表示摄像机目标位置,向量up 表示向上的方向,该向量一般都为(0,1,0)。
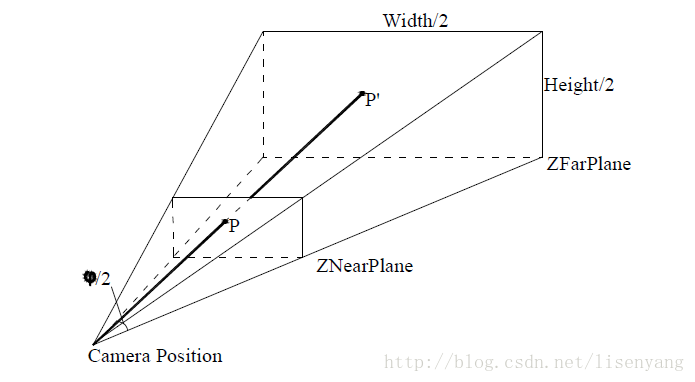
其次定义投影变换:可以使用Matrix.PerspectiveFovLH 或Matrix.PerspectiveFovRH 创建一个基于视场(FOV)的投影变换,其中PerspectiveFovLH 用于创建左手法则的投影矩阵,PerspectiveFovRH 用于创建右手法则的投影矩阵。下面以PerspectiveFovRH 为例来说明,PerspectiveFovRH()函数的定义如下:
public static Matrix PerspectiveFovLH
(
float fieldOfViewY,
float aspectRatio,
float znearPlane,
float zfarPlane
);
其中参数fieldOfViewY表示视场在Y 方向的弧度,参数aspectRatio 表示平面纵横比,
参数znearPlane,表示近平面的距离,参数zfarPlane表示远平面的距离。如下图所示:
建立投影矩阵代码如下:
Matrix projection = Matrix.PerspectiveFovLH((float)Math.PI / 4,
this.Width/this.Height, 1.0f, 50.0f);
之后是设置绘图设备投影及视图矩阵、绘制三角形等。全部代码如下:
using System;
using System.ComponentModel;
using System.Data;
using System.Drawing;
using System.Windows.Forms;
using Microsoft.DirectX;
using Microsoft.DirectX.Direct3D;
namespace 摄像机
{
public partial class Camera : Form
{
Device device = null;//定义绘图设备
public Camera()
{
this.ClientSize = new Size(800, 800);//指定窗体尺寸
this.Text = "摄像机";//指定窗体标题
}
public bool InitializeDirect3D()
{
try
{
PresentParameters presentParams = new PresentParameters();
presentParams.Windowed = true; //指定以Windows窗体形式显示
presentParams.SwapEffect = SwapEffect.Discard; //当前屏幕绘制后它将自动从内存中删除
device = new Device(0, DeviceType.Hardware, this, CreateFlags.SoftwareVertexProcessing, presentParams); //实例化device对象
return true;
}
catch (DirectXException e)
{
MessageBox.Show(e.ToString(), "Error"); //处理异常
return false;
}
}
public void Render()
{
if (device == null) //如果device为空则不渲染
{
return;
}
Vector3 eye = new Vector3(30, 0, -30);
Vector3 at = new Vector3(0, 0, 0);
Vector3 up = new Vector3(0, 1, 0);
Matrix viewMatrix = Matrix.LookAtLH(eye, at, up);
Matrix projection = Matrix.PerspectiveFovLH((float)Math.PI / 4, this.Width/this.Height, 1.0f, 50.0f);
device.Transform.Projection = projection;
device.Transform.View = viewMatrix;
device.RenderState.FillMode = FillMode.WireFrame;
device.RenderState.Lighting = false;
device.Clear(ClearFlags.Target, Color.Black, 1.0f, 0); //清除windows界面为黑色
device.BeginScene();
//在此添加渲染图形代码
CustomVertex.PositionColored[] vertices = new CustomVertex.PositionColored[3];//定义顶点
vertices[0].Position = new Vector3(0f, 0f, 0f);
vertices[0].Color = Color.Red.ToArgb();
vertices[1].Position = new Vector3(5f, 10f, 0f);
vertices[1].Color = Color.Green.ToArgb();
vertices[2].Position = new Vector3(10f, 0f, 0f);
vertices[2].Color = Color.Yellow.ToArgb();
device.VertexFormat = CustomVertex.PositionColored.Format;
device.DrawUserPrimitives(PrimitiveType.TriangleList, 1, vertices);
device.EndScene();
device.Present();
}
static void Main()
{
Camera Camera = new Camera(); //创建窗体对象
if (Camera.InitializeDirect3D() == false) //检查Direct3D是否启动
{
MessageBox.Show("无法启动Direct3D!", "错误!");
return;
}
Camera.Show(); //如果一切都初始化成功,则显示窗体
while (Camera.Created) //设置一个循环用于实时更新渲染状态
{
Camera.Render(); //保持device渲染,直到程序结束
Application.DoEvents(); //处理键盘鼠标等输入事件
}
}
}
}
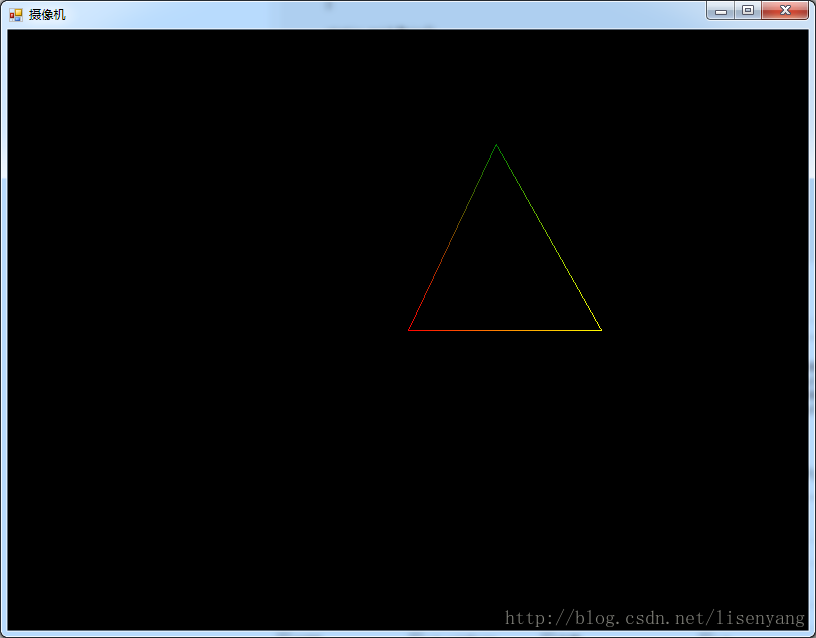
最终效果如图:
本文源码下载地址:http://download.csdn.net/detail/yangyisen0713/8385885
在使用摄像机前先来了解三个概念:世界空间(world space)、摄像机空间(cameraspace)和模型空间(model space)。世界空间(world space)可以认为是客观世界空间,所有对象都位于这个世界空间中。摄像机空间(camera space)用于展示显示区域,类似于人的眼睛。模型空间(model space)为模型自身的空间坐标系,如导入某个模型之前在建模时就具有的空间。
下面再介绍三个概念:View Transformation、World Transformation 和ProjectionTransformation。View Transformation(视图变换)是表示观察者位于世界空间,也称摄像机变换,把顶点转换成摄像机空间中的点。World Transformation(世界变换)是用于从模型空间转换坐标到世界坐标。Projection Transformation(投影变换)可以认为是用来控制摄像机的,有点类似于设置摄像机镜头,这也是这三种变换形式中最复杂的。其中定义视图变换和投影变换是模拟摄像机必须的,若不指定世界矩阵,默认情况下它为一个四阶单位矩阵。三维空间中的坐标,经过世界变换、视图变换(摄像机变换)、投影变换和屏幕转换,才得到二维屏幕上的坐标,其过程如下图所示:
首先我们定义视图变换:可以使用Matrix.LookAtLH 或Matrix.LookAtRH 来创建一个视图矩阵,用于表示摄像机位置和摄像机目标位置,其中Matrix.LookAtLH 用于创建左手法则的视图矩阵,Matrix.LookAtRH 用于创建右手法则的视图矩阵。创建视图矩阵代码如下:
Vector3 eye = new Vector3(0, 0, -30);
Vector3 at = new Vector3(0, 0, 0);
Vector3 up = new Vector3(0, 1, 0);
Matrix viewMatrix = Matrix.LookAtLH(eye, at, up);其中向量eye 表示摄像机位置,向量at 表示摄像机目标位置,向量up 表示向上的方向,该向量一般都为(0,1,0)。
其次定义投影变换:可以使用Matrix.PerspectiveFovLH 或Matrix.PerspectiveFovRH 创建一个基于视场(FOV)的投影变换,其中PerspectiveFovLH 用于创建左手法则的投影矩阵,PerspectiveFovRH 用于创建右手法则的投影矩阵。下面以PerspectiveFovRH 为例来说明,PerspectiveFovRH()函数的定义如下:
public static Matrix PerspectiveFovLH
(
float fieldOfViewY,
float aspectRatio,
float znearPlane,
float zfarPlane
);
其中参数fieldOfViewY表示视场在Y 方向的弧度,参数aspectRatio 表示平面纵横比,
参数znearPlane,表示近平面的距离,参数zfarPlane表示远平面的距离。如下图所示:
建立投影矩阵代码如下:
Matrix projection = Matrix.PerspectiveFovLH((float)Math.PI / 4,
this.Width/this.Height, 1.0f, 50.0f);
之后是设置绘图设备投影及视图矩阵、绘制三角形等。全部代码如下:
using System;
using System.ComponentModel;
using System.Data;
using System.Drawing;
using System.Windows.Forms;
using Microsoft.DirectX;
using Microsoft.DirectX.Direct3D;
namespace 摄像机
{
public partial class Camera : Form
{
Device device = null;//定义绘图设备
public Camera()
{
this.ClientSize = new Size(800, 800);//指定窗体尺寸
this.Text = "摄像机";//指定窗体标题
}
public bool InitializeDirect3D()
{
try
{
PresentParameters presentParams = new PresentParameters();
presentParams.Windowed = true; //指定以Windows窗体形式显示
presentParams.SwapEffect = SwapEffect.Discard; //当前屏幕绘制后它将自动从内存中删除
device = new Device(0, DeviceType.Hardware, this, CreateFlags.SoftwareVertexProcessing, presentParams); //实例化device对象
return true;
}
catch (DirectXException e)
{
MessageBox.Show(e.ToString(), "Error"); //处理异常
return false;
}
}
public void Render()
{
if (device == null) //如果device为空则不渲染
{
return;
}
Vector3 eye = new Vector3(30, 0, -30);
Vector3 at = new Vector3(0, 0, 0);
Vector3 up = new Vector3(0, 1, 0);
Matrix viewMatrix = Matrix.LookAtLH(eye, at, up);
Matrix projection = Matrix.PerspectiveFovLH((float)Math.PI / 4, this.Width/this.Height, 1.0f, 50.0f);
device.Transform.Projection = projection;
device.Transform.View = viewMatrix;
device.RenderState.FillMode = FillMode.WireFrame;
device.RenderState.Lighting = false;
device.Clear(ClearFlags.Target, Color.Black, 1.0f, 0); //清除windows界面为黑色
device.BeginScene();
//在此添加渲染图形代码
CustomVertex.PositionColored[] vertices = new CustomVertex.PositionColored[3];//定义顶点
vertices[0].Position = new Vector3(0f, 0f, 0f);
vertices[0].Color = Color.Red.ToArgb();
vertices[1].Position = new Vector3(5f, 10f, 0f);
vertices[1].Color = Color.Green.ToArgb();
vertices[2].Position = new Vector3(10f, 0f, 0f);
vertices[2].Color = Color.Yellow.ToArgb();
device.VertexFormat = CustomVertex.PositionColored.Format;
device.DrawUserPrimitives(PrimitiveType.TriangleList, 1, vertices);
device.EndScene();
device.Present();
}
static void Main()
{
Camera Camera = new Camera(); //创建窗体对象
if (Camera.InitializeDirect3D() == false) //检查Direct3D是否启动
{
MessageBox.Show("无法启动Direct3D!", "错误!");
return;
}
Camera.Show(); //如果一切都初始化成功,则显示窗体
while (Camera.Created) //设置一个循环用于实时更新渲染状态
{
Camera.Render(); //保持device渲染,直到程序结束
Application.DoEvents(); //处理键盘鼠标等输入事件
}
}
}
}
最终效果如图:
本文源码下载地址:http://download.csdn.net/detail/yangyisen0713/8385885

相关文章推荐
- Visual C# 的DirectX开发系列一初识DirectX
- Visual C# 的DirectX开发系列1初识DirectX
- 基于Visual C#的DirectX开发实例——第一个DirectX程序
- 基于Visual C#的DirectX开发实例——视图矩阵
- 【Visual C++】游戏开发笔记四十七 浅墨DirectX教程十五 翱翔于三维世界:摄像机的实现
- 30天了解30种技术系列---(4)Node.js神级开发工具-WebStorm
- 图解VC#版DirectX开发教程二 - 摄像机
- 【Windows Mobile开发系列 之 开始一】了解智能项目和一般PC项目的区别
- 07.GitHub实战系列~7.Git之VS2013团队开发(如果不想了解git命令直接学这篇即可)
- Windows 8 Directx 开发学习笔记(三)摄像机设置及控制正方体旋转
- Google Map开发系列(二)——使用谷歌地图API应该有所了解的一些技术外背景
- 建行E商贸通支付开发系列之一(了解E商贸通)
- 基于Visual C#的DirectX开发实例——绘制一个三角形
- 淘宝API开发系列-淘宝API相关了解
- 基于Visual C#的DirectX开发实例——透视投影矩阵
- AutoCAD 二次开发学习系列【1】- 初步了解开发环境
- 《基于Visual C# 的DirectX开发实例》目录
- Google Map开发系列(二)——使用谷歌地图API应该有所了解的一些技术外背景
- 基于Visual C#的DirectX开发实例教程
- 【Visual C++】游戏开发笔记四十七 浅墨DirectX教程十五 翱翔于三维世界:摄像机的实现