debian 系统python+uwsgi+nginx实现web环境
2015-01-20 16:59
337 查看
1,python web部署的实现:
python+uwsgi+nginx实现web。
本文测试环境:
服务器:树莓派B+
操作系统:
python2.7.3
django-1.7.2
rpyc-3.3.0
uwsgi-2.0.9
nginx-1.6.2
mysql-5.5.40
都是目前稳定版本最新版本。
2,创建相应目录:
3,安装必须的软件包
----------------------- 安装nginx --------------------------
下载软件包:
python+uwsgi+nginx实现web。
本文测试环境:
服务器:树莓派B+
操作系统:
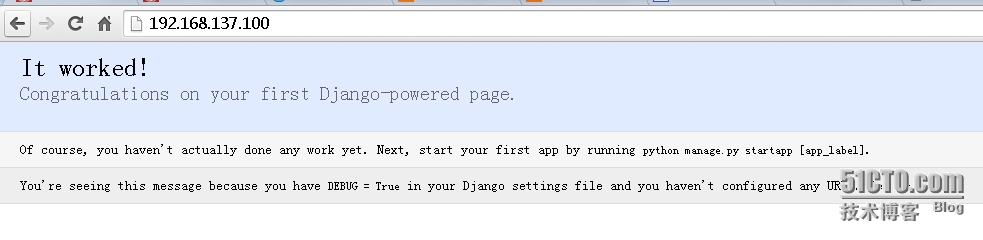
root@node100:~# cat /etc/issue
Raspbian GNU/Linux 7 \n \l
IP:
root@node100:~# ip ad s
1: lo: <LOOPBACK,UP,LOWER_UP> mtu 65536 qdisc noqueue state UNKNOWN
link/loopback 00:00:00:00:00:00 brd 00:00:00:00:00:00
inet 127.0.0.1/8 scope host lo
valid_lft forever preferred_lft forever
2: eth0: <BROADCAST,MULTICAST,UP,LOWER_UP> mtu 1500 qdisc pfifo_fast state UP qlen 1000
link/ether b8:27:eb:ed:b8:e5 brd ff:ff:ff:ff:ff:ff
inet 192.168.137.100/24 brd 192.168.137.255 scope global eth0
valid_lft forever preferred_lft forever
软件需求:
python2.7.3
django-1.7.2
rpyc-3.3.0
uwsgi-2.0.9
nginx-1.6.2
mysql-5.5.40
都是目前稳定版本最新版本。
2,创建相应目录:
root@node100:~# mkdir /data
root@node100:~# mkdir /data/logs    #所有日志存放位置
root@node100:~# mkdir /data/www    #页面代码
root@node100:~# mkdir /data/server    #软件安装位置,后面nginx貌似装到/data下面了,这个目录就没用了。
root@node100:~# mkdir /soft    #下载软包位置
3,安装必须的软件包
# apt-get update#更新下系统
安装相应的库文件,有些系统以及安装了就不用重新安装了:
# apt-get install libpcre3-dev libssl-dev libpcre3 libssl build-essential zlib1g zlib1g-dev

build-essential    #可以解决包间的依赖关系等,很重要,raspbian默认安装。
----------------------- 安装nginx --------------------------
下载软件包:
# cd /soft/ # wget http://nginx.org/download/nginx-1.6.2.tar.gz[/code]创建nginx运行用户和组:# groupadd -g 5000 www # useradd -u 5000 -g 5000 www # tar -zxf nginx-1.6.2.tar.gz # cd nginx-1.6.2/ # ./configure --prefix=/data/nginx --user=www --group=www --with-http_stub_status_module ## --with-http_stub_status_module #启用Nginx状态监控模块,默认不开启。 # make # make install
----------------------- 安装mysql --------------------------# aptitude search mysql|grep ^i#查看系统中是否有mysql相应包,有则删除 # apt-get remove mysqlxxx#删除系统自带mysql相关包 # apt-get install mysql-server mysql-client python-mysqldb(python链接mysql支持包)#默认会安装许多依赖包,并且会让你设置mysql root账号密码。默认安装完成自动启动,测试:# mysql -uroot -p Enter password: Welcome to the MySQL monitor. Commands end with ; or \g. Your MySQL connection id is 43 Server version: 5.5.40-0+wheezy1 (Debian) Copyright (c) 2000, 2014, Oracle and/or its affiliates. All rights reserved. Oracle is a registered trademark of Oracle Corporation and/or its affiliates. Other names may be trademarks of their respective owners. Type 'help;' or '\h' for help. Type '\c' to clear the current input statement. mysql> show databases; +--------------------+ | Database | +--------------------+ | information_schema | | mysql | | performance_schema | +--------------------+ 3 rows in set (0.00 sec)
测试python-mysqldb是否安装成功:root@node100:~# python Python 2.7.3 (default, Mar 18 2014, 05:13:23) [GCC 4.6.3] on linux2 Type "help", "copyright", "credits" or "license" for more information. >>> import MySQLdb >>>不报错则成功。
----------------------- 安装rpyc --------------------------
rpyc模块用于平台与主控端做数据通讯交互,获取最新版:https://pypi.python.org/packages/source/r/rpyc# cd /soft/ # wget https://pypi.python.org/packages/source/r/rpyc/rpyc-3.3.0.tar.gz # tar -zxf rpyc-3.3.0.tar.gz # cd rpyc-3.3.0/ # python setup.py install无报错则成功。
----------------------- 安装uwsgi --------------------------
#### tar包安装:
获取最新版:http://uwsgi-docs.readthedocs.org/en/latest/Download.html
可以在百度百科里面查到uwsgi的有关信息。# apt-get install python-dev #编译时需要python相关库文件 # cd /soft # wget http://projects.unbit.it/downloads/uwsgi-2.0.9.tar.gz # tar -zxf uwsgi-2.0.9.tar.gz # cd uwsgi-2.0.9/ # python uwsgiconfig.py --build #看服务器配置,等待时间可能比较长。 ### apt-get源安装 # apt-get install uwsgi#这种安装会解决包的依赖关系,不用担心安装遇到依赖包错误。看到下面代码,表示安装成功:[ ok ] Starting app server(s): uwsgi (omitted; missing conffile(s) in /etc/uwsgi/apps-enabled).----------------------- 安装Django --------------------------
参考:http://chongzi100.blog.51cto.com/340243/1600754
版本:Django-1.7.2
4,创建django工程:# cd /data/www/ # django-admin startproject web04 # tree web04 web04 ├── manage.py └── web04 ├── __init__.py ├── settings.py ├── urls.py ├── wsgi.py 1 directory, 5 filesdjango测试,可以看参考文章。
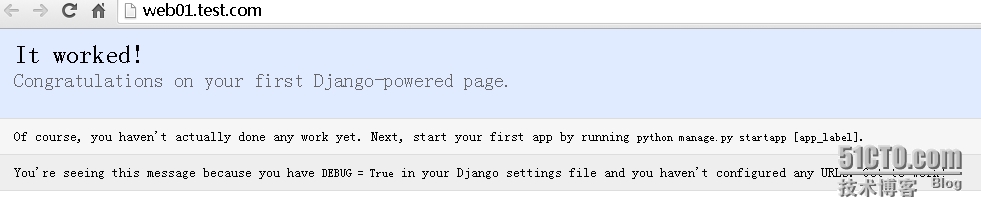
5,配置nginx:# pwd /data/nginx/conf # cat nginx.conf user www; worker_processes 1; pid /data/logs/nginx/nginx.pid; events { worker_connections 1024; } http { include mime.types; default_type application/octet-stream; sendfile on; keepalive_timeout 65; gzip on; server { listen 80; server_name web01.test.com; location / { uwsgi_pass 192.168.137.100:8000; uwsgi_param UWSGI_CHDIR /data/www/web04/web04; uwsgi_param UWSGI_SCRIPT wsgi; include uwsgi_params; access_log /data/logs/nginx_access.log; #打开日志功能方便排错。 } } }6,配置uwsgi,创建uwsgi配置文件/data/nginx/conf/uwsgi.ini# cat uwsgi.ini [uwsgi] socket = 192.168.137.100:8000 master = true pidfile = /data/logs/uwsgi.pid processes = 4 #指定进程数 workers = 1 #分配CPU核数 chdir = /data/www/web04/web04 #项目主目录 pythonpath = /data/www/web04 #项目上层目录 profiler = true memory-report = true enable-threads = true logdate = true limit-as = 512 #内存限制512k daemonize = /data/logs/django.log #开启日志,方便排错 gid = www uid = www vhost = false #如果是多站点,可改为true plugins = python #指定uwsgi将使用python
更多的参数说明,可参考官方说明。
http://uwsgi-docs.readthedocs.org/en/latest/Configuration.html
7,测试:启动uwsgi: uwsgi --ini /data/nginx/conf/uwsgi.ini 启动nginx: /data/nginx/sbin/nginx
8,遇到的错误:
"unavailable modifier requested"
该错误在网上搜了下,多数是uwsgi配置文件无法找到python导致的。
解决方法:
确认已经安装了uwsgi-plugin-python:# aptitude search uwsgi-plugin-python i uwsgi-plugin-python - Python WSGI plugin for uWSGI p uwsgi-plugin-python3 - Python 3 WSGI plugin for uWSGI两个参数都表示软件包的当前状态。
i #表示已安装
p #表示清除软件包
修改配置文件:# vim uwsgi.ini plugins = python #添加该行,指定uwsgi用的是python
9,结束语:
文中没有做python再去链接mysql的测试,在以后的文章中写入吧。如果有哪里错了,请留言给我。
本文出自 “daemonSA” 博客,请务必保留此出处http://daemonsa.blog.51cto.com/340243/1606216

相关文章推荐
- 搭建python的web环境 Centos5.4+Nginx-0.8.50+UWSGI-0.9.6.2+Django-1.2.3搭建高性能WEB服务器环境
- CentOS + Python3.6+ Django2.0 + uwsgi + nginx + mysql web发布环境搭建
- Linux系统上Nginx+Python的web.py与Django框架环境
- centos6 上用nginx 和 uwsgi 搭建 python web运行环境
- Debian环境 Python + Django + Nginx + uWSGI + MySQL 配置备忘
- CentOS + Python3.3 + Django1.7 + uwsgi + nginx + mysql web发布环境搭建
- mysql + Python3.5.2 + Django + Uwsgi + Nginx实现生产环境
- Debian环境 Python + Django + Nginx + uWSGI + MySQL 配置
- Linux系统上Nginx+Python的web.py与Django框架环境
- centos7简单搭建nginx+uwsgi+web.py的Python web环境(记录)
- Nginx+uwsgi+Django (Python web环境)
- nginx+uwsgi+python实现web图片缩放功能
- JAVA_WEB项目(结合Servlet+jsp+ckEditor编辑器+jquery easyui技术)实现新闻发布管理系统第一篇:前期环境准备
- debian下面nginx + uwsgi + Django1.5.1 配置环境
- nginx+apache实现动静态页面分离的web生产环境(二)
- 【Python开发web】(1) -- 系统环境与框架的选择
- Nginx+uWSGI+DJango+Python+ Mysql 搭建可靠的python web服务
- Nginx与python web服务配置(Uwsgi& FastCGI)
- (转载)利用Nginx替代apache实现高性能的Web环境
- nginx python spawn-fcgi Flup webpy搭建python的web环境