Struts2教程--第二章 Struts2的工作机制及分析
2014-12-25 19:59
423 查看
原作者博客:http://www.blogjava.net/lzhidj/archive/2008/07/10/213898.html
读者如果曾经学习过Struts1.x或者有过Struts1.x的开发经验,那么千万不要想当然地以为这一章可以跳过。实际上Struts1.x与Struts2并无我们想象的血缘关系。虽然Struts2的开发小组极力保留Struts1.x的习惯,但因为Struts2的核心设计完全改变,从思想到设计到工作流程,都有了很大的不同。
Struts2是Struts社区和WebWork社区的共同成果,我们甚至可以说,Struts2是WebWork的升级版,他采用的正是WebWork的核心,所以,Struts2并不是一个不成熟的产品,相反,构建在WebWork基础之上的Struts2是一个运行稳定、性能优异、设计成熟的WEB框架。
本章主要对Struts的源代码进行分析,因为Struts2与WebWork的关系如此密不可分,因此,读者需要下载xwork的源代码,访问http://www.opensymphony.com/xwork/download.action即可自行下载。
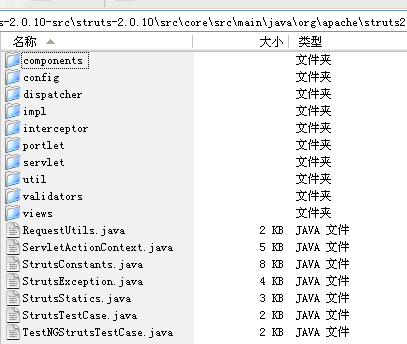
下载的Struts2源代码文件是一个名叫struts-2.1.0-src.zip的压缩包,里面的目录和文件非常多,读者可以定位到struts-2.1.0-src"struts-2.0.10"src"core"src"main"java目录下查看Struts2的源文件,如图14所示。
(图14)
以下是对各包的简要说明:
下表是对一些重要类的说明:

(图15)
1、客户端初始化一个指向Servlet容器(例如Tomcat)的请求;
2、这个请求经过一系列的过滤器(Filter)(这些过滤器中有一个叫做ActionContextCleanUp的可选过滤器,这个过滤器对于Struts2和其他框架的集成很有帮助,例如:SiteMesh
Plugin);
3、接着FilterDispatcher被调用,FilterDispatcher询问ActionMapper来决定这个请求是否需要调用某个Action;
4、如果ActionMapper决定需要调用某个Action,FilterDispatcher把请求的处理交给ActionProxy;
5、ActionProxy通过Configuration Manager询问框架的配置文件,找到需要调用的Action类;
6、ActionProxy创建一个ActionInvocation的实例。
7、ActionInvocation实例使用命名模式来调用,在调用Action的过程前后,涉及到相关拦截器(Intercepter)的调用。
8、一旦Action执行完毕,ActionInvocation负责根据struts.xml中的配置找到对应的返回结果。返回结果通常是(但不总是,也可能是另外的一个Action链)一个需要被表示的JSP或者FreeMarker的模版。在表示的过程中可以使用Struts2
框架中继承的标签。在这个过程中需要涉及到ActionMapper。
注:以上步骤参考至网上,具体网址已忘记。在此表示感谢!
代码清单6:web.xml(截取)
<filter>
<filter-name>struts2</filter-name>
<filter-class>
org.apache.struts2.dispatcher.FilterDispatcher
</filter-class>
</filter>
<filter-mapping>
<filter-name>struts2</filter-name>
<url-pattern>/*</url-pattern>
</filter-mapping>
Struts2建议,在对Struts2的配置尚不熟悉的情况下,将url-pattern配置为/*,这样该过滤器将截拦所有请求。
实际上,FilterDispatcher除了实现Filter接口以外,还实现了StrutsStatics接口,继承代码如下:
代码清单7:FilterDispatcher结构
publicclass FilterDispatcher
implementsStrutsStatics, Filter {
}
StrutsStatics并没有定义业务方法,只定义了若干个常量。Struts2对常用的接口进行了重新封装,比如HttpServletRequest、HttpServletResponse、HttpServletContext等。 以下是StrutsStatics的定义:
代码清单8:StrutsStatics.java
publicinterface
StrutsStatics {
/**
*ConstantfortheHTTPrequestobject.
*/
publicstaticfinal
String HTTP_REQUEST =
"com.opensymphony.xwork2.dispatcher.HttpServletRequest";
/**
*ConstantfortheHTTPresponseobject.
*/
publicstaticfinal
String HTTP_RESPONSE =
"com.opensymphony.xwork2.dispatcher.HttpServletResponse";
/**
*ConstantforanHTTPrequestdispatcher}.
*/
publicstaticfinal
String SERVLET_DISPATCHER =
"com.opensymphony.xwork2.dispatcher.ServletDispatcher";
/**
*Constantfortheservletcontext}object.
*/
publicstaticfinal
String SERVLET_CONTEXT =
"com.opensymphony.xwork2.dispatcher.ServletContext";
/**
*ConstantfortheJSPpagecontext}.
*/
publicstaticfinal
String PAGE_CONTEXT =
"com.opensymphony.xwork2.dispatcher.PageContext";
/**ConstantforthePortletContextobject*/
publicstaticfinal
String STRUTS_PORTLET_CONTEXT =
"struts.portlet.context";
}
容器启动后,FilterDispatcher被实例化,调用init(FilterConfig
filterConfig)方法。该方法创建Dispatcher类的对象,并且将FilterDispatcher配置的初始化参数传到对象中(详情请参考代码清单10),并负责Action的执行。然后得到参数packages,值得注意的是,还有另外三个固定的包和该参数进行拼接,分别是org.apache.struts2.static、template、和org.apache.struts2.interceptor.debugging,中间用空格隔开,经过解析将包名变成路径后存储到一个名叫pathPrefixes的数组中,这些目录中的文件会被自动搜寻。
代码清单9:FilterDispatcher.init()方法
publicvoid
init(FilterConfig filterConfig) throws ServletException {
this.filterConfig = filterConfig;
dispatcher = createDispatcher(filterConfig);
dispatcher.init();
String param = filterConfig.getInitParameter("packages");
String packages =
"org.apache.struts2.statictemplate org.apache.struts2.interceptor.debugging";
if (param !=
null) {
packages = param +
" " + packages;
}
this.pathPrefixes
= parse(packages);
}
代码清单10:FilterDispatcher.createDispatcher()方法
protected Dispatcher createDispatcher(FilterConfig
filterConfig) {
Map<String,String> params =
newHashMap<String,String>();
for (Enumeration e =filterConfig.getInitParameterNames();
e.hasMoreElements(); ) {
String name = (String) e.nextElement();
String value = filterConfig.getInitParameter(name);
params.put(name, value);
}
returnnew
Dispatcher(filterConfig.getServletContext(),params);
}
当用户向Struts2发送请求时,FilterDispatcher的doFilter()方法自动调用,这个方法非常关键。首先,Struts2对请求对象进行重新包装,此次包装根据请求内容的类型不同,返回不同的对象,如果为multipart/form-data类型,则返回MultiPartRequestWrapper类型的对象,该对象服务于文件上传,否则返回StrutsRequestWrapper类型的对象,MultiPartRequestWrapper是StrutsRequestWrapper的子类,而这两个类都是HttpServletRequest接口的实现。包装请求对象如代码清单11所示:
代码清单11:FilterDispatcher.prepareDispatcherAndWrapRequest()方法
protectedHttpServletRequestprepareDispatcherAndWrapRequest(
HttpServletRequestrequest,
HttpServletResponseresponse)
throws ServletException {
Dispatcher du = Dispatcher.getInstance();
if (du ==
null) {
Dispatcher.setInstance(dispatcher);
dispatcher.prepare(request, response);
}
else {
dispatcher = du;
}
try {
request = dispatcher.wrapRequest(request, getServletContext());
}
catch (IOException e) {
String message =
"Could notwrap servlet request with MultipartRequestWrapper!";
LOG.error(message, e);
thrownew
ServletException(message, e);
}
return request;
}
request对象重新包装后,通过ActionMapper的getMapping()方法得到请求的Action,Action的配置信息存储在ActionMapping对象中,该语句如下:mapping
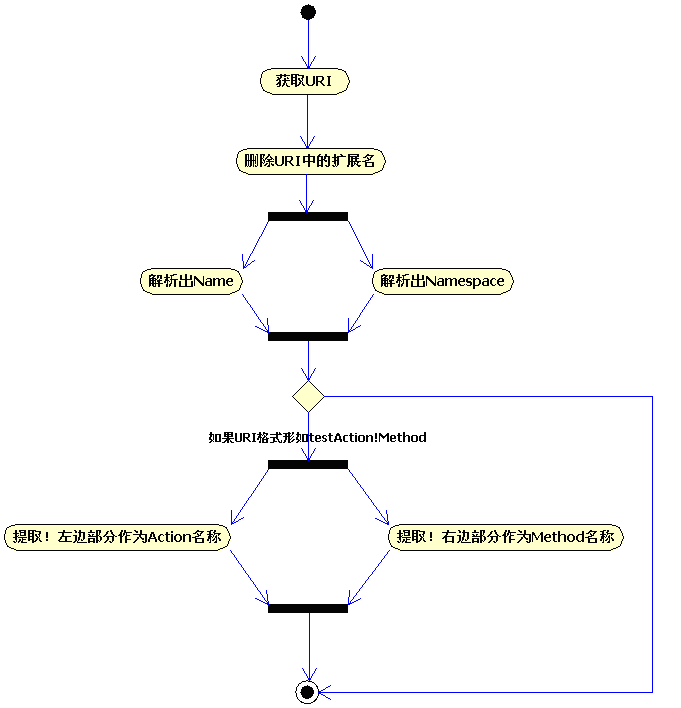
= actionMapper.getMapping(request,dispatcher.getConfigurationManager());。下面是ActionMapping接口的实现类DefaultActionMapper的getMapping()方法的源代码:
代码清单12:DefaultActionMapper.getMapping()方法
public ActionMapping getMapping(HttpServletRequest
request,
ConfigurationManager configManager) {
ActionMapping mapping =
new ActionMapping();
String uri = getUri(request);//得到请求路径的URI,如:testAtcion.action或testAction!method
uri = dropExtension(uri);//删除扩展名,默认扩展名为action,在代码中的定义是List
extensions = new ArrayList() {{add("action");}};
if (uri ==
null) {
returnnull;
}
parseNameAndNamespace(uri, mapping, configManager);//从uri变量中解析出Action的name和namespace
handleSpecialParameters(request, mapping);//将请求参数中的重复项去掉
//如果Action的name没有解析出来,直接返回
if (mapping.getName() ==
null) {
returnnull;
}
//下面处理形如testAction!method格式的请求路径
if (allowDynamicMethodCalls)
{
// handle"name!method" convention.
String name = mapping.getName();
int exclamation = name.lastIndexOf("!");//!是Action名称和方法名的分隔符
if (exclamation != -1) {
mapping.setName(name.substring(0, exclamation));//提取左边为name
mapping.setMethod(name.substring(exclamation + 1));//提取右边的method
}
}
return mapping;
}
该代码的活动图如下:
(图16)
从代码中看出,getMapping()方法返回ActionMapping类型的对象,该对象包含三个参数:Action的name、namespace和要调用的方法method。
如果getMapping()方法返回ActionMapping对象为null,则FilterDispatcher认为用户请求不是Action,自然另当别论,FilterDispatcher会做一件非常有意思的事:如果请求以/struts开头,会自动查找在web.xml文件中配置的packages初始化参数,就像下面这样(注意粗斜体部分):
代码清单13:web.xml(部分)
<filter>
<filter-name>struts2</filter-name>
<filter-class>
org.apache.struts2.dispatcher.FilterDispatcher
</filter-class>
<init-param>
<param-name>packages</param-name>
<param-value>com.lizanhong.action</param-value>
</init-param>
</filter>
FilterDispatcher会将com.lizanhong.action包下的文件当作静态资源处理,即直接在页面上显示文件内容,不过会忽略扩展名为class的文件。比如在com.lizanhong.action包下有一个aaa.txt的文本文件,其内容为“中华人民共和国”,访问http://localhost:8081/Struts2Demo/struts/aaa.txt时会有如图17的输出:

(图17)
查找静态资源的源代码如清单14:
代码清单14:FilterDispatcher.findStaticResource()方法
protectedvoid
findStaticResource(String name,HttpServletRequest request, HttpServletResponse response)
throws IOException {
if (!name.endsWith(".class"))
{//忽略class文件
//遍历packages参数
for (String pathPrefix :
pathPrefixes) {
InputStream is =findInputStream(name, pathPrefix);//读取请求文件流
if (is !=
null) {
……(省略部分代码)
// set thecontent-type header
String contentType =getContentType(name);//读取内容类型
if(contentType !=
null) {
response.setContentType(contentType);//重新设置内容类型
}
……(省略部分代码)
try {
//将读取到的文件流以每次复制4096个字节的方式循环输出
copy(is,response.getOutputStream());
}
finally {
is.close();
}
return;
}
}
}
}
如果用户请求的资源不是以/struts开头——可能是.jsp文件,也可能是.html文件,则通过过滤器链继续往下传送,直到到达请求的资源为止。
如果getMapping()方法返回有效的ActionMapping对象,则被认为正在请求某个Action,将调用Dispatcher.serviceAction(request,
response,servletContext, mapping)方法,该方法是处理Action的关键所在。上述过程的源代码如清单15所示。
代码清单15:FilterDispatcher.doFilter()方法
publicvoid
doFilter(ServletRequest req, ServletResponseres, FilterChain chain) throws IOException, ServletException {
HttpServletRequest request = (HttpServletRequest) req;
HttpServletResponse response = (HttpServletResponse) res;
ServletContext servletContext = getServletContext();
String timerKey =
"FilterDispatcher_doFilter:";
try {
UtilTimerStack.push(timerKey);
request = prepareDispatcherAndWrapRequest(request, response);//重新包装request
ActionMapping mapping;
try {
mapping =actionMapper.getMapping(request, dispatcher.getConfigurationManager());//得到存储Action信息的ActionMapping对象
}
catch (Exception ex) {
……(省略部分代码)
return;
}
if (mapping ==
null) {//如果mapping为null,则认为不是请求Action资源
String resourcePath =RequestUtils.getServletPath(request);
if ("".equals(resourcePath)
&& null != request.getPathInfo()) {
resourcePath =request.getPathInfo();
}
//如果请求的资源以/struts开头,则当作静态资源处理
if (serveStatic
&& resourcePath.startsWith("/struts")) {
String name =resourcePath.substring("/struts".length());
findStaticResource(name,request, response);
}
else {
//否则,过滤器链继续往下传递
chain.doFilter(request,response);
}
// The framework did its job here
return;
}
//如果请求的资源是Action,则调用serviceAction方法。
dispatcher.serviceAction(request, response, servletContext, mapping);
}
finally {
try {
ActionContextCleanUp.cleanUp(req);
}
finally {
UtilTimerStack.pop(timerKey);
}
}
}
这段代码的活动图如图18所示:

(图18)
在Dispatcher.serviceAction()方法中,先加载Struts2的配置文件,如果没有人为配置,则默认加载struts-default.xml、struts-plugin.xml和struts.xml,并且将配置信息保存在形如com.opensymphony.xwork2.config.entities.XxxxConfig的类中。
类com.opensymphony.xwork2.config.providers.XmlConfigurationProvider负责配置文件的读取和解析,
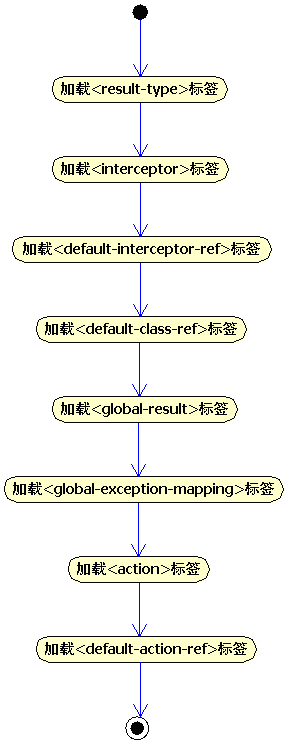
addAction()方法负责读取<action>标签,并将数据保存在ActionConfig中;addResultTypes()方法负责将<result-type>标签转化为ResultTypeConfig对象;loadInterceptors()方法负责将<interceptor>标签转化为InterceptorConfi对象;loadInterceptorStack()方法负责将<interceptor-ref>标签转化为InterceptorStackConfig对象;loadInterceptorStacks()方法负责将<interceptor-stack>标签转化成InterceptorStackConfig对象。而上面的方法最终会被addPackage()方法调用,将所读取到的数据汇集到PackageConfig对象中,细节请参考代码清单16。
代码清单16:XmlConfigurationProvider.addPackage()方法
protected PackageConfig addPackage(Element packageElement)
throws ConfigurationException {
PackageConfig newPackage = buildPackageContext(packageElement);
if (newPackage.isNeedsRefresh())
{
return newPackage;
}
if (LOG.isDebugEnabled()) {
LOG.debug("Loaded" + newPackage);
}
// add result types (anddefault result) to this package
addResultTypes(newPackage, packageElement);
// load the interceptors andinterceptor stacks for this package
loadInterceptors(newPackage, packageElement);
// load the defaultinterceptor reference for this package
loadDefaultInterceptorRef(newPackage, packageElement);
// load the default class reffor this package
loadDefaultClassRef(newPackage, packageElement);
// load the global resultlist for this package
loadGlobalResults(newPackage, packageElement);
// load the global exceptionhandler list for this package
loadGlobalExceptionMappings(newPackage, packageElement);
// get actions
NodeList actionList = packageElement.getElementsByTagName("action");
for (int
i = 0; i< actionList.getLength(); i++) {
Element actionElement = (Element) actionList.item(i);
addAction(actionElement, newPackage);
}
// load the default actionreference for this package
loadDefaultActionRef(newPackage, packageElement);
configuration.addPackageConfig(newPackage.getName(),newPackage);
return newPackage;
}
活动图如图19所示:
(图19)
配置信息加载完成后,创建一个Action的代理对象——ActionProxy引用,实际上对Action的调用正是通过ActionProxy实现的,而ActionProxy又由ActionProxyFactory创建,ActionProxyFactory是创建ActionProxy的工厂。
注:ActionProxy和ActionProxyFactory都是接口,他们的默认实现类分别是DefaultActionProxy和DefaultActionProxyFactory,位于com.opensymphony.xwork2包下。
在这里,我们绝对有必要介绍一下com.opensymphony.xwork2.DefaultActionInvocation类,该类是对ActionInvocation接口的默认实现,负责Action和截拦器的执行。
在DefaultActionInvocation类中,定义了invoke()方法,该方法实现了截拦器的递归调用和执行Action的execute()方法。其中,递归调用截拦器的代码如清单17所示:
代码清单17:调用截拦器,DefaultActionInvocation.invoke()方法的部分代码
if (interceptors.hasNext())
{
//从截拦器集合中取出当前的截拦器
finalInterceptorMapping interceptor = (InterceptorMapping)
interceptors.next();
UtilTimerStack.profile("interceptor: "+interceptor.getName(),
newUtilTimerStack.ProfilingBlock<String>() {
public String doProfiling()
throws Exception {
//执行截拦器(Interceptor)接口中定义的intercept方法
resultCode= interceptor.getInterceptor().intercept(DefaultActionInvocation.this);
returnnull;
}
});
}
从代码中似乎看不到截拦器的递归调用,其实是否递归完全取决于程序员对程序的控制,先来看一下Interceptor接口的定义:
代码清单18:Interceptor.java
publicinterface Interceptor
extendsSerializable {
void destroy();
void init();
String intercept(ActionInvocation invocation)
throws Exception;
}
所有的截拦器必须实现intercept方法,而该方法的参数恰恰又是ActionInvocation,所以,如果在intercept方法中调用invocation.invoke(),代码清单17会再次执行,从Action的Intercepor列表中找到下一个截拦器,依此递归。下面是一个自定义截拦器示例:
代码清单19:CustomIntercepter.java
publicclass CustomIntercepter
extends AbstractInterceptor {
@Override
public String intercept(ActionInvocation actionInvocation)
throws Exception
{
actionInvocation.invoke();
return"李赞红";
}
}
截拦器的调用活动图如图20所示:

(图20)
如果截拦器全部执行完毕,则调用invokeActionOnly()方法执行Action,invokeActionOnly()方法基本没做什么工作,只调用了invokeAction()方法。
为了执行Action,必须先创建该对象,该工作在DefaultActionInvocation的构造方法中调用init()方法早早完成。调用过程是:DefaultActionInvocation()->init()->createAction()。创建Action的代码如下:
代码清单20:DefaultActionInvocation.createAction()方法
protectedvoid
createAction(Map contextMap) {
try {
action =objectFactory.buildAction(proxy.getActionName(),
proxy.getNamespace(),proxy.getConfig(), contextMap);
}
catch (InstantiationException e) {
……异常代码省略
}
}
Action创建好后,轮到invokeAction()大显身手了,该方法比较长,但关键语句实在很少,用心点看不会很难。
代码清单20:DefaultActionInvocation.invokeAction()方法
protected String invokeAction(Object action,ActionConfig actionConfig)
throws Exception {
//获取Action中定义的execute()方法名称,实际上该方法是可以随便定义的
String methodName = proxy.getMethod();
String timerKey =
"invokeAction:"+proxy.getActionName();
try {
UtilTimerStack.push(timerKey);
Method method;
try {
//将方法名转化成Method对象
method = getAction().getClass().getMethod(methodName,new
Class[0]);
}
catch (NoSuchMethodException e) {
// hmm -- OK, try doXxx instead
try {
//如果Method出错,则尝试在方法名前加do,再转成Method对象
String altMethodName =
"do" + methodName.substring(0, 1).toUpperCase() +methodName.substring(1);
method =getAction().getClass().getMethod(altMethodName,
new Class[0]);
}
catch(NoSuchMethodException e1) {
// throw the original one
throw e;
}
}
//执行方法
Object methodResult = method.invoke(action,
new Object[0]);
//处理跳转
if (methodResult
instanceof Result) {
this.result =(Result) methodResult;
returnnull;
}
else {
return (String)methodResult;
}
}
catch (NoSuchMethodException e) {
……省略异常代码
}
finally {
UtilTimerStack.pop(timerKey);
}
}
刚才使用了一段插述,我们继续回到ActionProxy类。
我们说Action的调用是通过ActionProxy实现的,其实就是调用了ActionProxy.execute()方法,而该方法又调用了ActionInvocation.invoke()方法。归根到底,最后调用的是DefaultActionInvocation.invokeAction()方法。
以下是调用关系图:

其中:
Ø ActionProxy:管理Action的生命周期,它是设置和执行Action的起始点。
Ø ActionInvocation:在ActionProxy层之下,它表示了Action的执行状态。它持有Action实例和所有的Interceptor
以下是serviceAction()方法的定义:
代码清单21:Dispatcher.serviceAction()方法
publicvoid
serviceAction(HttpServletRequest request,HttpServletResponse response, ServletContext context,
ActionMappingmapping)
throws ServletException {
Map<String, Object> extraContext = createContextMap(request,response, mapping, context);
// If there was a previousvalue stack, then create a new copy and pass it in to be used by the new Action
ValueStack stack = (ValueStack) request.getAttribute(ServletActionContext.STRUTS_VALUESTACK_KEY);
if (stack !=
null) {
extraContext.put(ActionContext.VALUE_STACK,ValueStackFactory.getFactory().createValueStack(stack));
}
String timerKey =
"Handlingrequest from Dispatcher";
try {
UtilTimerStack.push(timerKey);
String namespace = mapping.getNamespace();
String name = mapping.getName();
String method = mapping.getMethod();
Configuration config = configurationManager.getConfiguration();
ActionProxy proxy =config.getContainer().getInstance(ActionProxyFactory.class).createActionProxy(
namespace, name,extraContext,
true,
false);
proxy.setMethod(method);
request.setAttribute(ServletActionContext.STRUTS_VALUESTACK_KEY,proxy.getInvocation().getStack());
// if the ActionMapping saysto go straight to a result, do it!
if (mapping.getResult() !=
null) {
Result result =mapping.getResult();
result.execute(proxy.getInvocation());
}
else {
proxy.execute();
}
// If there was a previousvalue stack then set it back onto the request
if (stack !=
null) {
request.setAttribute(ServletActionContext.STRUTS_VALUESTACK_KEY, stack);
}
}
catch (ConfigurationException e) {
LOG.error("Could notfind action or result", e);
sendError(request, response, context, HttpServletResponse.SC_NOT_FOUND,e);
}
catch (Exception e) {
thrownew
ServletException(e);
}
finally {
UtilTimerStack.pop(timerKey);
}
}
最后,通过Result完成页面的跳转。
以下是Struts2运行时调用方法的顺序图:
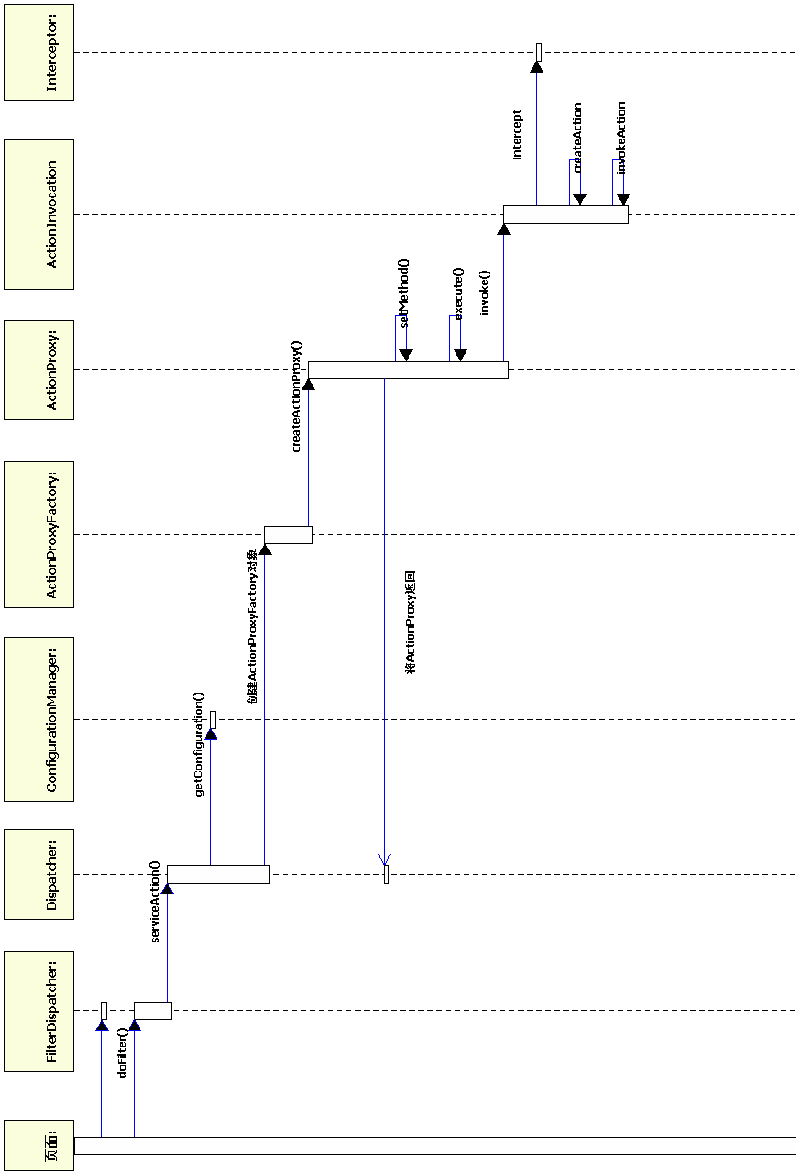
(图21)
当然,笔者不可能为读者解释所有类,这也不是我的初衷。Struts2+xwork一共有700余类,除了为读者做到现在的这些,已无法再做更多的事情。读者可以到Struts官方网站下载帮助文档,慢慢阅读和理解,相信会受益颇丰。
本章并不适合java语言初学者或者对java博大精深的思想理解不深的读者阅读,这其中涉及到太多的术语和类的使用,特别不要去钻牛角尖,容易使自信心受损。基本搞清楚Struts2的使用之后,再回过头来阅读本章,对一些知识点和思想也许会有更深的体会。
如果读者的java功底比较浑厚,而且对Struts2充满兴趣,但又没太多时间研究,不妨仔细阅读本章,再对照Struts的源代码,希望对您有所帮助。
概述
本章讲述Struts2的工作原理。读者如果曾经学习过Struts1.x或者有过Struts1.x的开发经验,那么千万不要想当然地以为这一章可以跳过。实际上Struts1.x与Struts2并无我们想象的血缘关系。虽然Struts2的开发小组极力保留Struts1.x的习惯,但因为Struts2的核心设计完全改变,从思想到设计到工作流程,都有了很大的不同。
Struts2是Struts社区和WebWork社区的共同成果,我们甚至可以说,Struts2是WebWork的升级版,他采用的正是WebWork的核心,所以,Struts2并不是一个不成熟的产品,相反,构建在WebWork基础之上的Struts2是一个运行稳定、性能优异、设计成熟的WEB框架。
本章主要对Struts的源代码进行分析,因为Struts2与WebWork的关系如此密不可分,因此,读者需要下载xwork的源代码,访问http://www.opensymphony.com/xwork/download.action即可自行下载。
下载的Struts2源代码文件是一个名叫struts-2.1.0-src.zip的压缩包,里面的目录和文件非常多,读者可以定位到struts-2.1.0-src"struts-2.0.10"src"core"src"main"java目录下查看Struts2的源文件,如图14所示。
(图14)
主要的包和类
Struts2框架的正常运行,除了占核心地位的xwork的支持以外,Struts2本身也提供了许多类,这些类被分门别类组织到不同的包中。从源代码中发现,基本上每一个Struts2类都访问了WebWork提供的功能,从而也可以看出Struts2与WebWork千丝万缕的联系。但无论如何,Struts2的核心功能比如将请求委托给哪个Action处理都是由xwork完成的,Struts2只是在WebWork的基础上做了适当的简化、加强和封装,并少量保留Struts1.x中的习惯。以下是对各包的简要说明:
| 包名 | 说明 |
| org.apache.struts2. components | 该包封装视图组件,Struts2在视图组件上有了很大加强,不仅增加了组件的属性个数,更新增了几个非常有用的组件,如updownselect、doubleselect、datetimepicker、token、tree等。 另外,Struts2可视化视图组件开始支持主题(theme),缺省情况下,使用自带的缺省主题,如果要自定义页面效果,需要将组件的theme属性设置为simple。 |
| org.apache.struts2. config | 该包定义与配置相关的接口和类。实际上,工程中的xml和properties文件的读取和解析都是由WebWork完成的,Struts只做了少量的工作。 |
| org.apache.struts2.dispatcher | Struts2的核心包,最重要的类都放在该包中。 |
| org.apache.struts2.impl | 该包只定义了3个类,他们是StrutsActionProxy、StrutsActionProxyFactory、StrutsObjectFactory,这三个类都是对xwork的扩展。 |
| org.apache.struts2.interceptor | 定义内置的截拦器。 |
| org.apache.struts2.util | 实用包。 |
| org.apache.struts2.validators | 只定义了一个类:DWRValidator。 |
| org.apache.struts2.views | 提供freemarker、jsp、velocity等不同类型的页面呈现。 |
| 类名 | 说明 |
| org.apache.struts2.dispatcher. Dispatcher | 该类有两个作用: 1、初始化 2、调用指定的Action的execute()方法。 |
| org.apache.struts2.dispatcher. FilterDispatcher | 这是一个过滤器。文档中已明确说明,如果没有经验,配置时请将url-pattern的值设成/*。 该类有四个作用: 1、执行Action 2、清理ActionContext,避免内存泄漏 3、处理静态内容(Serving static content) 4、为请求启动xwork’s的截拦器链。 |
| com.opensymphony.xwork2. ActionProxy | Action的代理接口。 |
| com.opensymphony.xwork2. ctionProxyFactory | 生产ActionProxy的工厂。 |
| com.opensymphony.xwork2.ActionInvocation | 负责调用Action和截拦器。 |
| com.opensymphony.xwork2.config.providers. XmlConfigurationProvider | 负责Struts2的配置文件的解析。 |
Struts2的工作机制
3.1Struts2体系结构图
Strut2的体系结构如图15所示:(图15)
3.2Struts2的工作机制
从图15可以看出,一个请求在Struts2框架中的处理大概分为以下几个步骤:1、客户端初始化一个指向Servlet容器(例如Tomcat)的请求;
2、这个请求经过一系列的过滤器(Filter)(这些过滤器中有一个叫做ActionContextCleanUp的可选过滤器,这个过滤器对于Struts2和其他框架的集成很有帮助,例如:SiteMesh
Plugin);
3、接着FilterDispatcher被调用,FilterDispatcher询问ActionMapper来决定这个请求是否需要调用某个Action;
4、如果ActionMapper决定需要调用某个Action,FilterDispatcher把请求的处理交给ActionProxy;
5、ActionProxy通过Configuration Manager询问框架的配置文件,找到需要调用的Action类;
6、ActionProxy创建一个ActionInvocation的实例。
7、ActionInvocation实例使用命名模式来调用,在调用Action的过程前后,涉及到相关拦截器(Intercepter)的调用。
8、一旦Action执行完毕,ActionInvocation负责根据struts.xml中的配置找到对应的返回结果。返回结果通常是(但不总是,也可能是另外的一个Action链)一个需要被表示的JSP或者FreeMarker的模版。在表示的过程中可以使用Struts2
框架中继承的标签。在这个过程中需要涉及到ActionMapper。
注:以上步骤参考至网上,具体网址已忘记。在此表示感谢!
3.3Struts2源代码分析
和Struts1.x不同,Struts2的启动是通过FilterDispatcher过滤器实现的。下面是该过滤器在web.xml文件中的配置:代码清单6:web.xml(截取)
<filter>
<filter-name>struts2</filter-name>
<filter-class>
org.apache.struts2.dispatcher.FilterDispatcher
</filter-class>
</filter>
<filter-mapping>
<filter-name>struts2</filter-name>
<url-pattern>/*</url-pattern>
</filter-mapping>
Struts2建议,在对Struts2的配置尚不熟悉的情况下,将url-pattern配置为/*,这样该过滤器将截拦所有请求。
实际上,FilterDispatcher除了实现Filter接口以外,还实现了StrutsStatics接口,继承代码如下:
代码清单7:FilterDispatcher结构
publicclass FilterDispatcher
implementsStrutsStatics, Filter {
}
StrutsStatics并没有定义业务方法,只定义了若干个常量。Struts2对常用的接口进行了重新封装,比如HttpServletRequest、HttpServletResponse、HttpServletContext等。 以下是StrutsStatics的定义:
代码清单8:StrutsStatics.java
publicinterface
StrutsStatics {
/**
*ConstantfortheHTTPrequestobject.
*/
publicstaticfinal
String HTTP_REQUEST =
"com.opensymphony.xwork2.dispatcher.HttpServletRequest";
/**
*ConstantfortheHTTPresponseobject.
*/
publicstaticfinal
String HTTP_RESPONSE =
"com.opensymphony.xwork2.dispatcher.HttpServletResponse";
/**
*ConstantforanHTTPrequestdispatcher}.
*/
publicstaticfinal
String SERVLET_DISPATCHER =
"com.opensymphony.xwork2.dispatcher.ServletDispatcher";
/**
*Constantfortheservletcontext}object.
*/
publicstaticfinal
String SERVLET_CONTEXT =
"com.opensymphony.xwork2.dispatcher.ServletContext";
/**
*ConstantfortheJSPpagecontext}.
*/
publicstaticfinal
String PAGE_CONTEXT =
"com.opensymphony.xwork2.dispatcher.PageContext";
/**ConstantforthePortletContextobject*/
publicstaticfinal
String STRUTS_PORTLET_CONTEXT =
"struts.portlet.context";
}
容器启动后,FilterDispatcher被实例化,调用init(FilterConfig
filterConfig)方法。该方法创建Dispatcher类的对象,并且将FilterDispatcher配置的初始化参数传到对象中(详情请参考代码清单10),并负责Action的执行。然后得到参数packages,值得注意的是,还有另外三个固定的包和该参数进行拼接,分别是org.apache.struts2.static、template、和org.apache.struts2.interceptor.debugging,中间用空格隔开,经过解析将包名变成路径后存储到一个名叫pathPrefixes的数组中,这些目录中的文件会被自动搜寻。
代码清单9:FilterDispatcher.init()方法
publicvoid
init(FilterConfig filterConfig) throws ServletException {
this.filterConfig = filterConfig;
dispatcher = createDispatcher(filterConfig);
dispatcher.init();
String param = filterConfig.getInitParameter("packages");
String packages =
"org.apache.struts2.statictemplate org.apache.struts2.interceptor.debugging";
if (param !=
null) {
packages = param +
" " + packages;
}
this.pathPrefixes
= parse(packages);
}
代码清单10:FilterDispatcher.createDispatcher()方法
protected Dispatcher createDispatcher(FilterConfig
filterConfig) {
Map<String,String> params =
newHashMap<String,String>();
for (Enumeration e =filterConfig.getInitParameterNames();
e.hasMoreElements(); ) {
String name = (String) e.nextElement();
String value = filterConfig.getInitParameter(name);
params.put(name, value);
}
returnnew
Dispatcher(filterConfig.getServletContext(),params);
}
当用户向Struts2发送请求时,FilterDispatcher的doFilter()方法自动调用,这个方法非常关键。首先,Struts2对请求对象进行重新包装,此次包装根据请求内容的类型不同,返回不同的对象,如果为multipart/form-data类型,则返回MultiPartRequestWrapper类型的对象,该对象服务于文件上传,否则返回StrutsRequestWrapper类型的对象,MultiPartRequestWrapper是StrutsRequestWrapper的子类,而这两个类都是HttpServletRequest接口的实现。包装请求对象如代码清单11所示:
代码清单11:FilterDispatcher.prepareDispatcherAndWrapRequest()方法
protectedHttpServletRequestprepareDispatcherAndWrapRequest(
HttpServletRequestrequest,
HttpServletResponseresponse)
throws ServletException {
Dispatcher du = Dispatcher.getInstance();
if (du ==
null) {
Dispatcher.setInstance(dispatcher);
dispatcher.prepare(request, response);
}
else {
dispatcher = du;
}
try {
request = dispatcher.wrapRequest(request, getServletContext());
}
catch (IOException e) {
String message =
"Could notwrap servlet request with MultipartRequestWrapper!";
LOG.error(message, e);
thrownew
ServletException(message, e);
}
return request;
}
request对象重新包装后,通过ActionMapper的getMapping()方法得到请求的Action,Action的配置信息存储在ActionMapping对象中,该语句如下:mapping
= actionMapper.getMapping(request,dispatcher.getConfigurationManager());。下面是ActionMapping接口的实现类DefaultActionMapper的getMapping()方法的源代码:
代码清单12:DefaultActionMapper.getMapping()方法
public ActionMapping getMapping(HttpServletRequest
request,
ConfigurationManager configManager) {
ActionMapping mapping =
new ActionMapping();
String uri = getUri(request);//得到请求路径的URI,如:testAtcion.action或testAction!method
uri = dropExtension(uri);//删除扩展名,默认扩展名为action,在代码中的定义是List
extensions = new ArrayList() {{add("action");}};
if (uri ==
null) {
returnnull;
}
parseNameAndNamespace(uri, mapping, configManager);//从uri变量中解析出Action的name和namespace
handleSpecialParameters(request, mapping);//将请求参数中的重复项去掉
//如果Action的name没有解析出来,直接返回
if (mapping.getName() ==
null) {
returnnull;
}
//下面处理形如testAction!method格式的请求路径
if (allowDynamicMethodCalls)
{
// handle"name!method" convention.
String name = mapping.getName();
int exclamation = name.lastIndexOf("!");//!是Action名称和方法名的分隔符
if (exclamation != -1) {
mapping.setName(name.substring(0, exclamation));//提取左边为name
mapping.setMethod(name.substring(exclamation + 1));//提取右边的method
}
}
return mapping;
}
该代码的活动图如下:
(图16)
从代码中看出,getMapping()方法返回ActionMapping类型的对象,该对象包含三个参数:Action的name、namespace和要调用的方法method。
如果getMapping()方法返回ActionMapping对象为null,则FilterDispatcher认为用户请求不是Action,自然另当别论,FilterDispatcher会做一件非常有意思的事:如果请求以/struts开头,会自动查找在web.xml文件中配置的packages初始化参数,就像下面这样(注意粗斜体部分):
代码清单13:web.xml(部分)
<filter>
<filter-name>struts2</filter-name>
<filter-class>
org.apache.struts2.dispatcher.FilterDispatcher
</filter-class>
<init-param>
<param-name>packages</param-name>
<param-value>com.lizanhong.action</param-value>
</init-param>
</filter>
FilterDispatcher会将com.lizanhong.action包下的文件当作静态资源处理,即直接在页面上显示文件内容,不过会忽略扩展名为class的文件。比如在com.lizanhong.action包下有一个aaa.txt的文本文件,其内容为“中华人民共和国”,访问http://localhost:8081/Struts2Demo/struts/aaa.txt时会有如图17的输出:
(图17)
查找静态资源的源代码如清单14:
代码清单14:FilterDispatcher.findStaticResource()方法
protectedvoid
findStaticResource(String name,HttpServletRequest request, HttpServletResponse response)
throws IOException {
if (!name.endsWith(".class"))
{//忽略class文件
//遍历packages参数
for (String pathPrefix :
pathPrefixes) {
InputStream is =findInputStream(name, pathPrefix);//读取请求文件流
if (is !=
null) {
……(省略部分代码)
// set thecontent-type header
String contentType =getContentType(name);//读取内容类型
if(contentType !=
null) {
response.setContentType(contentType);//重新设置内容类型
}
……(省略部分代码)
try {
//将读取到的文件流以每次复制4096个字节的方式循环输出
copy(is,response.getOutputStream());
}
finally {
is.close();
}
return;
}
}
}
}
如果用户请求的资源不是以/struts开头——可能是.jsp文件,也可能是.html文件,则通过过滤器链继续往下传送,直到到达请求的资源为止。
如果getMapping()方法返回有效的ActionMapping对象,则被认为正在请求某个Action,将调用Dispatcher.serviceAction(request,
response,servletContext, mapping)方法,该方法是处理Action的关键所在。上述过程的源代码如清单15所示。
代码清单15:FilterDispatcher.doFilter()方法
publicvoid
doFilter(ServletRequest req, ServletResponseres, FilterChain chain) throws IOException, ServletException {
HttpServletRequest request = (HttpServletRequest) req;
HttpServletResponse response = (HttpServletResponse) res;
ServletContext servletContext = getServletContext();
String timerKey =
"FilterDispatcher_doFilter:";
try {
UtilTimerStack.push(timerKey);
request = prepareDispatcherAndWrapRequest(request, response);//重新包装request
ActionMapping mapping;
try {
mapping =actionMapper.getMapping(request, dispatcher.getConfigurationManager());//得到存储Action信息的ActionMapping对象
}
catch (Exception ex) {
……(省略部分代码)
return;
}
if (mapping ==
null) {//如果mapping为null,则认为不是请求Action资源
String resourcePath =RequestUtils.getServletPath(request);
if ("".equals(resourcePath)
&& null != request.getPathInfo()) {
resourcePath =request.getPathInfo();
}
//如果请求的资源以/struts开头,则当作静态资源处理
if (serveStatic
&& resourcePath.startsWith("/struts")) {
String name =resourcePath.substring("/struts".length());
findStaticResource(name,request, response);
}
else {
//否则,过滤器链继续往下传递
chain.doFilter(request,response);
}
// The framework did its job here
return;
}
//如果请求的资源是Action,则调用serviceAction方法。
dispatcher.serviceAction(request, response, servletContext, mapping);
}
finally {
try {
ActionContextCleanUp.cleanUp(req);
}
finally {
UtilTimerStack.pop(timerKey);
}
}
}
这段代码的活动图如图18所示:
(图18)
在Dispatcher.serviceAction()方法中,先加载Struts2的配置文件,如果没有人为配置,则默认加载struts-default.xml、struts-plugin.xml和struts.xml,并且将配置信息保存在形如com.opensymphony.xwork2.config.entities.XxxxConfig的类中。
类com.opensymphony.xwork2.config.providers.XmlConfigurationProvider负责配置文件的读取和解析,
addAction()方法负责读取<action>标签,并将数据保存在ActionConfig中;addResultTypes()方法负责将<result-type>标签转化为ResultTypeConfig对象;loadInterceptors()方法负责将<interceptor>标签转化为InterceptorConfi对象;loadInterceptorStack()方法负责将<interceptor-ref>标签转化为InterceptorStackConfig对象;loadInterceptorStacks()方法负责将<interceptor-stack>标签转化成InterceptorStackConfig对象。而上面的方法最终会被addPackage()方法调用,将所读取到的数据汇集到PackageConfig对象中,细节请参考代码清单16。
代码清单16:XmlConfigurationProvider.addPackage()方法
protected PackageConfig addPackage(Element packageElement)
throws ConfigurationException {
PackageConfig newPackage = buildPackageContext(packageElement);
if (newPackage.isNeedsRefresh())
{
return newPackage;
}
if (LOG.isDebugEnabled()) {
LOG.debug("Loaded" + newPackage);
}
// add result types (anddefault result) to this package
addResultTypes(newPackage, packageElement);
// load the interceptors andinterceptor stacks for this package
loadInterceptors(newPackage, packageElement);
// load the defaultinterceptor reference for this package
loadDefaultInterceptorRef(newPackage, packageElement);
// load the default class reffor this package
loadDefaultClassRef(newPackage, packageElement);
// load the global resultlist for this package
loadGlobalResults(newPackage, packageElement);
// load the global exceptionhandler list for this package
loadGlobalExceptionMappings(newPackage, packageElement);
// get actions
NodeList actionList = packageElement.getElementsByTagName("action");
for (int
i = 0; i< actionList.getLength(); i++) {
Element actionElement = (Element) actionList.item(i);
addAction(actionElement, newPackage);
}
// load the default actionreference for this package
loadDefaultActionRef(newPackage, packageElement);
configuration.addPackageConfig(newPackage.getName(),newPackage);
return newPackage;
}
活动图如图19所示:
(图19)
配置信息加载完成后,创建一个Action的代理对象——ActionProxy引用,实际上对Action的调用正是通过ActionProxy实现的,而ActionProxy又由ActionProxyFactory创建,ActionProxyFactory是创建ActionProxy的工厂。
注:ActionProxy和ActionProxyFactory都是接口,他们的默认实现类分别是DefaultActionProxy和DefaultActionProxyFactory,位于com.opensymphony.xwork2包下。
在这里,我们绝对有必要介绍一下com.opensymphony.xwork2.DefaultActionInvocation类,该类是对ActionInvocation接口的默认实现,负责Action和截拦器的执行。
在DefaultActionInvocation类中,定义了invoke()方法,该方法实现了截拦器的递归调用和执行Action的execute()方法。其中,递归调用截拦器的代码如清单17所示:
代码清单17:调用截拦器,DefaultActionInvocation.invoke()方法的部分代码
if (interceptors.hasNext())
{
//从截拦器集合中取出当前的截拦器
finalInterceptorMapping interceptor = (InterceptorMapping)
interceptors.next();
UtilTimerStack.profile("interceptor: "+interceptor.getName(),
newUtilTimerStack.ProfilingBlock<String>() {
public String doProfiling()
throws Exception {
//执行截拦器(Interceptor)接口中定义的intercept方法
resultCode= interceptor.getInterceptor().intercept(DefaultActionInvocation.this);
returnnull;
}
});
}
从代码中似乎看不到截拦器的递归调用,其实是否递归完全取决于程序员对程序的控制,先来看一下Interceptor接口的定义:
代码清单18:Interceptor.java
publicinterface Interceptor
extendsSerializable {
void destroy();
void init();
String intercept(ActionInvocation invocation)
throws Exception;
}
所有的截拦器必须实现intercept方法,而该方法的参数恰恰又是ActionInvocation,所以,如果在intercept方法中调用invocation.invoke(),代码清单17会再次执行,从Action的Intercepor列表中找到下一个截拦器,依此递归。下面是一个自定义截拦器示例:
代码清单19:CustomIntercepter.java
publicclass CustomIntercepter
extends AbstractInterceptor {
@Override
public String intercept(ActionInvocation actionInvocation)
throws Exception
{
actionInvocation.invoke();
return"李赞红";
}
}
截拦器的调用活动图如图20所示:
(图20)
如果截拦器全部执行完毕,则调用invokeActionOnly()方法执行Action,invokeActionOnly()方法基本没做什么工作,只调用了invokeAction()方法。
为了执行Action,必须先创建该对象,该工作在DefaultActionInvocation的构造方法中调用init()方法早早完成。调用过程是:DefaultActionInvocation()->init()->createAction()。创建Action的代码如下:
代码清单20:DefaultActionInvocation.createAction()方法
protectedvoid
createAction(Map contextMap) {
try {
action =objectFactory.buildAction(proxy.getActionName(),
proxy.getNamespace(),proxy.getConfig(), contextMap);
}
catch (InstantiationException e) {
……异常代码省略
}
}
Action创建好后,轮到invokeAction()大显身手了,该方法比较长,但关键语句实在很少,用心点看不会很难。
代码清单20:DefaultActionInvocation.invokeAction()方法
protected String invokeAction(Object action,ActionConfig actionConfig)
throws Exception {
//获取Action中定义的execute()方法名称,实际上该方法是可以随便定义的
String methodName = proxy.getMethod();
String timerKey =
"invokeAction:"+proxy.getActionName();
try {
UtilTimerStack.push(timerKey);
Method method;
try {
//将方法名转化成Method对象
method = getAction().getClass().getMethod(methodName,new
Class[0]);
}
catch (NoSuchMethodException e) {
// hmm -- OK, try doXxx instead
try {
//如果Method出错,则尝试在方法名前加do,再转成Method对象
String altMethodName =
"do" + methodName.substring(0, 1).toUpperCase() +methodName.substring(1);
method =getAction().getClass().getMethod(altMethodName,
new Class[0]);
}
catch(NoSuchMethodException e1) {
// throw the original one
throw e;
}
}
//执行方法
Object methodResult = method.invoke(action,
new Object[0]);
//处理跳转
if (methodResult
instanceof Result) {
this.result =(Result) methodResult;
returnnull;
}
else {
return (String)methodResult;
}
}
catch (NoSuchMethodException e) {
……省略异常代码
}
finally {
UtilTimerStack.pop(timerKey);
}
}
刚才使用了一段插述,我们继续回到ActionProxy类。
我们说Action的调用是通过ActionProxy实现的,其实就是调用了ActionProxy.execute()方法,而该方法又调用了ActionInvocation.invoke()方法。归根到底,最后调用的是DefaultActionInvocation.invokeAction()方法。
以下是调用关系图:
其中:
Ø ActionProxy:管理Action的生命周期,它是设置和执行Action的起始点。
Ø ActionInvocation:在ActionProxy层之下,它表示了Action的执行状态。它持有Action实例和所有的Interceptor
以下是serviceAction()方法的定义:
代码清单21:Dispatcher.serviceAction()方法
publicvoid
serviceAction(HttpServletRequest request,HttpServletResponse response, ServletContext context,
ActionMappingmapping)
throws ServletException {
Map<String, Object> extraContext = createContextMap(request,response, mapping, context);
// If there was a previousvalue stack, then create a new copy and pass it in to be used by the new Action
ValueStack stack = (ValueStack) request.getAttribute(ServletActionContext.STRUTS_VALUESTACK_KEY);
if (stack !=
null) {
extraContext.put(ActionContext.VALUE_STACK,ValueStackFactory.getFactory().createValueStack(stack));
}
String timerKey =
"Handlingrequest from Dispatcher";
try {
UtilTimerStack.push(timerKey);
String namespace = mapping.getNamespace();
String name = mapping.getName();
String method = mapping.getMethod();
Configuration config = configurationManager.getConfiguration();
ActionProxy proxy =config.getContainer().getInstance(ActionProxyFactory.class).createActionProxy(
namespace, name,extraContext,
true,
false);
proxy.setMethod(method);
request.setAttribute(ServletActionContext.STRUTS_VALUESTACK_KEY,proxy.getInvocation().getStack());
// if the ActionMapping saysto go straight to a result, do it!
if (mapping.getResult() !=
null) {
Result result =mapping.getResult();
result.execute(proxy.getInvocation());
}
else {
proxy.execute();
}
// If there was a previousvalue stack then set it back onto the request
if (stack !=
null) {
request.setAttribute(ServletActionContext.STRUTS_VALUESTACK_KEY, stack);
}
}
catch (ConfigurationException e) {
LOG.error("Could notfind action or result", e);
sendError(request, response, context, HttpServletResponse.SC_NOT_FOUND,e);
}
catch (Exception e) {
thrownew
ServletException(e);
}
finally {
UtilTimerStack.pop(timerKey);
}
}
最后,通过Result完成页面的跳转。
3.4 本小节总结
总体来讲,Struts2的工作机制比Struts1.x要复杂很多,但我们不得不佩服Struts和WebWork开发小组的功底,代码如此优雅,甚至能够感受看到两个开发小组心神相通的默契。两个字:佩服。以下是Struts2运行时调用方法的顺序图:
(图21)
四、 总结
阅读源代码是一件非常辛苦的事,对读者本身的要求也很高,一方面要有扎实的功底,另一方面要有超强的耐力和恒心。本章目的就是希望能帮助读者理清一条思路,在必要的地方作出简单的解释,达到事半功倍的效果。当然,笔者不可能为读者解释所有类,这也不是我的初衷。Struts2+xwork一共有700余类,除了为读者做到现在的这些,已无法再做更多的事情。读者可以到Struts官方网站下载帮助文档,慢慢阅读和理解,相信会受益颇丰。
本章并不适合java语言初学者或者对java博大精深的思想理解不深的读者阅读,这其中涉及到太多的术语和类的使用,特别不要去钻牛角尖,容易使自信心受损。基本搞清楚Struts2的使用之后,再回过头来阅读本章,对一些知识点和思想也许会有更深的体会。
如果读者的java功底比较浑厚,而且对Struts2充满兴趣,但又没太多时间研究,不妨仔细阅读本章,再对照Struts的源代码,希望对您有所帮助。

相关文章推荐
- Struts2教程--第二章 Struts2的工作机制及分析
- 第二章 Struts2的工作机制及分析
- 第二章 Struts2的工作机制及分析
- Struts2的工作机制及分析
- Struts2的工作机制及分析
- Struts2的工作机制及分析
- Struts2的工作机制及分析
- Struts2的工作机制原理分析及实例
- Struts2的工作机制及分析(转)
- Struts2的工作机制及分析
- Struts2的工作机制及分析
- Struts2工作机制源码分析
- Struts2的工作机制及分析(转)
- Struts2的工作机制及分析(转)
- Struts2的工作机制及分析
- Struts2的工作机制及分析
- Struts2的工作机制及分析
- 深入分析 Java I/O 的工作机制
- 深入分析 Java I/O 的工作机制
- 深入分析 Java I/O 的工作机制