ios调用相机,选择图片上传
2014-12-09 16:11
393 查看
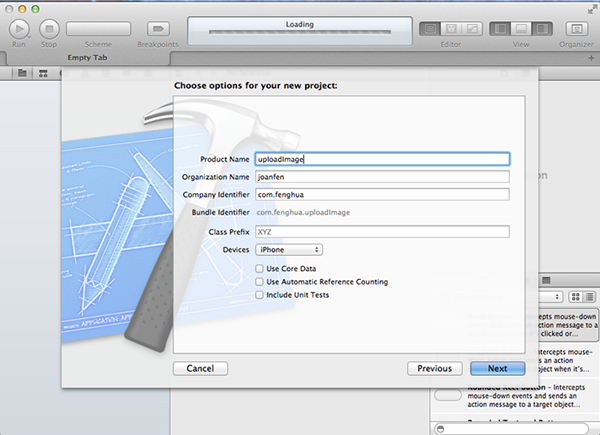
一、新建工程

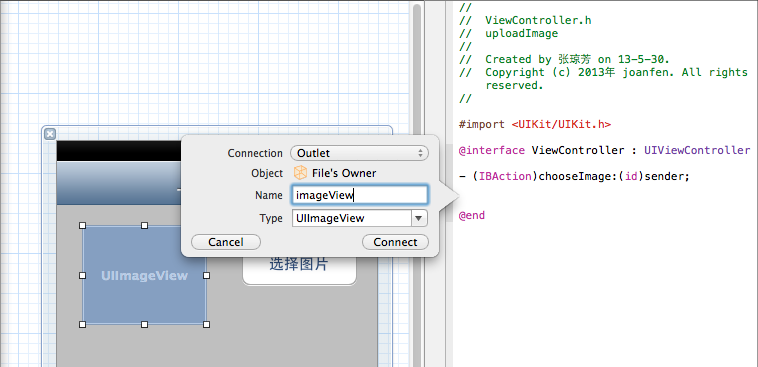
二、拖控件,创建映射

三、在.h中加入delegate
@interface ViewController : UIViewController
复制代码
四、实现按钮事件
-(IBAction)chooseImage:(id)sender {
UIActionSheet *sheet;
// 判断是否支持相机
if([UIImagePickerController isSourceTypeAvailable:UIImagePickerControllerSourceTypeCamera])
{
sheet = [[UIActionSheet alloc] initWithTitle:@"选择" delegate:self cancelButtonTitle:nil destructiveButtonTitle:@"取消" otherButtonTitles:@"拍照",@"从相册选择", nil];
}
else {
sheet = [[UIActionSheet alloc] initWithTitle:@"选择" delegate:self cancelButtonTitle:nil destructiveButtonTitle:@"取消" otherButtonTitles:@"从相册选择", nil];
}
sheet.tag = 255;
[sheet showInView:self.view];
}
复制代码
五、实现actionSheet delegate事件
-(void) actionSheet:(UIActionSheet *)actionSheet clickedButtonAtIndex:(NSInteger)buttonIndex
{
if (actionSheet.tag == 255) {
NSUInteger sourceType = 0;
// 判断是否支持相机
if([UIImagePickerController isSourceTypeAvailable:UIImagePickerControllerSourceTypeCamera]) {
switch (buttonIndex) {
case 0:
// 取消
return;
case 1:
// 相机
sourceType = UIImagePickerControllerSourceTypeCamera;
break;
case 2:
// 相册
sourceType = UIImagePickerControllerSourceTypePhotoLibrary;
break;
}
}
else {
if (buttonIndex == 0) {
return;
} else {
sourceType = UIImagePickerControllerSourceTypeSavedPhotosAlbum;
}
}
// 跳转到相机或相册页面
UIImagePickerController *imagePickerController = [[UIImagePickerController alloc] init];
imagePickerController.delegate = self;
imagePickerController.allowsEditing = YES;
imagePickerController.sourceType = sourceType;
[self presentViewController:imagePickerController animated:YES completion:^{}];
[imagePickerController release];
}
}
复制代码
六、实现ImagePicker delegate 事件
#pragma mark - image picker delegte
- (void)imagePickerController:(UIImagePickerController *)picker didFinishPickingMediaWithInfo:(NSDictionary *)info
{
[picker dismissViewControllerAnimated:YES completion:^{}];
UIImage *image = [info objectForKey:UIImagePickerControllerOriginalImage];
/* 此处info 有六个值
* UIImagePickerControllerMediaType; // an NSString UTTypeImage)
* UIImagePickerControllerOriginalImage; // a UIImage 原始图片
* UIImagePickerControllerEditedImage; // a UIImage 裁剪后图片
* UIImagePickerControllerCropRect; // an NSValue (CGRect)
* UIImagePickerControllerMediaURL; // an NSURL
* UIImagePickerControllerReferenceURL // an NSURL that references an asset in the AssetsLibrary framework
* UIImagePickerControllerMediaMetadata // an NSDictionary containing metadata from a captured photo
*/
// 保存图片至本地,方法见下文
[self saveImage:image withName:@"currentImage.png"];
NSString *fullPath = [[NSHomeDirectory() stringByAppendingPathComponent:@"Documents"] stringByAppendingPathComponent:@"currentImage.png"];
UIImage *savedImage = [[UIImage alloc] initWithContentsOfFile:fullPath];
isFullScreen = NO;
[self.imageView setImage:savedImage];
self.imageView.tag = 100;
}
- (void)imagePickerControllerDidCancel:(UIImagePickerController *)picker
{
[self dismissViewControllerAnimated:YES completion:^{}];
}
复制代码
七、保存图片
高保真压缩图片方法
NSData * UIImageJPEGRepresentation ( UIImage *image, CGFloat compressionQuality
)
复制代码
此方法可将图片压缩,但是图片质量基本不变,第二个参数即图片质量参数。
#pragma mark - 保存图片至沙盒
- (void) saveImage:(UIImage *)currentImage withName:(NSString *)imageName
{
NSData *imageData = UIImageJPEGRepresentation(currentImage, 0.5);
// 获取沙盒目录
NSString *fullPath = [[NSHomeDirectory() stringByAppendingPathComponent:@"Documents"] stringByAppendingPathComponent:imageName];
// 将图片写入文件
[imageData writeToFile:fullPath atomically:NO];
}
复制代码
八、实现点击图片预览功能,滑动放大缩小,带动画
-(void)touchesBegan:(NSSet *)touches withEvent:(UIEvent *)event
{
isFullScreen = !isFullScreen;
UITouch *touch = [touches anyObject];
CGPoint touchPoint = [touch locationInView:self.view];
CGPoint imagePoint = self.imageView.frame.origin;
//touchPoint.x ,touchPoint.y 就是触点的坐标
// 触点在imageView内,点击imageView时 放大,再次点击时缩小
if(imagePoint.x <= touchPoint.x && imagePoint.x +self.imageView.frame.size.width >=touchPoint.x && imagePoint.y <= touchPoint.y && imagePoint.y+self.imageView.frame.size.height >= touchPoint.y)
{
// 设置图片放大动画
[UIView beginAnimations:nil context:nil];
// 动画时间
[UIView setAnimationDuration:1];
if (isFullScreen) {
// 放大尺寸
self.imageView.frame = CGRectMake(0, 0, 320, 480);
}
else {
// 缩小尺寸
self.imageView.frame = CGRectMake(50, 65, 90, 115);
}
// commit动画
[UIView commitAnimations];
}
}
复制代码
九、上传图片,使用ASIhttpRequest类库实现,由于本文重点不是网络请求,故不对ASIHttpRequest详细讲述,只贴出部分代码
ASIFormDataRequest *requestReport = [[ASIFormDataRequest alloc] initWithURL:服务器地址];
NSString *Path = [[NSHomeDirectory() stringByAppendingPathComponent:@"Documents"] stringByAppendingPathComponent:@"currentImage.png"];
[requestReport setFile:Path forKey:@"picturepath"];
[requestReport buildPostBody];
requestReport.delegate = self;
[requestReport startAsynchronous];
复制代码
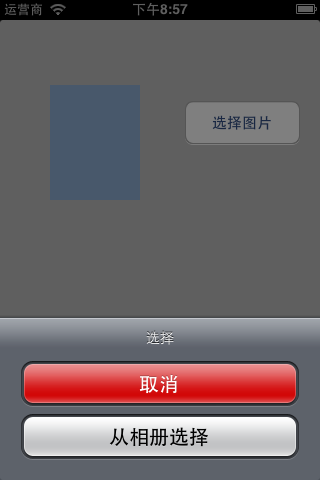
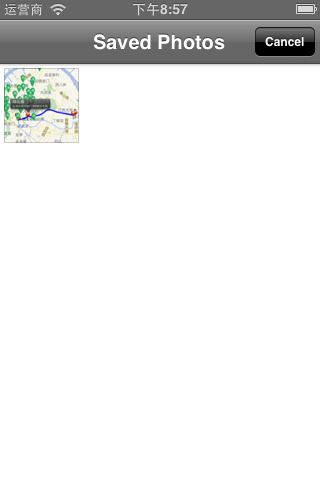
效果图如下:

->


ps:
1.模拟器无法调用相机;
2.模拟器添加图片方法:将图片拖至模拟器主屏,会由模拟器safari打开,长按可保存至模拟器相册,即可进行模拟器调试了。
=============================================================
今天调用系统的照相和本地相册,编辑图片的功能,但是按钮都是英文,我想改为中文的 取消,选择,重拍
需要改变两种方法
1. UIImagePickerController页面的Cancel和Choose按钮以及截取中得重拍按钮,想改成中文
本来打算通过获取这些按钮的指针进行设置的,最后发现可以在工程中直接 project-->info-->Localization--->language中add一个简体中文就可以了
参考:http://www.cocoachina.com/bbs/read.php?tid=132828
2.定制当然也有方法
首先通过递归的方法不断地在self.view的hierarchy中不断遍历,直到查找到这个view,获取其指针进行操作
二、拖控件,创建映射
三、在.h中加入delegate
@interface ViewController : UIViewController
复制代码
四、实现按钮事件
-(IBAction)chooseImage:(id)sender {
UIActionSheet *sheet;
// 判断是否支持相机
if([UIImagePickerController isSourceTypeAvailable:UIImagePickerControllerSourceTypeCamera])
{
sheet = [[UIActionSheet alloc] initWithTitle:@"选择" delegate:self cancelButtonTitle:nil destructiveButtonTitle:@"取消" otherButtonTitles:@"拍照",@"从相册选择", nil];
}
else {
sheet = [[UIActionSheet alloc] initWithTitle:@"选择" delegate:self cancelButtonTitle:nil destructiveButtonTitle:@"取消" otherButtonTitles:@"从相册选择", nil];
}
sheet.tag = 255;
[sheet showInView:self.view];
}
复制代码
五、实现actionSheet delegate事件
-(void) actionSheet:(UIActionSheet *)actionSheet clickedButtonAtIndex:(NSInteger)buttonIndex
{
if (actionSheet.tag == 255) {
NSUInteger sourceType = 0;
// 判断是否支持相机
if([UIImagePickerController isSourceTypeAvailable:UIImagePickerControllerSourceTypeCamera]) {
switch (buttonIndex) {
case 0:
// 取消
return;
case 1:
// 相机
sourceType = UIImagePickerControllerSourceTypeCamera;
break;
case 2:
// 相册
sourceType = UIImagePickerControllerSourceTypePhotoLibrary;
break;
}
}
else {
if (buttonIndex == 0) {
return;
} else {
sourceType = UIImagePickerControllerSourceTypeSavedPhotosAlbum;
}
}
// 跳转到相机或相册页面
UIImagePickerController *imagePickerController = [[UIImagePickerController alloc] init];
imagePickerController.delegate = self;
imagePickerController.allowsEditing = YES;
imagePickerController.sourceType = sourceType;
[self presentViewController:imagePickerController animated:YES completion:^{}];
[imagePickerController release];
}
}
复制代码
六、实现ImagePicker delegate 事件
#pragma mark - image picker delegte
- (void)imagePickerController:(UIImagePickerController *)picker didFinishPickingMediaWithInfo:(NSDictionary *)info
{
[picker dismissViewControllerAnimated:YES completion:^{}];
UIImage *image = [info objectForKey:UIImagePickerControllerOriginalImage];
/* 此处info 有六个值
* UIImagePickerControllerMediaType; // an NSString UTTypeImage)
* UIImagePickerControllerOriginalImage; // a UIImage 原始图片
* UIImagePickerControllerEditedImage; // a UIImage 裁剪后图片
* UIImagePickerControllerCropRect; // an NSValue (CGRect)
* UIImagePickerControllerMediaURL; // an NSURL
* UIImagePickerControllerReferenceURL // an NSURL that references an asset in the AssetsLibrary framework
* UIImagePickerControllerMediaMetadata // an NSDictionary containing metadata from a captured photo
*/
// 保存图片至本地,方法见下文
[self saveImage:image withName:@"currentImage.png"];
NSString *fullPath = [[NSHomeDirectory() stringByAppendingPathComponent:@"Documents"] stringByAppendingPathComponent:@"currentImage.png"];
UIImage *savedImage = [[UIImage alloc] initWithContentsOfFile:fullPath];
isFullScreen = NO;
[self.imageView setImage:savedImage];
self.imageView.tag = 100;
}
- (void)imagePickerControllerDidCancel:(UIImagePickerController *)picker
{
[self dismissViewControllerAnimated:YES completion:^{}];
}
复制代码
七、保存图片
高保真压缩图片方法
NSData * UIImageJPEGRepresentation ( UIImage *image, CGFloat compressionQuality
)
复制代码
此方法可将图片压缩,但是图片质量基本不变,第二个参数即图片质量参数。
#pragma mark - 保存图片至沙盒
- (void) saveImage:(UIImage *)currentImage withName:(NSString *)imageName
{
NSData *imageData = UIImageJPEGRepresentation(currentImage, 0.5);
// 获取沙盒目录
NSString *fullPath = [[NSHomeDirectory() stringByAppendingPathComponent:@"Documents"] stringByAppendingPathComponent:imageName];
// 将图片写入文件
[imageData writeToFile:fullPath atomically:NO];
}
复制代码
八、实现点击图片预览功能,滑动放大缩小,带动画
-(void)touchesBegan:(NSSet *)touches withEvent:(UIEvent *)event
{
isFullScreen = !isFullScreen;
UITouch *touch = [touches anyObject];
CGPoint touchPoint = [touch locationInView:self.view];
CGPoint imagePoint = self.imageView.frame.origin;
//touchPoint.x ,touchPoint.y 就是触点的坐标
// 触点在imageView内,点击imageView时 放大,再次点击时缩小
if(imagePoint.x <= touchPoint.x && imagePoint.x +self.imageView.frame.size.width >=touchPoint.x && imagePoint.y <= touchPoint.y && imagePoint.y+self.imageView.frame.size.height >= touchPoint.y)
{
// 设置图片放大动画
[UIView beginAnimations:nil context:nil];
// 动画时间
[UIView setAnimationDuration:1];
if (isFullScreen) {
// 放大尺寸
self.imageView.frame = CGRectMake(0, 0, 320, 480);
}
else {
// 缩小尺寸
self.imageView.frame = CGRectMake(50, 65, 90, 115);
}
// commit动画
[UIView commitAnimations];
}
}
复制代码
九、上传图片,使用ASIhttpRequest类库实现,由于本文重点不是网络请求,故不对ASIHttpRequest详细讲述,只贴出部分代码
ASIFormDataRequest *requestReport = [[ASIFormDataRequest alloc] initWithURL:服务器地址];
NSString *Path = [[NSHomeDirectory() stringByAppendingPathComponent:@"Documents"] stringByAppendingPathComponent:@"currentImage.png"];
[requestReport setFile:Path forKey:@"picturepath"];
[requestReport buildPostBody];
requestReport.delegate = self;
[requestReport startAsynchronous];
复制代码
效果图如下:
->


ps:
1.模拟器无法调用相机;
2.模拟器添加图片方法:将图片拖至模拟器主屏,会由模拟器safari打开,长按可保存至模拟器相册,即可进行模拟器调试了。
=============================================================
今天调用系统的照相和本地相册,编辑图片的功能,但是按钮都是英文,我想改为中文的 取消,选择,重拍
需要改变两种方法
1. UIImagePickerController页面的Cancel和Choose按钮以及截取中得重拍按钮,想改成中文
本来打算通过获取这些按钮的指针进行设置的,最后发现可以在工程中直接 project-->info-->Localization--->language中add一个简体中文就可以了
参考:http://www.cocoachina.com/bbs/read.php?tid=132828
2.定制当然也有方法
首先通过递归的方法不断地在self.view的hierarchy中不断遍历,直到查找到这个view,获取其指针进行操作
| ? |

相关文章推荐
- 原 iOS学习:调用相机,选择图片上传,带预览功能
- iOS学习:调用相机,选择图片上传,带预览功能
- iOS学习:调用相机,选择图片上传,带预览功能
- iOS学习:调用相机,选择图片上传,带预览功能
- iOS学习:调用相机,选择图片上传,带预览功能
- iOS学习:调用相机,选择图片上传,带预览功能
- iOS学习:调用相机,选择图片上传,带预览功能
- iOS学习:调用相机,选择图片上传,带预览功能 ,修改界面为中文
- iOS学习:调用相机,选择图片上传,带预览功能
- iOS学习:调用相机和相册,选择图片上传
- iOS学习:调用相机,选择图片上传,带预览功能
- 调用相机,选择图片上传,带预览功能
- 从UIWebView中调用iOS相册,并选择图片上传到Linux Web服务器
- iOS 调用相机拍照和选择图库图片 设置头像
- iOS调用系统相册和相机选择图片
- ios调用相册或相机上传图片
- iOS 相机调用相册打开及图片头像的上传到服务器详解
- 调用相机,选择图片上传,带预览功能
- 调用相机,选择图片上传,带预览功能
- 从UIWebView中调用iOS相册,并选择图片上传到Linux Web服务器。