(转)NGINX 反向代理、负载均衡、页面缓存、URL重写及读写分离详解
2014-11-27 10:29
609 查看
本文章转自:陈明乾 的BLOG。转载时请务必以超链接形式标明文章 原始出处 、作者信息和本声明。原文地址:/article/4340860.html
大纲
一、前言
二、环境准备
三、安装与配置Nginx
四、Nginx之反向代理
五、Nginx之负载均衡
六、Nginx之页面缓存
七、Nginx之URL重写
八、Nginx之读写分离
注,操作系统为 CentOS 6.4 x86_64 , Nginx 是版本是最新版的1.4.2,所以实验用到的软件请点击这里下载:http://yunpan.cn/QXIgqMmVmuZrm
一、前言
在前面的几篇博文中我们主要讲解了Nginx作为Web服务器知识点,主要的知识点有nginx的理论详解、nginx作为web服务器的操作讲解、nginx作为LNMP架构的讲解,不清楚的博友可以回头看看,在这一篇博客中我们主要讲解, nginx的反向代理、负载均衡、缓存、URL重写以及读写分离详解。好了,下面我们来具体说一说。
二、环境准备
1.操作系统
CentOS 6.4 x86_64
2.软件版本
Nginx 1.4.2
3.实验拓扑
注,实验拓扑见下文。
4.安装yum源
5.各节点时间同步
6.关闭防火墙与SELinux
三、安装Nginx
1.解压
2.新建nginx用户与组
3.准备编译配置文件
4.编译并安装
5.为nginx提供SysV init脚本
6.为此脚本赋予执行权限
7.添加至服务管理列表,并让其开机自动启动
8.启动nginx
9.查看一下端口
10.测试一下

好了,Nginx安装与配置就到这里,下面我们来说一说Nginx的反向代理。
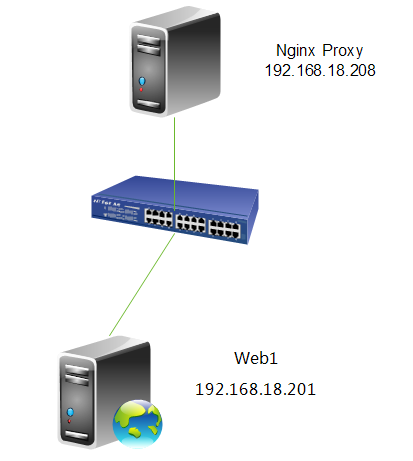
四、Nginx之反向代理
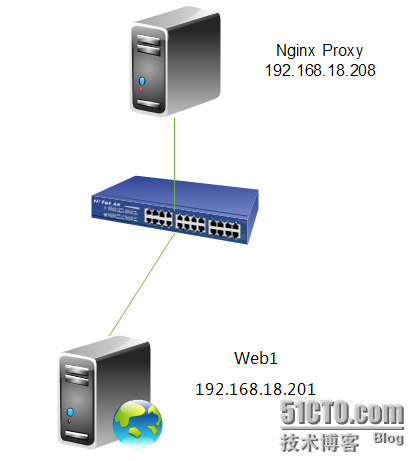
在配置nginx反向代理之间我们得先准备两台测试服务器,Web1与Web2。
1.安装httpd
2.提供测试页面
3.启动httpd服务
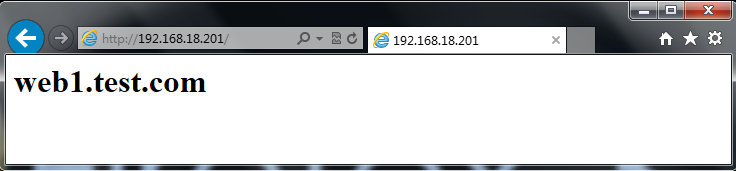
4.测试一下

5.简单说一下,正向代理与反向代理
结论就是,正向代理 是一个位于客户端和原始服务器(origin server)之间的服务器,为了从原始服务器取得内容,客户端向代理发送一个请求并指定目标(原始服务器),然后代理向原始服务器转交请求并将获得的内容返回给客户端。客户端必须要进行一些特别的设置才能使用正向代理。
继续举例:
例用户访问 http://www.test.com/readme,但www.test.com上并不存在readme页面,他是偷偷从另外一台服务器上取回来,然后作为自己的内容返回用户,但用户并不知情。这里所提到的 www.test.com 这个域名对应的服务器就设置了反向代理功能。
结论就是,反向代理正好相反,对于客户端而言它就像是原始服务器,并且客户端不需要进行任何特别的设置。客户端向反向代理的命名空间(name-space)中的内容发送普通请求,接着反向代理将判断向何处(原始服务器)转交请求,并将获得的内容返回给客户端,就像这些内容原本就是它自己的一样。
从用途上来讲:
正向代理的典型用途是为在防火墙内的局域网客户端提供访问Internet的途径。正向代理还可以使用缓冲特性减少网络使用率。反向代理的典型用途是将防火墙后面的服务器提供给Internet用户访问。反向代理还可以为后端的多台服务器提供负载平衡,或为后端较慢的服务器提供缓冲服务。另外,反向代理还可以启用高级URL策略和管理技术,从而使处于不同web服务器系统的web页面同时存在于同一个URL空间下。
从安全性来讲:
正向代理允许客户端通过它访问任意网站并且隐藏客户端自身,因此你必须采取安全措施以确保仅为经过授权的客户端提供服务。反向代理对外都是透明的,访问者并不知道自己访问的是一个代理。
6.nginx 代理模块
http 代理官方中文文档:http://www.howtocn.org/nginx:nginx%E6%A8%A1%E5%9D%97%E5%8F%82%E8%80%83%E6%89%8B%E5%86%8C%E4%B8%AD%E6%96%87%E7%89%88:standardhttpmodules:httpproxy
说明:代理模块的指令有很多我这里只讲解重要的proxy_pass,想了解更多代理指令请参考官方中文文档。
这个模块可以转发请求到其他的服务器。HTTP/1.0无法使用keepalive(后端服务器将为每个请求创建并且删除连接)。nginx为浏览器发送HTTP/1.1并为后端服务器发送HTTP/1.0,这样浏览器就可以为浏览器处理keepalive。
如下例:
注意,当使用http proxy模块(甚至FastCGI),所有的连接请求在发送到后端服务器之前nginx将缓存它们,因此,在测量从后端传送的数据时,它的进度显示可能不正确。
实验拓扑:
7.配置http反向代理
指令说明:proxy_pass
语法:proxy_pass URL
默认值:no
使用字段:location, location中的if字段
这个指令设置被代理服务器的地址和被映射的URI,地址可以使用主机名或IP加端口号的形式,例如:proxy_pass http://localhost:8000/uri/;
8.重新加载一下配置文件
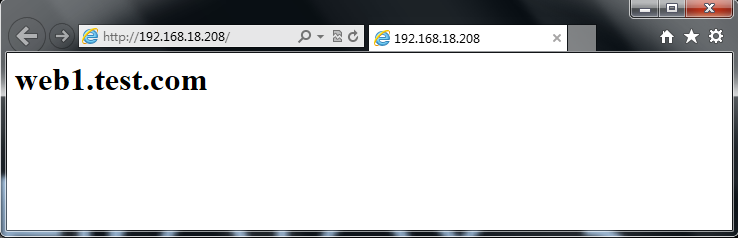
9.测试一下
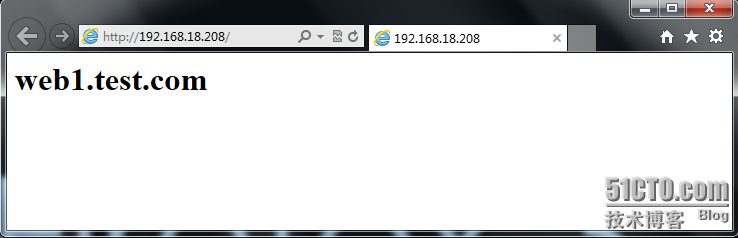
注,大家可以看到,当我们访问192.168.18.208时,被代理重新定向到Web1上。
10.查看一下Web服务器日志
注,大家可以看到我们这里的客户的IP全是,nginx代理服务器的IP,并不是真实客户端的IP。下面我们修改一下,让日志的IP显示真实的客户端的IP。
11.修改nginx配置文件
指令说明:proxy_set_header
语法:proxy_set_header header value
默认值: Host and Connection
使用字段:http, server, location
这个指令允许将发送到被代理服务器的请求头重新定义或者增加一些字段。这个值可以是一个文本,变量或者它们的组合。proxy_set_header在指定的字段中没有定义时会从它的上级字段继承。
12.重新加载一下配置文件
13.测试并查看日志
注,大家可以看到日志记录的还是代理的IP,没有显示真实客户端的IP,为什么呢?我们来看一下httpd的配置文件。
14.查看并修改httpd配置文件
[root@web1~]#vim /etc/httpd/conf/httpd.conf

注,大家可以这里记录日志的参数还是%h,下面我们修改一下参数。

注,这是修改后的参数,将h%修改为%{X-Real-IP}i,好的下面我们再来测试一下。
15.重启并测试
注,大家可以看到现在的日志里记录的IP地址就是真实的客户端地址了。好了,到这里Nginx代理后端一台服务器就演示到这里,下面我们继续说。
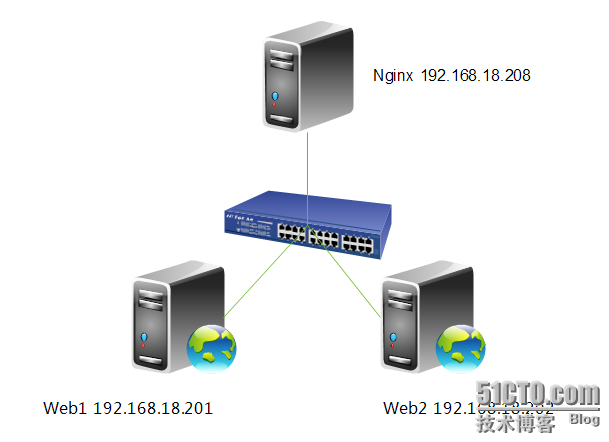
五、Nginx之负载均衡
注,大家可以看到,由于我们网站是发展初期,nginx只代理了后端一台服务器,但由于我们网站名气大涨访问的人越来越多一台服务器实在是顶不住,于是我们加了多台服务器,那么多台服务器又怎么配置代理呢,我们这里以两台服务器为案例,为大家做演示。
1.upstream负载均衡模块说明
案例:
下面设定负载均衡的服务器列表。
upstream是Nginx的HTTP Upstream模块,这个模块通过一个简单的调度算法来实现客户端IP到后端服务器的负载均衡。在上面的设定中,通过upstream指令指定了一个负载均衡器的名称test.net。这个名称可以任意指定,在后面需要用到的地方直接调用即可。
2.upstream支持的负载均衡算法
Nginx的负载均衡模块目前支持4种调度算法,下面进行分别介绍,其中后两项属于第三方调度算法。
轮询(默认)。每个请求按时间顺序逐一分配到不同的后端服务器,如果后端某台服务器宕机,故障系统被自动剔除,使用户访问不受影响。Weight 指定轮询权值,Weight值越大,分配到的访问机率越高,主要用于后端每个服务器性能不均的情况下。
ip_hash。每个请求按访问IP的hash结果分配,这样来自同一个IP的访客固定访问一个后端服务器,有效解决了动态网页存在的session共享问题。
fair。这是比上面两个更加智能的负载均衡算法。此种算法可以依据页面大小和加载时间长短智能地进行负载均衡,也就是根据后端服务器的响应时间来分配请求,响应时间短的优先分配。Nginx本身是不支持fair的,如果需要使用这种调度算法,必须下载Nginx的upstream_fair模块。
url_hash。此方法按访问url的hash结果来分配请求,使每个url定向到同一个后端服务器,可以进一步提高后端缓存服务器的效率。Nginx本身是不支持url_hash的,如果需要使用这种调度算法,必须安装Nginx 的hash软件包。
3.upstream支持的状态参数
在HTTP Upstream模块中,可以通过server指令指定后端服务器的IP地址和端口,同时还可以设定每个后端服务器在负载均衡调度中的状态。常用的状态有:
down,表示当前的server暂时不参与负载均衡。
backup,预留的备份机器。当其他所有的非backup机器出现故障或者忙的时候,才会请求backup机器,因此这台机器的压力最轻。
max_fails,允许请求失败的次数,默认为1。当超过最大次数时,返回proxy_next_upstream模块定义的错误。
fail_timeout,在经历了max_fails次失败后,暂停服务的时间。max_fails可以和fail_timeout一起使用。
注,当负载调度算法为ip_hash时,后端服务器在负载均衡调度中的状态不能是weight和backup。
4.实验拓扑
5.配置nginx负载均衡
注,upstream是定义在server{ }之外的,不能定义在server{ }内部。定义好upstream之后,用proxy_pass引用一下即可。
6.重新加载一下配置文件
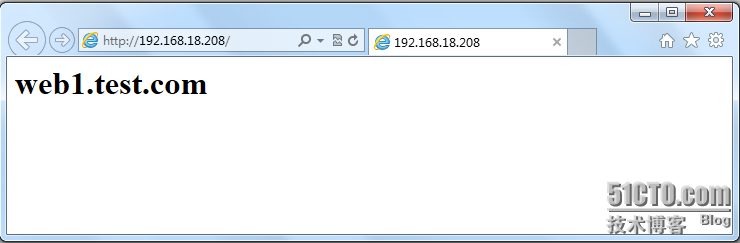
7.测试一下


注,大家可以不断的刷新浏览的内容,可以发现web1与web2是交替出现的,达到了负载均衡的效果。
8.查看一下Web访问服务器日志
Web1:
Web2:
先修改一下,Web服务器记录日志的格式。
接着,再访问多次,继续查看日志。
注,大家可以看到,两台服务器日志都记录是192.168.18.138访问的日志,也说明了负载均衡配置成功。
9.配置nginx进行健康状态检查
max_fails,允许请求失败的次数,默认为1。当超过最大次数时,返回proxy_next_upstream模块定义的错误。
fail_timeout,在经历了max_fails次失败后,暂停服务的时间。max_fails可以和fail_timeout一起使用,进行健康状态检查。
10.重新加载一下配置文件
11.停止服务器并测试
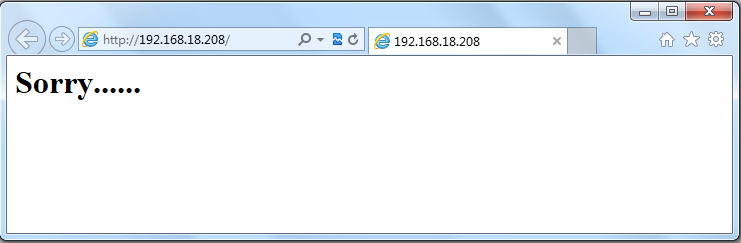
注,大家可以看到,现在只能访问Web2,再重新启动Web1,再次访问一下。

注,大家可以看到,现在又可以重新访问,说明nginx的健康状态查检配置成功。但大家想一下,如果不幸的是所有服务器都不能提供服务了怎么办,用户打开页面就会出现出错页面,那么会带来用户体验的降低,所以我们能不能像配置LVS是配置sorry_server呢,答案是可以的,但这里不是配置sorry_server而是配置backup。
12.配置backup服务器
13.重新加载配置文件
14.关闭Web服务器并进行测试

注,大家可以看到,当所有服务器都不能工作时,就会启动备份服务器。好了,backup服务器就配置到这里,下面我们来配置ip_hash负载均衡。
15.配置ip_hash负载均衡
ip_hash,每个请求按访问IP的hash结果分配,这样来自同一个IP的访客固定访问一个后端服务器,有效解决了动态网页存在的session共享问题。(一般电子商务网站用的比较多)
注,当负载调度算法为ip_hash时,后端服务器在负载均衡调度中的状态不能有backup。(有人可能会问,为什么呢?大家想啊,如果负载均衡把你分配到backup服务器上,你能访问到页面吗?不能,所以了不能配置backup服务器)
16.重新加载一下服务器
17.测试一下

注,大家可以看到,你不断的刷新页面一直会显示的民Web2,说明ip_hash负载均衡配置成功。下面我们来统计一下Web2的访问连接数。
18.统计Web2的访问连接数
注,你不断的刷新,连接数会越来越多。好了,nginx的负载均衡就全部演示到这里下面我们来说一说,页面缓存。
六、Nginx之页面缓存
1.指令说明
proxy_cache_path
语法:proxy_cache_pathpath [levels=number] keys_zone=zone_name:zone_size [inactive=time]
[max_size=size];
默认值:None
使用字段:http
指令指定缓存的路径和一些其他参数,缓存的数据存储在文件中,并且使用代理url的哈希值作为关键字与文件名。levels参数指定缓存的子目录数,例如:
文件名类似于:
levels指定目录结构,可以使用任意的1位或2位数字作为目录结构,如 X, X:X,或X:X:X 例如: “2”, “2:2”, “1:1:2“,但是最多只能是三级目录。
所有活动的key和元数据存储在共享的内存池中,这个区域用keys_zone参数指定。one指的是共享池的名称,10m指的是共享池的大小。
注意每一个定义的内存池必须是不重复的路径,例如:
如果在inactive参数指定的时间内缓存的数据没有被请求则被删除,默认inactive为10分钟。一个名为cache manager的进程控制磁盘的缓存大小,它被用来删除不活动的缓存和控制缓存大小,这些都在max_size参数中定义,当目前缓存的值超出max_size指定的值之后,超过其大小后最少使用数据(LRU替换算法)将被删除。内存池的大小按照缓存页面数的比例进行设置,一个页面(文件)的元数据大小按照操作系统来定,如FreeBSD/i386下为64字节,FreeBSD/amd64下为128字节。
proxy_cache
语法:proxy_cache zone_name;
默认值:None
使用字段:http, server, location
设置一个缓存区域的名称,一个相同的区域可以在不同的地方使用。
在0.7.48后,缓存遵循后端的”Expires”, “Cache-Control: no-cache”, “Cache-Control: max-age=XXX”头部字段,0.7.66版本以后,”Cache-Control:“private”和”no-store”头同样被遵循。nginx在缓存过程中不会处理”Vary”头,为了确保一些私有数据不被所有的用户看到,后端必须设置 “no-cache”或者”max-age=0”头,或者proxy_cache_key包含用户指定的数据如$cookie_xxx,使用cookie的值作为proxy_cache_key的一部分可以防止缓存私有数据,所以可以在不同的location中分别指定proxy_cache_key的值以便分开私有数据和公有数据。
缓存指令依赖代理缓冲区(buffers),如果proxy_buffers设置为off,缓存不会生效。
proxy_cache_valid
语法:proxy_cache_valid reply_code [reply_code …] time;
默认值:None
使用字段:http, server, location
为不同的应答设置不同的缓存时间,例如:
为应答代码为200和302的设置缓存时间为10分钟,404代码缓存1分钟。
如果只定义时间:
那么只对代码为200, 301和302的应答进行缓存。
同样可以使用any参数任何应答。
2.定义一个简单nginx缓存服务器
3.新建缓存目录
4.重新加载一下配置文件
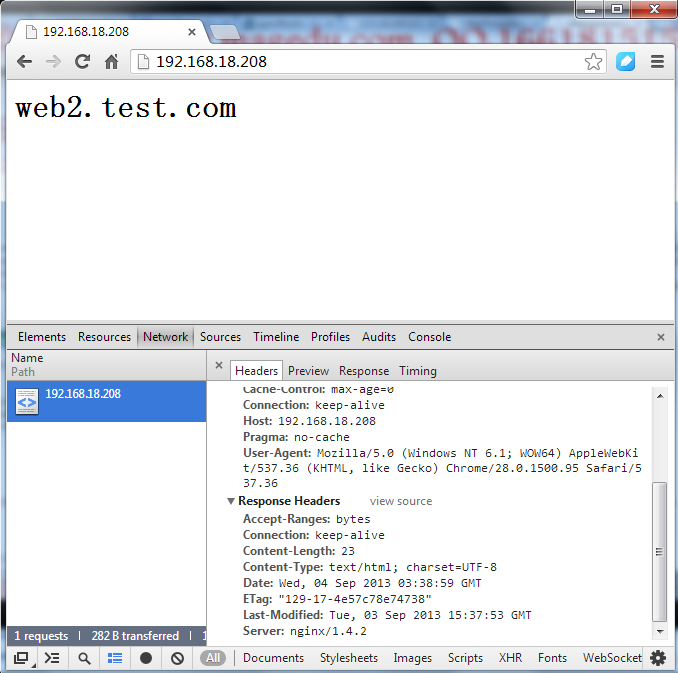
5.下面我们来测试一下(谷歌浏览器)
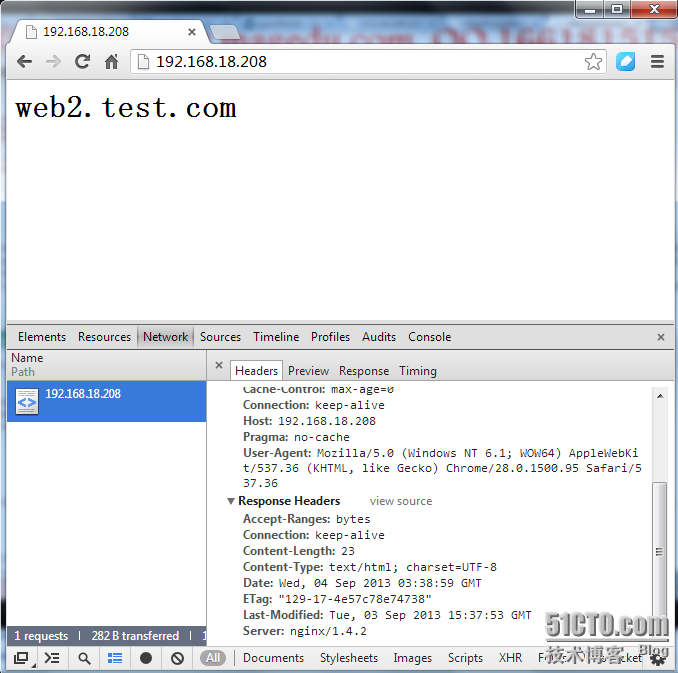
注,大家用谷歌浏览器测试的时候,可以按F12调用开发工具,选择Network选项,我们可以看到,Response Headers,在这里我们可以看到,我们请求的是否是缓存,但现在还看不到,下面我们来配置一下,再来测试。
6.缓存变量说明
$server_addr
服务器地址,在完成一次系统调用后可以确定这个值,如果要绕开系统调用,则必须在listen中指定地址并且使用bind参数。
$upstream_cache_status
0.8.3版本中其值可能为:
MISS 未命中
EXPIRED – expired。请求被传送到后端。
UPDATING – expired。由于proxy/fastcgi_cache_use_stale正在更新,将使用旧的应答。
STALE – expired。由于proxy/fastcgi_cache_use_stale,后端将得到过期的应答。
HIT 命中
7.重新加载一下配置文件
8.测试一下
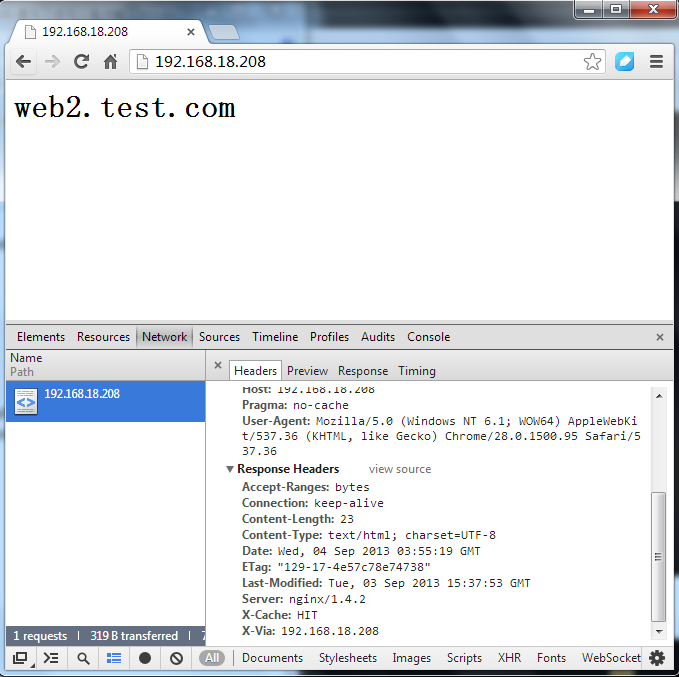
注,从图中我们可以看到,我们访问的服务器是192.168.18.208,缓存命中。大家可以看到是不是很直观啊。下面我们看一下缓存目录。
9.查看一下缓存目录
注,缓存目录里确实有缓存文件。好了,nginx缓存配置就到这边了,更多配置请根据需要看配置文档。下面我们来说一下,URL重写。
七、Nginx之URL重写
摘要
这个模块允许使用正则表达式重写URI(需PCRE库),并且可以根据相关变量重定向和选择不同的配置。如果这个指令在server字段中指定,那么将在被请求的location确定之前执行,如果在指令执行后所选择的location中有其他的重写规则,那么它们也被执行。如果在location中执行这个指令产生了新的URI,那么location又一次确定了新的URI。这样的循环可以最多执行10次,超过以后nginx将返回500错误。
break
语法:break
默认值:none
使用字段:server, location, if
完成当前设置的规则,停止执行其他的重写指令。
示例:
if
语法:if (condition) { … }
默认值:none
使用字段:server, location
注意:在使用if指令之前请查看if
is evil page并且尽量考虑用try_files代替。
判断一个条件,如果条件成立,则后面的大括号内的语句将执行,相关配置从上级继承。
可以在判断语句中指定下列值:
一个变量的名称;不成立的值为:空字符传”“或者一些用“0”开始的字符串。
一个使用=或者!=运算符的比较语句。
使用符号~*和~模式匹配的正则表达式:
~为区分大小写的匹配。
~*不区分大小写的匹配(firefox匹配FireFox)。
!~和!~*意为“不匹配的”。
使用-f和!-f检查一个文件是否存在。
使用-d和!-d检查一个目录是否存在。
使用-e和!-e检查一个文件,目录或者软链接是否存在。
使用-x和!-x检查一个文件是否为可执行文件。
正则表达式的一部分可以用圆括号,方便之后按照顺序用$1-$9来引用。
示例配置:
内置变量$invalid_referer用指令valid_referers指定。
return
语法:return code
默认值:none
使用字段:server, location, if
这个指令结束执行配置语句并为客户端返回状态代码,可以使用下列的值:204,400,402-406,408,410, 411, 413, 416与500-504。此外,非标准代码444将关闭连接并且不发送任何的头部。
rewrite
语法:rewrite regex replacement flag
默认值:none
使用字段:server, location, if
按照相关的正则表达式与字符串修改URI,指令按照在配置文件中出现的顺序执行。
可以在重写指令后面添加标记。
如果替换的字符串以http://开头,请求将被重定向,并且不再执行多余的rewrite指令。
尾部的标记(flag)可以是以下的值:
last – 完成重写指令,之后搜索相应的URI或location。
break – 完成重写指令。
redirect – 返回302临时重定向,如果替换字段用http://开头则被使用。
permanent – 返回301永久重定向。
注意如果一个重定向是相对的(没有主机名部分),nginx将在重定向的过程中使用匹配server_name指令的“Host”头或者server_name指令指定的第一个名称,如果头不匹配或不存在,如果没有设置server_name,将使用本地主机名,如果你总是想让nginx使用“Host”头,可以在server_name使用“*”通配符(查看http核心模块中的server_name)。例如:
但是如果我们将其放入一个名为/download/的location中,则需要将last标记改为break,否则nginx将执行10次循环并返回500错误。
如果替换字段中包含参数,那么其余的请求参数将附加到后面,为了防止附加,可以在最后一个字符后面跟一个问号:
注意:大括号({和}),可以同时用在正则表达式和配置块中,为了防止冲突,正则表达式使用大括号需要用双引号(或者单引号)。例如要重写以下的URL:
为:
则使用以下正则表达式(注意引号):
如果指定一个“?”在重写的结尾,Nginx将丢弃请求中的参数,即变量$args,当使用$request_uri或$uri&$args时可以在rewrite结尾使用“?”以避免nginx处理两次参数串。
在rewrite中使用$request_uri将www.example.com重写到example.com:
同样,重写只对路径进行操作,而不是参数,如果要重写一个带参数的URL,可以使用以下代替:
注意$args变量不会被编译,与location过程中的URI不同(参考http核心模块中的location)。
rewrite_log
语法:rewrite_log on |off
默认值:rewrite_log off
使用字段:server, location, if
变量:无
启用时将在error log中记录notice 标记的重写日志。
set
语法:set variable value
默认值:none
使用字段:server, location, if
指令设置一个变量并为其赋值,其值可以是文本,变量和它们的组合。
你可以使用set定义一个新的变量,但是不能使用set设置$http_xxx头部变量的值。
uninitialized_variable_warn
语法:uninitialized_variable_warn on|off
默认值:uninitialized_variable_warn on
使用字段:http, server, location, if
开启或关闭在未初始化变量中记录警告日志。
事实上,rewrite指令在配置文件加载时已经编译到内部代码中,在解释器产生请求时使用。
这个解释器是一个简单的堆栈虚拟机,如下列指令:
将被编译成以下顺序:
注意并没有关于limit_rate的代码,因为它没有提及ngx_http_rewrite_module模块,“if”块可以类似”location”指令在配置文件的相同部分同时存在。
如果$slow为真,对应的if块将生效,在这个配置中limit_rate的值为10k。
指令:
如果我们将第一个斜杠括入圆括号,则可以减少执行顺序:
之后的顺序类似如下:
测试一下
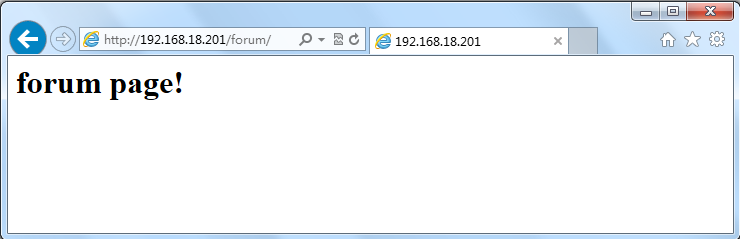
好了,下面我们来测试一下rewrite重写。
4.测试一下
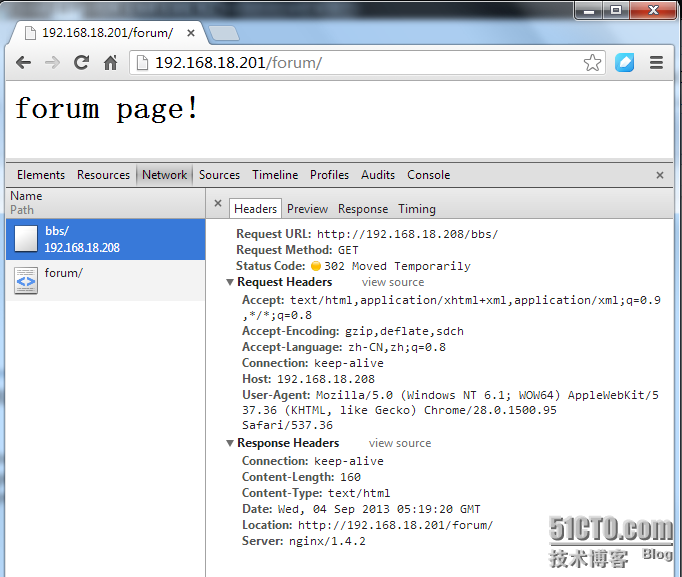
注,大家可以从图中看出,status code 302指的是临时重定向,那就说明我们rewrite重写配置成功。大家知道302是临时重定向而301是永久重定向,那么怎么实现永久重定向呢。一般服务器与服务器之间是临时重定向,服务器内部是永久重定向。下面我们来演示一下永久重定向。
5.配置永久重定向
6.重新加载一下配置文件
7.测试一下
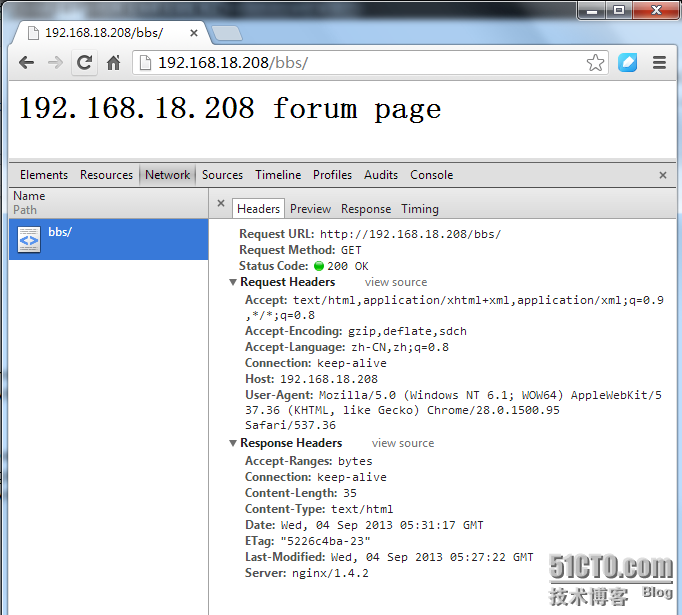
注,大家从图中可以看到,我们访问bbs/是直接帮我们跳转到forum/下,这种本机的跳转就是永久重定向也叫隐式重定向。好了,rewrite重定向我们就说到这里了,想要查询更多关于重定向的指令请参考官方文档。最后,我们来说一下读写分离。
八、Nginx之读写分离
1.实验拓扑

需求分析,前端一台nginx做负载均衡反向代理,后面两台httpd服务器。整个架构是提供BBS(论坛)服务,有一需求得实现读写分离,就是上传附件的功能,我们上传的附件只能上传到Web1,然后在Web1上利用rsync+inotify实现附件同步,大家都知道rsync+inotify只能是主向从同步,不能双向同步。所以Web1可进行写操作,而Web2只能进行读操作,这就带来读写分离的需求,下面我们就来说一下,读写分离怎么实现。
2.WebDAV功能说明
WebDAV (Web-based Distributed Authoring and Versioning) 一种基于 HTTP 1.1协议的通信协议。它扩展了HTTP 1.1,在GET、POST、HEAD等几个HTTP标准方法以外添加了一些新的方法,使应用程序可直接对Web Server直接读写,并支持写文件锁定(Locking)及解锁(Unlock),还可以支持文件的版本控制。这样我们就能配置读写分离功能了,下面我们来具体配置一下。
3.修改配置文件
4.重新加载一下配置文件
5.配置httpd的WebDAV功能

注,在<Directory “/var/www/html”>下启用就行。
6.重新启动一下httpd
7.测试一下
注,web1与web2访问都没问题。
注,我们上传文件到,web2上时,因为web2只人读功能,所以没有开户WebDAV功能,所以显示是405Method Not Allowed。
注,我们在Web1开启了WebDAV功能,但我们目录是root目录是不允许apache用户上传的,所以显示的是403 Forbidden。下面我们给apache授权,允许上传。
下面我们再来测试一下,
注,大家可以看到我们成功的上传了文件,说明nginx读写分离功能配置完成。最后,我们来查看一下上传的文件。
好了,到这里nginx的反向代理、负载均衡、页面缓存、URL重写及读写分离就全部讲解完成。希望大家有所收获,^_^……
本文出自 “Share your knowledge …” 博客,请务必保留此出处/article/4340860.html
大纲
一、前言
二、环境准备
三、安装与配置Nginx
四、Nginx之反向代理
五、Nginx之负载均衡
六、Nginx之页面缓存
七、Nginx之URL重写
八、Nginx之读写分离
注,操作系统为 CentOS 6.4 x86_64 , Nginx 是版本是最新版的1.4.2,所以实验用到的软件请点击这里下载:http://yunpan.cn/QXIgqMmVmuZrm
一、前言
在前面的几篇博文中我们主要讲解了Nginx作为Web服务器知识点,主要的知识点有nginx的理论详解、nginx作为web服务器的操作讲解、nginx作为LNMP架构的讲解,不清楚的博友可以回头看看,在这一篇博客中我们主要讲解, nginx的反向代理、负载均衡、缓存、URL重写以及读写分离详解。好了,下面我们来具体说一说。
二、环境准备
1.操作系统
CentOS 6.4 x86_64
2.软件版本
Nginx 1.4.2
3.实验拓扑
注,实验拓扑见下文。
4.安装yum源
| 1 2 3 | [root@nginx ~] # rpm -ivh http://download.fedoraproject.org/pub/epel/6/x86_64/epel-release-6-8.noarch.rpm[/code][root@web1~]# rpm -ivh http://download.fedoraproject.org/pub/epel/6/x86_64/epel-release-6-8.noarch.rpm[/code][root@web2~]# rpm -ivh http://download.fedoraproject.org/pub/epel/6/x86_64/epel-release-6-8.noarch.rpm[/code] |
| 1 2 3 | [root@nginx ~] # ntpdate 202.120.2.101 [root@web1~] # ntpdate 202.120.2.101 [root@web2~] # ntpdate 202.120.2.101 |
| 1 2 3 4 5 6 7 8 9 10 11 12 | [root@nginx ~] # service iptables stop [root@nginx ~] # chkconfig iptables off [root@nginx ~] # getenforce Disabled [root@web1~] # service iptables stop [root@web1~] # chkconfig iptables off [root@web1~] # getenforce Disabled [root@web2~] # service iptables stop [root@web2~] # chkconfig iptables off [root@web2~] # getenforce Disabled |
1.解压
| 1 | [root@nginx src] # tar xf nginx-1.4.2.tar.gz |
| 1 2 3 4 | [root@nginx src] # groupadd -g 108-r nginx [root@nginx src] # useradd -u 108 -r -g 108 nginx [root@nginx src] # id nginx uid=108(nginx) gid=108(nginx) 组=108(nginx) |
| 1 2 | [root@nginx src] # yum install -y pcre-devel openssl-devel [root@nginx nginx-1.4.2] # ./configure--prefix=/usr--sbin-path=/usr/sbin/nginx--conf-path=/etc/nginx/nginx.conf--error-log-path=/var/log/nginx/error.log--http-log-path=/var/log/nginx/access.log--pid-path=/var/run/nginx/nginx.pid --lock-path=/var/lock/nginx.lock --user=nginx--group=nginx--with-http_ssl_module--with-http_flv_module--with-http_stub_status_module--with-http_gzip_static_module--http-client-body-temp-path=/var/tmp/nginx/client/--http-proxy-temp-path=/var/tmp/nginx/proxy/--http-fastcgi-temp-path=/var/tmp/nginx/fcgi/ --http-uwsgi-temp-path=/var/tmp/nginx/uwsgi--http-scgi-temp-path=/var/tmp/nginx/scgi--with-pcre |
| 1 | [root@nginx nginx-1.4.2] # make && make install |
| 1 2 3 4 5 6 7 8 9 10 11 12 13 14 15 16 17 18 19 20 21 22 23 24 25 26 27 28 29 30 31 32 33 34 35 36 37 38 39 40 41 42 43 44 45 46 47 48 49 50 51 52 53 54 55 56 57 58 59 60 61 62 63 64 65 66 67 68 69 70 71 72 73 74 75 76 77 78 79 80 81 82 83 84 85 86 87 88 89 90 91 92 93 94 95 96 97 98 99 100 101 102 103 104 105 106 107 108 109 110 | [root@nginx ~] # cat /etc/init.d/nginx #!/bin/sh # #nginx - this script starts and stops # #chkconfig:- 8515 #description:Nginx is an HTTP(S) server, # proxy and IMAP/POP3 proxy #processname: nginx #config:/etc/nginx/nginx.conf #config:/etc/sysconfig/nginx #pidfile:/var/run/nginx.pid #Source function library. . /etc/rc .d /init .d /functions #Source networking configuration. . /etc/sysconfig/network #Check that networking is up. [ "$NETWORKING" = "no" ] && exit 0 nginx= "/usr/sbin/nginx" prog=$( basename $nginx) NGINX_CONF_FILE= "/etc/nginx/nginx.conf" [-f /etc/sysconfig/nginx ] &&. /etc/sysconfig/nginx lockfile= /var/lock/subsys/nginx make_dirs() {# make required directories user=`nginx -V 2>&1| grep "configure arguments:" | sed 's/[^*]*--user=\([^ ]*\).*/\1/g' -` options=`$nginx grep 'configure arguments:' ` for opt in $options; do if [ ` echo $opt grep '.*-temp-path' ` ]; then value=` echo $opt cut -d "=" -f if [ "$value" ]; then # echo "creating" $value mkdir -p $value && chown -R $user $value fi fi done } start() {[ exit 5 [ exit 6 make_dirs echo -n $ "Starting $prog: " daemon $nginx -c $NGINX_CONF_FILE retval=$? echo [ $retval- eq 0 ] && touch $lockfile return $retval } stop() {echo -n $ "Stopping $prog: " killproc $prog -QUIT retval=$? echo [ $retval- eq 0 ] && rm -f return $retval } restart() {configtest return $? stop sleep 1 start } reload() {configtest return $? echo -n $ "Reloading $prog: " killproc $nginx -HUP RETVAL=$? echo } force_reload() {restart } configtest() {$nginx -t -c $NGINX_CONF_FILE } rh_status() {status $prog } rh_status_q() {rh_status > /dev/null 2>&1 } case "$1" in start) rh_status_q && exit 0 $1 ;; stop) rh_status_q exit 0 $1 ;; restart|configtest) $1 ;; reload) rh_status_q exit 7 $1 ;; force-reload) force_reload ;; status) rh_status ;; condrestart|try-restart) rh_status_q exit 0 ;; *) echo $ "Usage: exit 2 esac |
| 1 | [root@nginx ~] # chmod +x /etc/init.d/nginx |
| 1 2 3 4 | [root@nginx ~] # chkconfig --add nginx [root@nginx ~] # chkconfig nginx on [root@nginx ~] # chkconfig nginx --list nginx0:关闭 1:关闭 2:启用 |
| 1 2 | [root@nginx ~] # service nginx start 正在启动 nginx: [确定] |
| 1 2 | [root@nginx ~] # tcp000.0.0.0:80 /nginx |

好了,Nginx安装与配置就到这里,下面我们来说一说Nginx的反向代理。
四、Nginx之反向代理
在配置nginx反向代理之间我们得先准备两台测试服务器,Web1与Web2。
1.安装httpd
| 1 2 | [root@web1~] # yum install -y httpd [root@web2~] # yum install -y httpd |
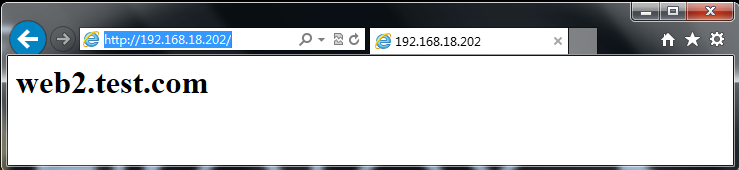
| 1 2 | [root@web1~] # echo "<h1>web1.test.com</h1>" > /var/www/html/index.html [root@web2~] # echo "<h1>web2.test.com</h1>" > /var/www/html/index.html |
| 1 2 3 4 | [root@web1~] # service httpd start 正在启动 httpd: [确定] [root@web2~] # service httpd start 正在启动 httpd: [确定] |

5.简单说一下,正向代理与反向代理
(1).正向代理的概念
正向代理,也就是传说中的代理,他的工作原理就像一个跳板,简单的说,我是一个用户,我访问不了某网站,但是我能访问一个代理服务器,这个代理服务器呢,他能访问那个我不能访问的网站,于是我先连上代理服务器,告诉他我需要那个无法访问网站的内容,代理服务器去取回来,然后返回给我。从网站的角度,只在代理服务器来取内容的时候有一次记录,有时候并不知道是用户的请求,也隐藏了用户的资料,这取决于代理告不告诉网站。
结论就是,正向代理 是一个位于客户端和原始服务器(origin server)之间的服务器,为了从原始服务器取得内容,客户端向代理发送一个请求并指定目标(原始服务器),然后代理向原始服务器转交请求并将获得的内容返回给客户端。客户端必须要进行一些特别的设置才能使用正向代理。
(2).反向代理的概念
继续举例:例用户访问 http://www.test.com/readme,但www.test.com上并不存在readme页面,他是偷偷从另外一台服务器上取回来,然后作为自己的内容返回用户,但用户并不知情。这里所提到的 www.test.com 这个域名对应的服务器就设置了反向代理功能。
结论就是,反向代理正好相反,对于客户端而言它就像是原始服务器,并且客户端不需要进行任何特别的设置。客户端向反向代理的命名空间(name-space)中的内容发送普通请求,接着反向代理将判断向何处(原始服务器)转交请求,并将获得的内容返回给客户端,就像这些内容原本就是它自己的一样。
(3).两者区别
从用途上来讲:正向代理的典型用途是为在防火墙内的局域网客户端提供访问Internet的途径。正向代理还可以使用缓冲特性减少网络使用率。反向代理的典型用途是将防火墙后面的服务器提供给Internet用户访问。反向代理还可以为后端的多台服务器提供负载平衡,或为后端较慢的服务器提供缓冲服务。另外,反向代理还可以启用高级URL策略和管理技术,从而使处于不同web服务器系统的web页面同时存在于同一个URL空间下。
从安全性来讲:
正向代理允许客户端通过它访问任意网站并且隐藏客户端自身,因此你必须采取安全措施以确保仅为经过授权的客户端提供服务。反向代理对外都是透明的,访问者并不知道自己访问的是一个代理。
6.nginx 代理模块
http 代理官方中文文档:http://www.howtocn.org/nginx:nginx%E6%A8%A1%E5%9D%97%E5%8F%82%E8%80%83%E6%89%8B%E5%86%8C%E4%B8%AD%E6%96%87%E7%89%88:standardhttpmodules:httpproxy
说明:代理模块的指令有很多我这里只讲解重要的proxy_pass,想了解更多代理指令请参考官方中文文档。
这个模块可以转发请求到其他的服务器。HTTP/1.0无法使用keepalive(后端服务器将为每个请求创建并且删除连接)。nginx为浏览器发送HTTP/1.1并为后端服务器发送HTTP/1.0,这样浏览器就可以为浏览器处理keepalive。
如下例:
| 1 2 3 4 | location/ {proxy_pass http: //localhost :8000; proxy_set_header } |
实验拓扑:
7.配置http反向代理
| 1 2 3 4 5 6 | [root@nginx ~] # cd /etc/nginx/ [root@nginx nginx] # cp nginx.confnginx.conf.bak #备份一个原配置文件 [root@nginx nginx] # vim nginx.conf location/ {proxy_pass http: //192 .168.18.201; } |
语法:proxy_pass URL
默认值:no
使用字段:location, location中的if字段
这个指令设置被代理服务器的地址和被映射的URI,地址可以使用主机名或IP加端口号的形式,例如:proxy_pass http://localhost:8000/uri/;
8.重新加载一下配置文件
| 1 2 3 4 | [root@nginx ~] # service nginx reload nginx: the configuration file /etc/nginx/nginx .conf syntax is ok nginx: configuration file /etc/nginx/nginx .conf test is successful 重新载入 nginx: [确定] |
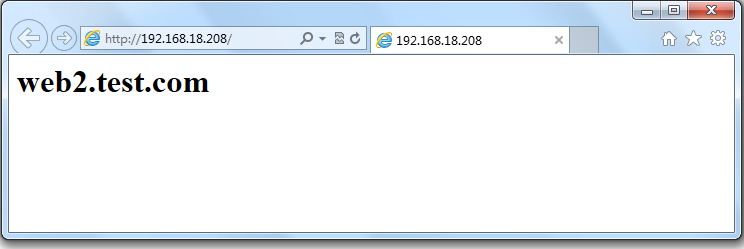
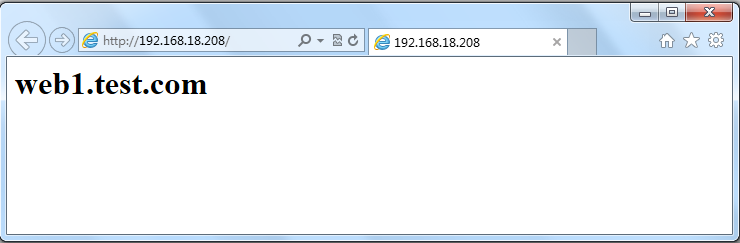
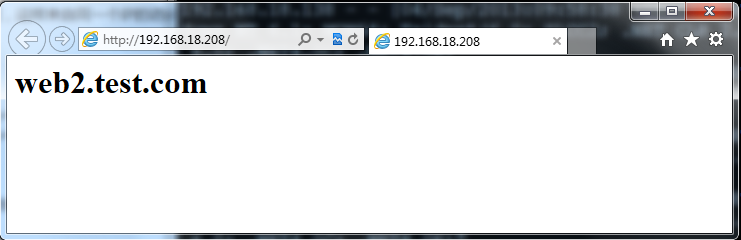
注,大家可以看到,当我们访问192.168.18.208时,被代理重新定向到Web1上。
10.查看一下Web服务器日志
| 1 2 3 4 5 6 7 8 9 10 11 | [root@web1~] # tail /var/log/httpd/access_log 192.168.18.208 - - [04 /Sep/2013 :00:14:20 +0800] "GET /favicon.ico HTTP/1.0" 404 289 "-" "Mozilla/5.0 192.168.18.208 - - [04 /Sep/2013 :00:14:20 +0800] "GET / HTTP/1.0" 200 23 "-" "Mozilla/5.0 192.168.18.208 - - [04 /Sep/2013 :00:14:20 +0800] "GET /favicon.ico HTTP/1.0" 404 289 "-" "Mozilla/5.0 192.168.18.138 - - [04 /Sep/2013 :00:14:45 +0800] "GET / HTTP/1.1" 200 23 "-" "Mozilla/5.0 192.168.18.138 - - [04 /Sep/2013 :00:14:48 +0800] "GET /favicon.ico HTTP/1.1" 404 289 "-" "Mozilla/5.0 192.168.18.208 - - [04 /Sep/2013 :00:14:55 +0800] "GET /favicon.ico HTTP/1.0" 404 289 "-" "Mozilla/5.0 192.168.18.208 - - [04 /Sep/2013 :00:15:05 +0800] "GET /favicon.ico HTTP/1.0" 404 289 "-" "Mozilla/5.0 192.168.18.208 - - [04 /Sep/2013 :00:15:13 +0800] "GET /favicon.ico HTTP/1.0" 404 289 "-" "Mozilla/5.0 192.168.18.208 - - [04 /Sep/2013 :00:15:16 +0800] "GET / HTTP/1.0" 200 23 "-" "Mozilla/5.0 192.168.18.208 - - [04 /Sep/2013 :00:15:16 +0800] "GET /favicon.ico HTTP/1.0" 404 289 "-" "Mozilla/5.0 |
11.修改nginx配置文件
| 1 2 3 4 | location/ {proxy_pass http: //192 .168.18.201; proxy_set_header #加上这一行 } |
语法:proxy_set_header header value
默认值: Host and Connection
使用字段:http, server, location
这个指令允许将发送到被代理服务器的请求头重新定义或者增加一些字段。这个值可以是一个文本,变量或者它们的组合。proxy_set_header在指定的字段中没有定义时会从它的上级字段继承。
12.重新加载一下配置文件
| 1 2 3 4 | [root@nginx ~] # service nginx reload nginx: the configuration file /etc/nginx/nginx .conf syntax is ok nginx: configuration file /etc/nginx/nginx .conf test is successful 重新载入 nginx: [确定] |
| 1 2 3 4 5 6 7 8 9 10 11 | [root@web1~] # tail /var/log/httpd/access_log 192.168.18.208 - - [03 /Sep/2013 :16:26:18 +0800] "GET / HTTP/1.0" 200 23 "-" "Mozilla/5.0 (compatible; MSIE 10.0; Windows NT 6.1; WOW64; Trident/6.0)" 192.168.18.208 - - [03 /Sep/2013 :16:26:18 +0800] "GET / HTTP/1.0" 200 23 "-" "Mozilla/5.0 (compatible; MSIE 10.0; Windows NT 6.1; WOW64; Trident/6.0)" 192.168.18.208 - - [03 /Sep/2013 :16:26:18 +0800] "GET / HTTP/1.0" 200 23 "-" "Mozilla/5.0 (compatible; MSIE 10.0; Windows NT 6.1; WOW64; Trident/6.0)" 192.168.18.208 - - [03 /Sep/2013 :16:26:18 +0800] "GET / HTTP/1.0" 200 23 "-" "Mozilla/5.0 (compatible; MSIE 10.0; Windows NT 6.1; WOW64; Trident/6.0)" 192.168.18.208 - - [03 /Sep/2013 :16:26:18 +0800] "GET / HTTP/1.0" 200 23 "-" "Mozilla/5.0 (compatible; MSIE 10.0; Windows NT 6.1; WOW64; Trident/6.0)" 192.168.18.208 - - [03 /Sep/2013 :16:26:18 +0800] "GET / HTTP/1.0" 200 23 "-" "Mozilla/5.0 (compatible; MSIE 10.0; Windows NT 6.1; WOW64; Trident/6.0)" 192.168.18.208 - - [03 /Sep/2013 :16:26:18 +0800] "GET / HTTP/1.0" 200 23 "-" "Mozilla/5.0 (compatible; MSIE 10.0; Windows NT 6.1; WOW64; Trident/6.0)" 192.168.18.208 - - [03 /Sep/2013 :16:26:18 +0800] "GET / HTTP/1.0" 200 23 "-" "Mozilla/5.0 (compatible; MSIE 10.0; Windows NT 6.1; WOW64; Trident/6.0)" 192.168.18.208 - - [03 /Sep/2013 :16:26:18 +0800] "GET / HTTP/1.0" 200 23 "-" "Mozilla/5.0 (compatible; MSIE 10.0; Windows NT 6.1; WOW64; Trident/6.0)" 192.168.18.208 - - [03 /Sep/2013 :16:26:18 +0800] "GET / HTTP/1.0" 200 23 "-" "Mozilla/5.0 (compatible; MSIE 10.0; Windows NT 6.1; WOW64; Trident/6.0)" |
14.查看并修改httpd配置文件
[root@web1~]#vim /etc/httpd/conf/httpd.conf

注,大家可以这里记录日志的参数还是%h,下面我们修改一下参数。

注,这是修改后的参数,将h%修改为%{X-Real-IP}i,好的下面我们再来测试一下。
15.重启并测试
| 1 2 3 4 5 6 7 8 9 10 11 12 13 14 | [root@web1~] # service httpd restart 停止 httpd: [确定] 正在启动 httpd: [确定] [root@web1~] # tail /var/log/httpd/access_log 192.168.18.138 - - [03 /Sep/2013 :17:09:14 +0800] "GET / HTTP/1.0" 200 23 "-" "Mozilla/5.0 (compatible; MSIE 10.0; Windows NT 6.1; WOW64; Trident/6.0)" 192.168.18.138 - - [03 /Sep/2013 :17:09:14 +0800] "GET / HTTP/1.0" 200 23 "-" "Mozilla/5.0 (compatible; MSIE 10.0; Windows NT 6.1; WOW64; Trident/6.0)" 192.168.18.138 - - [03 /Sep/2013 :17:09:15 +0800] "GET / HTTP/1.0" 200 23 "-" "Mozilla/5.0 (compatible; MSIE 10.0; Windows NT 6.1; WOW64; Trident/6.0)" 192.168.18.138 - - [03 /Sep/2013 :17:09:15 +0800] "GET / HTTP/1.0" 200 23 "-" "Mozilla/5.0 (compatible; MSIE 10.0; Windows NT 6.1; WOW64; Trident/6.0)" 192.168.18.138 - - [03 /Sep/2013 :17:09:15 +0800] "GET / HTTP/1.0" 200 23 "-" "Mozilla/5.0 (compatible; MSIE 10.0; Windows NT 6.1; WOW64; Trident/6.0)" 192.168.18.138 - - [03 /Sep/2013 :17:09:15 +0800] "GET / HTTP/1.0" 200 23 "-" "Mozilla/5.0 (compatible; MSIE 10.0; Windows NT 6.1; WOW64; Trident/6.0)" 192.168.18.138 - - [03 /Sep/2013 :17:09:15 +0800] "GET / HTTP/1.0" 200 23 "-" "Mozilla/5.0 (compatible; MSIE 10.0; Windows NT 6.1; WOW64; Trident/6.0)" 192.168.18.138 - - [03 /Sep/2013 :17:09:15 +0800] "GET / HTTP/1.0" 200 23 "-" "Mozilla/5.0 (compatible; MSIE 10.0; Windows NT 6.1; WOW64; Trident/6.0)" 192.168.18.138 - - [03 /Sep/2013 :17:09:15 +0800] "GET / HTTP/1.0" 200 23 "-" "Mozilla/5.0 (compatible; MSIE 10.0; Windows NT 6.1; WOW64; Trident/6.0)" 192.168.18.138 - - [03 /Sep/2013 :17:09:15 +0800] "GET / HTTP/1.0" 200 23 "-" "Mozilla/5.0 (compatible; MSIE 10.0; Windows NT 6.1; WOW64; Trident/6.0)" |
五、Nginx之负载均衡
注,大家可以看到,由于我们网站是发展初期,nginx只代理了后端一台服务器,但由于我们网站名气大涨访问的人越来越多一台服务器实在是顶不住,于是我们加了多台服务器,那么多台服务器又怎么配置代理呢,我们这里以两台服务器为案例,为大家做演示。
1.upstream负载均衡模块说明
案例:
下面设定负载均衡的服务器列表。
| 1 2 3 4 5 6 7 8 9 10 11 12 | upstream test .net{ip_hash; server 192.168.10.13:80; server 192.168.10.14:80down; server 192.168.10.15:8009max_fails=3 server 192.168.10.16:8080; } server {location
/ {proxy_pass http: //test .net; } } |
2.upstream支持的负载均衡算法
Nginx的负载均衡模块目前支持4种调度算法,下面进行分别介绍,其中后两项属于第三方调度算法。
轮询(默认)。每个请求按时间顺序逐一分配到不同的后端服务器,如果后端某台服务器宕机,故障系统被自动剔除,使用户访问不受影响。Weight 指定轮询权值,Weight值越大,分配到的访问机率越高,主要用于后端每个服务器性能不均的情况下。
ip_hash。每个请求按访问IP的hash结果分配,这样来自同一个IP的访客固定访问一个后端服务器,有效解决了动态网页存在的session共享问题。
fair。这是比上面两个更加智能的负载均衡算法。此种算法可以依据页面大小和加载时间长短智能地进行负载均衡,也就是根据后端服务器的响应时间来分配请求,响应时间短的优先分配。Nginx本身是不支持fair的,如果需要使用这种调度算法,必须下载Nginx的upstream_fair模块。
url_hash。此方法按访问url的hash结果来分配请求,使每个url定向到同一个后端服务器,可以进一步提高后端缓存服务器的效率。Nginx本身是不支持url_hash的,如果需要使用这种调度算法,必须安装Nginx 的hash软件包。
3.upstream支持的状态参数
在HTTP Upstream模块中,可以通过server指令指定后端服务器的IP地址和端口,同时还可以设定每个后端服务器在负载均衡调度中的状态。常用的状态有:
down,表示当前的server暂时不参与负载均衡。
backup,预留的备份机器。当其他所有的非backup机器出现故障或者忙的时候,才会请求backup机器,因此这台机器的压力最轻。
max_fails,允许请求失败的次数,默认为1。当超过最大次数时,返回proxy_next_upstream模块定义的错误。
fail_timeout,在经历了max_fails次失败后,暂停服务的时间。max_fails可以和fail_timeout一起使用。
注,当负载调度算法为ip_hash时,后端服务器在负载均衡调度中的状态不能是weight和backup。
4.实验拓扑

5.配置nginx负载均衡
| 1 2 3 4 5 6 7 8 9 10 11 12 13 14 15 | [root@nginx ~] # vim /etc/nginx/nginx.conf upstreamwebservers {server server } server
{listen 80; server_name localhost; #charset koi8-r; #access_log location
/ {proxy_pass http: //webservers ; proxy_set_header } } |
6.重新加载一下配置文件
| 1 2 3 4 | [root@nginx ~] # service nginx reload nginx: the configuration file /etc/nginx/nginx .conf syntax is ok nginx: configuration file /etc/nginx/nginx .conf test is successful 重新载入 nginx: [确定] |


注,大家可以不断的刷新浏览的内容,可以发现web1与web2是交替出现的,达到了负载均衡的效果。
8.查看一下Web访问服务器日志
Web1:
| 1 2 3 4 5 6 7 8 9 10 11 | [root@web1~] # tail /var/log/httpd/access_log 192.168.18.138 - - [04 /Sep/2013 :09:41:58 +0800] "GET / HTTP/1.0" 200 23 "-" "Mozilla/5.0 (compatible; MSIE 10.0; Windows NT 6.1; WOW64; Trident/6.0)" 192.168.18.138 - - [04 /Sep/2013 :09:41:58 +0800] "GET / HTTP/1.0" 200 23 "-" "Mozilla/5.0 (compatible; MSIE 10.0; Windows NT 6.1; WOW64; Trident/6.0)" 192.168.18.138 - - [04 /Sep/2013 :09:41:59 +0800] "GET / HTTP/1.0" 200 23 "-" "Mozilla/5.0 (compatible; MSIE 10.0; Windows NT 6.1; WOW64; Trident/6.0)" 192.168.18.138 - - [04 /Sep/2013 :09:41:59 +0800] "GET / HTTP/1.0" 200 23 "-" "Mozilla/5.0 (compatible; MSIE 10.0; Windows NT 6.1; WOW64; Trident/6.0)" 192.168.18.138 - - [04 /Sep/2013 :09:42:00 +0800] "GET / HTTP/1.0" 200 23 "-" "Mozilla/5.0 (compatible; MSIE 10.0; Windows NT 6.1; WOW64; Trident/6.0)" 192.168.18.138 - - [04 /Sep/2013 :09:42:00 +0800] "GET / HTTP/1.0" 200 23 "-" "Mozilla/5.0 (compatible; MSIE 10.0; Windows NT 6.1; WOW64; Trident/6.0)" 192.168.18.138 - - [04 /Sep/2013 :09:42:00 +0800] "GET / HTTP/1.0" 200 23 "-" "Mozilla/5.0 (compatible; MSIE 10.0; Windows NT 6.1; WOW64; Trident/6.0)" 192.168.18.138 - - [04 /Sep/2013 :09:44:21 +0800] "GET / HTTP/1.0" 200 23 "-" "Mozilla/5.0 (compatible; MSIE 10.0; Windows NT 6.1; WOW64; Trident/6.0)" 192.168.18.138 - - [04 /Sep/2013 :09:44:22 +0800] "GET / HTTP/1.0" 200 23 "-" "Mozilla/5.0 (compatible; MSIE 10.0; Windows NT 6.1; WOW64; Trident/6.0)" 192.168.18.138 - - [04 /Sep/2013 :09:44:22 +0800] "GET / HTTP/1.0" 200 23 "-" "Mozilla/5.0 (compatible; MSIE 10.0; Windows NT 6.1; WOW64; Trident/6.0)" |
先修改一下,Web服务器记录日志的格式。
| 1 2 3 4 5 | [root@web2~] # vim /etc/httpd/conf/httpd.conf LogFormat "%{X-Real-IP}i
%l %u %t \"%r\" %>s %b \"%{Referer}i\" \"%{User-Agent}i\"" combined [root@web2~] # service httpd restart 停止 httpd: [确定] 正在启动 httpd: [确定] |
| 1 2 3 4 5 6 7 8 9 10 11 | [root@web2~] # tail /var/log/httpd/access_log 192.168.18.138 - - [04 /Sep/2013 :09:50:28 +0800] "GET / HTTP/1.0" 200 23 "-" "Mozilla/5.0 (compatible; MSIE 10.0; Windows NT 6.1; WOW64; Trident/6.0)" 192.168.18.138 - - [04 /Sep/2013 :09:50:28 +0800] "GET / HTTP/1.0" 200 23 "-" "Mozilla/5.0 (compatible; MSIE 10.0; Windows NT 6.1; WOW64; Trident/6.0)" 192.168.18.138 - - [04 /Sep/2013 :09:50:28 +0800] "GET / HTTP/1.0" 200 23 "-" "Mozilla/5.0 (compatible; MSIE 10.0; Windows NT 6.1; WOW64; Trident/6.0)" 192.168.18.138 - - [04 /Sep/2013 :09:50:28 +0800] "GET / HTTP/1.0" 200 23 "-" "Mozilla/5.0 (compatible; MSIE 10.0; Windows NT 6.1; WOW64; Trident/6.0)" 192.168.18.138 - - [04 /Sep/2013 :09:50:28 +0800] "GET / HTTP/1.0" 200 23 "-" "Mozilla/5.0 (compatible; MSIE 10.0; Windows NT 6.1; WOW64; Trident/6.0)" 192.168.18.138 - - [04 /Sep/2013 :09:50:28 +0800] "GET / HTTP/1.0" 200 23 "-" "Mozilla/5.0 (compatible; MSIE 10.0; Windows NT 6.1; WOW64; Trident/6.0)" 192.168.18.138 - - [04 /Sep/2013 :09:50:28 +0800] "GET / HTTP/1.0" 200 23 "-" "Mozilla/5.0 (compatible; MSIE 10.0; Windows NT 6.1; WOW64; Trident/6.0)" 192.168.18.138 - - [04 /Sep/2013 :09:50:28 +0800] "GET / HTTP/1.0" 200 23 "-" "Mozilla/5.0 (compatible; MSIE 10.0; Windows NT 6.1; WOW64; Trident/6.0)" 192.168.18.138 - - [04 /Sep/2013 :09:50:29 +0800] "GET / HTTP/1.0" 200 23 "-" "Mozilla/5.0 (compatible; MSIE 10.0; Windows NT 6.1; WOW64; Trident/6.0)" 192.168.18.138 - - [04 /Sep/2013 :09:50:29 +0800] "GET / HTTP/1.0" 200 23 "-" "Mozilla/5.0 (compatible; MSIE 10.0; Windows NT 6.1; WOW64; Trident/6.0)" |
9.配置nginx进行健康状态检查
max_fails,允许请求失败的次数,默认为1。当超过最大次数时,返回proxy_next_upstream模块定义的错误。
fail_timeout,在经历了max_fails次失败后,暂停服务的时间。max_fails可以和fail_timeout一起使用,进行健康状态检查。
| 1 2 3 4 5 | [root@nginx ~] # vim /etc/nginx/nginx.conf upstreamwebservers {server server } |
| 1 2 3 4 | [root@nginx ~] # service nginx reload nginx: the configuration file /etc/nginx/nginx .conf syntax is ok nginx: configuration file /etc/nginx/nginx .conf test is successful 重新载入 nginx: [确定] |
| 1 2 3 | 先停止Web1,进行测试。 [root@web1~] # service httpd stop 停止 httpd: [确定] |

注,大家可以看到,现在只能访问Web2,再重新启动Web1,再次访问一下。
| 1 2 | [root@web1~] # service httpd start 正在启动 httpd: [确定] |

注,大家可以看到,现在又可以重新访问,说明nginx的健康状态查检配置成功。但大家想一下,如果不幸的是所有服务器都不能提供服务了怎么办,用户打开页面就会出现出错页面,那么会带来用户体验的降低,所以我们能不能像配置LVS是配置sorry_server呢,答案是可以的,但这里不是配置sorry_server而是配置backup。
12.配置backup服务器
| 1 2 3 4 5 6 7 8 9 10 11 12 13 14 15 | [root@nginx ~] # vim /etc/nginx/nginx.conf server {listen 8080; server_name localhost; root /data/www/errorpage ; index index.html; } upstreamwebservers {server server server } [root@nginx ~] # mkdir -pv /data/www/errorpage [root@nginx errorpage] # cat index.html <h1>Sorry......< /h1 > |
| 1 2 3 4 | [root@nginx errorpage] # service nginx reload nginx: the configuration file /etc/nginx/nginx .conf syntax is ok nginx: configuration file /etc/nginx/nginx .conf test is successful 重新载入 nginx: [确定] |
| 1 2 3 4 | [root@web1~] # service httpd stop 停止 httpd: [确定] [root@web2~] # service httpd stop 停止 httpd: [确定] |
注,大家可以看到,当所有服务器都不能工作时,就会启动备份服务器。好了,backup服务器就配置到这里,下面我们来配置ip_hash负载均衡。
15.配置ip_hash负载均衡
ip_hash,每个请求按访问IP的hash结果分配,这样来自同一个IP的访客固定访问一个后端服务器,有效解决了动态网页存在的session共享问题。(一般电子商务网站用的比较多)
| 1 2 3 4 5 6 7 | [root@nginx ~] # vim /etc/nginx/nginx.conf upstreamwebservers {ip_hash; server server #server } |
16.重新加载一下服务器
| 1 2 3 4 | [root@nginx ~] # service nginx reload nginx: the configuration file /etc/nginx/nginx .conf syntax is ok nginx: configuration file /etc/nginx/nginx .conf test is successful 重新载入 nginx: [确定] |
注,大家可以看到,你不断的刷新页面一直会显示的民Web2,说明ip_hash负载均衡配置成功。下面我们来统计一下Web2的访问连接数。
18.统计Web2的访问连接数
| 1 2 | [root@web2~] # 304 |
六、Nginx之页面缓存
1.指令说明
proxy_cache_path
语法:proxy_cache_pathpath [levels=number] keys_zone=zone_name:zone_size [inactive=time]
[max_size=size];
默认值:None
使用字段:http
指令指定缓存的路径和一些其他参数,缓存的数据存储在文件中,并且使用代理url的哈希值作为关键字与文件名。levels参数指定缓存的子目录数,例如:
| 1 | proxy_cache_path /data/nginx/cache levels=1:2 keys_zone=one:10m; |
| 1 | /data/nginx/cache/c/29/b7f54b2df7773722d382f4809d65029c |
所有活动的key和元数据存储在共享的内存池中,这个区域用keys_zone参数指定。one指的是共享池的名称,10m指的是共享池的大小。
注意每一个定义的内存池必须是不重复的路径,例如:
| 1 2 3 | proxy_cache_path /data/nginx/cache/one levels=1 keys_zone=one:10m; proxy_cache_path /data/nginx/cache/two levels=2:2 keys_zone=two:100m; proxy_cache_path /data/nginx/cache/three levels=1:1:2 keys_zone=three:1000m; |
proxy_cache
语法:proxy_cache zone_name;
默认值:None
使用字段:http, server, location
设置一个缓存区域的名称,一个相同的区域可以在不同的地方使用。
在0.7.48后,缓存遵循后端的”Expires”, “Cache-Control: no-cache”, “Cache-Control: max-age=XXX”头部字段,0.7.66版本以后,”Cache-Control:“private”和”no-store”头同样被遵循。nginx在缓存过程中不会处理”Vary”头,为了确保一些私有数据不被所有的用户看到,后端必须设置 “no-cache”或者”max-age=0”头,或者proxy_cache_key包含用户指定的数据如$cookie_xxx,使用cookie的值作为proxy_cache_key的一部分可以防止缓存私有数据,所以可以在不同的location中分别指定proxy_cache_key的值以便分开私有数据和公有数据。
缓存指令依赖代理缓冲区(buffers),如果proxy_buffers设置为off,缓存不会生效。
proxy_cache_valid
语法:proxy_cache_valid reply_code [reply_code …] time;
默认值:None
使用字段:http, server, location
为不同的应答设置不同的缓存时间,例如:
| 1 2 | proxy_cache_valid20030210m; proxy_cache_valid4041m; |
如果只定义时间:
| 1 | proxy_cache_valid 5m; |
同样可以使用any参数任何应答。
| 1 2 3 | proxy_cache_valid20030210m; proxy_cache_valid3011h; proxy_cache_validany 1m; |
| 1 2 3 4 5 6 7 8 9 10 11 12 13 14 | [root@nginx ~] # vim /etc/nginx/nginx.conf proxy_cache_path /data/nginx/cache/webserver levels=1:2 keys_zone=webserver:20m max_size=1g; server
{listen 80; server_name localhost; #charset koi8-r; #access_log location
/ {proxy_pass http: //webservers ; proxy_set_header proxy_cache webserver; proxy_cache_valid } } |
| 1 | [root@nginx ~] # mkdir -pv /data/nginx/cache/webserver |
| 1 2 3 4 | [root@nginx webserver] # service nginx reload nginx: the configuration file /etc/nginx/nginx .conf syntax is ok nginx: configuration file /etc/nginx/nginx .conf test is successful 重新载入 nginx: [确定] |
注,大家用谷歌浏览器测试的时候,可以按F12调用开发工具,选择Network选项,我们可以看到,Response Headers,在这里我们可以看到,我们请求的是否是缓存,但现在还看不到,下面我们来配置一下,再来测试。
6.缓存变量说明
$server_addr
服务器地址,在完成一次系统调用后可以确定这个值,如果要绕开系统调用,则必须在listen中指定地址并且使用bind参数。
$upstream_cache_status
0.8.3版本中其值可能为:
MISS 未命中
EXPIRED – expired。请求被传送到后端。
UPDATING – expired。由于proxy/fastcgi_cache_use_stale正在更新,将使用旧的应答。
STALE – expired。由于proxy/fastcgi_cache_use_stale,后端将得到过期的应答。
HIT 命中
| 1 2 3 4 5 6 7 8 9 10 11 12 13 14 15 16 17 | [root@nginx ~] # vim /etc/nginx/nginx.conf proxy_cache_path /data/nginx/cache/webserver levels=1:2 keys_zone=webserver:20m max_size=1g; server
{listen 80; server_name localhost; #charset koi8-r; #access_log #增加两头部 add_header X-Via $server_addr; add_header X-Cache $upstream_cache_status; location
/ {proxy_pass http: //webservers ; proxy_set_header proxy_cache webserver; proxy_cache_valid } } |
| 1 2 3 4 | [root@nginx ~] # service nginx reload nginx: the configuration file /etc/nginx/nginx .conf syntax is ok nginx: configuration file /etc/nginx/nginx .conf test is successful 重新载入 nginx: [确定] |
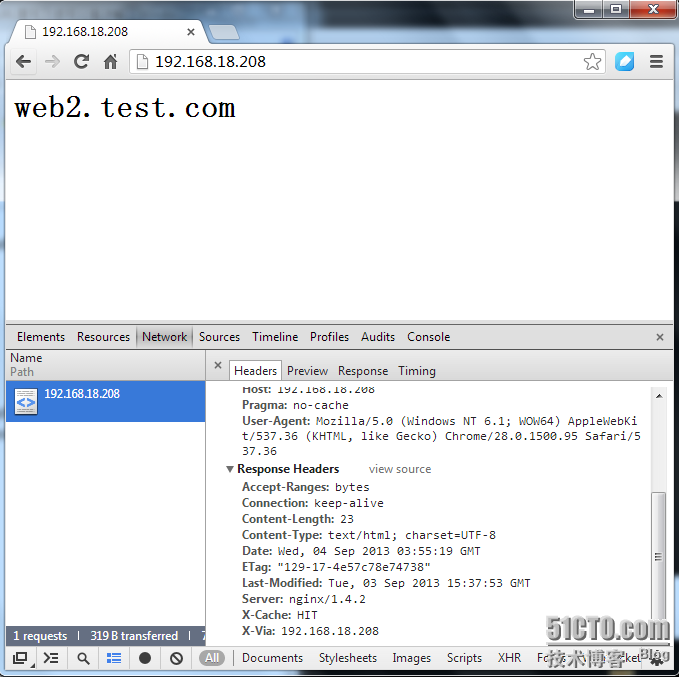
注,从图中我们可以看到,我们访问的服务器是192.168.18.208,缓存命中。大家可以看到是不是很直观啊。下面我们看一下缓存目录。
9.查看一下缓存目录
| 1 2 3 | [root@nginx ~] # cd /data/nginx/cache/webserver/f/63/ [root@nginx 63] # ls 681ad4c77694b65d61c9985553a2763f |
七、Nginx之URL重写
1.URL重写模块(Rewrite)
摘要这个模块允许使用正则表达式重写URI(需PCRE库),并且可以根据相关变量重定向和选择不同的配置。如果这个指令在server字段中指定,那么将在被请求的location确定之前执行,如果在指令执行后所选择的location中有其他的重写规则,那么它们也被执行。如果在location中执行这个指令产生了新的URI,那么location又一次确定了新的URI。这样的循环可以最多执行10次,超过以后nginx将返回500错误。
指令
break
语法:break
默认值:none
使用字段:server, location, if
完成当前设置的规则,停止执行其他的重写指令。
示例:
| 1 2 3 4 | if ($slow)
{limit_rate 10k; break ; } |
if
语法:if (condition) { … }
默认值:none
使用字段:server, location
注意:在使用if指令之前请查看if
is evil page并且尽量考虑用try_files代替。
判断一个条件,如果条件成立,则后面的大括号内的语句将执行,相关配置从上级继承。
可以在判断语句中指定下列值:
一个变量的名称;不成立的值为:空字符传”“或者一些用“0”开始的字符串。
一个使用=或者!=运算符的比较语句。
使用符号~*和~模式匹配的正则表达式:
~为区分大小写的匹配。
~*不区分大小写的匹配(firefox匹配FireFox)。
!~和!~*意为“不匹配的”。
使用-f和!-f检查一个文件是否存在。
使用-d和!-d检查一个目录是否存在。
使用-e和!-e检查一个文件,目录或者软链接是否存在。
使用-x和!-x检查一个文件是否为可执行文件。
正则表达式的一部分可以用圆括号,方便之后按照顺序用$1-$9来引用。
示例配置:
| 1 2 3 4 5 6 7 8 9 10 11 12 13 14 15 16 17 18 19 20 21 22 23 24 25 26 27 28 | if ($http_user_agent
~ MSIE) {rewrite ^(.*)$ /msie/ $1 break ; } if ($http_cookie ~* "id=([^;] +)(?:;|$)" )
{set $ id $1; } if ($request_method return 405; } if (!-f
$request_filename) {break ; proxy_pass http: //127 .0.0.1; } if ($slow)
{limit_rate 10k; } if ($invalid_referer)
{return 403; } if ($args
~ post=140){rewrite ^ http: //example .com/ permanent; } |
return
语法:return code
默认值:none
使用字段:server, location, if
这个指令结束执行配置语句并为客户端返回状态代码,可以使用下列的值:204,400,402-406,408,410, 411, 413, 416与500-504。此外,非标准代码444将关闭连接并且不发送任何的头部。
rewrite
语法:rewrite regex replacement flag
默认值:none
使用字段:server, location, if
按照相关的正则表达式与字符串修改URI,指令按照在配置文件中出现的顺序执行。
可以在重写指令后面添加标记。
如果替换的字符串以http://开头,请求将被重定向,并且不再执行多余的rewrite指令。
尾部的标记(flag)可以是以下的值:
last – 完成重写指令,之后搜索相应的URI或location。
break – 完成重写指令。
redirect – 返回302临时重定向,如果替换字段用http://开头则被使用。
permanent – 返回301永久重定向。
注意如果一个重定向是相对的(没有主机名部分),nginx将在重定向的过程中使用匹配server_name指令的“Host”头或者server_name指令指定的第一个名称,如果头不匹配或不存在,如果没有设置server_name,将使用本地主机名,如果你总是想让nginx使用“Host”头,可以在server_name使用“*”通配符(查看http核心模块中的server_name)。例如:
| 1 2 3 | rewrite^( /download/ .*) /media/ (.*)\..*$ $1 /mp3/ $2.mp3 last; rewrite^( /download/ .*) /audio/ (.*)\..*$ $1 /mp3/ $2.ra last; return 403; |
| 1 2 3 4 5 | location /download/ {rewrite ^( /download/ .*) /media/ (.*)\..*$ $1 /mp3/ $2.mp3 break ; rewrite ^( /download/ .*) /audio/ (.*)\..*$ $1 /mp3/ $2.ra break ; return 403; } |
| 1 | rewrite^ /users/ (.*)$ /show ?user=$1? last; |
| 1 | /photos/123456 |
| 1 | /path/to/photos/12/1234/123456 .png |
| 1 | rewrite "/photos/([0-9]
{2})([0-9] {2})([0-9] {2})" /path/to/photos/ $1/$1$2/$1$2$3.png; |
在rewrite中使用$request_uri将www.example.com重写到example.com:
| 1 2 3 4 | server {server_name www.example.com; rewrite ^ http: //example .com$request_uri? permanent; } |
| 1 2 3 | if ($args
^~ post=100){rewrite ^ http: //example .com /new-address .html? permanent; } |
rewrite_log
语法:rewrite_log on |off
默认值:rewrite_log off
使用字段:server, location, if
变量:无
启用时将在error log中记录notice 标记的重写日志。
set
语法:set variable value
默认值:none
使用字段:server, location, if
指令设置一个变量并为其赋值,其值可以是文本,变量和它们的组合。
你可以使用set定义一个新的变量,但是不能使用set设置$http_xxx头部变量的值。
uninitialized_variable_warn
语法:uninitialized_variable_warn on|off
默认值:uninitialized_variable_warn on
使用字段:http, server, location, if
开启或关闭在未初始化变量中记录警告日志。
事实上,rewrite指令在配置文件加载时已经编译到内部代码中,在解释器产生请求时使用。
这个解释器是一个简单的堆栈虚拟机,如下列指令:
| 1 2 3 4 5 6 7 8 | location /download/ {if ($forbidden)
{return 403; } if ($slow)
{limit_rate 10k; } rewrite ^/(download/.*) /media/ (.*)\..*$ /$1 /mp3/ $2.mp3 break ; |
| 1 2 3 4 5 6 7 8 9 10 11 12 13 14 | variable $forbidden checking to zero recovery 403 completion of entire code variable $slow checking to zero checkings of regular excodession copying "/" copying$1 copying "/mp3/" copying$2 copying ".mp3" completion of regular excodession completion of entire sequence |
如果$slow为真,对应的if块将生效,在这个配置中limit_rate的值为10k。
指令:
| 1 | rewrite^/(download/.*) /media/ (.*)\..*$ /$1 /mp3/ $2.mp3 break ; |
| 1 | rewrite^( /download/ .*) /media/ (.*)\..*$ $1 /mp3/ $2.mp3 break ; |
| 1 2 3 4 5 6 7 | checking regular excodession copying$1 copying "/mp3/" copying$2 copying ".mp3" completion of regular excodession completion of entire code |
2.简单案例
注,由于配置文件内容较多,为了让大家看着方便,我们备份一下配置文件,打开一个新的配置文件。
| 1 2 3 4 5 6 7 8 9 10 11 12 13 14 15 | [root@nginx ~] # cd /etc/nginx/ [root@nginx nginx] # [root@nginx nginx] # cp nginx.conf.bak nginx.conf [root@nginx nginx] # vim /etc/nginx/nginx.conf server {listen 80; server_name localhost; #charset koi8-r; #access_log location
/ {root html; index index.html index.htm; rewrite ^ /bbs/ (.*)$ http: //192 .168.18.201 /forum/ $1; } } |
准备forum目录与测试文件
| 1 2 3 4 5 6 7 | [root@web1~] # cd /var/www/html/ [root@web1html] # ls index.html [root@web1html] # mkdir forum [root@web1html] # cd forum/ [root@web1forum] # vim index.html <h1>forum page!< /h1 > |

好了,下面我们来测试一下rewrite重写。
3.重新加载一下配置文件
| 1 2 3 4 | [root@nginx 63] # service nginx reload nginx: the configuration file /etc/nginx/nginx .conf syntax is ok nginx: configuration file /etc/nginx/nginx .conf test is successful 重新载入 nginx: [确定] |

注,大家可以从图中看出,status code 302指的是临时重定向,那就说明我们rewrite重写配置成功。大家知道302是临时重定向而301是永久重定向,那么怎么实现永久重定向呢。一般服务器与服务器之间是临时重定向,服务器内部是永久重定向。下面我们来演示一下永久重定向。
5.配置永久重定向
| 1 2 3 4 5 6 7 8 9 10 11 12 | [root@nginx nginx] # vim /etc/nginx/nginx.conf server {listen 80; server_name localhost; #charset koi8-r; #access_log location
/ {root html; index index.html index.htm; rewrite ^ /bbs/ (.*)$ /forum/ $1; } } |
准备forum目录与测试文件
| 1 2 3 4 5 6 7 | [root@nginx ~] # cd /usr/html/ [root@nginx html] # ls 50x.htmlindex.html [root@nginx html] # mkdir forum [root@nginx html] # cd forum/ [root@nginx forum] # vim index.html <h1>192.168.18.208 forum page< /h1 > |
| 1 2 3 4 | [root@nginx ~] # service nginx reload nginx: the configuration file /etc/nginx/nginx .conf syntax is ok nginx: configuration file /etc/nginx/nginx .conf test is successful 重新载入 nginx: [确定] |

注,大家从图中可以看到,我们访问bbs/是直接帮我们跳转到forum/下,这种本机的跳转就是永久重定向也叫隐式重定向。好了,rewrite重定向我们就说到这里了,想要查询更多关于重定向的指令请参考官方文档。最后,我们来说一下读写分离。
八、Nginx之读写分离
1.实验拓扑

需求分析,前端一台nginx做负载均衡反向代理,后面两台httpd服务器。整个架构是提供BBS(论坛)服务,有一需求得实现读写分离,就是上传附件的功能,我们上传的附件只能上传到Web1,然后在Web1上利用rsync+inotify实现附件同步,大家都知道rsync+inotify只能是主向从同步,不能双向同步。所以Web1可进行写操作,而Web2只能进行读操作,这就带来读写分离的需求,下面我们就来说一下,读写分离怎么实现。
2.WebDAV功能说明
WebDAV (Web-based Distributed Authoring and Versioning) 一种基于 HTTP 1.1协议的通信协议。它扩展了HTTP 1.1,在GET、POST、HEAD等几个HTTP标准方法以外添加了一些新的方法,使应用程序可直接对Web Server直接读写,并支持写文件锁定(Locking)及解锁(Unlock),还可以支持文件的版本控制。这样我们就能配置读写分离功能了,下面我们来具体配置一下。
3.修改配置文件
| 1 2 3 4 5 6 7 8 9 10 11 12 13 | [root@nginx nginx] # vim /etc/nginx/nginx.conf server {listen 80; server_name localhost; #charset koi8-r; #access_log location
/ {proxy_pass http: //192 .168.18.202; if ($request_method "PUT" ){proxy_pass http: //192 .168.18.201; } } } |
| 1 2 3 4 | [root@nginx ~] # service nginx reload nginx: the configuration file /etc/nginx/nginx .conf syntax is ok nginx: configuration file /etc/nginx/nginx .conf test is successful 重新载入 nginx: [确定] |
| 1 | [root@web1~] # vim /etc/httpd/conf/httpd.conf |

注,在<Directory “/var/www/html”>下启用就行。
6.重新启动一下httpd
| 1 2 3 | [root@web1~] # service httpd restart 停止 httpd: [确定] 正在启动 httpd: [确定] |
| 1 2 3 4 | [root@nginx ~] # curl http://192.168.18.201[/code]<h1>web1.test.com</h1>[root@nginx ~]# curl http://192.168.18.202[/code]<h1>web2.test.com</h1> |
| 1 2 3 4 5 6 7 8 9 10 | [root@nginx ~] # |
| 1 2 3 4 5 6 7 8 9 10 11 | [root@nginx ~] # |
| 1 | [root@web1~] # setfacl -m u:apache:rwx /var/www/html/ |
| 1 2 3 4 5 6 7 8 9 10 | [root@nginx ~] # |
| 1 2 3 4 5 6 | [root@web1~] # cd /var/www/html/ [root@web1html] # ll 总用量 12 drwxr-xr-x 2rootroot40969月 -rw-r--r-- 1rootroot23 9月 -rw-r--r-- 1apache apache479月 |
本文出自 “Share your knowledge …” 博客,请务必保留此出处/article/4340860.html

相关文章推荐
- Nginx 反向代理、负载均衡、页面缓存、URL重写及读写分离详解(二)
- Nginx 反向代理、负载均衡、页面缓存、URL重写及读写分离详解
- Nginx 反向代理、负载均衡、页面缓存、URL重写及读写分离详解
- Nginx 反向代理、负载均衡、页面缓存、URL重写及读写分离详解
- Nginx 反向代理、负载均衡、页面缓存、URL重写及读写分离详解
- Nginx 反向代理、负载均衡、页面缓存、URL重写及读写分离详解 (三)
- Nginx 反向代理、负载均衡、页面缓存、URL重写及读写分离详解(1)
- Nginx 反向代理、负载均衡、页面缓存、URL重写及读写分离详解
- Nginx 反向代理、负载均衡、页面缓存、URL重写及读写分离详解
- [转载]Nginx 反向代理、负载均衡、页面缓存、URL重写及读写分离详解
- Nginx 反向代理、负载均衡、页面缓存、URL重写及读写分离详解
- Nginx 反向代理、负载均衡、页面缓存、URL重写及读写分离详解
- Nginx 反向代理、负载均衡、页面缓存、URL重写及读写分离详解(2)
- Nginx 反向代理、负载均衡、页面缓存、URL重写及读写分离详解
- Nginx 反向代理、负载均衡、页面缓存、URL重写及读写分离详解 (六)
- Nginx 反向代理、负载均衡、页面缓存、URL重写及读写分离详解
- Nginx 反向代理、负载均衡、页面缓存、URL重写及读写分离详解 (五)
- Nginx 反向代理、负载均衡、页面缓存、URL重写及读写分离详解
- Nginx 反向代理、负载均衡、页面缓存、URL重写及读写分离详解 (转载)
- Nginx 反向代理、负载均衡、页面缓存、URL重写及读写分离详解