1 游戏逻辑架构,Cocos2d-x游戏项目创建,HelloWorld项目创建,HelloWorld程序分析,(CCApplicationProtocol,CCApplication,AppDeleg
2014-10-20 00:27
405 查看
1
游戏逻辑架构
详细介绍
A
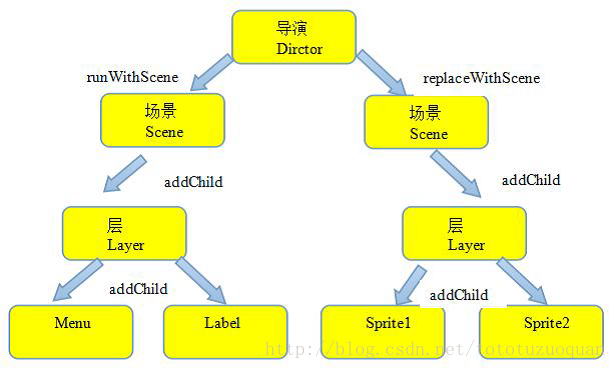
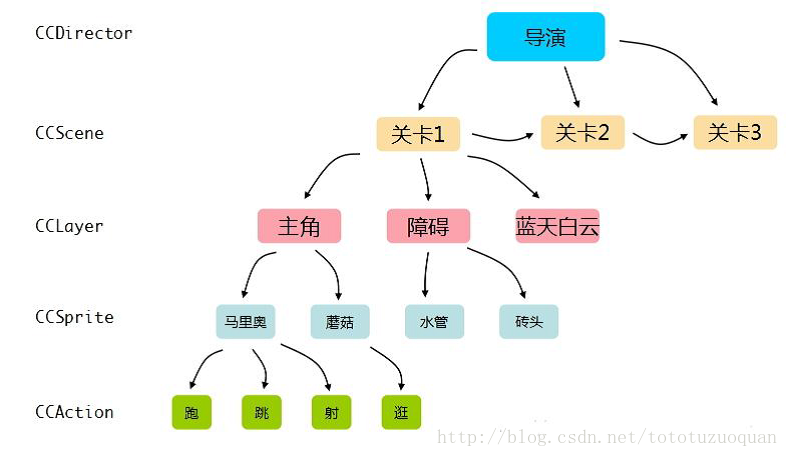
一个导演同一时间只能运行一个场景,场景当中,可以同时加载多个层,一个层可以可载多个精灵。层中亦可以加层。
B
场景切换
sceneàaddChild(layer);
layeràaddChild(sprite);
2
项目创建命令:
A
进入tools下的project-creat
E:\Installed\cocos2d-x-2.2.3\tools\project-creator>
B
python create_project.py -project MyCocos2dx -package com.toto.mycocos01 -language cpp
C
命令解释:
-project MyCocos2dx工程名
-package com.toto.mycocos01
包名
-language cpp
开发语言可选项目有javascript lua
D
创建后的项目目录:
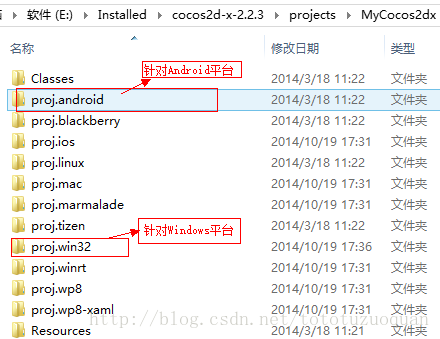
3
简介
1
查看cocos2dx游戏的版本信息。
创建了一个cocos2dx项目之后,打开项目之后,会有如下项目结构

展开libcocos2d,找到cocos2d.cpp,双击打开此cpp文件,内容如下:
#include
"cocos2d.h"
NS_CC_BEGIN
const
char*
cocos2dVersion()
{
return
"2.2.3";
}
NS_CC_END
截图如下:
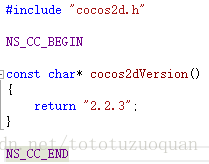
分析:
A
由上可以看出项目的版本号是:2.2.3
B
依赖的头文件
“cocos2d.h”
2
查看程序入口
程序入口是:main.cpp
#include
"main.h"
#include
"AppDelegate.h"
#include
"CCEGLView.h"
USING_NS_CC;
int
APIENTRY
_tWinMain(HINSTANCE
hInstance,
HINSTANCE
hPrevInstance,
LPTSTR
lpCmdLine,
int
nCmdShow)
{
UNREFERENCED_PARAMETER(hPrevInstance);
UNREFERENCED_PARAMETER(lpCmdLine);
// create the application instance
AppDelegate
app;
//Delegate:表示
委派…为代表 n:代表
CCEGLView*
eglView =
CCEGLView::sharedOpenGLView();
eglView->setViewName("MyCocos2dx");
//程序的标题
eglView->setFrameSize(480,
320); //程序的尺寸
return
CCApplication::sharedApplication()->run();
//关于shared的一般是单例模式
}
进入run函数,
run的代码结构如下(选中run(),再按F12进行查看):
int
CCApplication::run()
{
PVRFrameEnableControlWindow(false);
// Main message loop:
MSG
msg;
LARGE_INTEGER
nFreq;
LARGE_INTEGER
nLast;
LARGE_INTEGER
nNow;
QueryPerformanceFrequency(&nFreq);
QueryPerformanceCounter(&nLast);
// Initialize instance and cocos2d.
if (!applicationDidFinishLaunching())
{
return 0;
}
CCEGLView*
pMainWnd =
CCEGLView::sharedOpenGLView();
pMainWnd->centerWindow();
ShowWindow(pMainWnd->getHWnd(),
SW_SHOW);
while (1)
{
if (!
PeekMessage(&msg,
NULL, 0, 0,
PM_REMOVE))
{
// Get current time tick.
QueryPerformanceCounter(&nNow);
// If it's the time to draw next frame, draw it, else sleep a while.
if (nNow.QuadPart
- nLast.QuadPart
> m_nAnimationInterval.QuadPart)
{
nLast.QuadPart
= nNow.QuadPart;
CCDirector::sharedDirector()->mainLoop();
}
else
{
Sleep(0);
}
continue;
}
if (WM_QUIT
== msg.message)
{
// Quit message loop.
break;
}
// Deal with windows message.
if (!
m_hAccelTable || !
TranslateAccelerator(msg.hwnd,
m_hAccelTable, &msg))
{
TranslateMessage(&msg);
DispatchMessage(&msg);
}
}
return (int)
msg.wParam;
}
程序的入口:applicationDidFinishLaunching()

AppDelegate.cpp
bool
AppDelegate::applicationDidFinishLaunching()
{
// initialize director
CCDirector*
pDirector =
CCDirector::sharedDirector();
CCEGLView*
pEGLView =
CCEGLView::sharedOpenGLView();
pDirector->setOpenGLView(pEGLView);
// turn on display FPS
pDirector->setDisplayStats(true);
// set FPS. the default value is 1.0/60 if you don't call this
pDirector->setAnimationInterval(1.0
/ 60); //设置帧率
// create a scene. it's an autorelease object
CCScene *pScene
= HelloWorld::scene();
// run
pDirector->runWithScene(pScene);
return
true;
}
截图:
HelloWorldScene.h
HelloWorld类的本质是一个层(CCLayer):
#ifndef
__HELLOWORLD_SCENE_H__
#define
__HELLOWORLD_SCENE_H__
#include
"cocos2d.h"
class
HelloWorld :
public
cocos2d::CCLayer
{
public:
// Here's a difference. Method 'init' in cocos2d-x returns bool, instead of returning 'id' in cocos2d-iphone
virtual
bool
init();
// there's no 'id' in cpp, so we recommend returning the class instance pointer
static
cocos2d::CCScene*
scene();
// a selector callback
void
menuCloseCallback(CCObject*
pSender);
// implement the "static node()" method manually
CREATE_FUNC(HelloWorld);
};
#endif
// __HELLOWORLD_SCENE_H__
HelloWorldScene.cpp
#include
"HelloWorldScene.h"
USING_NS_CC;
CCScene*
HelloWorld::scene()
{
// 'scene' is an autorelease object
CCScene *scene
= CCScene::create();
// 'layer' is an autorelease object
HelloWorld *layer
= HelloWorld::create();
// add layer as a child to scene
scene->addChild(layer);
//return the scene
return
scene;
}
// on "init" you need to initialize your instance
bool
HelloWorld::init()
{
//////////////////////////////
// 1. super init first
if ( !CCLayer::init()
)
{
return
false;
}
CCSize
visibleSize =
CCDirector::sharedDirector()->getVisibleSize();
CCPoint
origin =
CCDirector::sharedDirector()->getVisibleOrigin();
/////////////////////////////
// 2. add a menu item with "X" image, which is clicked to quit the program
//
you may modify it.
// add a "close" icon to exit the progress. it's an autorelease object
CCMenuItemImage *pCloseItem
= CCMenuItemImage::create(
"CloseNormal.png",
"CloseSelected.png",
this,
menu_selector(HelloWorld::menuCloseCallback));
pCloseItem->setPosition(ccp(origin.x
+ visibleSize.width
- pCloseItem->getContentSize().width/2
,
origin.y
+ pCloseItem->getContentSize().height/2));
// create menu, it's an autorelease object
CCMenu*
pMenu =
CCMenu::create(pCloseItem,
NULL);
pMenu->setPosition(CCPointZero);
this->addChild(pMenu,
1);
/////////////////////////////
// 3. add your codes below...
// add a label shows "Hello World"
// create and initialize a label
CCLabelTTF*
pLabel =
CCLabelTTF::create("Hello
World",
"Arial", 24);
// position the label on the center of the screen
pLabel->setPosition(ccp(origin.x
+ visibleSize.width/2,
origin.y
+ visibleSize.height
- pLabel->getContentSize().height));
// add the label as a child to this layer
this->addChild(pLabel,
1);
// add "HelloWorld" splash screen"
CCSprite*
pSprite =
CCSprite::create("HelloWorld.png");
// position the sprite on the center of the screen
pSprite->setPosition(ccp(visibleSize.width/2
+ origin.x,
visibleSize.height/2
+ origin.y));
// add the sprite as a child to this layer
this->addChild(pSprite,
0);
return
true;
}
void
HelloWorld::menuCloseCallback(CCObject*
pSender)
{
#if (CC_TARGET_PLATFORM
== CC_PLATFORM_WINRT) || (CC_TARGET_PLATFORM
== CC_PLATFORM_WP8)
CCMessageBox("You
pressed the close button. Windows Store Apps do not implement a close button.","Alert");
#else
CCDirector::sharedDirector()->end();
#if (CC_TARGET_PLATFORM
== CC_PLATFORM_IOS)
exit(0);
#endif
#endif
}
总结:
1、对于cocos真正的初始化是在init()方法中
2、CCScene中的
autorelease()完成了析构的过程
3、CCPointZero
表示的位置是CCPointMake(0,0);
4
(CCApplicationProtocol,CCApplication,AppDelegate)三个类的类关系介绍:
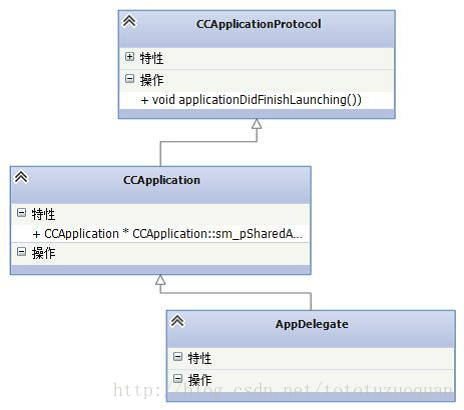
抽出代码具体实现:
优点:屏蔽了平台的差异性,实现跨平台
1
CCApplicationProtocol 定义了接口
#ifndef
__CC_APPLICATION_PROTOCOL_H__
#define
__CC_APPLICATION_PROTOCOL_H__
NS_CC_BEGIN
enum
TargetPlatform
{
kTargetWindows,
kTargetLinux,
kTargetMacOS,
kTargetAndroid,
kTargetIphone,
kTargetIpad,
kTargetBlackBerry,
kTargetNaCl,
kTargetEmscripten,
kTargetTizen,
kTargetWinRT,
kTargetWP8
};
/**
* @addtogroup platform
* @{
* @js NA
* @lua NA
*/
class
CC_DLL
CCApplicationProtocol
{
public:
virtual ~CCApplicationProtocol()
{}
/**
@brief Implement CCDirector and CCScene init code here.
@return true Initialize success, app continue.
@return false Initialize failed, app terminate.
*/
virtual
bool
applicationDidFinishLaunching() = 0;
//这个类是一个纯虚函数
/**
@brief The function be called when the application enter background
@param the pointer of the application
*/
virtual
void
applicationDidEnterBackground() = 0;
/**
@brief The function be called when the application enter foreground
@param the pointer of the application
*/
virtual
void
applicationWillEnterForeground() = 0;
/**
@brief Callback by CCDirector for limit FPS.
@interval The time, expressed in seconds, between current frame and next.
*/
virtual
void
setAnimationInterval(double
interval) = 0;
/**
@brief Get current language config
@return Current language config
*/
virtual
ccLanguageType
getCurrentLanguage() = 0;
/**
@brief Get target platform
*/
virtual
TargetPlatform
getTargetPlatform() = 0;
};
// end of platform group
/// @}
NS_CC_END
#endif
// __CC_APPLICATION_PROTOCOL_H__
2
CCApplication 各个平台不同的逻辑

3
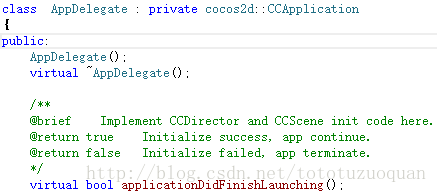
AppDelegate 私有继承了CCApplication
仅实现CCApplicationProtocol
里的接口
1
游戏逻辑架构
详细介绍
A
一个导演同一时间只能运行一个场景,场景当中,可以同时加载多个层,一个层可以可载多个精灵。层中亦可以加层。
B
场景切换
sceneàaddChild(layer);
layeràaddChild(sprite);
2
项目创建命令:
A
进入tools下的project-creat
E:\Installed\cocos2d-x-2.2.3\tools\project-creator>
B
python create_project.py -project MyCocos2dx -package com.toto.mycocos01 -language cpp
C
命令解释:
-project MyCocos2dx工程名
-package com.toto.mycocos01
包名
-language cpp
开发语言可选项目有javascript lua
D
创建后的项目目录:
3
简介
1
查看cocos2dx游戏的版本信息。
创建了一个cocos2dx项目之后,打开项目之后,会有如下项目结构
展开libcocos2d,找到cocos2d.cpp,双击打开此cpp文件,内容如下:
#include
"cocos2d.h"
NS_CC_BEGIN
const
char*
cocos2dVersion()
{
return
"2.2.3";
}
NS_CC_END
截图如下:
分析:
A
由上可以看出项目的版本号是:2.2.3
B
依赖的头文件
“cocos2d.h”
2
查看程序入口
程序入口是:main.cpp
#include
"main.h"
#include
"AppDelegate.h"
#include
"CCEGLView.h"
USING_NS_CC;
int
APIENTRY
_tWinMain(HINSTANCE
hInstance,
HINSTANCE
hPrevInstance,
LPTSTR
lpCmdLine,
int
nCmdShow)
{
UNREFERENCED_PARAMETER(hPrevInstance);
UNREFERENCED_PARAMETER(lpCmdLine);
// create the application instance
AppDelegate
app;
//Delegate:表示
委派…为代表 n:代表
CCEGLView*
eglView =
CCEGLView::sharedOpenGLView();
eglView->setViewName("MyCocos2dx");
//程序的标题
eglView->setFrameSize(480,
320); //程序的尺寸
return
CCApplication::sharedApplication()->run();
//关于shared的一般是单例模式
}
进入run函数,
run的代码结构如下(选中run(),再按F12进行查看):
int
CCApplication::run()
{
PVRFrameEnableControlWindow(false);
// Main message loop:
MSG
msg;
LARGE_INTEGER
nFreq;
LARGE_INTEGER
nLast;
LARGE_INTEGER
nNow;
QueryPerformanceFrequency(&nFreq);
QueryPerformanceCounter(&nLast);
// Initialize instance and cocos2d.
if (!applicationDidFinishLaunching())
{
return 0;
}
CCEGLView*
pMainWnd =
CCEGLView::sharedOpenGLView();
pMainWnd->centerWindow();
ShowWindow(pMainWnd->getHWnd(),
SW_SHOW);
while (1)
{
if (!
PeekMessage(&msg,
NULL, 0, 0,
PM_REMOVE))
{
// Get current time tick.
QueryPerformanceCounter(&nNow);
// If it's the time to draw next frame, draw it, else sleep a while.
if (nNow.QuadPart
- nLast.QuadPart
> m_nAnimationInterval.QuadPart)
{
nLast.QuadPart
= nNow.QuadPart;
CCDirector::sharedDirector()->mainLoop();
}
else
{
Sleep(0);
}
continue;
}
if (WM_QUIT
== msg.message)
{
// Quit message loop.
break;
}
// Deal with windows message.
if (!
m_hAccelTable || !
TranslateAccelerator(msg.hwnd,
m_hAccelTable, &msg))
{
TranslateMessage(&msg);
DispatchMessage(&msg);
}
}
return (int)
msg.wParam;
}
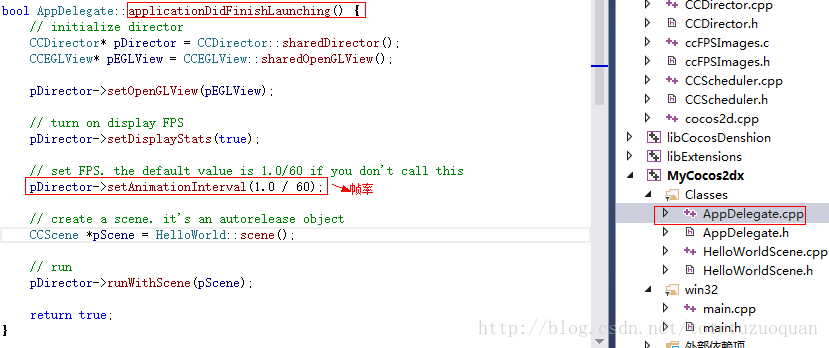
程序的入口:applicationDidFinishLaunching()
AppDelegate.cpp
bool
AppDelegate::applicationDidFinishLaunching()
{
// initialize director
CCDirector*
pDirector =
CCDirector::sharedDirector();
CCEGLView*
pEGLView =
CCEGLView::sharedOpenGLView();
pDirector->setOpenGLView(pEGLView);
// turn on display FPS
pDirector->setDisplayStats(true);
// set FPS. the default value is 1.0/60 if you don't call this
pDirector->setAnimationInterval(1.0
/ 60); //设置帧率
// create a scene. it's an autorelease object
CCScene *pScene
= HelloWorld::scene();
// run
pDirector->runWithScene(pScene);
return
true;
}
截图:
HelloWorldScene.h
HelloWorld类的本质是一个层(CCLayer):
#ifndef
__HELLOWORLD_SCENE_H__
#define
__HELLOWORLD_SCENE_H__
#include
"cocos2d.h"
class
HelloWorld :
public
cocos2d::CCLayer
{
public:
// Here's a difference. Method 'init' in cocos2d-x returns bool, instead of returning 'id' in cocos2d-iphone
virtual
bool
init();
// there's no 'id' in cpp, so we recommend returning the class instance pointer
static
cocos2d::CCScene*
scene();
// a selector callback
void
menuCloseCallback(CCObject*
pSender);
// implement the "static node()" method manually
CREATE_FUNC(HelloWorld);
};
#endif
// __HELLOWORLD_SCENE_H__
HelloWorldScene.cpp
#include
"HelloWorldScene.h"
USING_NS_CC;
CCScene*
HelloWorld::scene()
{
// 'scene' is an autorelease object
CCScene *scene
= CCScene::create();
// 'layer' is an autorelease object
HelloWorld *layer
= HelloWorld::create();
// add layer as a child to scene
scene->addChild(layer);
//return the scene
return
scene;
}
// on "init" you need to initialize your instance
bool
HelloWorld::init()
{
//////////////////////////////
// 1. super init first
if ( !CCLayer::init()
)
{
return
false;
}
CCSize
visibleSize =
CCDirector::sharedDirector()->getVisibleSize();
CCPoint
origin =
CCDirector::sharedDirector()->getVisibleOrigin();
/////////////////////////////
// 2. add a menu item with "X" image, which is clicked to quit the program
//
you may modify it.
// add a "close" icon to exit the progress. it's an autorelease object
CCMenuItemImage *pCloseItem
= CCMenuItemImage::create(
"CloseNormal.png",
"CloseSelected.png",
this,
menu_selector(HelloWorld::menuCloseCallback));
pCloseItem->setPosition(ccp(origin.x
+ visibleSize.width
- pCloseItem->getContentSize().width/2
,
origin.y
+ pCloseItem->getContentSize().height/2));
// create menu, it's an autorelease object
CCMenu*
pMenu =
CCMenu::create(pCloseItem,
NULL);
pMenu->setPosition(CCPointZero);
this->addChild(pMenu,
1);
/////////////////////////////
// 3. add your codes below...
// add a label shows "Hello World"
// create and initialize a label
CCLabelTTF*
pLabel =
CCLabelTTF::create("Hello
World",
"Arial", 24);
// position the label on the center of the screen
pLabel->setPosition(ccp(origin.x
+ visibleSize.width/2,
origin.y
+ visibleSize.height
- pLabel->getContentSize().height));
// add the label as a child to this layer
this->addChild(pLabel,
1);
// add "HelloWorld" splash screen"
CCSprite*
pSprite =
CCSprite::create("HelloWorld.png");
// position the sprite on the center of the screen
pSprite->setPosition(ccp(visibleSize.width/2
+ origin.x,
visibleSize.height/2
+ origin.y));
// add the sprite as a child to this layer
this->addChild(pSprite,
0);
return
true;
}
void
HelloWorld::menuCloseCallback(CCObject*
pSender)
{
#if (CC_TARGET_PLATFORM
== CC_PLATFORM_WINRT) || (CC_TARGET_PLATFORM
== CC_PLATFORM_WP8)
CCMessageBox("You
pressed the close button. Windows Store Apps do not implement a close button.","Alert");
#else
CCDirector::sharedDirector()->end();
#if (CC_TARGET_PLATFORM
== CC_PLATFORM_IOS)
exit(0);
#endif
#endif
}
总结:
1、对于cocos真正的初始化是在init()方法中
2、CCScene中的
autorelease()完成了析构的过程
3、CCPointZero
表示的位置是CCPointMake(0,0);
4
(CCApplicationProtocol,CCApplication,AppDelegate)三个类的类关系介绍:
抽出代码具体实现:
优点:屏蔽了平台的差异性,实现跨平台
1
CCApplicationProtocol 定义了接口
#ifndef
__CC_APPLICATION_PROTOCOL_H__
#define
__CC_APPLICATION_PROTOCOL_H__
NS_CC_BEGIN
enum
TargetPlatform
{
kTargetWindows,
kTargetLinux,
kTargetMacOS,
kTargetAndroid,
kTargetIphone,
kTargetIpad,
kTargetBlackBerry,
kTargetNaCl,
kTargetEmscripten,
kTargetTizen,
kTargetWinRT,
kTargetWP8
};
/**
* @addtogroup platform
* @{
* @js NA
* @lua NA
*/
class
CC_DLL
CCApplicationProtocol
{
public:
virtual ~CCApplicationProtocol()
{}
/**
@brief Implement CCDirector and CCScene init code here.
@return true Initialize success, app continue.
@return false Initialize failed, app terminate.
*/
virtual
bool
applicationDidFinishLaunching() = 0;
//这个类是一个纯虚函数
/**
@brief The function be called when the application enter background
@param the pointer of the application
*/
virtual
void
applicationDidEnterBackground() = 0;
/**
@brief The function be called when the application enter foreground
@param the pointer of the application
*/
virtual
void
applicationWillEnterForeground() = 0;
/**
@brief Callback by CCDirector for limit FPS.
@interval The time, expressed in seconds, between current frame and next.
*/
virtual
void
setAnimationInterval(double
interval) = 0;
/**
@brief Get current language config
@return Current language config
*/
virtual
ccLanguageType
getCurrentLanguage() = 0;
/**
@brief Get target platform
*/
virtual
TargetPlatform
getTargetPlatform() = 0;
};
// end of platform group
/// @}
NS_CC_END
#endif
// __CC_APPLICATION_PROTOCOL_H__
2
CCApplication 各个平台不同的逻辑
3
AppDelegate 私有继承了CCApplication
仅实现CCApplicationProtocol
里的接口

相关文章推荐
- 我的Cocos2d-x学习笔记(三)游戏逻辑架构与HelloWorld分析
- 我的Cocos2d-x学习笔记(三)游戏逻辑架构与HelloWorld分析
- quick-cocos2d-x游戏开发【2】——项目结构分析、创建新场景
- cocos2d-x打飞机实例总结(一):程序入口分析和AppDelegate,Application,ApplicationProtocol三个类的分析
- quick-cocos2d-x游戏开发【2】——项目结构分析、创建新场景
- quick-cocos2d-x游戏开发【2】——项目结构分析、创建新场景
- 〖用cocos2d-android引擎写游戏〗(一)第一个程序HelloWorld
- 【iOS-cocos2d-X 游戏开发之四】Cocos2dX创建Android NDK新项目并编译导入Eclipse中正常运行!
- 【Android游戏开发之十】(优化处理)详细剖析Android Traceview效率检视工具,分析程序运行速度!并讲解两种创建SDcard方式!
- Cocos2d-x-3.2 创建HelloWorld项目
- cocos2d-x 3.0游戏开发xcode5环境的搭建以及项目创建
- 《Cocos2d-x游戏开发之旅》读书笔记2:学习创建游戏项目
- 【iOS-cocos2d游戏引擎开发之一】搭建cocos2d游戏引擎环境,创建第一个HelloWorld! 推荐
- 【Android游戏开发之十】(优化处理)详细剖析Android Traceview 效率检视工具!分析程序运行速度!并讲解两种创建SDcard方式!
- quick-cocos2d-x教程1:在window上创建第一个项目目录,并制作helloworld
- quick-cocos2d-x游戏开发【1】——引擎结构总览和创建项目
- cocos2d-x 3.0 HelloWorld项目创建
- 【iOS-cocos2d-X 游戏开发之四】Cocos2dX创建Android NDK新项目并编译导入Eclipse中正常运行! 推荐
- cocos2d-x创建项目(cocos2d-x游戏开发二)
- 【iOS-cocos2d-X 游戏开发之四】Cocos2dX创建Android NDK新项目并编译导入Eclipse中正常运行!