QT使用教程
2014-09-26 00:00
302 查看
Introduction
This tutorial will explain in detail how to take your first steps in programming with Qt using the Qt Creator integrated development environment (IDE).
If you want to learn how to make powerful GUIs with all the latest fancy technologies, this is not the tutorial for you. This is firmly intended as a gentle introduction to help beginners get up and running without scaring them.
We will begin by creating a new Qt-based project and modifying the generated code to show a very simple graphical user interface (GUI). Once our basic application project is in place and running, we will go back and modify it to do some slightly useful things.
We will start off simple and build up in complexity as you get more familiar with the widgets and other facilities at your disposal.
So, grab yourself a copy of the Qt SDK or if you are on Linux the system-provided copy of Qt and a compiler and let’s get started!
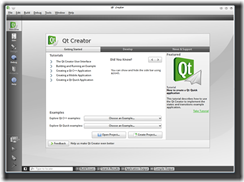
1. Start up Qt Creator.
2. Go to File->“New File or Project…” menu entry.
3. Choose Qt Gui Application and choose a name for it.
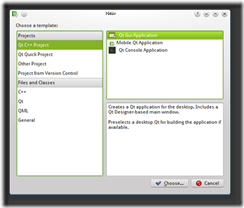
4. Enter a project name, “qt-tutorial-01”, say.

5. Select one or more versions of Qt to target. A desktop build is fine for this tutorial.

6. Select the base class to be QWidget (leave the class name as Widget which is the default).

7. Check project creation options on summary and click “Finish”.

The above will create you a simple project consisting of four files:
l main.cpp
l widget.h
l widget.cpp
<
3ff8
p>l widget.ui
1. Click on that and designer will switch to design mode and open up the file. You should see a blank widget. Now do this:

2. Using the toolbox on the left, drag a Label onto the widget form

3. Do similarly for a Line Edit and place it to the right of the Label. The exact position is not important.

4. Click on the widget background so that both of your new widgets (the label and line edit) get deselected.

5. In the toolbar at the top click on the “Lay out Horizontally” button or press Ctrl-H to add all widgets to a horizontal layout. The layout will take care of resizing your widgets for you if the parent widget’s size changes.
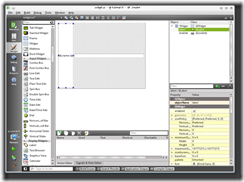
6. Double click on the Label and it will switch to edit mode. Change the text to “My name is

7. Press Ctrl-S to save the form.
8. Click on the Edit mode button in the left hand panel of creator to switch back to the text editor. You will probably see the raw xml content of the UI file at this point. Just close it we are done with it for now.

Now open up the widget.h file and edit it so that it looks like this:
Now edit the corresponding .cpp file to look like this:
Finally edit main.cpp to this:

This is what the application looks like when it is executed:
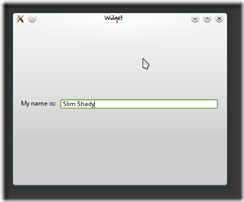
As you can see the main() function is very simple. All we do is create a QApplication [doc.qt.nokia.com] and then a Widget (this is our custom widget that we layed out in designer and added custom behaviour to in code with the name() and setName() functions).
We then call our custom setName function on the widget. This in turn gets a pointer to the QLineEdit[doc.qt.nokia.com] widget that we placed on the form and calls the setText() [doc.qt.nokia.com]() function of QLineEdit.
Finally we show the widget and enter the event loop by calling a.exec().
Once you understand how this simple app works then you can start adding some more bells and whistles like signal/slot connections.
· How to Use QPushButton [developer.qt.nokia.com]
· How to use signals and slots [developer.qt.nokia.com]
Categories:
· Developing_with_Qt
o General
· HowTo
· Tutorial
This tutorial will explain in detail how to take your first steps in programming with Qt using the Qt Creator integrated development environment (IDE).
If you want to learn how to make powerful GUIs with all the latest fancy technologies, this is not the tutorial for you. This is firmly intended as a gentle introduction to help beginners get up and running without scaring them.
We will begin by creating a new Qt-based project and modifying the generated code to show a very simple graphical user interface (GUI). Once our basic application project is in place and running, we will go back and modify it to do some slightly useful things.
We will start off simple and build up in complexity as you get more familiar with the widgets and other facilities at your disposal.
So, grab yourself a copy of the Qt SDK or if you are on Linux the system-provided copy of Qt and a compiler and let’s get started!
Baby steps: Creating a new project
Let’s try making a trivial application that has a single window that shows a QLabel and a QLineEdit. To do this follow these simple steps:1. Start up Qt Creator.

2. Go to File->“New File or Project…” menu entry.
3. Choose Qt Gui Application and choose a name for it.

4. Enter a project name, “qt-tutorial-01”, say.

5. Select one or more versions of Qt to target. A desktop build is fine for this tutorial.

6. Select the base class to be QWidget (leave the class name as Widget which is the default).

7. Check project creation options on summary and click “Finish”.

The above will create you a simple project consisting of four files:
l main.cpp
l widget.h
l widget.cpp
<
3ff8
p>l widget.ui
Learning to crawl: Editing the project files
We will edit the widget.ui file first so:1. Click on that and designer will switch to design mode and open up the file. You should see a blank widget. Now do this:

2. Using the toolbox on the left, drag a Label onto the widget form

3. Do similarly for a Line Edit and place it to the right of the Label. The exact position is not important.

4. Click on the widget background so that both of your new widgets (the label and line edit) get deselected.

5. In the toolbar at the top click on the “Lay out Horizontally” button or press Ctrl-H to add all widgets to a horizontal layout. The layout will take care of resizing your widgets for you if the parent widget’s size changes.

6. Double click on the Label and it will switch to edit mode. Change the text to “My name is

7. Press Ctrl-S to save the form.
8. Click on the Edit mode button in the left hand panel of creator to switch back to the text editor. You will probably see the raw xml content of the UI file at this point. Just close it we are done with it for now.

Now open up the widget.h file and edit it so that it looks like this:
| 1. #ifndef WIDGET_H 2. #define WIDGET_H 3. 4. #include <QWidget> 5. 6. namespace Ui { 7. class Widget; 8. } 9. 10. class Widget : public QWidget 11. { 12. Q_OBJECT 13. 14. public: 15. explicit Widget(QWidget *parent = 0); 16. ~Widget(); 17. 18. void setName(const QString &name); 19. QString name() const; 20. 21. private: 22. Ui::Widget *ui; 23. }; 24. 25. #endif // WIDGET_H |
| 1. #include "widget.h" 2. #include "ui_widget.h" 3. 4. Widget::Widget(QWidget *parent) : 5. QWidget(parent), 6. ui(new Ui::Widget) 7. { 8. ui->setupUi(this); 9. } 10. 11. Widget::~Widget() 12. { 13. delete ui; 14. } 15. 16. void Widget::setName(const QString &name) 17. { 18. ui->lineEdit->setText(name); 19. } 20. 21. QString Widget::name() const 22. { 23. return ui->lineEdit->text(); 24. } |
| 1. #include <QtGui/QApplication> 2. #include "widget.h" 3. 4. int main(int argc, char *argv[]) 5. { 6. QApplication a(argc, argv); 7. Widget w; 8. 9. w.setName("Slim Shady"); 10. 11. w.show(); 12. 13. return a.exec(); 14. } |
Up and running: Building and running the application
Now build (Hammer icon in lower left or default shortcut of Ctrl-Shift-B) and run the application (green “play” icon in lower left corner). You will see some compiler messages go past in the “Compile Output” panel at the bottom whilst building.
This is what the application looks like when it is executed:

As you can see the main() function is very simple. All we do is create a QApplication [doc.qt.nokia.com] and then a Widget (this is our custom widget that we layed out in designer and added custom behaviour to in code with the name() and setName() functions).
We then call our custom setName function on the widget. This in turn gets a pointer to the QLineEdit[doc.qt.nokia.com] widget that we placed on the form and calls the setText() [doc.qt.nokia.com]() function of QLineEdit.
Finally we show the widget and enter the event loop by calling a.exec().
Once you understand how this simple app works then you can start adding some more bells and whistles like signal/slot connections.
See also
· Introduction to Qt Quick for C++ Developers [developer.qt.nokia.com]· How to Use QPushButton [developer.qt.nokia.com]
· How to use signals and slots [developer.qt.nokia.com]
Categories:
· Developing_with_Qt
o General
· HowTo
· Tutorial

相关文章推荐
- qt-designer使用教程--编写自己的槽
- qt-designer使用教程3--编写自己的槽
- Qt下使用OpenGL(2)-根据NeHe的教程改写的
- Qt教程一 —— 第四章:使用窗口部件
- Qt下使用OpenGL(4)-根据NeHe的教程改写的
- PySide教程:PySide中使用Qt属性
- PySide教程:PySide中使用Qt“.NET研究”属性
- PySide教程:PySide中使用Qt属性
- BB10 NDK Cascades 框架简介和QT使用教程(与Nokia Symbian QT的区别)
- qt-designer使用教程1--HelloWorld
- qt-designer使用教程--编写自己的槽
- 教程:使用QT建立Python GUI应用程序
- 使用Cmake搭建Qt+VTK工程(顺便推荐超好Cmake入门教程一本)
- Qt4另类使用教程(五)---Qt4使用win32 wgl渲染OpenGL FrameWork + cg language(GPU渲染语言)
- qt-designer使用教程2--调用退出.txt
- qt-designer使用教程1--HelloWorld.txt
- Qt4另类使用教程(二)---Qt4 右键菜单 透明Widget 实例
- 使用QtCreator编写Qt程序教程
- Qt下使用OpenGL(3)-根据NeHe的教程改写的
- Qt教程4-使用用户自定义的窗口部件