swift UINavigationController 导航控制器(六)【转自http://blog.csdn.net/zhang_biao_1991/article/details/313927】
2014-09-12 15:45
399 查看
一.创建项目 //略
二.创建视图控制器(快捷的方法:不要在去创建swift 文件 ,直接如下操作

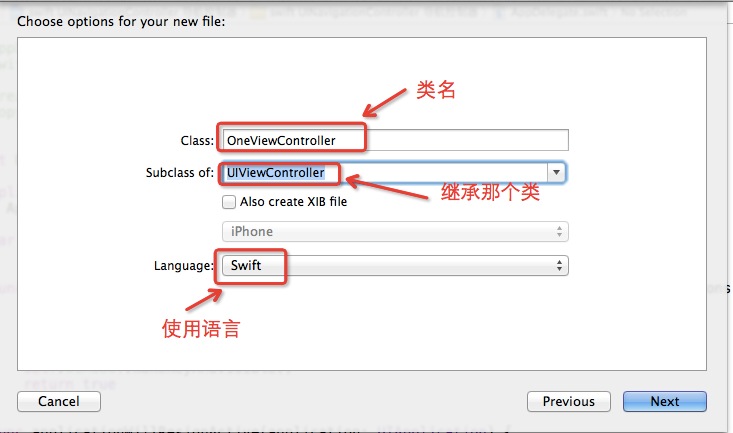
)
上代码(含有注释)
//
// AppDelegate.swift
// swift UINavigationController 导航控制器
//
// Created by zhangbiao on 14-6-16.
// Copyright (c) 2014年 理想. All rights reserved.
//
import UIKit
@UIApplicationMain
class AppDelegate: UIResponder, UIApplicationDelegate {
var window: UIWindow?
func application(application: UIApplication, didFinishLaunchingWithOptions launchOptions:NSDictionary?) -> Bool {
self.window = UIWindow(frame: UIScreen.mainScreen().bounds)
// Override point for customization after application launch.
self.window!.backgroundColor = UIColor.whiteColor()
self.window!.makeKeyAndVisible()
//定义一个视图控制器
let one_vc = OneViewController(nibName:nil,bundle: nil);
//创建导航控制器
let nvc=UINavigationController(rootViewController:one_vc);
//设置根视图
self.window!.rootViewController=nvc;
return true
}
func applicationWillResignActive(application: UIApplication) {
// Sent when the application is about to move from active to inactive state. This can occur for certain types of temporary interruptions (such as an incoming phone call or SMS message) or when the user quits the
application and it begins the transition to the background state.
// Use this method to pause ongoing tasks, disable timers, and throttle down OpenGL ES frame rates. Games should use this method to pause the game.
}
func applicationDidEnterBackground(application: UIApplication) {
// Use this method to release shared resources, save user data, invalidate timers, and store enough application state information to restore your application to its current state in case it is terminated later.
// If your application supports background execution, this method is called instead of applicationWillTerminate: when the user quits.
}
func applicationWillEnterForeground(application: UIApplication) {
// Called as part of the transition from the background to the inactive state; here you can undo many of the changes made on entering the background.
}
func applicationDidBecomeActive(application: UIApplication) {
// Restart any tasks that were paused (or not yet started) while the application was inactive. If the application was previously in the background, optionally refresh the user interface.
}
func applicationWillTerminate(application: UIApplication) {
// Called when the application is about to terminate. Save data if appropriate. See also applicationDidEnterBackground:.
}
}
//
// OneViewController.swift
// swift UINavigationController 导航控制器
//
// Created by zhangbiao on 14-6-16.
// Copyright (c) 2014年 理想. All rights reserved.
//
import UIKit
class OneViewController: UIViewController {
init(nibName nibNameOrNil: String?, bundle nibBundleOrNil: NSBundle?) {
super.init(nibName: nibNameOrNil, bundle: nibBundleOrNil)
// Custom initialization
}
//
override func viewDidLoad() {
super.viewDidLoad()
// 设置导航栏标题
self.title="One";
//Item 标题 //Item样式 //目标所有
//nxet 事件触发的方法名字
let nextItem=UIBarButtonItem(title:"下一页",style:.Plain,target:self,action:"next");
// 添加到到导航栏上
self.navigationItem.rightBarButtonItem = nextItem;
}
//Item 事件
func next()
{
println("点击了下一页");
// 定义一个控制器
let tow_vc = TowViewController();
//推入下一个视图
self.navigationController.pushViewController(tow_vc,animated:true);
}
override func didReceiveMemoryWarning() {
super.didReceiveMemoryWarning()
// Dispose of any resources that can be recreated.
}
/*
// #pragma mark - Navigation
// In a storyboard-based application, you will often want to do a little preparation before navigation
override func prepareForSegue(segue: UIStoryboardSegue?, sender: AnyObject?) {
// Get the new view controller using [segue destinationViewController].
// Pass the selected object to the new view controller.
}
*/
}
//
// TowViewController.swift
// swift UINavigationController 导航控制器
//
// Created by zhangbiao on 14-6-16.
// Copyright (c) 2014年 理想. All rights reserved.
//
import UIKit
class TowViewController: UIViewController {
//
// init(nibName nibNameOrNil: String?, bundle nibBundleOrNil: NSBundle?) {
// super.init(nibName: nibNameOrNil, bundle: nibBundleOrNil)
// // Custom initialization
// }
override func viewDidLoad()
{
super.viewDidLoad()
self.title="Tow";
// 创建一个按钮
var but=UIButton(frame:CGRect(x:110,y:100,width:100,height:40))
;
//设置tag
but.tag=1001;
//设置标题
but.setTitle("返回上一页",forState:.Normal);
//添加事件
but.addTarget(self,action:"butClick:",forControlEvents:.TouchUpInside);
// 设置背景颜色
but.backgroundColor=UIColor.blueColor();
//添加到试图上
self.view.addSubview(but);
var but1=UIButton(frame:CGRect(x:110,y:200,width:100,height:40))
;
//设置but tag
but1.tag=1002;
//设置标题
but1.setTitle("下一页",forState:.Normal);
//添加事件
but1.addTarget(self,action:"butClick:",forControlEvents:.TouchUpInside);
// 设置背景颜色
but1.backgroundColor=UIColor.blueColor();
//添加到视图上
self.view.addSubview(but1);
//添加一个Item Item使用系统图标
let myItem=UIBarButtonItem(barButtonSystemItem:.Action,target:self,action:"ItemClick");
self.navigationItem.leftBarButtonItem=myItem;
}
//but 按钮事件
func butClick(but:UIButton)
{
switch (but.tag)
{
case 1001:
//返回上一页 出栈操作
self.navigationController.popViewControllerAnimated(true);
case 1002:
// 进入下一页 再次压栈
// 创建一个试图控制器
let three=ThreeViewController();
// 压入栈
self.navigationController.pushViewController(three,animated:true);
default:
println("没有匹配的");
}
}
// but 按钮事件
func ItemClick()
{
var label=UILabel(frame:CGRect(x:20,y:300,width:280,height:50));
label.text="我给你笑一个吧
二.创建视图控制器(快捷的方法:不要在去创建swift 文件 ,直接如下操作
)
上代码(含有注释)
AppDelegate.swift
//// AppDelegate.swift
// swift UINavigationController 导航控制器
//
// Created by zhangbiao on 14-6-16.
// Copyright (c) 2014年 理想. All rights reserved.
//
import UIKit
@UIApplicationMain
class AppDelegate: UIResponder, UIApplicationDelegate {
var window: UIWindow?
func application(application: UIApplication, didFinishLaunchingWithOptions launchOptions:NSDictionary?) -> Bool {
self.window = UIWindow(frame: UIScreen.mainScreen().bounds)
// Override point for customization after application launch.
self.window!.backgroundColor = UIColor.whiteColor()
self.window!.makeKeyAndVisible()
//定义一个视图控制器
let one_vc = OneViewController(nibName:nil,bundle: nil);
//创建导航控制器
let nvc=UINavigationController(rootViewController:one_vc);
//设置根视图
self.window!.rootViewController=nvc;
return true
}
func applicationWillResignActive(application: UIApplication) {
// Sent when the application is about to move from active to inactive state. This can occur for certain types of temporary interruptions (such as an incoming phone call or SMS message) or when the user quits the
application and it begins the transition to the background state.
// Use this method to pause ongoing tasks, disable timers, and throttle down OpenGL ES frame rates. Games should use this method to pause the game.
}
func applicationDidEnterBackground(application: UIApplication) {
// Use this method to release shared resources, save user data, invalidate timers, and store enough application state information to restore your application to its current state in case it is terminated later.
// If your application supports background execution, this method is called instead of applicationWillTerminate: when the user quits.
}
func applicationWillEnterForeground(application: UIApplication) {
// Called as part of the transition from the background to the inactive state; here you can undo many of the changes made on entering the background.
}
func applicationDidBecomeActive(application: UIApplication) {
// Restart any tasks that were paused (or not yet started) while the application was inactive. If the application was previously in the background, optionally refresh the user interface.
}
func applicationWillTerminate(application: UIApplication) {
// Called when the application is about to terminate. Save data if appropriate. See also applicationDidEnterBackground:.
}
}
OneViewController.swift
//// OneViewController.swift
// swift UINavigationController 导航控制器
//
// Created by zhangbiao on 14-6-16.
// Copyright (c) 2014年 理想. All rights reserved.
//
import UIKit
class OneViewController: UIViewController {
init(nibName nibNameOrNil: String?, bundle nibBundleOrNil: NSBundle?) {
super.init(nibName: nibNameOrNil, bundle: nibBundleOrNil)
// Custom initialization
}
//
override func viewDidLoad() {
super.viewDidLoad()
// 设置导航栏标题
self.title="One";
//Item 标题 //Item样式 //目标所有
//nxet 事件触发的方法名字
let nextItem=UIBarButtonItem(title:"下一页",style:.Plain,target:self,action:"next");
// 添加到到导航栏上
self.navigationItem.rightBarButtonItem = nextItem;
}
//Item 事件
func next()
{
println("点击了下一页");
// 定义一个控制器
let tow_vc = TowViewController();
//推入下一个视图
self.navigationController.pushViewController(tow_vc,animated:true);
}
override func didReceiveMemoryWarning() {
super.didReceiveMemoryWarning()
// Dispose of any resources that can be recreated.
}
/*
// #pragma mark - Navigation
// In a storyboard-based application, you will often want to do a little preparation before navigation
override func prepareForSegue(segue: UIStoryboardSegue?, sender: AnyObject?) {
// Get the new view controller using [segue destinationViewController].
// Pass the selected object to the new view controller.
}
*/
}
TowViewController.swift
//// TowViewController.swift
// swift UINavigationController 导航控制器
//
// Created by zhangbiao on 14-6-16.
// Copyright (c) 2014年 理想. All rights reserved.
//
import UIKit
class TowViewController: UIViewController {
//
// init(nibName nibNameOrNil: String?, bundle nibBundleOrNil: NSBundle?) {
// super.init(nibName: nibNameOrNil, bundle: nibBundleOrNil)
// // Custom initialization
// }
override func viewDidLoad()
{
super.viewDidLoad()
self.title="Tow";
// 创建一个按钮
var but=UIButton(frame:CGRect(x:110,y:100,width:100,height:40))
;
//设置tag
but.tag=1001;
//设置标题
but.setTitle("返回上一页",forState:.Normal);
//添加事件
but.addTarget(self,action:"butClick:",forControlEvents:.TouchUpInside);
// 设置背景颜色
but.backgroundColor=UIColor.blueColor();
//添加到试图上
self.view.addSubview(but);
var but1=UIButton(frame:CGRect(x:110,y:200,width:100,height:40))
;
//设置but tag
but1.tag=1002;
//设置标题
but1.setTitle("下一页",forState:.Normal);
//添加事件
but1.addTarget(self,action:"butClick:",forControlEvents:.TouchUpInside);
// 设置背景颜色
but1.backgroundColor=UIColor.blueColor();
//添加到视图上
self.view.addSubview(but1);
//添加一个Item Item使用系统图标
let myItem=UIBarButtonItem(barButtonSystemItem:.Action,target:self,action:"ItemClick");
self.navigationItem.leftBarButtonItem=myItem;
}
//but 按钮事件
func butClick(but:UIButton)
{
switch (but.tag)
{
case 1001:
//返回上一页 出栈操作
self.navigationController.popViewControllerAnimated(true);
case 1002:
// 进入下一页 再次压栈
// 创建一个试图控制器
let three=ThreeViewController();
// 压入栈
self.navigationController.pushViewController(three,animated:true);
default:
println("没有匹配的");
}
}
// but 按钮事件
func ItemClick()
{
var label=UILabel(frame:CGRect(x:20,y:300,width:280,height:50));
label.text="我给你笑一个吧

相关文章推荐
- swift tuples 元组(二)【转自http://blog.csdn.net/zhang_biao_1991/article/details/31344495】
- swift Array 数组(三)【转自http://blog.csdn.net/zhang_biao_1991/article/details/31344663】
- swift UITableView 表视图(七)【转自http://blog.csdn.net/zhang_biao_1991/article/details/36015695】
- swift 流程控制(五)【转自http://blog.csdn.net/zhang_biao_1991/article/details/31345161】
- swift基础(一) 变量和常量和函数【转自http://blog.csdn.net/zhang_biao_1991/article/details/30518251】
- swift Dictionary 字典(四)【转自http://blog.csdn.net/zhang_biao_1991/article/details/31344785】
- postgresql运维命令简记 转自:http://blog.csdn.net/hitzhang/archive/2010/09/16/5888028.aspx
- 张孝祥的心得培训体会(http://blog.csdn.net/zhangxiaoxiang/)
- http://blog.csdn.net/zhang_xinxiu/article/details/38655311
- 数据库设计及命名规范http://blog.csdn.net/zhang_xinxiu/article/details/8521673
- Swift UINavigationController(导航控制器)的创建及导航栏的设置
- swift UINavigationController 导航控制器
- Swift UINavigationController(导航控制器)的创建及导航栏的设置
- 【JEEWX微信开发更便捷,Ngrok 内网穿透利器应用】http://blog.csdn.net/zhangdaiscott/article/details/51849227
- http://blog.csdn.net/zhangxiaoxiang/archive/2006/12/04/1429968.aspx
- Swift-导航控制器UINavigationController的用法示例
- Swift UINavigationController(导航控制器)的创建及导航栏的设置
- Swift 头像上传(2)http://blog.csdn.net/wei_chong_chong/article/details/52611110
- 转载请注明出处:http://blog.csdn.net/zhangphil
- 使用 CL 编译器选项查看 C++ 类内存布局 (转载)http://blog.csdn.net/zhangcunli/archive/2009/10/23/4720781.aspx