【Nginx】开发一个HTTP过滤模块
2014-07-03 15:26
543 查看
与HTTP处理模块不同,HTTP过滤模块的工作是对发送给用户的HTTP响应做一些加工。服务器返回的一个响应可以被任意多个HTTP过滤模块以流水线的方式依次处理。HTTP响应分为头部和包体,ngx_http_send_header和ngx_http_output_filter函数分别负责发送头部和包体,它们会依次调用各个过滤模块对待发送的响应进行处理。
HTTP过滤模块可以单独处理响应的头部或者包体或同时处理二者。处理头部和包体的方法原型分别如下,它们在HTTP框架模块ngx_http_core_module.h中定义:
上面是两个函数指针的声明,HTTP过滤模块就是依赖这种指针串接成一个单链表的,每个HTTP过滤模块至少定义一个上述函数指针。入口链表如下所示:
当HTTP模块调用ngx_http_send_header发送头部时,就从ngx_http_top_header_filter指向的模块开始遍历所有的HTTP头部过滤模块并处理;当HTTP模块调用ngx_http_output_filter发送包体时,就从ngx_http_top_body_filter指向的模块开始遍历所有的HTTP包体过滤模块并处理。函数ngx_http_send_header代码如下:
函数ngx_http_top_header_filter代码如下:
在每个HTTP过滤模块中至少存在上述两种函数指针中的一个,声明如下:
加入HTTP过滤模块单链表的方法如下:
当本模块被初始化时,调用上述函数,将自己加入到链表头部。类似上面ngx_http_addition_filter_init这样的初始化函数在什么时候被调用呢?答案是依该方法放在ngx_http_module_t结构体的哪个成员而定。一般而言,大多数官方HTTP过滤模块通常放在ngx_http_module_t.postconfiguration函数指针中,读取完所有配置项后被回调。各个模块初始化的顺序是怎么样的呢?这由configure命令生成的ngx_modules.c文件中的ngx_modules数组的排列顺序决定。数组中靠前的模块先初始化。由于过滤模块是将自己插入到链表头部,使得ngx_modules数组中过滤模块的排列顺序和它们实际执行的顺序相反。至于ngx_modules数组中的排列顺序,又是由其它脚本决定的。
下面是开发一个简单的HTTP过滤模块的过程。
首先定义两个结构体:
ngx_http_myfilter_conf_t用于保存标志是否开启过滤功能的配置项,这里我们使用预设的配置项解析方法对此配置项进行解析。ngx_http_myfilter_ctx_t则用于保存一个HTTP请求的上下文,因为HTTP包体的处理过程不是一次完成的,也就是说处理包体的函数会被调用多次,所以我们需要一个标志来记录当前是否已经由过滤模块进行过处理了。HTTP上下文相当于一张表,表中记录了该请求当前的处理记录。这样,当一个请求被拆分成多次处理时,同一个处理函数就能够了解该请求已经执行到哪里了,从而接着当前的进度进行处理。
HTTP模块结构ngx_http_module_t定义如下:
三个函数借口的作用分别如下:
ngx_http_myfilter_init:初始化该过滤模块,也就是将该模块插入到HTTP过滤模块单链表中,插入方法已经在上面介绍过了。
ngx_http_myfilter_create_conf:给保存配置项的结构体ngx_http_myfilter_conf_t分配空间并初始化结构体成员
ngx_http_myfilter_merge_conf:合并出现在main、srv级别的同名配置项
还有一个非常重要的结构ngx_command_t定义如下:
我们使用预设的配置项解析函数ngx_conf_set_flag_slot解析配置项myfilter,将解析出的配置项参数存入结构体ngx_http_myfilter_conf_t的enable成员中。配置项myfilter只能是“on”或者“off”。
注意,HTTP过滤模块仍然属于一个HTTP模块,也就是说:
ngx_module_t.type = NGX_HTTP_MODULE
下面是HTTP过滤模块的核心部分,即两个指针分别指向的函数。首先来看看处理HTTP响应头部的函数:
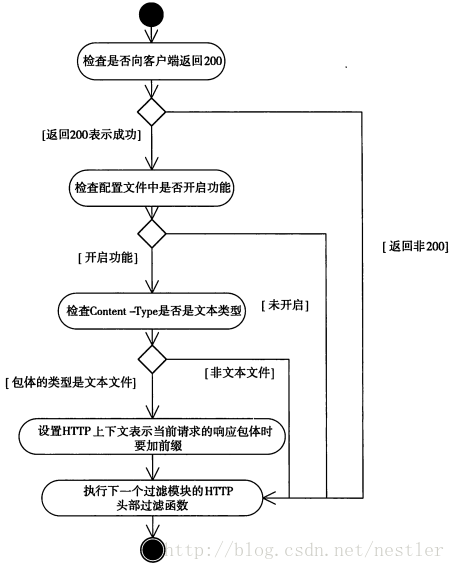
这里有几点要注意。当该模块遇到错误的响应或模块本身出错时,不应该退出程序而是应该交由下一个HTTP过滤模块处理,这就是上述代码中多次调用ngx_http_next_header_filter函数的原因。还有就是函数首先要判断在配置文件中是否打开此过滤功能并检查响应的类型。流程图如下:
接下来是处理HTTP包体的函数:
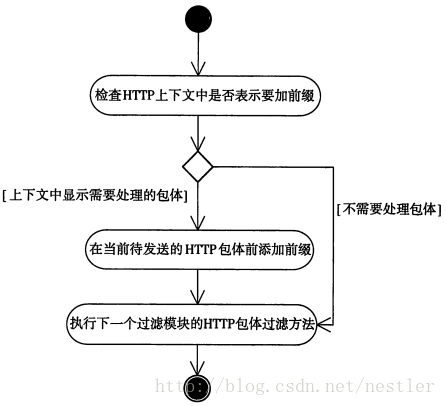
根据这一句cl->next = in可以判断,我们将filter_prefix包含的字符串添加到了HTTP响应包体的前面。以上函数的流程图如下:
下面是编译及演示过程。我们在第一个mytest模块的基础上对发送的信息添加前缀。为了把两个模块同时编译进nginx,我们在config时输入如下命令:
然后检查是否成功包含了两个模块,这里我们可以查看保存所有模块的数组ngx_modules[]:
结果如下:
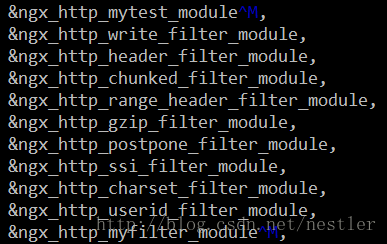
可以看到,HTTP模块mytest和HTTP过滤模块myfilter都被包含进来了。接下来就是make和make install了。安装成功后,我们还要修改配置文件:
配置文件修改后如下图所示:
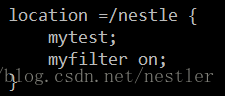
当客户端输入的URI为/nestle时,就会启动mytest和myfilter两个模块,运行结果如下所示:
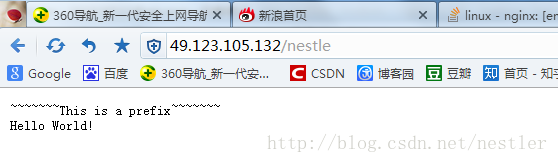
可以看到,HTTP过滤模块成功的在响应包体的内容前面添加了我们预设的字符串。
整个HTTP过滤模块的完整代码如下:
参考:
《深入理解Nginx》第六章。
HTTP过滤模块可以单独处理响应的头部或者包体或同时处理二者。处理头部和包体的方法原型分别如下,它们在HTTP框架模块ngx_http_core_module.h中定义:
// 过滤模块处理HTTP头部的方法原型
typedef ngx_int_t (*ngx_http_output_header_filter_pt)(ngx_http_request_t *r);

// 过滤模块处理HTTP包体的方法原型
typedef ngx_int_t (*ngx_http_output_body_filter_pt)(ngx_http_request_t *r, ngx_chain_t *chain);
上面是两个函数指针的声明,HTTP过滤模块就是依赖这种指针串接成一个单链表的,每个HTTP过滤模块至少定义一个上述函数指针。入口链表如下所示:
// HTTP过滤模块链表入口
extern ngx_http_output_header_filter_pt  ngx_http_top_header_filter;
extern ngx_http_output_body_filter_pt    ngx_http_top_body_filter;
当HTTP模块调用ngx_http_send_header发送头部时,就从ngx_http_top_header_filter指向的模块开始遍历所有的HTTP头部过滤模块并处理;当HTTP模块调用ngx_http_output_filter发送包体时,就从ngx_http_top_body_filter指向的模块开始遍历所有的HTTP包体过滤模块并处理。函数ngx_http_send_header代码如下:
ngx_int_t
ngx_http_send_header(ngx_http_request_t *r)
{
if (r->header_sent) {
ngx_log_error(NGX_LOG_ALERT, r->connection->log, 0,
"header already sent");
return NGX_ERROR;
}

if (r->err_status) {
r->headers_out.status = r->err_status;
r->headers_out.status_line.len = 0;
}

// 从头遍历HTTP头部过滤模块
return ngx_http_top_header_filter(r);
}
函数ngx_http_top_header_filter代码如下:
ngx_int_t
ngx_http_output_filter(ngx_http_request_t *r, ngx_chain_t *in)
{
ngx_int_t          rc;
ngx_connection_t  *c;

c = r->connection;

ngx_log_debug2(NGX_LOG_DEBUG_HTTP, c->log, 0,
"http output filter \"%V?%V\"", &r->uri, &r->args);

// 遍历HTTP包体过滤模块
rc = ngx_http_top_body_filter(r, in);

if (rc == NGX_ERROR) {
/* NGX_ERROR may be returned by any filter */
c->error = 1;
}

return rc;
}
在每个HTTP过滤模块中至少存在上述两种函数指针中的一个,声明如下:
static ngx_http_output_header_filter_pt  ngx_http_next_header_filter;
static ngx_http_output_body_filter_pt    ngx_http_next_body_filter;
加入HTTP过滤模块单链表的方法如下:
static ngx_int_t
ngx_http_addition_filter_init(ngx_conf_t *cf)
{
// 从头部加入
ngx_http_next_header_filter = ngx_http_top_header_filter;
ngx_http_top_header_filter = ngx_http_addition_header_filter;

// 从头部加入
ngx_http_next_body_filter = ngx_http_top_body_filter;
ngx_http_top_body_filter = ngx_http_addition_body_filter;

return NGX_OK;
}
当本模块被初始化时,调用上述函数,将自己加入到链表头部。类似上面ngx_http_addition_filter_init这样的初始化函数在什么时候被调用呢?答案是依该方法放在ngx_http_module_t结构体的哪个成员而定。一般而言,大多数官方HTTP过滤模块通常放在ngx_http_module_t.postconfiguration函数指针中,读取完所有配置项后被回调。各个模块初始化的顺序是怎么样的呢?这由configure命令生成的ngx_modules.c文件中的ngx_modules数组的排列顺序决定。数组中靠前的模块先初始化。由于过滤模块是将自己插入到链表头部,使得ngx_modules数组中过滤模块的排列顺序和它们实际执行的顺序相反。至于ngx_modules数组中的排列顺序,又是由其它脚本决定的。
下面是开发一个简单的HTTP过滤模块的过程。
首先定义两个结构体:
typedef struct
{
ngx_flag_t  enable;     // 保存on或者off
} ngx_http_myfilter_conf_t;

typedef struct
{
ngx_int_t  add_prefix;
} ngx_http_myfilter_ctx_t;  // HTTP上下文结构体
ngx_http_myfilter_conf_t用于保存标志是否开启过滤功能的配置项,这里我们使用预设的配置项解析方法对此配置项进行解析。ngx_http_myfilter_ctx_t则用于保存一个HTTP请求的上下文,因为HTTP包体的处理过程不是一次完成的,也就是说处理包体的函数会被调用多次,所以我们需要一个标志来记录当前是否已经由过滤模块进行过处理了。HTTP上下文相当于一张表,表中记录了该请求当前的处理记录。这样,当一个请求被拆分成多次处理时,同一个处理函数就能够了解该请求已经执行到哪里了,从而接着当前的进度进行处理。
HTTP模块结构ngx_http_module_t定义如下:
static ngx_http_module_t  ngx_http_myfilter_module_ctx =
{
NULL,                             /* preconfiguration */
ngx_http_myfilter_init,           /* postconfiguration */

NULL,                             /* create_main_conf */
NULL,                             /* init_main_conf */

NULL,                             /* create_srv_conf */
NULL,                             /* merge_srv_conf */

ngx_http_myfilter_create_conf,    /* create_loc_conf */
ngx_http_myfilter_merge_conf      /* merge_loc_conf */
};
三个函数借口的作用分别如下:
ngx_http_myfilter_init:初始化该过滤模块,也就是将该模块插入到HTTP过滤模块单链表中,插入方法已经在上面介绍过了。
ngx_http_myfilter_create_conf:给保存配置项的结构体ngx_http_myfilter_conf_t分配空间并初始化结构体成员
ngx_http_myfilter_merge_conf:合并出现在main、srv级别的同名配置项
还有一个非常重要的结构ngx_command_t定义如下:
static ngx_command_t  ngx_http_myfilter_commands[] =
{
{
ngx_string("myfilter"),
NGX_HTTP_MAIN_CONF | NGX_HTTP_SRV_CONF | NGX_HTTP_LOC_CONF | NGX_HTTP_LMT_CONF | NGX_CONF_FLAG,
ngx_conf_set_flag_slot,     // 自带的解析函数
NGX_HTTP_LOC_CONF_OFFSET,
offsetof(ngx_http_myfilter_conf_t, enable),
NULL
},
ngx_null_command
};
我们使用预设的配置项解析函数ngx_conf_set_flag_slot解析配置项myfilter,将解析出的配置项参数存入结构体ngx_http_myfilter_conf_t的enable成员中。配置项myfilter只能是“on”或者“off”。
注意,HTTP过滤模块仍然属于一个HTTP模块,也就是说:
ngx_module_t.type = NGX_HTTP_MODULE
下面是HTTP过滤模块的核心部分,即两个指针分别指向的函数。首先来看看处理HTTP响应头部的函数:
// 处理请求的头部
static ngx_int_t ngx_http_myfilter_header_filter(ngx_http_request_t *r)
{
ngx_http_myfilter_ctx_t   *ctx;
ngx_http_myfilter_conf_t  *conf;

//如果不是返回成功,这时是不需要理会是否加前缀的,直接交由下一个过滤模块
//处理响应码非200的情形
if (r->headers_out.status != NGX_HTTP_OK)
return ngx_http_next_header_filter(r);

//获取http上下文
ctx = ngx_http_get_module_ctx(r, ngx_http_myfilter_module);
if (ctx)
//该请求的上下文已经存在,这说明该模块已经被调用过1次,直接交由下一个过滤模块处理
return ngx_http_next_header_filter(r);

//获取存储配置项的ngx_http_myfilter_conf_t结构体
conf = ngx_http_get_module_loc_conf(r, ngx_http_myfilter_module);

//如果enable成员为0,也就是配置文件中没有配置add_prefix配置项,
//或者add_prefix配置项的参数值是off,这时直接交由下一个过滤模块处理
if (conf->enable == 0)
return ngx_http_next_header_filter(r);

//构造http上下文结构体ngx_http_myfilter_ctx_t
ctx = ngx_pcalloc(r->pool, sizeof(ngx_http_myfilter_ctx_t));
if (ctx == NULL)
return NGX_ERROR;

//add_prefix为0表示不加前缀
ctx->add_prefix = 0;

//将构造的上下文设置到当前请求中
ngx_http_set_ctx(r, ctx, ngx_http_myfilter_module);

//myfilter过滤模块只处理Content-Type是"text/plain"类型的http响应
if (r->headers_out.content_type.len >= sizeof("text/plain") - 1
&& ngx_strncasecmp(r->headers_out.content_type.data, (u_char *) "text/plain", sizeof("text/plain") - 1) == 0)
{
ctx->add_prefix = 1;    //1表示需要在http包体前加入前缀

//如果处理模块已经在Content-Length写入了http包体的长度,由于
//我们加入了前缀字符串,所以需要把这个字符串的长度也加入到
//Content-Length中
if (r->headers_out.content_length_n > 0)
r->headers_out.content_length_n += filter_prefix.len;
}

//交由下一个过滤模块继续处理
return ngx_http_next_header_filter(r);
}
这里有几点要注意。当该模块遇到错误的响应或模块本身出错时,不应该退出程序而是应该交由下一个HTTP过滤模块处理,这就是上述代码中多次调用ngx_http_next_header_filter函数的原因。还有就是函数首先要判断在配置文件中是否打开此过滤功能并检查响应的类型。流程图如下:
接下来是处理HTTP包体的函数:
//将在包体中添加这个前缀
static ngx_str_t filter_prefix = ngx_string("~~~~~~~This is a prefix~~~~~~~\n");

// 处理请求的包体
static ngx_int_t ngx_http_myfilter_body_filter(ngx_http_request_t *r, ngx_chain_t *in)
{
ngx_http_myfilter_ctx_t  *ctx;

// 获得HTTP上下文
ctx = ngx_http_get_module_ctx(r, ngx_http_myfilter_module);

//如果获取不到上下文,或者上下文结构体中的add_prefix为0或者2时,
//都不会添加前缀,这时直接交给下一个http过滤模块处理
if (ctx == NULL || ctx->add_prefix != 1)
return ngx_http_next_body_filter(r, in);

//将add_prefix设置为2,这样即使ngx_http_myfilter_body_filter再次回调时,也不会重复添加前缀
ctx->add_prefix = 2;

//从请求的内存池中分配内存,用于存储字符串前缀
ngx_buf_t* b = ngx_create_temp_buf(r->pool, filter_prefix.len);

//将ngx_buf_t中的指针正确地指向filter_prefix字符串
b->start = b->pos = filter_prefix.data;
b->last = b->pos + filter_prefix.len;

//从请求的内存池中生成ngx_chain_t链表,将刚分配的ngx_buf_t设置到
//其buf成员中,并将它添加到原先待发送的http包体前面
ngx_chain_t *cl = ngx_alloc_chain_link(r->pool);
cl->buf = b;
cl->next = in;

//调用下一个模块的http包体处理方法,注意这时传入的是新生成的cl链表
return ngx_http_next_body_filter(r, cl);
}
根据这一句cl->next = in可以判断,我们将filter_prefix包含的字符串添加到了HTTP响应包体的前面。以上函数的流程图如下:
下面是编译及演示过程。我们在第一个mytest模块的基础上对发送的信息添加前缀。为了把两个模块同时编译进nginx,我们在config时输入如下命令:
./configure --add-module="/work/nginx/modules/mytest /work/nginx/modules/myfilter"
然后检查是否成功包含了两个模块,这里我们可以查看保存所有模块的数组ngx_modules[]:
vim objs/ngx_modules.c
结果如下:
可以看到,HTTP模块mytest和HTTP过滤模块myfilter都被包含进来了。接下来就是make和make install了。安装成功后,我们还要修改配置文件:
vim /usr/local/nginx/conf/nginx.conf
配置文件修改后如下图所示:
当客户端输入的URI为/nestle时,就会启动mytest和myfilter两个模块,运行结果如下所示:
可以看到,HTTP过滤模块成功的在响应包体的内容前面添加了我们预设的字符串。
整个HTTP过滤模块的完整代码如下:
#include <ngx_config.h>
#include <ngx_core.h>
#include <ngx_http.h>

// 配置项结构体
typedef struct {
ngx_flag_t enable;
} ngx_http_myfilter_conf_t;

// 上下文结构体
typedef struct {
ngx_int_t add_prefix;
} ngx_http_myfilter_ctx_t;

ngx_module_t ngx_http_myfilter_module;	// 前向声明

static ngx_http_output_header_filter_pt ngx_http_next_header_filter;
static ngx_http_output_body_filter_pt ngx_http_next_body_filter;

// 需要添加的前缀内容
static ngx_str_t filter_prefix = ngx_string("~~~~~~~This is a prefix~~~~~~~\n");

static ngx_int_t ngx_http_myfilter_header_filter(ngx_http_request_t *r)
{
ngx_http_myfilter_ctx_t  *ctx;
ngx_http_myfilter_conf_t *conf;

if (r->headers_out.status != NGX_HTTP_OK)
return ngx_http_next_header_filter(r);	// 交由下一个过滤模块处理

ctx = ngx_http_get_module_ctx(r, ngx_http_myfilter_module);
if (ctx)
return ngx_http_next_header_filter(r);	// 上下文已存在,不再处理

conf = ngx_http_get_module_loc_conf(r, ngx_http_myfilter_module);	// 获取配置项结构体
if (conf->enable == 0)
return ngx_http_next_header_filter(r);	// 此过滤模块未打开

ctx = ngx_pcalloc(r->pool, sizeof(ngx_http_myfilter_ctx_t));	// 创建上下文结构体
if (ctx == NULL)
return NGX_ERROR;

ctx->add_prefix = 0;	// 0表示不需要添加前缀
ngx_http_set_ctx(r, ctx, ngx_http_myfilter_module);

// 只处理Content-Type为text/plain类型的HTTP请求
if (r->headers_out.content_type.len >= sizeof("text/plain")-1 &&
ngx_strncasecmp(r->headers_out.content_type.data, (u_char *)"text/plain", sizeof("text/plain")-1) == 0)
{
ctx->add_prefix = 1;	// 1表示需要加入前缀
if (r->headers_out.content_length_n > 0)
r->headers_out.content_length_n += filter_prefix.len;	// 响应包体长度增加
}

return ngx_http_next_header_filter(r);
}

static ngx_int_t ngx_http_myfilter_body_filter(ngx_http_request_t *r, ngx_chain_t *in)
{
ngx_http_myfilter_ctx_t  *ctx;

ctx = ngx_http_get_module_ctx(r, ngx_http_myfilter_module);	// 获取上下文结构体
if (ctx == NULL || ctx->add_prefix != 1)
return ngx_http_next_body_filter(r, in);	// 不添加前缀

ctx->add_prefix = 2;	// 2表示已添加前缀

ngx_buf_t *b = ngx_create_temp_buf(r->pool, filter_prefix.len);
b->start = b->pos = filter_prefix.data;
b->last = b->pos + filter_prefix.len;

// 链入待发送包体头部
ngx_chain_t *cl = ngx_alloc_chain_link(r->pool);
cl->buf = b;
cl->next = in;

return ngx_http_next_body_filter(r, cl);	// 跳到下一个过滤模块
}

// 初始化HTTP过滤模块
static ngx_int_t ngx_http_myfilter_init(ngx_conf_t *cf)
{
ngx_http_next_header_filter = ngx_http_top_header_filter;
ngx_http_top_header_filter = ngx_http_myfilter_header_filter;

ngx_http_next_body_filter = ngx_http_top_body_filter;
ngx_http_top_body_filter = ngx_http_myfilter_body_filter;

return NGX_OK;
}

// 创建存储配置项的结构体
static void* ngx_http_myfilter_create_conf(ngx_conf_t *cf)
{
ngx_http_myfilter_conf_t *mycf;

mycf = (ngx_http_myfilter_conf_t *)ngx_pcalloc(cf->pool, sizeof(ngx_http_myfilter_conf_t));
if (mycf == NULL)
return NULL;

mycf->enable = NGX_CONF_UNSET;
return mycf;
}

// 合并配置项
static char* ngx_http_myfilter_merge_conf(ngx_conf_t *cf, void *parent, void *child)
{
ngx_http_myfilter_conf_t *prev = (ngx_http_myfilter_conf_t *)parent;
ngx_http_myfilter_conf_t *conf = (ngx_http_myfilter_conf_t *)child;

ngx_conf_merge_value(conf->enable, prev->enable, 0);	// 合并函数

return NGX_CONF_OK;
}

static ngx_command_t ngx_http_myfilter_commands[] = {
{
ngx_string("myfilter"),
NGX_HTTP_MAIN_CONF | NGX_HTTP_SRV_CONF | NGX_HTTP_LOC_CONF | NGX_HTTP_LMT_CONF | NGX_CONF_FLAG,
ngx_conf_set_flag_slot,
NGX_HTTP_LOC_CONF_OFFSET,
offsetof(ngx_http_myfilter_conf_t, enable),
NULL,
},
ngx_null_command
};

// HTTP框架初始化时调用的八个函数
static ngx_http_module_t ngx_http_myfilter_module_ctx = {
NULL,
ngx_http_myfilter_init,
NULL,
NULL,
NULL,
NULL,
ngx_http_myfilter_create_conf,
ngx_http_myfilter_merge_conf,
};

// 定义一个HTTP模块
ngx_module_t ngx_http_myfilter_module = {
NGX_MODULE_V1,  // 0,0,0,0,0,0,1
&ngx_http_myfilter_module_ctx,
ngx_http_myfilter_commands,
NGX_HTTP_MODULE,
NULL,
NULL,
NULL,
NULL,
NULL,
NULL,
NULL,
NGX_MODULE_V1_PADDING,  // 0,0,0,0,0,0,0,0,保留字段
};
参考:
《深入理解Nginx》第六章。

相关文章推荐
- Nginx开发一个简单的HTTP过滤模块
- 【Nginx】开发一个HTTP过滤模块
- Nginx开发一个简单的HTTP过滤模块
- Nginx基础. 开发HTTP过滤模块
- 深入理解nginx chap3 开发一个简单的HTTP模块
- Nginx模块开发(5)————开发简单的HTTP过滤模块
- 开发一个HTTP过滤模块
- 【Nginx】开发一个简单的HTTP模块
- nginx的http模块开发--一个验证url参数的例子
- Nginx HTTP过滤模块开发
- nginx 开发一个简单的 HTTP 模块
- 【Nginx】开发一个简单的HTTP模块
- nginx图片过滤处理模块http_image_filter_module安装配置笔记
- Nginx HttpSubModule sub_filter模块的过滤功能
- Nginx 模块开发(1)—— 一个稍稍能说明问题模块开发 Step By Step 过程
- Nginx 模块开发(1)—— 一个稍稍能说明问题模块开发 Step By Step 过程
- Nginx基础. HTTP过滤模块添加方式探讨
- 【Nginx】初识nginx---实现一个简单的http模块
- Nginx学习(7)—http过滤模块(2)
- Nginx开发从入门到精通(三):过滤模块