HTML5中canvas实现小球击打小方块游戏
2014-06-09 16:21
232 查看
游戏开发流程:
1、创建画布:
将画布放在div标签里面,这样可以控制画布居中的位置,在对div标签加上一些样式,利于观看[html] view plaincopyprint?


<div id="main">
<!--将画布嵌在div块里面,使其可以居中-->
<canvas id="liuming_canvas" width="300px" height="500px">
</canvas>
</div>
<div id="main"> <!--将画布嵌在div块里面,使其可以居中--> <canvas id="liuming_canvas" width="300px" height="500px"> </canvas> </div>
2、创建移动的小木块:
定义一个可以用于移动的小方块,该小方块包含如下的属性,坐标位置,小方块的长和宽,小方块移动的大小距离[html] view plaincopyprint?
var diamond = {
x : 100,
y : 485,
width : 100,
height : 15,
move : 10
}
var diamond = {
x : 100,
y : 485,
width : 100,
height : 15,
move : 10
}3、创建用于击打的小球:
定义一个用于移动和击打小方块的小球,该小球包含如下的属性,小球的做坐标位置,半径,在x轴和y轴的速度[html] view plaincopyprint?
var  ball_impact = {
x : 150,
y : 465,
r : 10,
vx : 200,
vy : 200
}
var ball_impact = {
x : 150,
y : 465,
r : 10,
vx : 200,
vy : 200
}4、生成一系列的小方块:
生成一系列的小方块用于被小球击打,小球的生成主要是根据画布的大小和小方块的坐标与长[html] view plaincopyprint?
var diamond_impact = [];
diamond_impact.length =
0;
var width_span =
25; // 任意两个小方块的横向间隔
var height_span = 25; //任意两个小方块的水平间隔
for(var i =1 ; i
<=10 ; i++){//控制每行输出的小方块
<span
style="white-space:pre">
</span> for(var
j = 1 ; j
< 10 ; j++){//输出每列的小方块 只有x轴和y轴的坐标不一样而已
var diamond_impact_children = {
x : width_span,
y : height_span,
width : 10,
height : 10
};
width_span += 30;
diamond_impact.push(diamond_impact_children); //将得到的小方块放在 diamond_impact 中,已被以后使用
}
height_span += 25;
width_span =
25;
}
var diamond_impact = [];
diamond_impact.length = 0;
var width_span = 25; // 任意两个小方块的横向间隔
var height_span = 25;	//任意两个小方块的水平间隔
for(var i =1 ; i <=10 ; i++){//控制每行输出的小方块
<span style="white-space:pre">	</span> 	for(var j = 1 ; j < 10 ; j++){//输出每列的小方块  只有x轴和y轴的坐标不一样而已
var diamond_impact_children = {
x : width_span,
y : height_span,
width : 10,
height : 10
};
width_span += 30;
diamond_impact.push(diamond_impact_child
4000
ren); //将得到的小方块放在 diamond_impact 中,已被以后使用
}
height_span += 25;
width_span = 25;
}
5、编写移动小方块的移动方法:
移动小方块的实现,首先需要监听获得键盘的事件,之后再根据获得的键盘事件来分别处理来向那个方向移动,在此处我分别定义了四个方向,目的是为了只在左右移动可能不能完全消灭小方块,在移动的过程之中还要判断移动小方块的位置,以防止是否已经出界。在此处我分别定义了四个方法来处理各个方向的移动。
[html] view plaincopyprint?
//键盘事件,获取当前在那个方向运动
var direction = "";
document.onkeydown = function (e) {
if (e.keyCode == 37 ) direction = "left" ;
if (e.keyCode == 39 ) direction = "right";
if (e.keyCode == 38 ) direction = "up";
if (e.keyCode == 40 ) direction = "down";
}
//键盘事件,获取当前在那个方向运动
var direction = "";
document.onkeydown = function (e) {
if (e.keyCode == 37 ) direction = "left" ;
if (e.keyCode == 39 ) direction = "right";
if (e.keyCode == 38 ) direction = "up";
if (e.keyCode == 40 ) direction = "down";
} [html] view plaincopyprint?
//定义四个方法来重绘制方块的位置  分别有 左、右、上、下
function move_right_diamond(){
clear_diamond();//清除以前的方块
init_canvas_background();//再次初始化画布  下同
//重新绘制小方块的位置
if(diamond.x + diamond.width >= canvas.width){ //判断方块是否已经到达最右端
cxt.fillStyle = "#17F705";
cxt.fillRect(diamond.x,diamond.y,diamond.width,diamond.height);
}else{
diamond.x += diamond.move;
cxt.fillStyle = "#17F705";
cxt.fillRect(diamond.x,diamond.y,diamond.width,diamond.height);
}
}
//其余方法类似
//定义四个方法来重绘制方块的位置 分别有 左、右、上、下
function move_right_diamond(){
clear_diamond();//清除以前的方块
init_canvas_background();//再次初始化画布 下同
//重新绘制小方块的位置
if(diamond.x + diamond.width >= canvas.width){ //判断方块是否已经到达最右端
cxt.fillStyle = "#17F705";
cxt.fillRect(diamond.x,diamond.y,diamond.width,diamond.height);
}else{
diamond.x += diamond.move;
cxt.fillStyle = "#17F705";
cxt.fillRect(diamond.x,diamond.y,diamond.width,diamond.height);
}
}
//其余方法类似6、编写小球移动的方法以及碰壁和接触移动小方块反弹的方法:
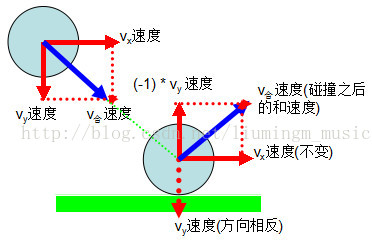
反弹:小方块的反弹,主要改变其x轴和y轴方向的速度,由于我们定义的是匀速运动,为此我们只需要改变其速度的方向。移动:根据小球的速度和指定的移动大小来计算出新的小球坐标,之后再绘制新的小球。
反弹图片实例:(对于触碰墙壁反弹类似,就不多说)
小球移动的代码:
[html] view plaincopyprint?
cxt.arc(ball_impact.x,ball_impact.y,ball_impact.r,0,Math.PI * 2,true);
cxt.closePath();
cxt.fill();
ball_impact.x += ball_impact.vx * cyc /1000;//改变其坐标的位置
ball_impact.y += ball_impact.vy * cyc /1000;
cxt.arc(ball_impact.x,ball_impact.y,ball_impact.r,0,Math.PI * 2,true); cxt.closePath(); cxt.fill(); ball_impact.x += ball_impact.vx * cyc /1000;//改变其坐标的位置 ball_impact.y += ball_impact.vy * cyc /1000;
7、小球击打小方块,小方块消失的方法:
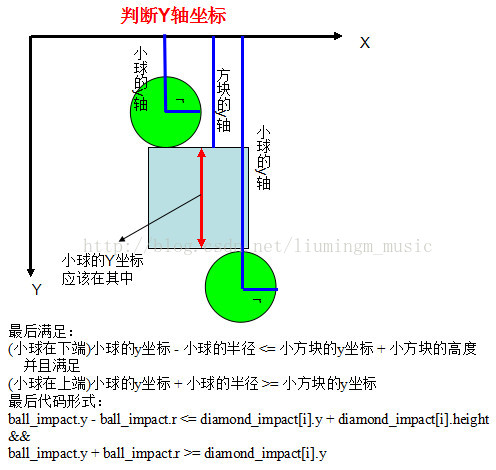
击打:小球击打小方框,主要判断小球和小方块的坐标位置即可。注意此处将会分别判断y轴和x轴将小球的击打的小方块限定在一个区域里面。小时:击中当前小方块之后改变其长宽,之后重绘小方块即可,由于当前的小方块的长宽都为0,即绘制之后的小方块没有。
图解击打的坐标变化:

8、判断游失败和成功的方法:
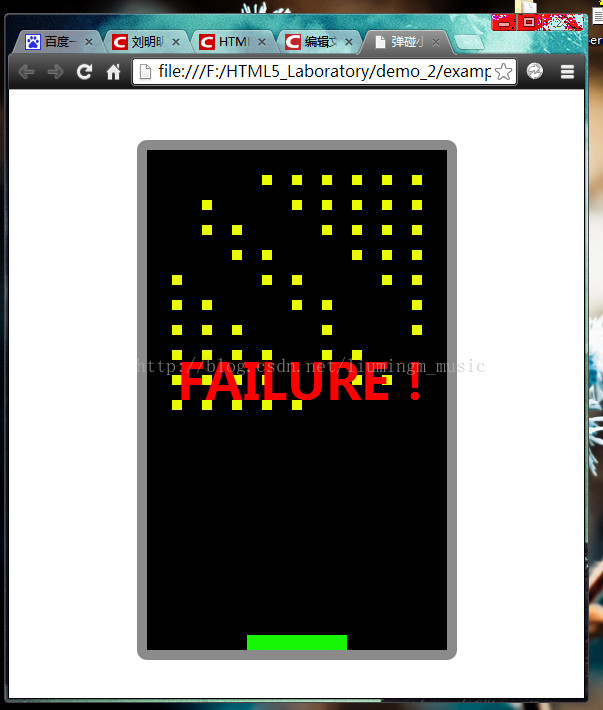
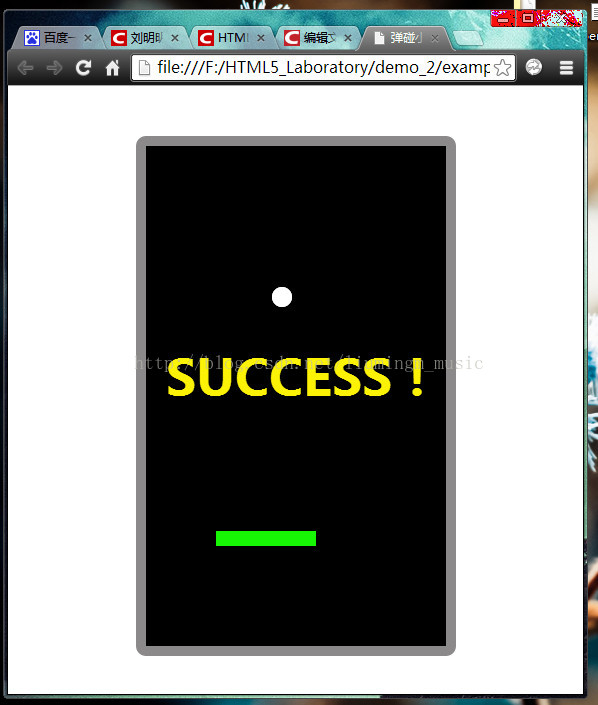
失败:是要小球的掉到最低端即小球的Y坐标大于画布的Y坐标 就是失败;成功:计数判断是否消灭的小方块数是否和指定的小方块数相同。
[html] view plaincopyprint?
if(ball_impact.y + ball_impact.r >= canvas.height){
cxt.fillStyle = "#FC0000";
cxt.font = "bold 50px 微软雅黑";
cxt.fillText("FAILURE!",30,250);
diamond.move = 0;//不能移动板块
}
if(ball_impact.y + ball_impact.r >= canvas.height){
cxt.fillStyle = "#FC0000";
cxt.font = "bold 50px 微软雅黑";
cxt.fillText("FAILURE!",30,250);
diamond.move = 0;//不能移动板块
}[html] view plaincopyprint?
//判断是否与所有的小方块数相等
if(count_sum == 90){
cxt.fillStyle = "#FCF205";
<span style="white-space:pre">	</span>cxt.font = "bold 50px 微软雅黑";
cxt.fillText("SUCCESS!",20,250);
diamond.move = 0;//不能移动板块
<span style="white-space:pre">	</span>ball_impact.vx =0;
ball_impact.vy =0;
else{
count_sum = 0;
}
//判断是否与所有的小方块数相等
if(count_sum == 90){
cxt.fillStyle = "#FCF205";
<span style="white-space:pre"> </span>cxt.font = "bold 50px 微软雅黑";
cxt.fillText("SUCCESS!",20,250);
diamond.move = 0;//不能移动板块
<span style="white-space:pre"> </span>ball_impact.vx =0;
ball_impact.vy =0;
else{
count_sum = 0;
}9、显示效果:

相关文章推荐
- 第八讲:HTML5中canvas实现小球击打小方块游戏
- 第八讲:HTML5中canvas实现小球击打小方块游戏
- 使用TiledLayer类及Canvas类实现游戏背景图层
- Android游戏开发之小球重力感应实现(二十五)
- html5 canvas 实现小球绕椭圆旋转
- (NO.00004)iOS实现打砖块游戏(八):游戏中小球与砖块的碰撞
- (NO.00004)iOS实现打砖块游戏(八):游戏中小球与砖块的碰撞
- 打小球游戏(Brick & Ball)最终完美版:C语言实现
- javascript HTML5 canvas实现打砖块游戏
- (NO.00004)iOS实现打砖块游戏(九):游戏中小球与反弹棒的碰撞
- Android游戏开发之小球重力感应实现(二十五)
- (转)Android游戏开发之小球重力感应实现(二十五)
- canvas标签应用 简单俄罗斯方块游戏的实现
- html5 canvas实现小球绕圆旋转
- HTML5 Canvas 图像动画的实现(实例小球弹跳)
- (2010年11月26)javaMe实现的智能小球碰墙游戏
- Android游戏开发之小球重力感应实现
- Javascript和HTML5利用canvas构建Web五子棋游戏实现算法
- Android游戏开发学习①弹跳小球实现方法
- (NO.00004)iOS实现打砖块游戏(九):游戏中小球与反弹棒的碰撞