基于memcached搭建LNMMP平台
2014-04-27 23:19
316 查看
一、环境介绍
二、nginx与php的安装配置
1.nginx的安装与配置
关于Nginx的安装,请移步至本人相关博文http://wangfeng7399.blog.51cto.com/3518031/1403741,本处将不再给出操作步骤
2.安装php
关于php的安装,请移步至本人相关博文,http://wangfeng7399.blog.51cto.com/3518031/1381688,本处将不再给出操作步骤
3、安装xcache,为php加速
关于xcache的安装,请移步至本人相关博文http://wangfeng7399.blog.51cto.com/3518031/1381688,本处将不再给出具体操作步骤
4.nginx和php的结合
编辑/etc/nginx/nginx.conf,启用如下选项
5.压力测试
关于数据库的安装配置,请移步至本人相关博文http://wangfeng7399.blog.51cto.com/3518031/1393146,本处将不再累赘
四、memcached的安装
1.简介
Memcached是一款开源、高性能、分布式内存对象缓存系统,可应用各种需要缓存的场景,其主要目的是通过降低对Database的访问来加速web应用程序。它是一个基于内存的“键值对”存储,用于存储数据库调用、API调用或页面引用结果的直接数据,如字符串、对象等。
memcached是以LiveJournal旗下Danga Interactive 公司的Brad Fitzpatric 为首开发的一款软件。现在已成为mixi、hatena、Facebook、Vox、LiveJournal等众多服务中提高Web应用扩展性的重要因素。
Memcached是一款开发工具,它既不是一个代码加速器,也不是数据库中间件。其设计哲学思想主要反映在如下方面:
1. 简单key/value存储:服务器不关心数据本身的意义及结构,只要是可序列化数据即可。存储项由“键、过期时间、可选的标志及数据”四个部分组成;
2. 功能的实现一半依赖于客户端,一半基于服务器端:客户负责发送存储项至服务器端、从服务端获取数据以及无法连接至服务器时采用相应的动作;服务端负责接收、存储数据,并负责数据项的超时过期;
3. 各服务器间彼此无视:不在服务器间进行数据同步;
4. O(1)的执行效率
5. 清理超期数据:默认情况下,Memcached是一个LRU缓存,同时,它按事先预订的时长清理超期数据;但事实上,memcached不会删除任何已缓存数据,只是在其过期之后不再为客户所见;而且,memcached也不会真正按期限清理缓存,而仅是当get命令到达时检查其时长;
Memcached提供了为数不多的几个命令来完成与服务器端的交互,这些命令基于memcached的协议实现。
存储类命令:set, add, replace, append, prepend
获取数据类命令:get, delete, incr/decr
统计类命令:stats, stats items, stats slabs, stats sizes
清理命令: flush_all
2.安装
memcached可以通过yum安装也可以通过编译源码安装,本处通过yun安装
memcached提供一组基本命令用于基于命令行调用其服务或查看服务器状态等
-l <ip_addr>:指定进程监听的地址
-d:以守护模式运行
-u <username>:以指定的用户运行menmcached进程
-m <num>:用于缓存数据的最大内存空间,单位为MB,默认为64MB
-c <num>:最大支持的并发连接数,默认为1024
-p <num>: 指定监听的TCP端口,默认为11211
-U <num>:指定监听的UDP端口,默认为11211,0表示关闭UDP端口
-t <threads>:用于处理入站请求的最大线程数,仅在mencached编译时开启了支持线程才有效
-f <num>:设定slab allocator定义预先分配内存空间大小固定的块时使用的增长因子
-M:当内存不够使用时返回错误信息,而不是按照LRU算法利用空间
-n:指定最小的slab chuck大小;单位为字节
-S:启用ssl进行进行用户认证
五、安装Memcached的PHP扩展
1、安装php的memcache扩展
编辑/etc/php.ini文件添加如下项
3.测试
可以看到测试成功
4.安装memcache的图形化界面
用户名和密码都为admin
有没有感到这是一个很赞的软件
5.压力测试
nginx的数据也可以换成在memcache中,配置如下
| 功用 | ip地址 | 安装软件 |
| 提供前段静态页面和动态页面 | 192.168.1.201 | nginx+php |
| 缓存服务器 | 192.168.1.202 | mencached |
| 数据库服务器 | 192.168.1.203 | MariaDB |
1.nginx的安装与配置
关于Nginx的安装,请移步至本人相关博文http://wangfeng7399.blog.51cto.com/3518031/1403741,本处将不再给出操作步骤
2.安装php
关于php的安装,请移步至本人相关博文,http://wangfeng7399.blog.51cto.com/3518031/1381688,本处将不再给出操作步骤
3、安装xcache,为php加速
关于xcache的安装,请移步至本人相关博文http://wangfeng7399.blog.51cto.com/3518031/1381688,本处将不再给出具体操作步骤
4.nginx和php的结合
编辑/etc/nginx/nginx.conf,启用如下选项
location ~ \.php$ {
root           html;
fastcgi_pass   127.0.0.1:9000;
fastcgi_index  index.php;
fastcgi_param  SCRIPT_FILENAME  $document_root$$fastcgi_script_name;
include        fastcgi_params;
} 编辑/etc/nginx/fastcgi_params,将其内容更改为如下内容fastcgi_param GATEWAY_INTERFACE CGI/1.1; fastcgi_param SERVER_SOFTWARE nginx; fastcgi_param QUERY_STRING $query_string; fastcgi_param REQUEST_METHOD $request_method; fastcgi_param CONTENT_TYPE $content_type; fastcgi_param CONTENT_LENGTH $content_length; fastcgi_param SCRIPT_FILENAME $document_root$fastcgi_script_name; fastcgi_param SCRIPT_NAME $fastcgi_script_name; fastcgi_param REQUEST_URI $request_uri; fastcgi_param DOCUMENT_URI $document_uri; fastcgi_param DOCUMENT_ROOT $document_root; fastcgi_param SERVER_PROTOCOL $server_protocol; fastcgi_param REMOTE_ADDR $remote_addr; fastcgi_param REMOTE_PORT $remote_port; fastcgi_param SERVER_ADDR $server_addr; fastcgi_param SERVER_PORT $server_port; fastcgi_param SERVER_NAME $server_name;并在做支持的主页面格式中添加php格式的主页
location / {
root   html;
index  index.php index.html index.htm;
} 而后重新载入nginx的配置文件[root@node1 ~]# service nginx reload nginx: the configuration file /etc/nginx/nginx.conf syntax is ok nginx: configuration file /etc/nginx/nginx.conf test is successful Reloading nginx: [ OK ]准备测试页面
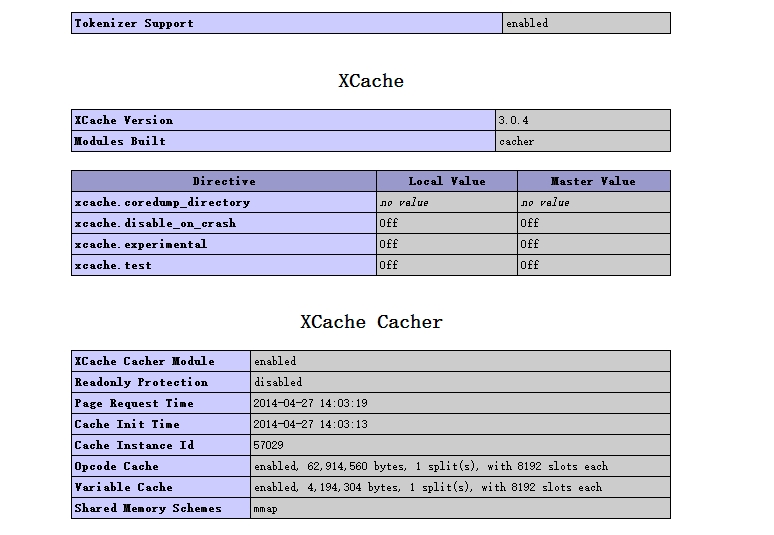
[root@node1 ~]# vi /usr/local/nginx/html/index.php
<?php
phpinfo();
?>
可以看到nginx与php、xcache整合成功
5.压力测试
[root@node1 xcache-3.0.4]# ab -c 100 -n 1000 http://192.168.1.201/index.php Concurrency Level:      100
Time taken for tests:   3.259 seconds
Complete requests:      1000
Failed requests:        87
(Connect: 0, Receive: 0, Length: 87, Exceptions: 0)
Write errors:           0
Total transferred:      60208909 bytes
HTML transferred:       60061909 bytes
Requests per second:    306.81 [#/sec] (mean)
Time per request:       325.930 [ms] (mean)
Time per request:       3.259 [ms] (mean, across all concurrent requests)
Transfer rate:          18040.01 [Kbytes/sec] received
三、数据库的安装配置
关于数据库的安装配置,请移步至本人相关博文http://wangfeng7399.blog.51cto.com/3518031/1393146,本处将不再累赘
四、memcached的安装
1.简介
Memcached是一款开源、高性能、分布式内存对象缓存系统,可应用各种需要缓存的场景,其主要目的是通过降低对Database的访问来加速web应用程序。它是一个基于内存的“键值对”存储,用于存储数据库调用、API调用或页面引用结果的直接数据,如字符串、对象等。
memcached是以LiveJournal旗下Danga Interactive 公司的Brad Fitzpatric 为首开发的一款软件。现在已成为mixi、hatena、Facebook、Vox、LiveJournal等众多服务中提高Web应用扩展性的重要因素。
Memcached是一款开发工具,它既不是一个代码加速器,也不是数据库中间件。其设计哲学思想主要反映在如下方面:
1. 简单key/value存储:服务器不关心数据本身的意义及结构,只要是可序列化数据即可。存储项由“键、过期时间、可选的标志及数据”四个部分组成;
2. 功能的实现一半依赖于客户端,一半基于服务器端:客户负责发送存储项至服务器端、从服务端获取数据以及无法连接至服务器时采用相应的动作;服务端负责接收、存储数据,并负责数据项的超时过期;
3. 各服务器间彼此无视:不在服务器间进行数据同步;
4. O(1)的执行效率
5. 清理超期数据:默认情况下,Memcached是一个LRU缓存,同时,它按事先预订的时长清理超期数据;但事实上,memcached不会删除任何已缓存数据,只是在其过期之后不再为客户所见;而且,memcached也不会真正按期限清理缓存,而仅是当get命令到达时检查其时长;
Memcached提供了为数不多的几个命令来完成与服务器端的交互,这些命令基于memcached的协议实现。
存储类命令:set, add, replace, append, prepend
获取数据类命令:get, delete, incr/decr
统计类命令:stats, stats items, stats slabs, stats sizes
清理命令: flush_all
2.安装
memcached可以通过yum安装也可以通过编译源码安装,本处通过yun安装
[root@node2 ~]# yum install -y memcached3.使用telnet命令测试menmcached的使用
memcached提供一组基本命令用于基于命令行调用其服务或查看服务器状态等
[root@node2 ~]# telnet 127.0.0.1 11211 add mykey 0 60 12 Hello world! STORED get mykey VALUE mykey 0 12 Hello world! END add命令格式: add keyname flag timeout datasize get命令格式: get keyname4.memcached的常用选项说明:
-l <ip_addr>:指定进程监听的地址
-d:以守护模式运行
-u <username>:以指定的用户运行menmcached进程
-m <num>:用于缓存数据的最大内存空间,单位为MB,默认为64MB
-c <num>:最大支持的并发连接数,默认为1024
-p <num>: 指定监听的TCP端口,默认为11211
-U <num>:指定监听的UDP端口,默认为11211,0表示关闭UDP端口
-t <threads>:用于处理入站请求的最大线程数,仅在mencached编译时开启了支持线程才有效
-f <num>:设定slab allocator定义预先分配内存空间大小固定的块时使用的增长因子
-M:当内存不够使用时返回错误信息,而不是按照LRU算法利用空间
-n:指定最小的slab chuck大小;单位为字节
-S:启用ssl进行进行用户认证
五、安装Memcached的PHP扩展
1、安装php的memcache扩展
[root@node1 ~]# wget http://pecl.php.net/get/memcache-2.2.7.tgz [root@node1 ~]# tar xf memcache-2.2.7.tgz
[root@node1 ~]# cd memcache-2.2.7
[root@node1 memcache-2.2.7]# /usr/local/php/bin/phpize
[root@node1 memcache-2.2.7]# ./configure --with-php-config=/usr/local/php/bin/php-config --enable-memcache
[root@node1 memcache-2.2.7]# make && make install
上述安装完成会出现如下提示
Installing shared extensions:     /usr/local/php/lib/php/extensions/no-debug-non-zts-20100525/
2.开启menmcache扩展
编辑/etc/php.ini文件添加如下项
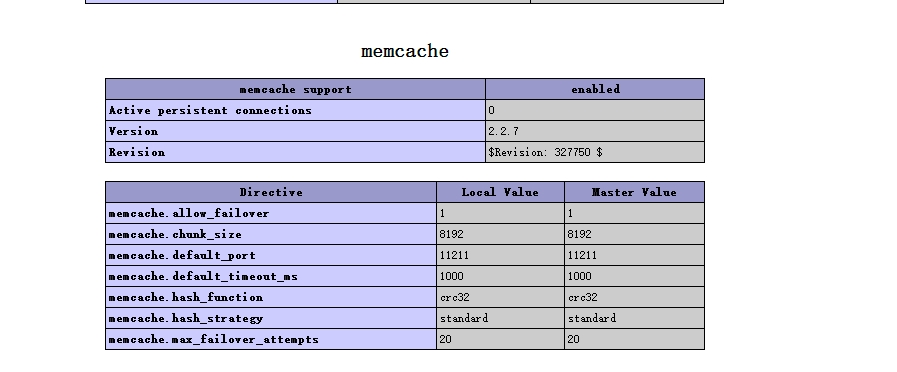
extension =/usr/local/php/lib/php/extensions/no-debug-non-zts-20100525/memcache.so可以看到memcache加载成功
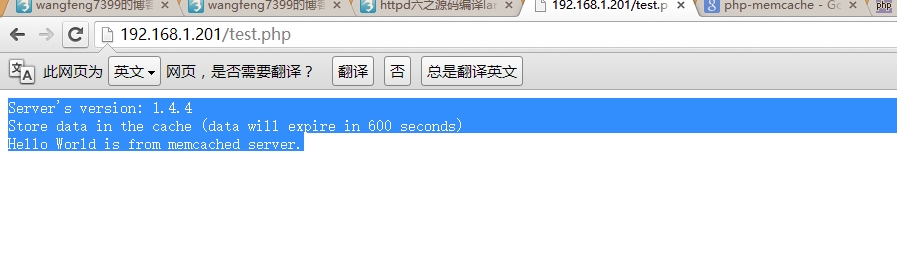
3.测试
在html路径下添加一个test.php页面,内容如下
<?php
$mem = new Memcache;
$mem->connect("127.0.0.1", 11211)  or die("Could not connect");
$version = $mem->getVersion();
echo "Server's version: ".$version."<br/>\n";
$mem->set('hellokey', 'Hello World', 0, 600) or die("Failed to save data at the memcached server");
echo "Store data in the cache (data will expire in 600 seconds)<br/>\n";
$get_result = $mem->get('hellokey');
echo "$get_result is from memcached server.";
?>
可以看到测试成功
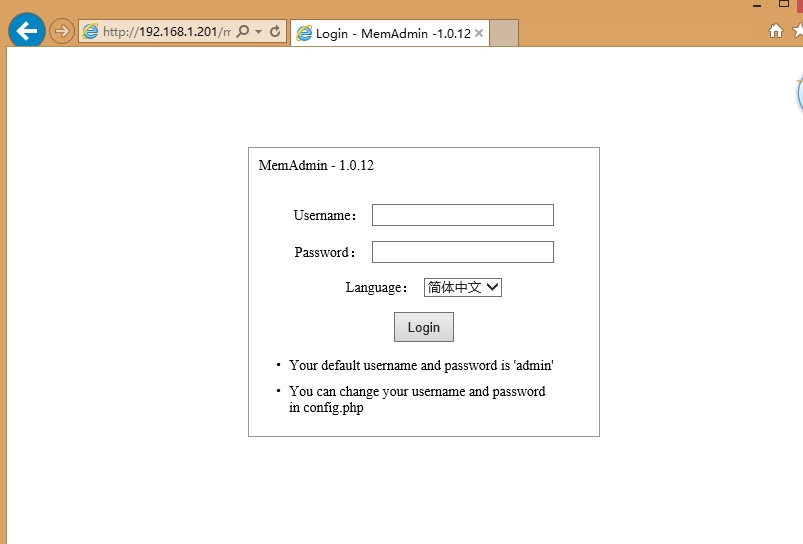
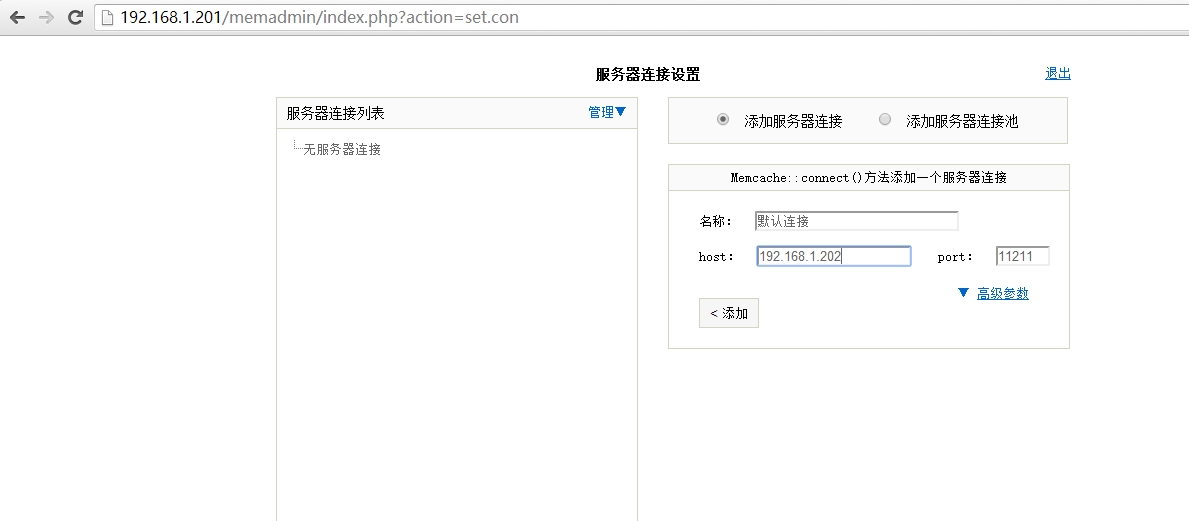
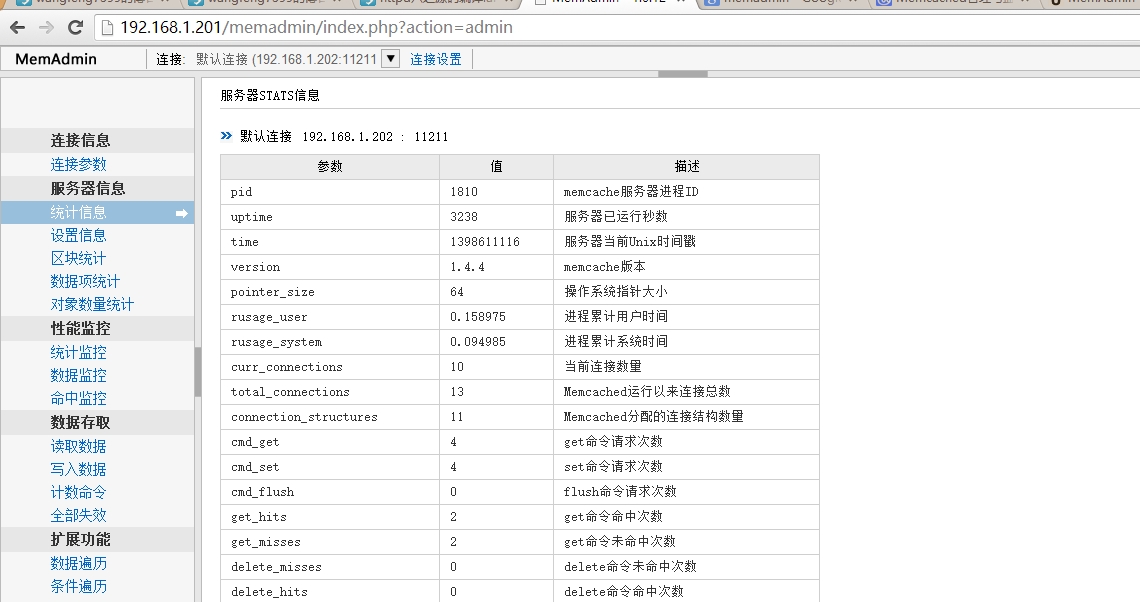
4.安装memcache的图形化界面
[root@node1 ~]# cd /usr/local/nginx/html/
[root@node1 html]# wget http://www.junopen.com/memadmin/memadmin-1.0.12.tar.gz [root@node1 html]# tar xf memadmin-1.0.12.tar.gz
[root@node1 html]# cd memadmin
用户名和密码都为admin
有没有感到这是一个很赞的软件
5.压力测试
Concurrency Level:      100
Time taken for tests:   1.965 seconds
Complete requests:      1000
Failed requests:        0
Write errors:           0
Total transferred:      276000 bytes
HTML transferred:       129000 bytes
Requests per second:    508.81 [#/sec] (mean)
Time per request:       196.536 [ms] (mean)
Time per request:       1.965 [ms] (mean, across all concurrent requests)
Transfer rate:          137.14 [Kbytes/sec] received
六、nginx和memcached集合
nginx的数据也可以换成在memcache中,配置如下
server {
listen       80;
server_name  www.wangfeng7399.com;
#charset koi8-r;
#access_log  logs/host.access.log  main;
location / {
set $memcached_key $uri;
memcached_pass     192.168.1.202:11211;
default_type       text/html;
error_page         404 @fallback;
}
location @fallback {
proxy_pass http://192.168.1.201; }
}

相关文章推荐
- Nginx结合memcached实现LNMMP平台搭建
- Python 学习之一:在Mac OS X下基于Sublime Text搭建开发平台包含numpy,scipy
- 基于CentOS 5.4搭建nginx+php+spawn-fcgi+mysql高性能php平台
- Windows平台上iPhone SDK基于Cygwin开发环境搭建方法
- 基于Linux搭建一个类似Qik手机录像直播平台(服务器端:feng streaming server + web server,客户端:Android手机应用)
- 基于java的OpenCV环境搭建(Windows平台上ecplise)
- (jenkins)hudson平台搭建android项目持续化集成以及基于NativeDriver的UI自动化测试环境
- IONIC基于windows平台的基础环境搭建
- GPS部标监控平台的架构设计(十一)-基于Memcached的分布式Gps监控平台
- 基于rhel7.2的Zabbix平台搭建和部署(四)
- LNMMP平台搭建
- 用GitBlit 和 VS GitSourceControlProvider 搭建基于 Http(s) 的 Git 工作平台
- 基于feng streaming server 搭建Android直播测试平台
- Windows平台搭建基于PyQt5.8.2开发Python GUI程序的环境(含打包过程)
- 基于feng streaming server 搭建Android直播测试平台
- 个人学习笔记----基于Spring4.3.1+mybatis+postgresql+maven搭建的个人用调度平台(一)
- 大数据分析平台搭建教程:基于Apache Zeppelin Notebook和R的交互式数据科学
- 搭建基于 STM32 和 rt-thread 的开发平台