Pxe+Kickstart批量网络安装操作系统
2014-04-23 10:43
447 查看
Pxe+Kickstart实现无人值守批量网络安装操作系统

说明:当批量给主机安装操作系统时,我们不可能用传统的方式——用光盘、U盘等,一台一台逐个安装,这样一来,费时又力,对于批量部署主机时,效率是极低的。所以,我们通过Pxe+Kickstart技术来实现企业中集群服务的批量安装,近而将网络技术人员从繁忙中解脱出来,之后你就可以去悠闲地去饮一杯coffee了,过半个多小时回来,这批服务器都乘乘地拥有了自己的操作系统。下面是详细配置过程:实验环境准备VmwareworkStation虚拟机一台装有Linux操作系统的虚拟机,这里命名它为PXE-Server(静态IP为192.168.1.254)新建2台虚拟裸机(待安装的所有裸机网卡都配置成vmnet1)实验过程概述PXE-Server上安装dhcpd 、tftp 、nfs、httpd三个服务将相关内核和启动引导文件initrd.img pxelinux.0 pxelinux.cfg vmlinuz放到tftp根目录/tftpboot下步骤:1.配置yum库[root@localhost ~]# cd /etc/yum.repos.d[root@localhost yum.repos.d]# cp rhel-debuginfo.repo yang.repo [root@localhost yum.repos.d]#vim yang.repo [rhel-server] //[ ]里要以rhel- 开头,制作kickstart文件选择安装包时要用到name=Red Hat Enterprise Linux Serverbaseurl=file:///misc/cd/Serverenabled=1gpgcheck=1gpgkey=file:///etc/pki/rpm-gpg/RPM-GPG-KEY-redhat-release测试yum库安装情况[root@localhost ~]#yum listLoaded plugins: product-id, security, subscription-managerThis system is not registered to Red Hat Subscription Management. You can use subscription-manager to register.Installed PackagesDeployment_Guide-en-US.noarch 5.8-1.el5 installed Deployment_Guide-zh-CN.noarch 5.8-1.el5 installed Deployment_Guide-zh-TW.noarch 5.8-1.el5 installed GConf2.i386 2.14.0-9.el5 installed ..出现上边的界面表示yum库安装成功!2.安装并配置DHCP服务[root@localhost ~]# yum -y install dhcp* //安装 [root@localhost ~]# vim /etc/dhcpd.conf //配置ddns-update-style interim;next-server 192.168.1.254; //filename "pxelinux.0";subnet 192.168.1.0 netmask 255.255.255.0 {option subnet-mask 255.255.255.0;option domain-name "tarena.com";option domain-name-servers 192.168.1.254;range dynamic-bootp 192.168.1.1 192.168.1.10;default-lease-time 21600;max-lease-time 43200;}3.安装NFS共享服务[root@localhost ~]# yum -y install nfs-utils portmap //安装软件包[b]nfs-utils- 1.0.9-66.el5 [b]portmap-4.0-65.2.2.1[/b]
[root@localhost ~]# vim /etc/exports // 修改主配置文件
/data/iso/rhel5.9 *(ro) [/b][b][root@localhost ~]# mkdir -p /data/iso/rhel5.9 //创建系统镜像存放目录[/b][b][b][root@localhost ~]# cp -rf /misc/cd/* /data/iso/rhel5.9 //拷贝光盘所有[/b][/b][b][b]也可以用挂载的方法,同样实现访问镜像文件的作用[/b][/b][b][b][b][root@localhost ~]# umount -a[/b][/b][/b][b][b][b][b][root@localhost ~]# mount /misc/cd /data/iso/rhel5.9 [/b][/b][/b][/b]3.安装并配置TFTP服务[root@localhost ~]# yum -yinstall tftp[root@localhost ~]#service xinetd restart //开启tftp临时服务[root@localhost ~]# cd /misc/cd/images/pxeboot //进入光盘目录[root@localhost pxeboot]# lsinitrd.img README TRANS.TBL vmlinuz[root@localhost pxeboot]# cp initrd.img vmlinuz /tftpboot [root@localhost ~]#vim /etc/xinetd.d/tftp //配置tftp临时服务文件

[root@localhost ~]# find / -name pxelinux.0 //查找pxelinux.0文件存位置/tftpboot/linux-install/pxelinux.0/usr/share/syslinux/pxelinux.0[root@localhost ~]# cp /tftpboot/linux-install/pxelinux.0 /tftpboot //将这个文件拷贝到/tftpboot若没找到/pxelinux.0这个文件,则安装一个包:[root@localhost ~]# yum –y install syslinux-tftpboot.x86_64安装完后到这个位置去找/usr/share/syslinux/pxelinux.0[root@localhost ~]# cp -rf /tftpboot/linux-install/pxelinux.cfg/ /tftpboot //将pxelinux.cfg拷贝到/tftpboot若找不到则创建这目录[root@localhost pxeboot]# mkdir /tftpboot/pxelinux.cfg 然后[root@localhost pxeboot]# cp /misc/cd/isolinux/isolinux.cfg \> /tftpboot/pxelinux.cfg/default //拷贝模板到default[root@localhost ~]# cd /tftpboot/[root@localhost tftpboot]# lsinitrd.img linux-install pxelinux.0 pxelinux.cfg vmlinuz至此/tftpboot下的initrd.img pxelinux.0 pxelinux.cfg vmliuz全部准备好了4.生成Kickstart无人值守配置文件[root@localhost ~]# yum -y install system-config-kickstart //安装生成Kickstart的工具


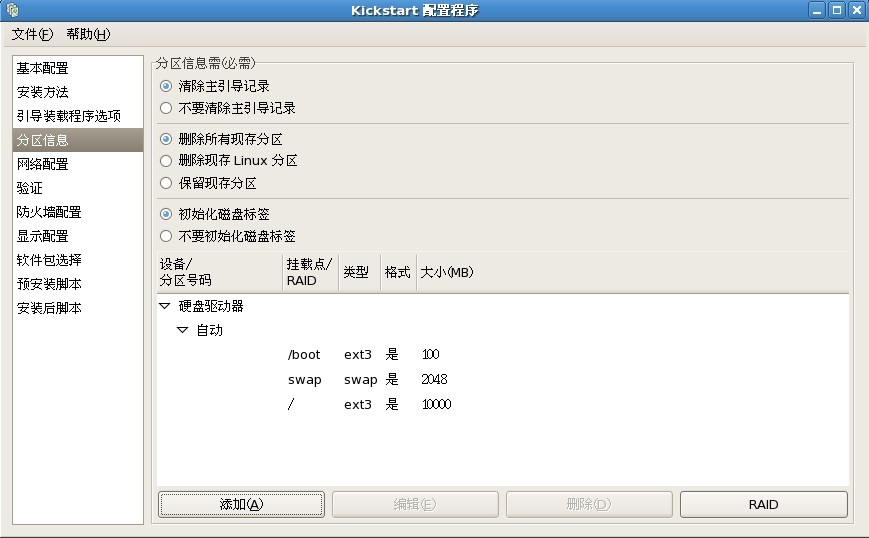
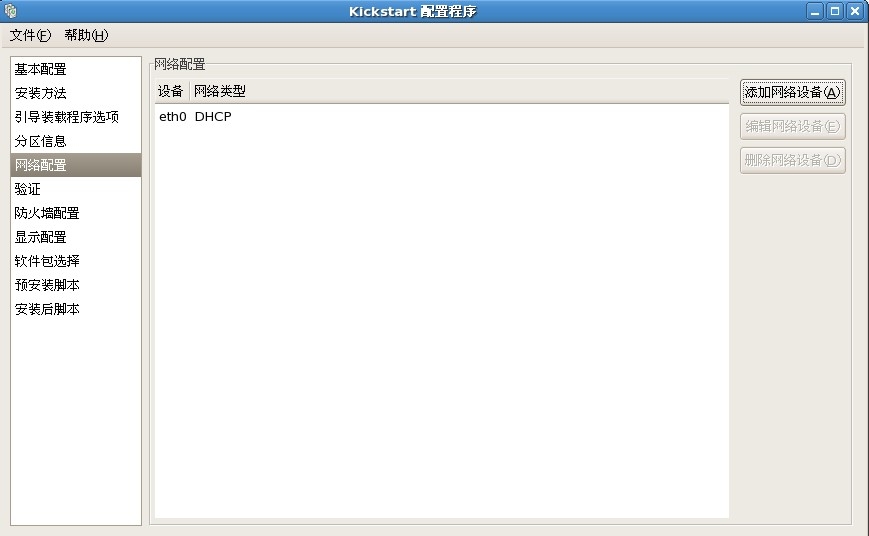


之后,点击文件保存到一个目录下就OK了
5.安装httpd服务[root@localhost ~]# yum -y install httpd[root@localhost ~]# cp /root/ks.cfg /var/www/html/ //ks.cfg是步骤4生成的配置文件 ,/var/www/html/ —— httpd默认站点[root@localhost ~]# service httpd restart[root@localhost ~]# chkconfig httpd on[root@localhost ~]# vim /var/www/html/ks.cfg在文件中添加key --skip //任意位置最后vim /tftpboot/pxelinux.cfg/default

6.测试将两台虚拟裸机开机(此后不应有交互的操作,静等安装)未完待续……
说明:当批量给主机安装操作系统时,我们不可能用传统的方式——用光盘、U盘等,一台一台逐个安装,这样一来,费时又力,对于批量部署主机时,效率是极低的。所以,我们通过Pxe+Kickstart技术来实现企业中集群服务的批量安装,近而将网络技术人员从繁忙中解脱出来,之后你就可以去悠闲地去饮一杯coffee了,过半个多小时回来,这批服务器都乘乘地拥有了自己的操作系统。下面是详细配置过程:实验环境准备VmwareworkStation虚拟机一台装有Linux操作系统的虚拟机,这里命名它为PXE-Server(静态IP为192.168.1.254)新建2台虚拟裸机(待安装的所有裸机网卡都配置成vmnet1)实验过程概述PXE-Server上安装dhcpd 、tftp 、nfs、httpd三个服务将相关内核和启动引导文件initrd.img pxelinux.0 pxelinux.cfg vmlinuz放到tftp根目录/tftpboot下步骤:1.配置yum库[root@localhost ~]# cd /etc/yum.repos.d[root@localhost yum.repos.d]# cp rhel-debuginfo.repo yang.repo [root@localhost yum.repos.d]#vim yang.repo [rhel-server] //[ ]里要以rhel- 开头,制作kickstart文件选择安装包时要用到name=Red Hat Enterprise Linux Serverbaseurl=file:///misc/cd/Serverenabled=1gpgcheck=1gpgkey=file:///etc/pki/rpm-gpg/RPM-GPG-KEY-redhat-release测试yum库安装情况[root@localhost ~]#yum listLoaded plugins: product-id, security, subscription-managerThis system is not registered to Red Hat Subscription Management. You can use subscription-manager to register.Installed PackagesDeployment_Guide-en-US.noarch 5.8-1.el5 installed Deployment_Guide-zh-CN.noarch 5.8-1.el5 installed Deployment_Guide-zh-TW.noarch 5.8-1.el5 installed GConf2.i386 2.14.0-9.el5 installed ..出现上边的界面表示yum库安装成功!2.安装并配置DHCP服务[root@localhost ~]# yum -y install dhcp* //安装 [root@localhost ~]# vim /etc/dhcpd.conf //配置ddns-update-style interim;next-server 192.168.1.254; //filename "pxelinux.0";subnet 192.168.1.0 netmask 255.255.255.0 {option subnet-mask 255.255.255.0;option domain-name "tarena.com";option domain-name-servers 192.168.1.254;range dynamic-bootp 192.168.1.1 192.168.1.10;default-lease-time 21600;max-lease-time 43200;}3.安装NFS共享服务[root@localhost ~]# yum -y install nfs-utils portmap //安装软件包[b]nfs-utils- 1.0.9-66.el5 [b]portmap-4.0-65.2.2.1[/b]
[root@localhost ~]# vim /etc/exports // 修改主配置文件
/data/iso/rhel5.9 *(ro) [/b][b][root@localhost ~]# mkdir -p /data/iso/rhel5.9 //创建系统镜像存放目录[/b][b][b][root@localhost ~]# cp -rf /misc/cd/* /data/iso/rhel5.9 //拷贝光盘所有[/b][/b][b][b]也可以用挂载的方法,同样实现访问镜像文件的作用[/b][/b][b][b][b][root@localhost ~]# umount -a[/b][/b][/b][b][b][b][b][root@localhost ~]# mount /misc/cd /data/iso/rhel5.9 [/b][/b][/b][/b]3.安装并配置TFTP服务[root@localhost ~]# yum -yinstall tftp[root@localhost ~]#service xinetd restart //开启tftp临时服务[root@localhost ~]# cd /misc/cd/images/pxeboot //进入光盘目录[root@localhost pxeboot]# lsinitrd.img README TRANS.TBL vmlinuz[root@localhost pxeboot]# cp initrd.img vmlinuz /tftpboot [root@localhost ~]#vim /etc/xinetd.d/tftp //配置tftp临时服务文件
[root@localhost ~]# find / -name pxelinux.0 //查找pxelinux.0文件存位置/tftpboot/linux-install/pxelinux.0/usr/share/syslinux/pxelinux.0[root@localhost ~]# cp /tftpboot/linux-install/pxelinux.0 /tftpboot //将这个文件拷贝到/tftpboot若没找到/pxelinux.0这个文件,则安装一个包:[root@localhost ~]# yum –y install syslinux-tftpboot.x86_64安装完后到这个位置去找/usr/share/syslinux/pxelinux.0[root@localhost ~]# cp -rf /tftpboot/linux-install/pxelinux.cfg/ /tftpboot //将pxelinux.cfg拷贝到/tftpboot若找不到则创建这目录[root@localhost pxeboot]# mkdir /tftpboot/pxelinux.cfg 然后[root@localhost pxeboot]# cp /misc/cd/isolinux/isolinux.cfg \> /tftpboot/pxelinux.cfg/default //拷贝模板到default[root@localhost ~]# cd /tftpboot/[root@localhost tftpboot]# lsinitrd.img linux-install pxelinux.0 pxelinux.cfg vmlinuz至此/tftpboot下的initrd.img pxelinux.0 pxelinux.cfg vmliuz全部准备好了4.生成Kickstart无人值守配置文件[root@localhost ~]# yum -y install system-config-kickstart //安装生成Kickstart的工具
之后,点击文件保存到一个目录下就OK了
5.安装httpd服务[root@localhost ~]# yum -y install httpd[root@localhost ~]# cp /root/ks.cfg /var/www/html/ //ks.cfg是步骤4生成的配置文件 ,/var/www/html/ —— httpd默认站点[root@localhost ~]# service httpd restart[root@localhost ~]# chkconfig httpd on[root@localhost ~]# vim /var/www/html/ks.cfg在文件中添加key --skip //任意位置最后vim /tftpboot/pxelinux.cfg/default
6.测试将两台虚拟裸机开机(此后不应有交互的操作,静等安装)未完待续……

相关文章推荐
- Pxe+Kickstart批量网络安装操作系统 推荐
- 关于linux - Centos 7 系统下使用PXE网络的方式(pxe+dhcpd+tftp+httpd)安装操作系统
- PXE自动网络引导安装Linux操作系统
- 利用RIS在网络中实现批量操作系统的安装
- 在网络中实现批量安装操作系统
- 在网络中实现批量安装操作系统
- Solaris 网络安装 操作系统
- 利用RIS在网络中实现批量操作系统的安装
- 网络学习(三十一)操作系统无人值守自动安装之Windows XP
- PXE网络安装Linux操作系统原理与详细过程
- 计算机网络10问之1 WindowsXP 操作系统安装后为什么不能上网?
- 安装操作系统centos6.5手动分区以及设置网络连通性
- centos6.4 下PXE+kickstart 网络安装操作系统
- 操作系统、数据库和网络01(数据库SQL安装)
- 安装在VMware Workstation (虚拟机)中的操作系统之间的网络访问设置
- 安装Kali Linux操作系统Kali Linux无线网络渗透
- 网络安装操作系统
- Python学习第二天----网络基础及操作系统简介(安装linux系统)
- CentOS系统基于网络的PXE+Kickstart无人值守批量安装操作系统(一)
- pxe网络安装linux操作系统