Web服务(三)httpd参数配置以及编译安装 推荐
2014-04-05 16:47
751 查看
接上篇Web服务(二)httpd配置参数详细介绍这边继续介绍部分参数的配置实现;以及httpd-2.4的编译安装。
一、参数配置13、https协议的实现
实现https之前需要先了解openssl;需要实现CA机制。openssl详情请参考Openssl、加密、解密和私有CA的实现过程;SSL握手要完成的工作:
交换协议版本号
选择双方都支持的加密方式
对两端实现身份验证
密钥交换
https是二进制格式的协议,监听与tcp:443端口。SSL会话是基于IP地址进行;不支持在基于FQDN的虚拟主机上实现。
下面直接来配置https:
CA这里直接使用的一台机器当CA和客户端;
创建CA和客户端证书签署
安装mod_ssl模块和更改主配置文件实现支持ssl协议:
提供主页文件
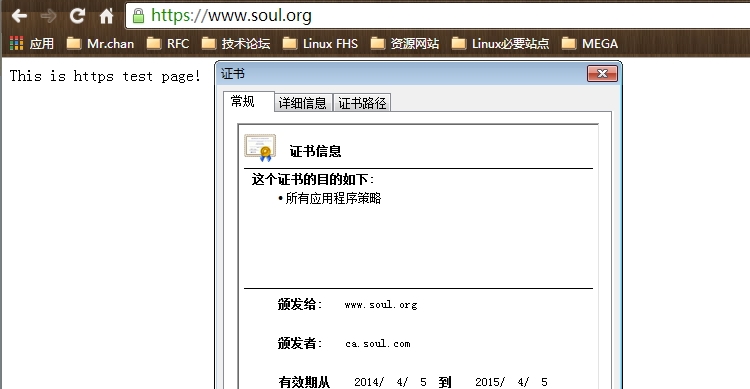
测试访问正常;https协议正常使用。
14、配置httpd的status页面

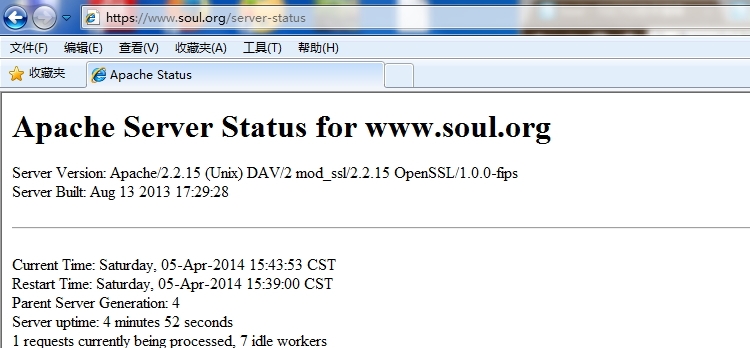
测试访问需要验证;并且可以显示详细的httpd服务器信息。
15、利用mod_deflate模块压缩页面优化传输速度
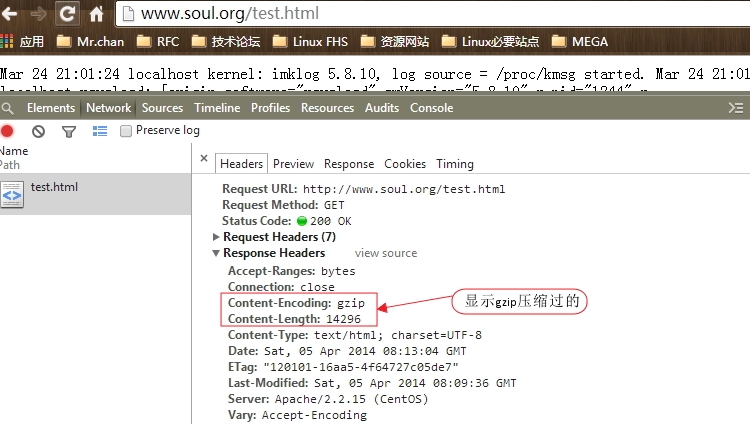
测试成功。该功能并不是所有状态都适合;需要合理的判断。
二、httpd-2.4的编译安装
由于这篇一直未完成;后续的博客都以完成;且其中以含有2.4版本的编译安装。这里就不再赘述了。连接:Linux下编译安装LAMP并分离为多台服务器。
如有错误;恳请纠正。
一、参数配置13、https协议的实现
实现https之前需要先了解openssl;需要实现CA机制。openssl详情请参考Openssl、加密、解密和私有CA的实现过程;SSL握手要完成的工作:
交换协议版本号
选择双方都支持的加密方式
对两端实现身份验证
密钥交换
https是二进制格式的协议,监听与tcp:443端口。SSL会话是基于IP地址进行;不支持在基于FQDN的虚拟主机上实现。
下面直接来配置https:
CA这里直接使用的一台机器当CA和客户端;
创建CA和客户端证书签署
#创建CA;详细过程就不贴了;以下是步骤
[Linux85]#cd /etc/pki/CA/
[Linux85]#(umask 077;openssl genrsa -out private/cakey.pem 2048)
[Linux85]#openssl req -new -x509 -key private/cakey.pem -out cacert.pem -days 365
[Linux85]#touch index.txt serial crlnumber
[Linux85]#echo 00 > serial

#生成客户端证书以及CA签署;CA与客户端都是同一台机器;也可以分为两台
[Linux85]#mkdir /etc/httpd/ssl
[Linux85]#cd /etc/httpd/ssl
[Linux85]#(umake 077;openssl genrsa -out httpd.key 1024)
[Linux85]#openssl req -new -key httpd.key -out httpd.csr
[Linux85]#openssl ca -in httpd.csr -out httpd.crt -days 365

#结束后把CA证书安装到windows中
安装mod_ssl模块和更改主配置文件实现支持ssl协议:
[Linux85]#yum -y install mod_ssl
[Linux85]#rpm -ql mod_ssl
/etc/httpd/conf.d/ssl.conf
/usr/lib64/httpd/modules/mod_ssl.so
/var/cache/mod_ssl
/var/cache/mod_ssl/scache.dir
/var/cache/mod_ssl/scache.pag
/var/cache/mod_ssl/scache.sem
[Linux85]#

#配置
[Linux85]#vim ssl.conf
#定位ServerName;开启下面两项
# General setup for the virtual host, inherited from global configuration
DocumentRoot "/var/www/html"
ServerName www.soul.org:443

#下面两项关于密钥和证书文件的路径
#   Server Certificate:
# Point SSLCertificateFile at a PEM encoded certificate.  If
# the certificate is encrypted, then you will be prompted for a
# pass phrase.  Note that a kill -HUP will prompt again.  A new
# certificate can be generated using the genkey(1) command.
SSLCertificateFile /etc/httpd/ssl/httpd.crt
#   Server Private Key:
#   If the key is not combined with the certificate, use this
#   directive to point at the key file.  Keep in mind that if
#   you've both a RSA and a DSA private key you can configure
#   both in parallel (to also allow the use of DSA ciphers, etc.)
SSLCertificateKeyFile /etc/httpd/ssl/httpd.key

[Linux85]#service httpd start
[Linux85]#ss -tunl | grep 443
tcp    LISTEN     0      128                   :::443                  :::*
#查看443端口以正常启动
提供主页文件
[Linux85]#vim /var/www/html/index.html
This is https test page!
#
把CA证书安装至windows中
测试访问正常;https协议正常使用。
14、配置httpd的status页面
[Linux85]#httpd -M | grep status
#下述这个模块如存在即可配置
status_module (shared)
Syntax OK
[Linux85]#

[Linux85]#vim /etc/httpd/conf/httpd.conf
#定位status;找到如下项开启
# Allow server status reports generated by mod_status,
# with the URL of http://servername/server-status # Change the ".example.com" to match your domain to enable.
#
<Location /server-status>
SetHandler server-status
AuthType    Basic            #为了确保安装;这里做了认证
AuthName    "server status"
AuthUserFile "/etc/httpd/conf/.htpasswd"
Require valid-user
Order deny,allow
Deny from all
Allow from 172.16.254.28    #限定只能改IP访问该页面
</Location>
测试访问需要验证;并且可以显示详细的httpd服务器信息。
15、利用mod_deflate模块压缩页面优化传输速度
[Linux85]#httpd -M | grep deflate
deflate_module (shared)
Syntax OK
[Linux85]#
#
#主配置文件内没有定义;这里自己新建配置文件
[Linux85]#vim /etc/httpd/conf.d/deflate.conf
SetOutputFilter DEFLATE

AddOutputFilterByType DEFLATE text/plain
AddOutputFilterByType DEFLATE text/html
AddOutputFilterByType DEFLATE application/xhtml+xml
AddOutputFilterByType DEFLATE text/xml
AddOutputFilterByType DEFLATE application/xml
AddOutputFilterByType DEFLATE application/x-javascript
AddOutputFilterByType DEFLATE text/javascript
AddOutputFilterByType DEFLATE text/css

# Level of compression (Highest 9 - Lowest 1)
DeflateCompressionLevel 9

# Netscape 4.x has some problems.
BrowserMatch ^Mozilla/4 gzip-only-text/html

# Netscape 4.06-4.08 have some more problems
BrowserMatch ^Mozilla/4\.0[678] no-gzip

# MSIE masquerades as Netscape, but it is fine
BrowserMatch \bMSI[E] !no-gzip !gzip-only-text/html

[Linux85]#service httpd restart
Stopping httpd:                                            [  OK  ]
Starting httpd:                                            [  OK  ]
[Linux85]#
测试成功。该功能并不是所有状态都适合;需要合理的判断。
二、httpd-2.4的编译安装
由于这篇一直未完成;后续的博客都以完成;且其中以含有2.4版本的编译安装。这里就不再赘述了。连接:Linux下编译安装LAMP并分离为多台服务器。
如有错误;恳请纠正。

相关文章推荐
- 在Red Hat Linux5下构建LAMP网站服务平台之编译安装Apache与配置基于域名的虚拟Web主机
- Web服务(二)httpd配置参数详细介绍
- 高可用集群之heartbeat配置,实现web服务的高可用以及Mariadb高可用 推荐
- 对vue中 默认的 config/index.js:配置的详细理解 -【以及webpack配置的理解】-config配置的目的都是为了服务webpack的配置,给不同的编译条件提供配置
- 在RHEL5下构建LAMP网站服务平台之编译安装Apache与配置基于域名的虚拟Web主机
- 编译安装httpd2.4,配置httpd服务
- Web服务其三编译安装httpd-2.4.9
- httpd2.4之编译安装及配置参数详细说明
- Web服务其三编译安装httpd-2.4.9
- Web服务基础六之编译安装配置RHEL+Apache+MySQL+PHP+ZendOptimize 推荐
- Linux入门之web服务(二)---应用实例httpd编译安装
- web之httpd功能配置与编译安装,配置文件解读
- 对vue中 默认的 config/index.js:配置的详细理解 -【以及webpack配置的理解】-config配置的目的都是为了服务webpack的配置,给不同的编译条件提供配置
- 基于最新版本httpd-2.4编译安装及其服务配置(上)
- 对vue中 默认的 config/index.js:配置的详细理解 -【以及webpack配置的理解】-config配置的目的都是为了服务webpack的配置,给不同的编译条件提供配置
- nginx(二) nginx编译安装 及 配置WEB服务
- httpd-2.4.9.tar.bz2的编译安装配置以及CGI、虚拟主机、https、mod_deflate、mod_status的实现。
- nginx(二) nginx编译安装 及 配置WEB服务
- Boost下载安装编译配置使用指南(含Windows、Linux以及ARM Linux)
- 用WCCP(web cache communication protocol)来配置Web cache服务 推荐