用PyInstaller把Python代码打包成单个独立的exe可执行文件
2014-03-04 12:04
1171 查看
之前就想要把自己的BlogsToWordpress打开成exe了。一直没去弄。
又看到有人提到python打开成exe的问题。
所以打算现在就去试试。
注:此处之所有选用BlogsToWordpress,是因为此python脚本够复杂,依赖的模块够多。
如果这个都搞定了,那么其他单个的python文件,和小python项目的打包,就更不成问题了。
1.先去找找,目前主流有哪几种方法。
找到几个名字
cx_Freeze
PyInstaller
py2exe
2.关于py2exe和PyInstaller的两者官网:
http://www.py2exe.org/index.cgi/FAQ
和
http://www.pyinstaller.org/
比较了一下,发现貌似后者更好用。
因为貌似py2exe还需要另外的其他库文件啊啥的,太琐碎。
而PyInstaller:
可以只是生成单独的可执行程序
且支持的版本也多:2.3到2.7都支持。以及x64也支持
也可以自定义图标
所以先去试试PyInstaller。
3.从主页
http://www.pyinstaller.org/
中下载对应的zip包:
https://github.com/downloads/pyinstaller/pyinstaller/pyinstaller-2.0.zip
得到3M+的pyinstaller-2.0.zip,解压,打开cmd,进入对应目录,去安装,结果说不支持:
?
所以算了,还是参考官网文档,一点点折腾吧。
4.参考在线文档:
http://www.pyinstaller.org/export/v2.0/project/doc/Manual.html?format=raw
结果说需要PyWin32,所以得先去装这个。
5.后来才发现,原来之前已经安装过了:
【已解决】Python中出错:ImportError: No module named win32com.client
但是要注意的是,import不是pywin32,而是win32com:
?
6.继续参考:
Installing PyInstaller
发现,解压后,就算是安装好了。
7.在一个文件夹中,准备好自己的Python程序:
D:\tmp\tmp_dev_root\python\tutorial_summary\make_exe\BlogsToWordpress
以备后用。
8.去到pyinstaller.py所在目录,去运行:
?
可以看到:
当前pyinstaller下面,的确生成了对应的BlogsToWordpress文件夹:
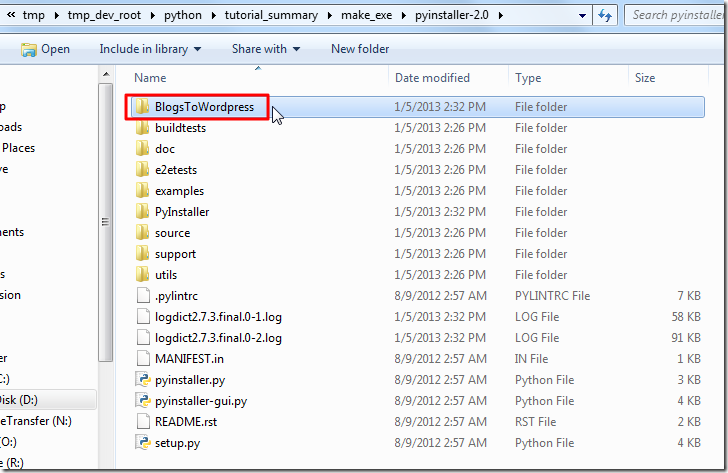
其下,也有对应的:
都已经生成了对应的exe了:
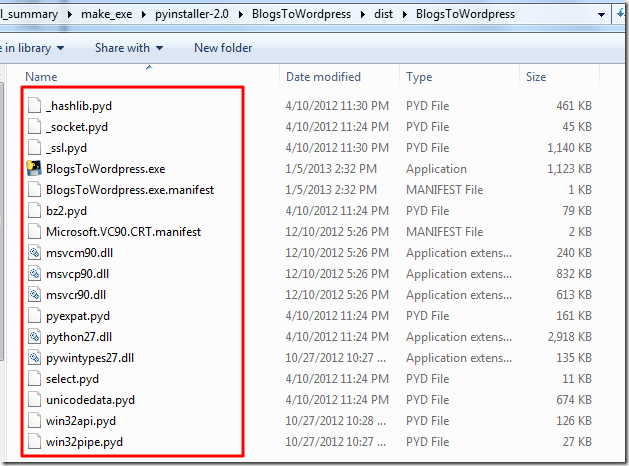
dist下面,有对应的,exe,pyd,dll等等:
汗,效率也忒高了,我还以为,需要折腾半天才可以呢,囧。。。。
9.先去试试生成的exe,是否满足我们的需求,是否可以独立运行。
不过运行之前,还是去先研究一下对应的参数吧。
看到了:
What to generate:
-F, --onefile
create a single file deployment
-D, --onedir
create a single directory deployment (default)
-o DIR, --out=DIR
create the spec file in directory. If not specified, and the current directory is Installer’s root directory, an output subdirectory will be created. Otherwise the current directory is used.
-n NAME, --name=NAME
optional name to assign to the project (from which the spec file name is generated). If omitted, the basename of the (first) script is used.
很明显,默认用的是-D,所以生成的是带目录的,现在重新去执行一次,使用-F生成单一的文件。
10.删掉旧的。重新运行:
?
去看看结果。
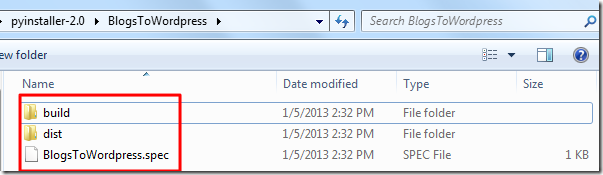
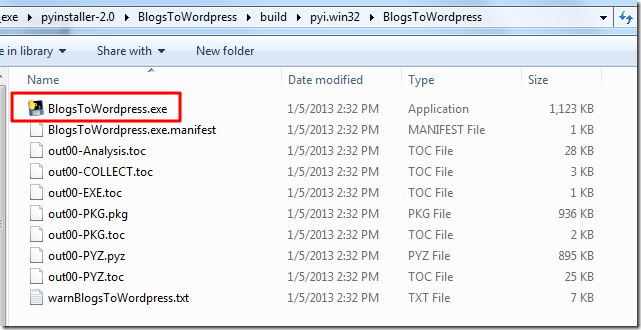
pyinstaller-2.0\BlogsToWordpress\build\pyi.win32\BlogsToWordpress
下面包含很多toc,pkg,pyz等文件:
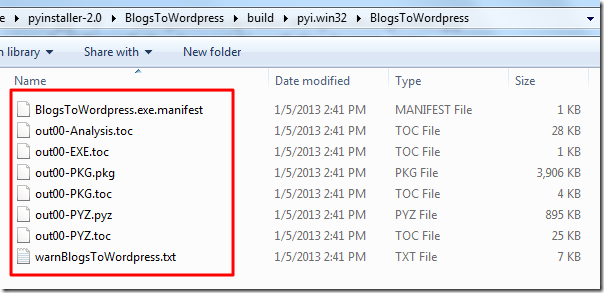
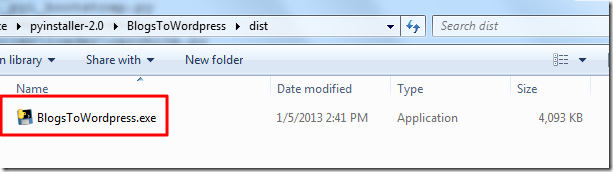
dist下面,就生成了,所需要的单个exe文件:
但是,注意到了,生成文件中,包含一个警告的文件:
D:\tmp\tmp_dev_root\python\tutorial_summary\make_exe\pyinstaller-2.0\BlogsToWordpress\build\pyi.win32\BlogsToWordpress\warnBlogsToWordpress.txt
?
不知道是否影响程序。
11.去运行单个的exe,看看效果。
结果直接出错:
?
很明显,还是无法自动导入很多的库啊。
去想办法,添加搜索路径,让其找到对应的库。
12.好像是-p参数:
-p DIR, --paths=DIR
set base path for import (like using PYTHONPATH). Multiple directories are allowed, separating them with the path separator (‘;’ under Windows, ‘:’ under Linux), or using this option multiple times.
去试试:
?
添加上路径后,生成的exe,的确也大了一点,变成4505KB了:
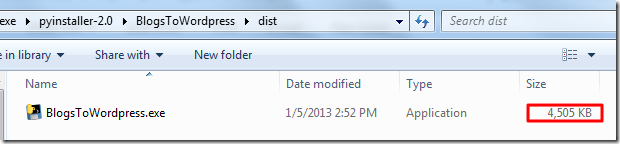
另外,warnBlogsToWordpress.txt中,的确没了crifanLib,但是还是有一些其他,可能要依赖的库:
?
比如,其中的PIL等库。
不过,关于PIL,我去看了看自己的
D:\tmp\dev_install_root\Python27_x64\Lib\site-packages
中的确没有,应该是重装python,导致了之前安装好的PIL没了。
所以,还是需要自己重新安装一下PIL的。
12.关于安装PIL的过程,详见:
【记录】下载和安装Python的第三方图像处理的库:PIL(Python Imaging Library)
13.然后再去
D:\tmp\dev_install_root\Python27_x64\Lib\site-packages
确认一下,果然有了PIL了。
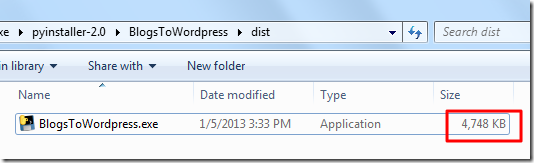
然后此处,删掉旧的,重新执行一次:
?
虽然结果警告中,也还是有PIL:
?
但是很明显,只是PIL模块内部的一些小问题罢了,不理会。
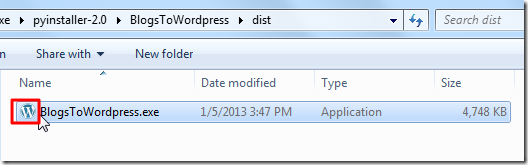
生成的exe,的确又变大了,4748KB:
13.去运行现在的最新的BlogsToWordpress.exe,看看效果如何。
果然是可以,如期望的一样,去执行了:
?
加上对应参数,再试试:
?
的确就是可以正常执行了。
剩下的,就是要拿到别的windows平台上,多测试测试,是否都正常。
14.接着打算再去试试,添加icon图标的事情。
参考官网的参数解释:
-r FILE[,TYPE[,NAME[,LANGUAGE]]], –resource=FILE[,TYPE[,NAME[,LANGUAGE]]]
add/update resource of the given type, name and language from FILE to the final executable. FILE can be a data file or an exe/dll. For data files, atleast TYPE and NAME need to be specified, LANGUAGE defaults to 0 or may be specified as wildcard * to update
all resources of the given TYPE and NAME. For exe/dll files, all resources from FILE will be added/updated to the final executable if TYPE, NAME and LANGUAGE are omitted or specified as wildcard *.Multiple resources are allowed, using this option multiple
times.
去运行:
?
可以看到,其自动会把icon添加到当前已有的exe中,然后可以看到对应的,带图标的exe的效果:
简单总结其使用方法:
生成单一的exe文件:
?
添加必要的搜索路径:
?
添加必要的搜索路径,且带图标:
?
需要注意的是:
1.检查生成的
pyinstaller-2.0\XXX\build\pyi.win32\XXX\warnXXX.txt
(XXX是你的项目名)
中,是否缺少了必要的模块。
如果有缺少的,那么去如上所述,添加必要的搜素路径,使得pyinstaller在运行时,可以找到对应的模块并集成进来。
2.此处我这里没有UPX,暂时没去折腾。
估计是用UPX去压缩,压缩后所生成的exe文件的大小,会小得多。
又看到有人提到python打开成exe的问题。
所以打算现在就去试试。
注:此处之所有选用BlogsToWordpress,是因为此python脚本够复杂,依赖的模块够多。
如果这个都搞定了,那么其他单个的python文件,和小python项目的打包,就更不成问题了。
1.先去找找,目前主流有哪几种方法。
找到几个名字
cx_Freeze
PyInstaller
py2exe
2.关于py2exe和PyInstaller的两者官网:
http://www.py2exe.org/index.cgi/FAQ
和
http://www.pyinstaller.org/
比较了一下,发现貌似后者更好用。
因为貌似py2exe还需要另外的其他库文件啊啥的,太琐碎。
而PyInstaller:
可以只是生成单独的可执行程序
且支持的版本也多:2.3到2.7都支持。以及x64也支持
也可以自定义图标
所以先去试试PyInstaller。
3.从主页
http://www.pyinstaller.org/
中下载对应的zip包:
https://github.com/downloads/pyinstaller/pyinstaller/pyinstaller-2.0.zip
得到3M+的pyinstaller-2.0.zip,解压,打开cmd,进入对应目录,去安装,结果说不支持:
?
4.参考在线文档:
http://www.pyinstaller.org/export/v2.0/project/doc/Manual.html?format=raw
结果说需要PyWin32,所以得先去装这个。
5.后来才发现,原来之前已经安装过了:
【已解决】Python中出错:ImportError: No module named win32com.client
但是要注意的是,import不是pywin32,而是win32com:
?
Installing PyInstaller
发现,解压后,就算是安装好了。
7.在一个文件夹中,准备好自己的Python程序:
D:\tmp\tmp_dev_root\python\tutorial_summary\make_exe\BlogsToWordpress
以备后用。
8.去到pyinstaller.py所在目录,去运行:
?
当前pyinstaller下面,的确生成了对应的BlogsToWordpress文件夹:
其下,也有对应的:
都已经生成了对应的exe了:
dist下面,有对应的,exe,pyd,dll等等:
汗,效率也忒高了,我还以为,需要折腾半天才可以呢,囧。。。。
9.先去试试生成的exe,是否满足我们的需求,是否可以独立运行。
不过运行之前,还是去先研究一下对应的参数吧。
看到了:
What to generate:
-F, --onefile
create a single file deployment
-D, --onedir
create a single directory deployment (default)
-o DIR, --out=DIR
create the spec file in directory. If not specified, and the current directory is Installer’s root directory, an output subdirectory will be created. Otherwise the current directory is used.
-n NAME, --name=NAME
optional name to assign to the project (from which the spec file name is generated). If omitted, the basename of the (first) script is used.
很明显,默认用的是-D,所以生成的是带目录的,现在重新去执行一次,使用-F生成单一的文件。
10.删掉旧的。重新运行:
?
pyinstaller-2.0\BlogsToWordpress\build\pyi.win32\BlogsToWordpress
下面包含很多toc,pkg,pyz等文件:
dist下面,就生成了,所需要的单个exe文件:
但是,注意到了,生成文件中,包含一个警告的文件:
D:\tmp\tmp_dev_root\python\tutorial_summary\make_exe\pyinstaller-2.0\BlogsToWordpress\build\pyi.win32\BlogsToWordpress\warnBlogsToWordpress.txt
?
11.去运行单个的exe,看看效果。
结果直接出错:
?
去想办法,添加搜索路径,让其找到对应的库。
12.好像是-p参数:
-p DIR, --paths=DIR
set base path for import (like using PYTHONPATH). Multiple directories are allowed, separating them with the path separator (‘;’ under Windows, ‘:’ under Linux), or using this option multiple times.
去试试:
?
另外,warnBlogsToWordpress.txt中,的确没了crifanLib,但是还是有一些其他,可能要依赖的库:
?
不过,关于PIL,我去看了看自己的
D:\tmp\dev_install_root\Python27_x64\Lib\site-packages
中的确没有,应该是重装python,导致了之前安装好的PIL没了。
所以,还是需要自己重新安装一下PIL的。
12.关于安装PIL的过程,详见:
【记录】下载和安装Python的第三方图像处理的库:PIL(Python Imaging Library)
13.然后再去
D:\tmp\dev_install_root\Python27_x64\Lib\site-packages
确认一下,果然有了PIL了。
然后此处,删掉旧的,重新执行一次:
?
?
生成的exe,的确又变大了,4748KB:
13.去运行现在的最新的BlogsToWordpress.exe,看看效果如何。
果然是可以,如期望的一样,去执行了:
?
?
剩下的,就是要拿到别的windows平台上,多测试测试,是否都正常。
14.接着打算再去试试,添加icon图标的事情。
参考官网的参数解释:
-r FILE[,TYPE[,NAME[,LANGUAGE]]], –resource=FILE[,TYPE[,NAME[,LANGUAGE]]]
add/update resource of the given type, name and language from FILE to the final executable. FILE can be a data file or an exe/dll. For data files, atleast TYPE and NAME need to be specified, LANGUAGE defaults to 0 or may be specified as wildcard * to update
all resources of the given TYPE and NAME. For exe/dll files, all resources from FILE will be added/updated to the final executable if TYPE, NAME and LANGUAGE are omitted or specified as wildcard *.Multiple resources are allowed, using this option multiple
times.
去运行:
?
总结
PyInstaller,的确非常好用啊。感谢作者们。简单总结其使用方法:
生成单一的exe文件:
?
?
?
需要注意的是:
1.检查生成的
pyinstaller-2.0\XXX\build\pyi.win32\XXX\warnXXX.txt
(XXX是你的项目名)
中,是否缺少了必要的模块。
如果有缺少的,那么去如上所述,添加必要的搜素路径,使得pyinstaller在运行时,可以找到对应的模块并集成进来。
2.此处我这里没有UPX,暂时没去折腾。
估计是用UPX去压缩,压缩后所生成的exe文件的大小,会小得多。

相关文章推荐
- 用PyInstaller把Python代码打包成单个独立的exe可执行文件
- 用PyInstaller把Python代码打包成单个独立的exe可执行文件
- 【转】python学习--用PyInstaller把Python代码打包成单个独立的exe可执行文件
- 用PyInstaller把Python代码打包成单个独立的exe可执行文件
- PyInstaller对python脚本进行代码打包成单个独立的exe可执行文件
- 【转载】用PyInstaller把Python代码打包成单个独立的exe可执行文件
- 用pyinstaller把python代码打包成exe可执行文件
- windows环境下把Python代码打包成独立执行的exe可执行文件
- Python3.4(Pyhon)代码如何打包成.exe可执行文件——详细教程
- Python3之使用pyinstaller打包.py文件成exe可执行文件
- 使用pyinstaller工具打包python项目代码生成exe文件
- win7下用PyInstaller把Python代码打包成exe文件
- 利用PyInstaller把Python程序打包成exe可执行文件
- 使用pyinstaller工具打包python项目代码生成exe文件
- 用Pyinstaller把Python3程序打包成可执行文件exe
- 用pyinstaller把python源文件打包成exe可执行文件
- 用Pyinstaller把Python3.4程序打包成可执行文件exe
- 使用pyinstaller工具打包python项目代码生成exe文件
- 使用pyinstaller工具打包python项目代码生成exe文件
- 打包python脚本为exe可执行文件-pyinstaller和cx_freeze示例