Android学习小Demo(9)一个To Do List的实现
2014-02-20 23:59
661 查看
记得看过一篇文章,是说一个人临走之前,列下了想做的最后100件事情,然后拿着这张便签,一件一件地去实现。又想起乔布斯说,如果今天是你的最后一天,你会怎么过?
我有很多事情想做,想写很多的文章,但是时间真的很不够用,妹妹说想把一天当做两天用,但是我想拆成三四天用。。。
这个小程序是我写来放在手机里,写上自己想做的事情,然后一件一件地完成,人生很短,真的很短。
先上一个效果图:
这是一个很简单的小程序,只有三个Activity,不过大家在Demo中见到的只是两个啦,还有左上角点击,可以见到一个“关于”的页面。
1)MainActivity:展示想做的任务,根据未完成的,已完成的,再按照创建时间排序。
2)DetailActivity,进行添加,更新的操作,如果是通过更新页面进去的话,还会展示两个按钮,已完成的任务会展示“Mark Uncomplete”按钮,未完成的任务会显示“Mark Complete”按钮。
3)AboutActivty,这是展示作者信息的页面啦,没有在上面显示出来,里面还有一个初始化sqlitedatabase的按钮。
那么这个小程序中用到了什么样的小技巧呢?
0)SqliteDatabase,当然是我们的数据啦,关于这个的使用,大家可以参考:
Android学习小Demo(8)SQLiteDatabase的使用
1)用到了support-v7 兼容包,主要目的是为了在2.3上面显示ActionBar。
2)页面切换中用到了动画效果,这个其实在之前做音乐播放器的时候也有用过的,不过有点奇怪的是,2.x和4.x,在旋转上的效果有点不一样,具体还没去找原因。
当点击home按钮,跑到AboutActivity中的效果跟点击“添加”按钮,进行任务编辑页面,是用着不一样的效果的,所以在startActivity之后,要用下面的函数:
更多的关于View Animation (Tween Animation),大家有兴趣的可以参考:
Android动画学习Demo(1)
关于ViewAnimation的用法及总结
3)就是自定义的编辑框的样式了,如下:
关于ShapeDrawable应用的一些介绍(中)之Gradient
4)自定义按钮的格式,这个就会用到layer_list和selector的使用了,这个还没有在博客中介绍过,先在这里说一下吧:
在drawable文件夹中,定义几个不一样的样式,如下是layout_button_normal.xml:
然后跟用shape一样,在layout中使用就好:
Android中关于Adapter的使用(下)BaseAdapter
6)另外有一个要注意的就是横屏跟坚屏中,布局应该是不一样的,会了使手机横屏看起来效果也比较好看,可以专门为横屏定义一个布局,比如:
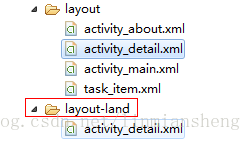
如图,我们可以在layout-land中也定义一个叫activity_detail.xml,这样当系统检测到是横屏(landscape)的时候,就会去这个文件夹中寻找布局。
当然,如果嫌麻烦,也可以直接在manifest中直接禁掉,比如对于AboutActivity,我就只想让它竖屏(portrait),如下:
嗯,没错啦,这个小demo就是对前面咱们讲过的那么多知识的一个很好的应用。
光学总归是不够的,还是需要亲自去动手去做,去实践,才能够真正做到用啊。
我有很多事情想做,想写很多的文章,但是时间真的很不够用,妹妹说想把一天当做两天用,但是我想拆成三四天用。。。
这个小程序是我写来放在手机里,写上自己想做的事情,然后一件一件地完成,人生很短,真的很短。
先上一个效果图:
这是一个很简单的小程序,只有三个Activity,不过大家在Demo中见到的只是两个啦,还有左上角点击,可以见到一个“关于”的页面。
1)MainActivity:展示想做的任务,根据未完成的,已完成的,再按照创建时间排序。
2)DetailActivity,进行添加,更新的操作,如果是通过更新页面进去的话,还会展示两个按钮,已完成的任务会展示“Mark Uncomplete”按钮,未完成的任务会显示“Mark Complete”按钮。
3)AboutActivty,这是展示作者信息的页面啦,没有在上面显示出来,里面还有一个初始化sqlitedatabase的按钮。
那么这个小程序中用到了什么样的小技巧呢?
0)SqliteDatabase,当然是我们的数据啦,关于这个的使用,大家可以参考:
Android学习小Demo(8)SQLiteDatabase的使用
1)用到了support-v7 兼容包,主要目的是为了在2.3上面显示ActionBar。
2)页面切换中用到了动画效果,这个其实在之前做音乐播放器的时候也有用过的,不过有点奇怪的是,2.x和4.x,在旋转上的效果有点不一样,具体还没去找原因。
public boolean onOptionsItemSelected(MenuItem item) {
switch (item.getItemId()) {
case android.R.id.home:
Intent aboutIntent = new Intent(MainActivity.this, AboutActivity.class);
startActivity(aboutIntent);
overridePendingTransition(R.anim.push_right_in,R.anim.hold);
break;
case R.id.action_add:
Intent intent = new Intent(MainActivity.this, DetailActivity.class);
startActivity(intent);
overridePendingTransition(R.anim.scale_in,R.anim.scale_left_out);
break;
}
return super.onOptionsItemSelected(item);
}
当点击home按钮,跑到AboutActivity中的效果跟点击“添加”按钮,进行任务编辑页面,是用着不一样的效果的,所以在startActivity之后,要用下面的函数:
public void overridePendingTransition(int enterAnim, int exitAnim) {
try {
ActivityManagerNative.getDefault().overridePendingTransition(
mToken, getPackageName(), enterAnim, exitAnim);
} catch (RemoteException e) {
}
}
而用到的动画效果,就是基本的Tween Animation了,其中一个scale_in,如下:<set xmlns:android="http://schemas.android.com/apk/res/android" > <scale android:duration="1000" android:fromXScale="0.5" android:fromYScale="0.5" android:pivotX="50%" android:pivotY="50%" android:toXScale="1.0" android:toYScale="1.0" /> <alpha android:duration="1000" android:fromAlpha="0.0" android:toAlpha="1.0" /> </set>
更多的关于View Animation (Tween Animation),大家有兴趣的可以参考:
Android动画学习Demo(1)
关于ViewAnimation的用法及总结
3)就是自定义的编辑框的样式了,如下:
<EditText
android:id="@+id/etTitle"
android:padding="5dip"
android:background="@drawable/shape_background" <!-- 自定义的样式 -->这是我在博客中直接加的。。。
android:layout_width="match_parent"
android:layout_height="0dp"
android:layout_weight="1"
android:gravity="center_vertical"
android:inputType="text"
android:textSize="20sp" />
而其对应的样式如下:
<?xml version="1.0" encoding="utf-8"?>
<shape xmlns:android="http://schemas.android.com/apk/res/android"
android:shape="rectangle">
<gradient android:startColor="#FFFFFF"
android:endColor="#FFFFFF"
android:centerY="0.2"
android:centerColor="#EEEEEE"
android:angle="270"
android:type="linear"/>
<stroke android:width="1dp"
android:color="#CCCCCC"/>
</shape>
关于这个,大家可以参考:
关于ShapeDrawable应用的一些介绍(中)之Gradient
4)自定义按钮的格式,这个就会用到layer_list和selector的使用了,这个还没有在博客中介绍过,先在这里说一下吧:
在drawable文件夹中,定义几个不一样的样式,如下是layout_button_normal.xml:
<?xml version="1.0" encoding="utf-8"?>
<layer-list xmlns:android="http://schemas.android.com/apk/res/android" >

<item>
<shape
xmlns:android="http://schemas.android.com/apk/res/android"
android:shape="rectangle" >
<corners android:radius="5dp" />
<solid android:color="#EEEEEE" />
<stroke
android:width="1dp"
android:color="#CCCCCC" />
</shape>
</item>

</layer-list>
类似的,我们可以定义,layout_button_pressed.xml 和 layout_button_selected.xml,然后再定义一个shape_button.xml,在里面使用selector属性:
<?xml version="1.0" encoding="utf-8"?>
<selector xmlns:android="http://schemas.android.com/apk/res/android">
<item android:state_pressed="true" android:drawable="@drawable/layer_button_pressed"></item>
<item android:state_focused="true" android:drawable="@drawable/layer_button_selected"></item>
<item android:drawable="@drawable/layer_button_normal"></item>
</selector>
在这里要注意一点,要把normal的放在最后,因为selector会根据状态从第一个往后面选,如果前面命中了,后面就不理的了,所以如果默认的没有什么状态的就要放在最后面。
然后跟用shape一样,在layout中使用就好:
android:background="@drawable/shape_button"5)MainActvity中显示数据,是用listview来显示的,也用到了BaseAdapter,可以参考:
Android中关于Adapter的使用(下)BaseAdapter
6)另外有一个要注意的就是横屏跟坚屏中,布局应该是不一样的,会了使手机横屏看起来效果也比较好看,可以专门为横屏定义一个布局,比如:
如图,我们可以在layout-land中也定义一个叫activity_detail.xml,这样当系统检测到是横屏(landscape)的时候,就会去这个文件夹中寻找布局。
当然,如果嫌麻烦,也可以直接在manifest中直接禁掉,比如对于AboutActivity,我就只想让它竖屏(portrait),如下:
<activity
android:name="com.lms.todo.AboutActivity"
android:label="@string/about_me"
android:screenOrientation="portrait" >
</activity>
嗯,没错啦,这个小demo就是对前面咱们讲过的那么多知识的一个很好的应用。
光学总归是不够的,还是需要亲自去动手去做,去实践,才能够真正做到用啊。

相关文章推荐
- android 代码实现控件之间的间距
- android FragmentPagerAdapter的“标准”配置
- Android"解决"onTouch和onClick的冲突问题
- 解決Linux下Android开发真机调试设备不被识别问题
- [Android]在代码里运行另一个程序的方法
- [软件咨询]WPS2012正式版已发布 金山Office移动版4.0发布
- Android笔记-Linux Kernel Ftrace (Function Trace)解析
- 模仿动画的放大缩小容器
- android USB如何修改VID具体实现
- Android增量升级的方法和原理详细介绍
- Android Mouse实现过程详细笔记
- 深入Android Browser配置管理的详解
- Android Mms之:深入理解对话列表管理
- js排序动画模拟-插入排序
- JQuery动画和停止动画实例代码
- Android APP与媒体存储服务的交互
- Jquery 自定义动画概述及示例
- android 多线程技术应用
- Android之采用execSQL与rawQuery方法完成数据的添删改查操作详解
- 基于jquery的动画效果代码