Apache的认证机制
2014-02-18 19:38
411 查看
apache支持的认证机制: basic认证:账号密码使用明文传输,所以很不安全,但是要结合ssl来使用的话比较安全,basic是根据目录(目录及其子目录)进行认证的。 摘要认证:使用md5或者sha1加密密码,然后在网络上进行传输,安全性提高了,但是不被广大浏览器所支持,所以使用的很少。 表单认证:需要在用户登录的时候给用户提示表单,要求用户在表单上输入完用户和密码以后才可以登录,都是不容易实现。
下面都是以basic来进行测试实验
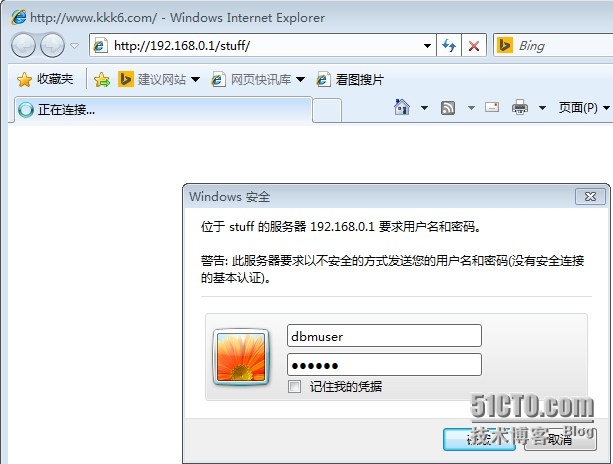
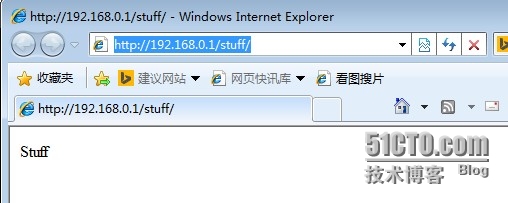
File文本格式的存储密码文件:[root@Wiker www]# pwd/var/www[root@Wiker www]#mkdir stuff[root@Wiker www]# vim/etc/httpd/conf/httpd.conf alias /stuff/"/var/www/stuff/"<Directory"/var/www/stuff"> Options none AllowOverride AuthConfig Authtype basic Authname "stuff" AuthBasicProvider file Authuserfile /etc/httpd/conf/.htpasswd Require valid-user</Directory>[root@Wiker www]#echo "Stuff" >/var/www/stuff/index.html[root@Wiker www]#service httpd restartStopping httpd: [ OK ]Starting httpd: [ OK ][root@Wiker www]# htpasswd -c -m /etc/httpd/conf/.htpasswd wiker #初次使用的时候加上-c进行初始化New password: Re-type new password:Adding password foruser wiker[root@Wiker www]# cat/etc/httpd/conf/.htpasswd wiker:$apr1$31wnUozp$Roa/3JAGg0zgV8Wom/UB60然后客户端打开http://192.168.0.1/stuff/
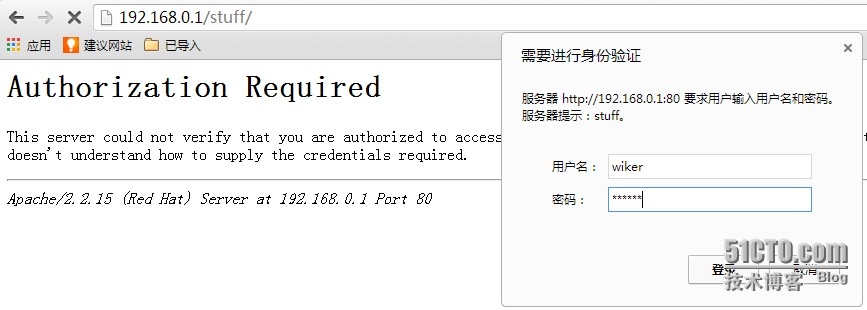
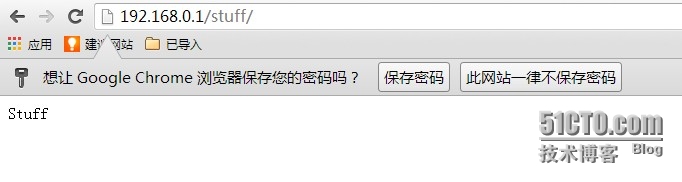
正确输入完用户名和密码以后就可以打开了
如果允许组中的成员都可以访问[root@Wiker www]# vim/etc/httpd/conf/httpd.confalias /stuff/"/var/www/stuff/"<Directory"/var/www/stuff"> Options none AllowOverride AuthConfig Authtype basic Authname "stuff" AuthBasicProvider file Authuserfile /etc/httpd/conf/.htpasswd Authgroupfile /etc/httpd/conf/.htgroup Require group mystuffs</Directory>[root@Wiker www]#htpasswd -m /etc/httpd/conf/.htpasswd testNew password: Re-type new password:Adding password foruser test[root@Wiker www]#htpasswd -m /etc/httpd/conf/.htpasswd userNew password: Re-type new password:Adding password foruser user[root@Wiker www]# vim/etc/httpd/conf/.htgroupmystuffs:wiker test[root@Wiker www]#service httpd restartStopping httpd: [ OK ]Starting httpd: [ OK ]然后用其他的浏览器再访问这个页面,不要使用刚才的浏览器,然后用户名和密码我们不输入那个组里面的
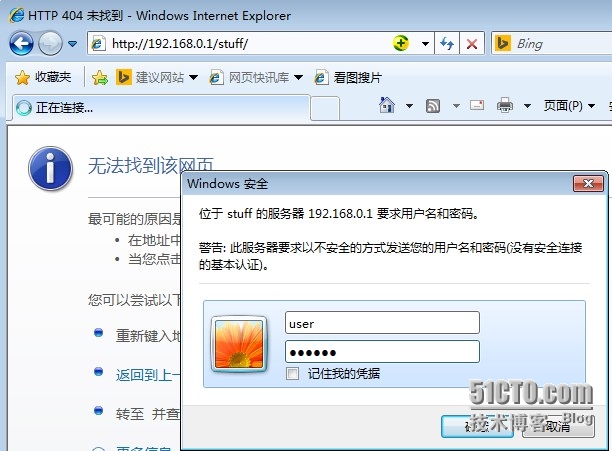
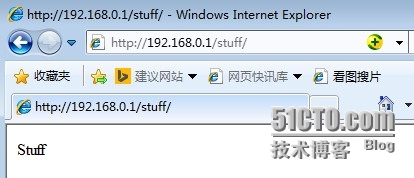
他就会提示我们再次输入(因为密码不正确),然后这次我们输入组里面的账号,然后就可以看到里面的信息了
DBM格式存储密码文件:普通情况下,用户和密码的提供者使用的是文本格式,所以不安全,我们可以使用dbm格式的数据库提来提高安全性[root@Wiker ~]# vim/etc/httpd/conf/httpd.conf alias /stuff/"/var/www/stuff/"<Directory"/var/www/stuff"> Options none AllowOverride AuthConfig Authtype basic Authname "stuff" AuthbasicProvider dbm Authdbmuserfile /etc/httpd/conf/.stuff.dbm Require valid-user</Directory>[root@Wiker ~]# htdbm-c -m /etc/httpd/conf/.stuff.dbm dbmuserEnter password : Re-type password : Database/etc/httpd/conf/.stuff.dbm created.[root@Wiker ~]# htdbm-m /etc/httpd/conf/.stuff.dbm redhatEnter password : Re-type password : Database/etc/httpd/conf/.stuff.dbm updated.[root@Wiker ~]# file /etc/httpd/conf/.stuff.dbm.* #密码文件是一个二进制文件,无法直接查看/etc/httpd/conf/.stuff.dbm.dir:empty/etc/httpd/conf/.stuff.dbm.pag:data[root@Wiker ~]# httpd-tSyntax OK[root@Wiker ~]#service httpd restartStopping httpd: [ OK ]Starting httpd: [ OK ]然后使用浏览器打开http://192.168.0.1/stuff/,不要使用之前的浏览器
然后就可以看到里面的页面了
本文出自 “IT没有圈” 博客,请务必保留此出处http://wiker.blog.51cto.com/8481872/1360233
下面都是以basic来进行测试实验
File文本格式的存储密码文件:[root@Wiker www]# pwd/var/www[root@Wiker www]#mkdir stuff[root@Wiker www]# vim/etc/httpd/conf/httpd.conf alias /stuff/"/var/www/stuff/"<Directory"/var/www/stuff"> Options none AllowOverride AuthConfig Authtype basic Authname "stuff" AuthBasicProvider file Authuserfile /etc/httpd/conf/.htpasswd Require valid-user</Directory>[root@Wiker www]#echo "Stuff" >/var/www/stuff/index.html[root@Wiker www]#service httpd restartStopping httpd: [ OK ]Starting httpd: [ OK ][root@Wiker www]# htpasswd -c -m /etc/httpd/conf/.htpasswd wiker #初次使用的时候加上-c进行初始化New password: Re-type new password:Adding password foruser wiker[root@Wiker www]# cat/etc/httpd/conf/.htpasswd wiker:$apr1$31wnUozp$Roa/3JAGg0zgV8Wom/UB60然后客户端打开http://192.168.0.1/stuff/

正确输入完用户名和密码以后就可以打开了
如果允许组中的成员都可以访问[root@Wiker www]# vim/etc/httpd/conf/httpd.confalias /stuff/"/var/www/stuff/"<Directory"/var/www/stuff"> Options none AllowOverride AuthConfig Authtype basic Authname "stuff" AuthBasicProvider file Authuserfile /etc/httpd/conf/.htpasswd Authgroupfile /etc/httpd/conf/.htgroup Require group mystuffs</Directory>[root@Wiker www]#htpasswd -m /etc/httpd/conf/.htpasswd testNew password: Re-type new password:Adding password foruser test[root@Wiker www]#htpasswd -m /etc/httpd/conf/.htpasswd userNew password: Re-type new password:Adding password foruser user[root@Wiker www]# vim/etc/httpd/conf/.htgroupmystuffs:wiker test[root@Wiker www]#service httpd restartStopping httpd: [ OK ]Starting httpd: [ OK ]然后用其他的浏览器再访问这个页面,不要使用刚才的浏览器,然后用户名和密码我们不输入那个组里面的
他就会提示我们再次输入(因为密码不正确),然后这次我们输入组里面的账号,然后就可以看到里面的信息了
DBM格式存储密码文件:普通情况下,用户和密码的提供者使用的是文本格式,所以不安全,我们可以使用dbm格式的数据库提来提高安全性[root@Wiker ~]# vim/etc/httpd/conf/httpd.conf alias /stuff/"/var/www/stuff/"<Directory"/var/www/stuff"> Options none AllowOverride AuthConfig Authtype basic Authname "stuff" AuthbasicProvider dbm Authdbmuserfile /etc/httpd/conf/.stuff.dbm Require valid-user</Directory>[root@Wiker ~]# htdbm-c -m /etc/httpd/conf/.stuff.dbm dbmuserEnter password : Re-type password : Database/etc/httpd/conf/.stuff.dbm created.[root@Wiker ~]# htdbm-m /etc/httpd/conf/.stuff.dbm redhatEnter password : Re-type password : Database/etc/httpd/conf/.stuff.dbm updated.[root@Wiker ~]# file /etc/httpd/conf/.stuff.dbm.* #密码文件是一个二进制文件,无法直接查看/etc/httpd/conf/.stuff.dbm.dir:empty/etc/httpd/conf/.stuff.dbm.pag:data[root@Wiker ~]# httpd-tSyntax OK[root@Wiker ~]#service httpd restartStopping httpd: [ OK ]Starting httpd: [ OK ]然后使用浏览器打开http://192.168.0.1/stuff/,不要使用之前的浏览器
然后就可以看到里面的页面了
本文出自 “IT没有圈” 博客,请务必保留此出处http://wiker.blog.51cto.com/8481872/1360233

相关文章推荐
- apache用户认证访问机制(转)
- apache工作机制,压缩,虚拟主机,用户认证
- 《基于apache 访问账号认证机制》
- apache shiro与spring整合、动态filterChainDefinitions、以及认证、授权
- apache+svn认证部署实战
- spring security & oauth2 安全认证机制
- Java RPC 通信机制之 SOAP:应用 Apache Axis进行 Web Service开发
- golang的HTTP基本认证机制实例详解
- apache 口令认证的基本配置
- Apache 用户认证
- Apache Nutch 1.3 学习笔记十一(页面评分机制 LinkRank 介绍)
- LAMP 之 Apache 用户认证
- HTTP协议(RFC2616)的两种认证机制(Basic和Digest)
- apache用户认证
- SubVersion + Apache2.2.4 + OpenLDAP2.3.32 实现权限认证
- apache 服务器禁止http方法 解决appscan 使用 HTTP 动词篡改的认证旁路漏洞
- 利用apache的重写机制实现url重定向
- 基于Token的WEB后台认证机制
- IT忍者神龟之基于CAS实现单点登录(SSO)之配置CAS服务端的数据库查询认证机制(一)
- apache用户认证配置