Spring+Spring Security+Maven 实现的一个Hello World例子
2014-01-11 10:37
357 查看
Spring Security允许开发人员轻松地将安全功能集成到J2EE Web应用程序中,它通过Servlet过滤器实现“用户自定义”安全检查。
在本教程中,我们将向您展示如何在Spring MVC中集成Spring Security 3.0并安全访问。在集成成功后,当我们查看页面的内容时用户需要先输入正确的“用户名”和“密码”。
本教程的开发环境为:
1.Spring 3.0.5.RELEASE
2.Spring Security 3.0.5.RELEASE
3.Eclipse 3.6
4.JDK 1.6
5.Maven 3
注意:Spring Security 3.0 至少需要java 5.0或更高的运行环境。
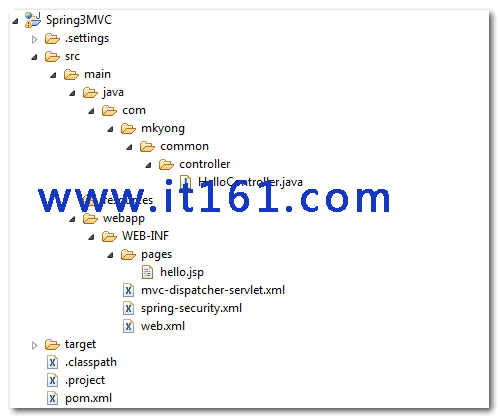
1.目录结构
本教程的最终目录如下所示:
2.[b]Spring Security依赖关系[/b]
为了正常运行 Spring security 3.0, 你需要加入 “spring-security-core.jar“, “spring-security-web.jar” and “spring-security-config.jar“. 在Maven库中你需要加入Spring配置库
pom.xml
3.Spring MVC Web应用程序
本教程是一个简单的Spring MVC 应用程序,即访问“/welcome”跳转到“hello.jsp”页面,稍后用Spring Security安全访问这个链接。
HelloController.java
hello.jsp
mvc-dispatcher-servlet.xml
4.Spring Secuity:用户验证
创建一个单独的Spring配置文件去定义Spring Security相关的东西。它要实现的是:只有用户输入了正确的用户名“mkyong”和密码“123456”才可以访问“/welcome” 。
下面的Spring配置文件你应该明白是什么意思。
spring-security.xml:
5.整合Spring Security
想要在Web应用程序中整合Spring Security,只需加入“DelegatingFilterProxy”作为Servlet过滤器拦截到来的请求即可。
web.xml
6.Demo
就是以上这些配置了,登陆页面在哪儿呢?不要着急,如果你不知道怎么创建登陆页面,我们将会创建一个简单的登陆页面去验证。
(登陆验证页面请访问:Spring Security实现的表单登陆的例子)
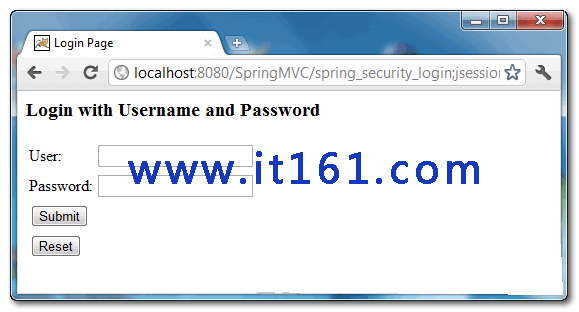
当我们访问“http://localhost:8080/SpringMVC/welcome”时,Spring Security 将会自动拦截到“http://localhost:8080/SpringMVC/spring_security_login”登陆页面验证身份。
http://localhost:8080/SpringMVC/spring_security_login页面如下所示:
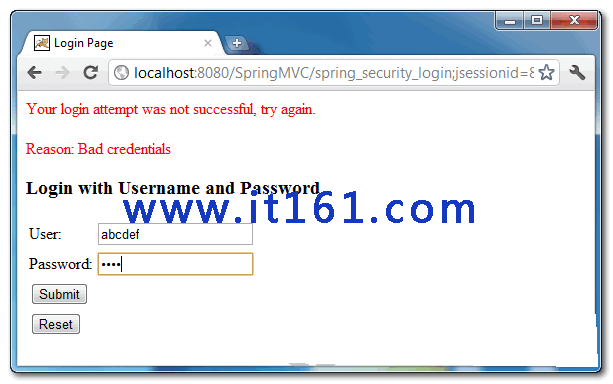
如果输错了用户名和密码则页面会显示错误的消息,如下所示:
http://localhost:8080/SpringMVC/spring_security_login?login_error
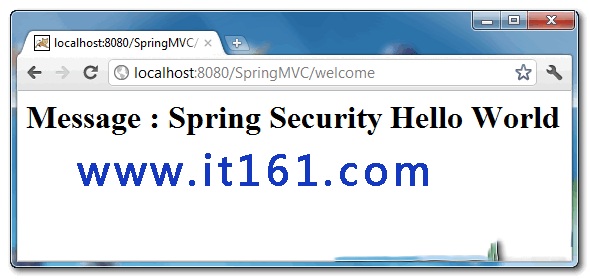
如果我们输对了用户名和密码,Spring Security则会跳转到欢迎页面,如下所示:
http://localhost:8080/SpringMVC/welcome
本文为原创文章,转载请注明出处,首发于http://www.it161.com/article/javaDetail?articleid=140107223703
更多IT文章,请访问http://www.it161.com/
在本教程中,我们将向您展示如何在Spring MVC中集成Spring Security 3.0并安全访问。在集成成功后,当我们查看页面的内容时用户需要先输入正确的“用户名”和“密码”。
本教程的开发环境为:
1.Spring 3.0.5.RELEASE
2.Spring Security 3.0.5.RELEASE
3.Eclipse 3.6
4.JDK 1.6
5.Maven 3
注意:Spring Security 3.0 至少需要java 5.0或更高的运行环境。
1.目录结构
本教程的最终目录如下所示:
2.[b]Spring Security依赖关系[/b]
为了正常运行 Spring security 3.0, 你需要加入 “spring-security-core.jar“, “spring-security-web.jar” and “spring-security-config.jar“. 在Maven库中你需要加入Spring配置库
pom.xml
| 1 2 3 4 5 6 7 8 9 10 11 12 13 14 15 16 17 18 19 20 21 22 23 24 25 26 27 28 29 30 31 32 33 34 35 36 37 38 39 40 41 42 43 44 45 46 47 | <properties> <spring.version>3.0.5.RELEASE</spring.version> </properties> <dependencies> <!-- Spring 3 --> <dependency> <groupId>org.springframework</groupId> <artifactId>spring-core</artifactId> <version>${spring.version}</version> </dependency> <dependency> <groupId>org.springframework</groupId> <artifactId>spring-web</artifactId> <version>${spring.version}</version> </dependency> <dependency> <groupId>org.springframework</groupId> <artifactId>spring-webmvc</artifactId> <version>${spring.version}</version> </dependency> <!-- Spring Security --> <dependency> <groupId>org.springframework.security</groupId> <artifactId>spring-security-core</artifactId> <version>${spring.version}</version> </dependency> <dependency> <groupId>org.springframework.security</groupId> <artifactId>spring-security-web</artifactId> <version>${spring.version}</version> </dependency> <dependency> <groupId>org.springframework.security</groupId> <artifactId>spring-security-config</artifactId> <version>${spring.version}</version> </dependency> </dependencies> </project> |
本教程是一个简单的Spring MVC 应用程序,即访问“/welcome”跳转到“hello.jsp”页面,稍后用Spring Security安全访问这个链接。
HelloController.java
| 1 2 3 4 5 6 7 8 9 10 11 12 13 14 15 16 17 18 19 20 | package com.mkyong.common.controller; import org.springframework.stereotype.Controller; import org.springframework.ui.ModelMap; import org.springframework.web.bind.annotation.RequestMapping; import org.springframework.web.bind.annotation.RequestMethod; @Controller @RequestMapping("/welcome") public class HelloController { @RequestMapping(method = RequestMethod.GET) public String printWelcome(ModelMap model) { model.addAttribute("message", "Spring Security Hello World"); return "hello"; } } |
| 1 2 3 4 5 | <html> <body> <h1>Message : ${message}</h1> </body> </html> |
| 1 2 3 4 5 6 7 8 9 10 11 12 13 14 15 16 17 18 19 20 21 22 | <beans xmlns=" http://www.springframework.org/schema/beans" xmlns:context=" http://www.springframework.org/schema/context" xmlns:xsi=" http://www.w3.org/2001/XMLSchema-instance" xsi:schemaLocation=" http://www.springframework.org/schema/beans http://www.springframework.org/schema/beans/spring-beans-3.0.xsd http://www.springframework.org/schema/context http://www.springframework.org/schema/context/spring-context-3.0.xsd"> <context:component-scan base-package="com.mkyong.common.controller" /> <bean class="org.springframework.web.servlet.view.InternalResourceViewResolver"> <property name="prefix"> <value>/WEB-INF/pages/</value> </property> <property name="suffix"> <value>.jsp</value> </property> </bean> </beans> |
创建一个单独的Spring配置文件去定义Spring Security相关的东西。它要实现的是:只有用户输入了正确的用户名“mkyong”和密码“123456”才可以访问“/welcome” 。
下面的Spring配置文件你应该明白是什么意思。
spring-security.xml:
| 1 2 3 4 5 6 7 8 9 10 11 12 13 14 15 16 17 18 19 20 21 | <beans:beans xmlns=" http://www.springframework.org/schema/security" xmlns:beans=" http://www.springframework.org/schema/beans" xmlns:xsi=" http://www.w3.org/2001/XMLSchema-instance" xsi:schemaLocation=" http://www.springframework.org/schema/beans http://www.springframework.org/schema/beans/spring-beans-3.0.xsd http://www.springframework.org/schema/security http://www.springframework.org/schema/security/spring-security-3.0.3.xsd"> <http auto-config="true"> <intercept-url pattern="/welcome*" access="ROLE_USER" /> </http> <authentication-manager> <authentication-provider> <user-service> <user name="mkyong" password="123456" authorities="ROLE_USER" /> </user-service> </authentication-provider> </authentication-manager> </beans:beans> |
想要在Web应用程序中整合Spring Security,只需加入“DelegatingFilterProxy”作为Servlet过滤器拦截到来的请求即可。
web.xml
| 1 2 3 4 5 6 7 8 9 10 11 12 13 14 15 16 17 18 19 20 21 22 23 24 25 26 27 28 29 30 31 32 33 34 35 36 37 38 39 40 41 42 43 44 45 46 47 48 49 | <web-app id="WebApp_ID" version="2.4" xmlns=" http://java.sun.com/xml/ns/j2ee" xmlns:xsi=" http://www.w3.org/2001/XMLSchema-instance" xsi:schemaLocation=" http://java.sun.com/xml/ns/j2ee http://java.sun.com/xml/ns/j2ee/web-app_2_4.xsd"> <display-name>Spring MVC Application</display-name> <!-- Spring MVC --> <servlet> <servlet-name>mvc-dispatcher</servlet-name> <servlet-class> org.springframework.web.servlet.DispatcherServlet </servlet-class> <load-on-startup>1</load-on-startup> </servlet> <servlet-mapping> <servlet-name>mvc-dispatcher</servlet-name> <url-pattern>/</url-pattern> </servlet-mapping> <listener> <listener-class> org.springframework.web.context.ContextLoaderListener </listener-class> </listener> <context-param> <param-name>contextConfigLocation</param-name> <param-value> /WEB-INF/mvc-dispatcher-servlet.xml, /WEB-INF/spring-security.xml </param-value> </context-param> <!-- Spring Security --> <filter> <filter-name>springSecurityFilterChain</filter-name> <filter-class> org.springframework.web.filter.DelegatingFilterProxy </filter-class> </filter> <filter-mapping> <filter-name>springSecurityFilterChain</filter-name> <url-pattern>/*</url-pattern> </filter-mapping> </web-app> |
就是以上这些配置了,登陆页面在哪儿呢?不要着急,如果你不知道怎么创建登陆页面,我们将会创建一个简单的登陆页面去验证。
(登陆验证页面请访问:Spring Security实现的表单登陆的例子)
当我们访问“http://localhost:8080/SpringMVC/welcome”时,Spring Security 将会自动拦截到“http://localhost:8080/SpringMVC/spring_security_login”登陆页面验证身份。
http://localhost:8080/SpringMVC/spring_security_login页面如下所示:
如果输错了用户名和密码则页面会显示错误的消息,如下所示:
http://localhost:8080/SpringMVC/spring_security_login?login_error
如果我们输对了用户名和密码,Spring Security则会跳转到欢迎页面,如下所示:
http://localhost:8080/SpringMVC/welcome
本文为原创文章,转载请注明出处,首发于http://www.it161.com/article/javaDetail?articleid=140107223703
更多IT文章,请访问http://www.it161.com/

相关文章推荐
- Spring+Spring Security+Maven 实现的一个Hello World例子
- 用Maven实现一个protobuf的Java例子
- SpringMVC+Hibernate+Maven+MySQL实现增删改查的一个小Demo
- Spring+Spring Security+JSTL实现的表单登陆的例子
- Security-OAuth2 密码模式之服务器实现(工具IDEA+Maven+springboot)
- 基于Eclipse Maven的Spring4/Spring-MVC/Hibernate4整合之八:一个简单例子演示Spring-MVC中多种参数传递方式
- SpringMvc+Mybatis+Maven+Mysql做一个CRUD的简单例子
- spring笔记--使用springAPI以及自定义类 实现AOP的一个例子
- Spring+Spring Security+JSTL实现的表单登陆的例子
- Spring Boot系列01-Spring Boot + maven 实现Hello World
- 【Idea】Idea+SpringMVC+Maven+Tomcat搭建一个简单的hello world工程
- spring中实现rmi的一个例子及说明
- spring笔记--使用springAPI以及自定义类 实现AOP的一个例子
- 一个简单的Spring实现的例子
- Security-OAuth2.0 密码模式客户端实现(IDEA+springboot+maven)
- Appium+Robotframework实现iOS应用的自动化测试-5:一个简单的例子
- SQL2000 存储过程中实现递归的一个简单例子
- 模板 traits的一个经典例子 , 解决 void func(T t)根据t的类型不同来做不同的实现
- 实现一个简易的IoC框架(上)(此篇与Spring.NET无关,为自己手写IoC框架)
- springmvc+mybaits的一个简单例子