Struts2+Poi实现导出excel功能
2013-10-25 11:26
399 查看
今天,客户需要添加一个功能,导出数据,开始想到导出word文件,后来搜索poi的相关内容后,了解到Poi对word支持不是很好,听说是项目组成员走了不少,看到几个人说导出word使用itext比较好,一想算了,还是用poi来导出excel文件吧,poi对excel的支持还是很不错的。
poi 下载地址:http://poi.apache.org/
struts2和poi不需要额外的插件来进行处理,导入poi的原始jar包就可以使用了,目前版本是3.9,。
这里不多说废话了,先上struts.xml配置文件:
以上的excelStream和fileName需要在action中定义,名字必须相同。
下面是action的代码:(控制器)
这里要提一下,fileName如果不做转码的话,文件名中的中文不会有显示或者有乱码出现。
控制器调用业务层的方法,返回一个HSSFWorkbook类型的对象,下面上业务层的方法:
poi使用大概的流程就是,创建HSSFWorkbook对象,它代表一个excel文件对象,之后使用它的api创建一个Sheet对象,通过sheet再去创建HSSFRow,有了行对象再通过它创建单元格对象HSSFCell,单元格对象有了以后直接调用.setCellValue()就完事了,剩下的更多其实就是样式等问题了,整体使用还是比较简单的,下面贴上一些比较常用的样式的api:
设置列宽、行高
sheet.setColumnWidth((short)column,(short)width);
row.setHeight((short)height);
render_code();
合并单元格
/*sheet.CellRangeAddress(int firstRow,int lastRow,int firstCol,int lastCol)*/
设置字体和内容位置
代码HSSFFont f = wb.createFont();
f.setFontHeightInPoints((short) 11);//字号
f.setBoldweight(HSSFFont.BOLDWEIGHT_NORMAL);//加粗
style.setFont(f);
style.setAlignment(HSSFCellStyle.ALIGN_CENTER);//左右居中
style.setVerticalAlignment(HSSFCellStyle.VERTICAL_CENTER);//上下居中
style.setRotation(short rotation);//单元格内容的旋转的角度
HSSFDataFormat df = wb.createDataFormat();
style1.setDataFormat(df.getFormat("0.00%"));//设置单元格数据格式
cell.setCellFormula(string);//给单元格设公式
style.setRotation(short rotation);//单元格内容的旋转的角度
cell.setCellStyle(style);
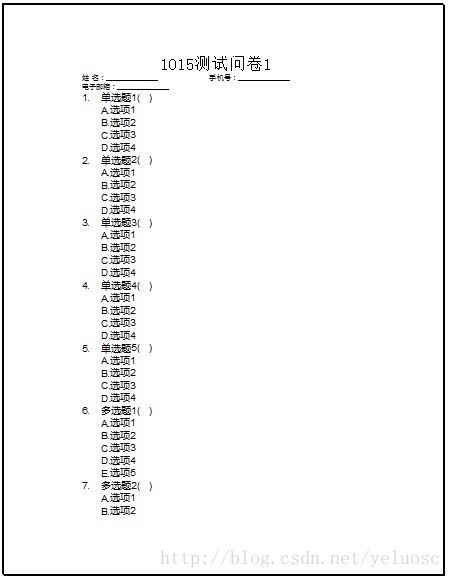
最后贴上我的效果图:
poi 下载地址:http://poi.apache.org/
struts2和poi不需要额外的插件来进行处理,导入poi的原始jar包就可以使用了,目前版本是3.9,。
这里不多说废话了,先上struts.xml配置文件:
<action name="exportPaper" class="com.capinfo.question.paper.action.PaperAction" method="exportPaper">
<result type="stream">
<param name="contentType">application/vnd.ms-excel</param>
<param name="inputName">excelStream</param><!-- inputName配置的是输入流的名称 -->
<param name="contentDisposition">attachment;filename="${fileName}.xls"</param>
<!-- contentDisposition的作用主要是让IE浏览器将其作为一个附件形式返回而不是直接在网页中显示,其中我们用到一个参数fileName,这样可以在Struts中动态修改这个Excel文件的名称。 -->
<param name="bufferSize">1024</param>
</result>
</action>
以上的excelStream和fileName需要在action中定义,名字必须相同。
下面是action的代码:(控制器)
@Getter@Setter
private InputStream excelStream;
@Getter@Setter
private String fileName;
public String exportPaper() throws IOException{
paper = paperBusiness.viewPaper(paper.getId());
problems = paperBusiness.viewProblem(paper.getId());
HSSFWorkbook workbook = paperBusiness.exportPaperExcel(paper, problems,0);
ByteArrayOutputStream outputStream = new ByteArrayOutputStream();
workbook.write(outputStream);
outputStream.flush();
byte[] byteArray = outputStream.toByteArray();
excelStream = new ByteArrayInputStream(byteArray,0,byteArray.length);
outputStream.close();
fileName = new String(paper.getName().getBytes("gb2312"),"iso8859-1");
return SUCCESS;
}
这里要提一下,fileName如果不做转码的话,文件名中的中文不会有显示或者有乱码出现。
控制器调用业务层的方法,返回一个HSSFWorkbook类型的对象,下面上业务层的方法:
@Override
public HSSFWorkbook exportPaperExcel(Paper paper, List<Problem> problems, int optionSort) {
int rowNumProblem = 4;//每道问题出现所在行的行号

HSSFWorkbook workbook = new HSSFWorkbook();//创建工作表
HSSFSheet sheet = workbook.createSheet("问卷内容");//创建表单
HSSFRow row = sheet.createRow(0);//创建第一行
HSSFCell cell = row.createCell(0);
cell.setCellValue(paper.getName());

//设置标题样式
HSSFCellStyle style = workbook.createCellStyle();
style.setAlignment(HSSFCellStyle.VERTICAL_CENTER);
style.setAlignment(HSSFCellStyle.ALIGN_CENTER);
HSSFFont font = workbook.createFont();
font.setFontName("宋体");
font.setFontHeightInPoints((short)24);
font.setBoldweight((short)20);
style.setFont(font);
cell.setCellStyle(style);
sheet.addMergedRegion(new CellRangeAddress(0,1,0,9));//问卷名称,合并单元格
/*CellRangeAddress(int firstRow,int lastRow,int firstCol,int lastCol)*/
sheet.setColumnWidth(0, 2500);
sheet.setColumnWidth(1, 1200);

HSSFCellStyle styleCell = workbook.createCellStyle();
HSSFFont fontCell = workbook.createFont();
styleCell.setAlignment(HSSFCellStyle.ALIGN_LEFT);
styleCell.setAlignment(HSSFCellStyle.VERTICAL_TOP);
fontCell.setFontHeightInPoints((short)14);
fontCell.setBoldweight((short)10);
styleCell.setFont(fontCell);

//表格第二行填写用户信息
HSSFRow rowUser = sheet.createRow(2);
rowUser.createCell(0);
HSSFCell cellName = rowUser.createCell(1);
cellName.setCellValue("姓  名:_____________");
sheet.addMergedRegion(new CellRangeAddress(2,2,1,4));
HSSFCell cellTele = rowUser.createCell(5);
cellTele.setCellValue("手机号:_____________");
sheet.addMergedRegion(new CellRangeAddress(2,2,5,8));

//表格第三行用户信息
HSSFRow rowUser2 = sheet.createRow(3);
rowUser2.createCell(0);
HSSFCell cellEmail = rowUser2.createCell(1);
cellEmail.setCellValue("电子邮箱:_____________");
sheet.addMergedRegion(new CellRangeAddress(3,3,1,4));

if(optionSort==0){//垂直排列
for(int i=0;i<problems.size();i++){
HSSFRow rowProblem = sheet.createRow(rowNumProblem);
rowProblem.createCell(0);
HSSFCell cellProblemId = rowProblem.createCell(1);//放置题号
cellProblemId.setCellValue(i+1+".");
HSSFCell cellProblemCont = rowProblem.createCell(2);//放置问题内容
if(problems.get(i).getType()!=3){
cellProblemCont.setCellValue(problems.get(i).getContent()+"(   )");
}else
cellProblemCont.setCellValue(problems.get(i).getContent());

cellProblemCont.setCellStyle(styleCell);
cellProblemId.setCellStyle(styleCell);
sheet.addMergedRegion(new CellRangeAddress(rowNumProblem,rowNumProblem,2,8));

rowNumProblem++;//每次+1,记录下一次行号起始位置
Set<ProblemOption> options = problems.get(i).getProblemOptions();
Iterator it = options.iterator();
while(it.hasNext()){
ProblemOption option = (ProblemOption)it.next();
HSSFRow rowOption = sheet.createRow(rowNumProblem);
rowOption.createCell(0);
rowOption.createCell(1);//选项前2个单元格为空
HSSFCell cellOption = rowOption.createCell(2);
if(problems.get(i).getType()!=3){
cellOption.setCellValue(option.getSign()+"."+option.getContent());
}else{
cellOption.setCellValue(option.getSign());
rowNumProblem++;
sheet.createRow(rowNumProblem);
rowNumProblem++;
sheet.createRow(rowNumProblem);
}

cellOption.setCellStyle(styleCell);
sheet.addMergedRegion(new CellRangeAddress(rowNumProblem,rowNumProblem,2,6));

rowNumProblem++;
}
}
}else if(optionSort == 1){//水平排列
for(int i=0;i<problems.size();i++){
int optionNumCell = 2;//选项的位置单元格列号
HSSFRow rowProblem = sheet.createRow(rowNumProblem);
rowProblem.createCell(0);
HSSFCell cellProblemId = rowProblem.createCell(1);//放置题号
cellProblemId.setCellValue(i+1+".");
HSSFCell cellProblemCont = rowProblem.createCell(2);//放置问题内容
if(problems.get(i).getType()!=3){
cellProblemCont.setCellValue(problems.get(i).getContent()+"(   )");
}else
cellProblemCont.setCellValue(problems.get(i).getContent());

cellProblemCont.setCellStyle(styleCell);
cellProblemId.setCellStyle(styleCell);
sheet.addMergedRegion(new CellRangeAddress(rowNumProblem,rowNumProblem,2,8));

rowNumProblem++;//每次+1,记录下一次行号起始位置
Set<ProblemOption> options = problems.get(i).getProblemOptions();
Iterator it = options.iterator();

HSSFRow rowOption = sheet.createRow(rowNumProblem);
rowOption.createCell(0);
rowOption.createCell(1);//选项前2个单元格为空
while(it.hasNext()){
ProblemOption option = (ProblemOption)it.next();
sheet.setColumnWidth(optionNumCell, 3500);

HSSFCell cellOption = rowOption.createCell(optionNumCell);
optionNumCell++;
if(problems.get(i).getType()!=3){
cellOption.setCellValue(option.getSign()+"."+option.getContent());

}else{
cellOption.setCellValue(option.getSign());
rowNumProblem++;
sheet.createRow(rowNumProblem);
rowNumProblem++;
sheet.createRow(rowNumProblem);
}

cellOption.setCellStyle(styleCell);
}
rowNumProblem++;
sheet.createRow(rowNumProblem);
}
}
return workbook;
}
poi使用大概的流程就是,创建HSSFWorkbook对象,它代表一个excel文件对象,之后使用它的api创建一个Sheet对象,通过sheet再去创建HSSFRow,有了行对象再通过它创建单元格对象HSSFCell,单元格对象有了以后直接调用.setCellValue()就完事了,剩下的更多其实就是样式等问题了,整体使用还是比较简单的,下面贴上一些比较常用的样式的api:
设置列宽、行高
sheet.setColumnWidth((short)column,(short)width);
row.setHeight((short)height);
render_code();
合并单元格
/*sheet.CellRangeAddress(int firstRow,int lastRow,int firstCol,int lastCol)*/
设置字体和内容位置
代码HSSFFont f = wb.createFont();
f.setFontHeightInPoints((short) 11);//字号
f.setBoldweight(HSSFFont.BOLDWEIGHT_NORMAL);//加粗
style.setFont(f);
style.setAlignment(HSSFCellStyle.ALIGN_CENTER);//左右居中
style.setVerticalAlignment(HSSFCellStyle.VERTICAL_CENTER);//上下居中
style.setRotation(short rotation);//单元格内容的旋转的角度
HSSFDataFormat df = wb.createDataFormat();
style1.setDataFormat(df.getFormat("0.00%"));//设置单元格数据格式
cell.setCellFormula(string);//给单元格设公式
style.setRotation(short rotation);//单元格内容的旋转的角度
cell.setCellStyle(style);
最后贴上我的效果图:

相关文章推荐
- 关于对Java Struts2+poi插件 实现的 导出Excel功能
- POI实现java导出Excel功能
- javaEE excel导出功能实现
- NPOI导出Excel表功能实现(多个工作簿)(备用)
- 在 Laravel 5 中使用 Laravel Excel 实现 Excel/CSV 文件导入导出功能
- (转)NPOI导出Excel表功能实现(多个工作簿)
- VUE的axios实现excel导出下载功能
- 在 Laravel 5 中使用 Laravel Excel 实现 Excel/CSV 文件导入导出功能
- jxl实现的导出excel的功能
- java实现页面excel导出功能
- JSF中实现导出Excel的功能(转)
- ssh结合easyui实现导出Excel功能
- 纯前端利用 js-xlsx 实现 Excel 文件导入导出功能示例
- Java 实现导出Excel功能
- asp.net mvc导出excel文件先保存到服务器某个目录,然后再导出到客户端供客户下载功能的实现
- (转)NPOI导出Excel表功能实现(多个工作簿)
- ASP.NET实现增删改查等功能(Access版)系统之六-导出数据到EXCEL
- s2sh开发轻松实现导出excel功能
- Jquery构建表单+SpringMVC实现导出Excel报表功能
- 假导出Excel功能实现,按CSV格式快速导出功能代码参考(追求代码追求简洁复用)浙江杭州