iOS 新浪微博客户端Demo实践之(四) 发微博页面
2013-05-17 00:18
435 查看
demo程序已经上传,需要5个资源分,没有资源分的,在评论中留下邮箱,我会发给你的,欢迎下载修改和交流!

demo下载链接地址
这一篇博文讲述发微博界面的实现。
首先我们先了解一下在这个发微博界面中需要做哪些事情吧!
(1) 发微博包括文字内容和微博图片,所以我们可以用一个textview来装载微博文字内容,用一个imageview来装载图片内容。
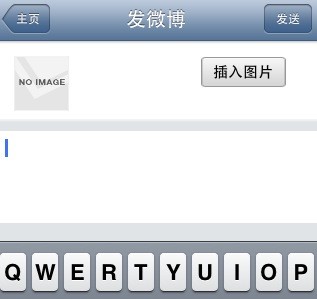
①在文字部分,用一个textview,在发送的时候检测一下发送文字的个数,如果超过140,那么给出提示信息。在图片部分,用一个imageview,并且如果添加了图片,那么在图片的右上角添加一个打叉的按钮,作用是去除图片;当然,在你没有选择添加图片或者取消了已选图片时,按键自动取消。效果如下图:


这个打叉的cancelButton的处理比较简单,代码如下:
在导航栏的右边添加一个发送按键,处理相关的发送信息。代码如下:
注意到其中的方法 -(void) postWithText:(NSString*)text 是发单纯文字微博的,而方法 -(void)postWithText:(NSString *)text image:(UIImage*)image 是发文字+图片微博的。具体的实现过程下面会讲解。
修改:突然发现其实上面的发送代码中还存在一个小问题,假如其中不输入文字也可以发送,显然这是不对的。那么还有添加一个if判断一下字数长度是否为0,如果是0的话给出一个alert窗口提示一下。
②这里要着重说的是如何添加图片。
这里用一个按键用于插入图片。


插入的图片来源包括系统相册和拍摄。
在这里我们需要用到UIImagePickerController 类来创建图像选取器。UIImagePickerController 图像选取器是一种导航控制器类,让你可以在应用程序中添加简单的图像选择功能或者照相机界面。用户会看到一个图像选择屏幕,在其中挑选相片,相片的来源则是他自己的相片库、保存下来的相片集或者照相机。当用户选定一个相片后,就会通过 UIImagePickerDelegate 协议中的方法,通知选取器的委托方法实现图像的选取。
The role and appearance of an image picker controller depend on the source type you assign to it before you present it.
A sourceType of UIImagePickerControllerSourceTypeCamera provides a user interface for taking a new picture or movie (on devices that support media capture).
A sourceType of UIImagePickerControllerSourceTypePhotoLibrary or UIImagePickerControllerSourceTypeSavedPhotosAlbum provides a user interface for choosing among saved pictures and movies.
这里说明了通过sourceType 设定图像的来源。包括
enum{
UIImagePickerControllerSourceTypePhotoLibrary,//相片库
UIImagePickerControllerSourceTypeCamera,//照相机
UIImagePickerControllerSourceTypeSavedPhotosAlbum//保存的相片
};
typedef NSUInteger UIImagePickerControllerSourceType;
Verify that the device is capable of picking content from the desired source. Do this calling the isSourceTypeAvailable: class method, providing a constant from the “UIImagePickerControllerSourceType” enumeration.
在使用时应先检查当前设备是否支持使用UIImagePickerController,这个时候我们需要调用isSourceTypeAvailable:方法判断,需要提供sourceType 作为参数
当用户选择一个图片之后,选择器的委托会通过 didFinishPickingImage 方法接到通知。代理会得到一个包含有该图像的 UIImage 对象,如果编辑功能开启的话,还会得到一个包含了编辑属性的NSDictionary。
使用UIImagePickerController的时候注意添加这两个delegate,<UIImagePickerControllerDelegate,UINavigationControllerDelegate>并实现其中的两个方法。
- (void)imagePickerController:(UIImagePickerController *)picker didFinishPickingMediaWithInfo:(NSDictionary *)info
- (void)imagePickerControllerDidCancel:(UIImagePickerController *)picker
设置选取器的delegate ,就可以将一个委托赋予选择器:picker.delegate =self;
在这里我们需要实现下面的这个第一个方法,这样当选取一个图像时,委托类就会得到通知,在这个方法中添加图像处理的有关代码就可以实现对选取图片的处理。
添加图片这部分的代码如下:
(1) 发微博需要用到的API调用;如果只是发文字微博的话,是用到这个API:https://api.weibo.com/2/statuses/update.json;如果是发文字+图片微博的话,用到的是这个API:https://upload.api.weibo.com/2/statuses/upload.json。注意到二者的HTTP请求都是POST;而且请求参数中也要做一点出来,文字的话必须做URLencode,内容不超过140个汉字;图片的话,需要是binary类型的,而且仅支持JPEG 、GIF 、PNG格式,图片大小小于5M。
这部分数据请求的处理我用到了ASIHTTPRequest这个第三方类库。
处理的代码如下:
使用时需要#import "ASIFormDataRequest.h"
有两点需要说明的是:
1、前面已经说到文字内容需要URLencode,在这里我么并没有做什么处理,因为我们使用的这个第三方类库已经帮我们实现了;对于微博图片内容,必须转换成binary现实,我们是这样处理的:UIImagePNGRepresentation(image)
NSData * UIImagePNGRepresentation (
UIImage *image
);
Returns the data for the specified image in PNG format
2、在发送完成的block中我们对textview和imagview都做了处理,方便发送下一条微博;同时我添加了一个提示框提示发送成功的信息,在这个提示框中我使用了customView,也就是打钩的image。效果图如下。

好了,大概就这样说完了!

demo下载链接地址
这一篇博文讲述发微博界面的实现。
首先我们先了解一下在这个发微博界面中需要做哪些事情吧!
(1) 发微博包括文字内容和微博图片,所以我们可以用一个textview来装载微博文字内容,用一个imageview来装载图片内容。
①在文字部分,用一个textview,在发送的时候检测一下发送文字的个数,如果超过140,那么给出提示信息。在图片部分,用一个imageview,并且如果添加了图片,那么在图片的右上角添加一个打叉的按钮,作用是去除图片;当然,在你没有选择添加图片或者取消了已选图片时,按键自动取消。效果如下图:
这个打叉的cancelButton的处理比较简单,代码如下:
- (IBAction)cancelImage:(id)sender {
_cancelButton.hidden = YES;
self.theImageView.image = [UIImage imageNamed:@"noImage50x118.png"];
}
在导航栏的右边添加一个发送按键,处理相关的发送信息。代码如下:
- (IBAction)sendWeibo:(id)sender {

[self.theTextView resignFirstResponder];

NSString *content = [[NSString alloc] initWithString:_theTextView.text];
//计算发送微博的内容字数,并作相应的处理
NSInteger contentLength = content.length;
if (contentLength > 140) {

MBProgressHUD *overLengthHud = [[MBProgressHUD alloc] initWithView:self.view];
[self.view addSubview:overLengthHud];
overLengthHud.mode = MBProgressHUDModeText;
overLengthHud.labelText = @"提示信息";
overLengthHud.detailsLabelText = [NSString stringWithFormat:@"微博字数:%d 超过140上限!",contentLength];
[overLengthHud show:YES];
[overLengthHud hide:YES afterDelay:2];
}
else {
UIImage *image = _theImageView.image;
//没有图片
if (!hasPostImage) {
[self postWithText:content];
}
//有图片
else {
[self postWithText:content image:image];
}

hud = [[MBProgressHUD alloc] init];
hud.dimBackground = YES;
hud.labelText = @"正在发送...";
[hud show:YES];
[self.view addSubview:hud];
}
}
注意到其中的方法 -(void) postWithText:(NSString*)text 是发单纯文字微博的,而方法 -(void)postWithText:(NSString *)text image:(UIImage*)image 是发文字+图片微博的。具体的实现过程下面会讲解。
修改:突然发现其实上面的发送代码中还存在一个小问题,假如其中不输入文字也可以发送,显然这是不对的。那么还有添加一个if判断一下字数长度是否为0,如果是0的话给出一个alert窗口提示一下。
if (contentLength == 0) {
UIAlertView *alert = [[UIAlertView alloc] initWithTitle:nil message:@"请输入微博内容!" delegate:nil cancelButtonTitle:@"好" otherButtonTitles:nil, nil];
[alert show];
}
else if (contentLength > 140) {

}
else {

}
②这里要着重说的是如何添加图片。
这里用一个按键用于插入图片。
插入的图片来源包括系统相册和拍摄。
在这里我们需要用到UIImagePickerController 类来创建图像选取器。UIImagePickerController 图像选取器是一种导航控制器类,让你可以在应用程序中添加简单的图像选择功能或者照相机界面。用户会看到一个图像选择屏幕,在其中挑选相片,相片的来源则是他自己的相片库、保存下来的相片集或者照相机。当用户选定一个相片后,就会通过 UIImagePickerDelegate 协议中的方法,通知选取器的委托方法实现图像的选取。
The role and appearance of an image picker controller depend on the source type you assign to it before you present it.
A sourceType of UIImagePickerControllerSourceTypeCamera provides a user interface for taking a new picture or movie (on devices that support media capture).
A sourceType of UIImagePickerControllerSourceTypePhotoLibrary or UIImagePickerControllerSourceTypeSavedPhotosAlbum provides a user interface for choosing among saved pictures and movies.
这里说明了通过sourceType 设定图像的来源。包括
enum{
UIImagePickerControllerSourceTypePhotoLibrary,//相片库
UIImagePickerControllerSourceTypeCamera,//照相机
UIImagePickerControllerSourceTypeSavedPhotosAlbum//保存的相片
};
typedef NSUInteger UIImagePickerControllerSourceType;
Verify that the device is capable of picking content from the desired source. Do this calling the isSourceTypeAvailable: class method, providing a constant from the “UIImagePickerControllerSourceType” enumeration.
在使用时应先检查当前设备是否支持使用UIImagePickerController,这个时候我们需要调用isSourceTypeAvailable:方法判断,需要提供sourceType 作为参数
当用户选择一个图片之后,选择器的委托会通过 didFinishPickingImage 方法接到通知。代理会得到一个包含有该图像的 UIImage 对象,如果编辑功能开启的话,还会得到一个包含了编辑属性的NSDictionary。
使用UIImagePickerController的时候注意添加这两个delegate,<UIImagePickerControllerDelegate,UINavigationControllerDelegate>并实现其中的两个方法。
- (void)imagePickerController:(UIImagePickerController *)picker didFinishPickingMediaWithInfo:(NSDictionary *)info
- (void)imagePickerControllerDidCancel:(UIImagePickerController *)picker
设置选取器的delegate ,就可以将一个委托赋予选择器:picker.delegate =self;
在这里我们需要实现下面的这个第一个方法,这样当选取一个图像时,委托类就会得到通知,在这个方法中添加图像处理的有关代码就可以实现对选取图片的处理。
添加图片这部分的代码如下:
  - (IBAction)addPhoto:(id)sender {
      UIAlertView *alert = [[UIAlertView alloc] initWithTitle:nil message:@"插入图片" delegate:self cancelButtonTitle:@"取消" otherButtonTitles:@"系统相册",@"拍摄", nil];
      [alert show];
  }

  #pragma mark - UIAlertViewDelegate
  - (void)alertView:(UIAlertView *)alertView clickedButtonAtIndex:(NSInteger)buttonIndex
  {
      if (buttonIndex == 1)
      {
          [self addPhoto];
      }
      else if(buttonIndex == 2)
      {
          [self takePhoto];
      }
  }

  - (void)addPhoto
  {
      UIImagePickerController * imagePickerController = [[UIImagePickerController alloc]init];
  	imagePickerController.sourceType = UIImagePickerControllerSourceTypePhotoLibrary;
  	imagePickerController.delegate = self;
  	imagePickerController.allowsEditing = NO;
  	[self presentModalViewController:imagePickerController animated:YES];
  }

  - (void)takePhoto
  {
      if (![UIImagePickerController isSourceTypeAvailable:UIImagePickerControllerSourceTypeCamera])
      {
          UIAlertView *alert = [[UIAlertView alloc] initWithTitle:nil
                                                          message:@"该设备不支持拍照功能"
                                                         delegate:nil
                                                cancelButtonTitle:nil
                                                otherButtonTitles:@"好", nil];
          [alert show];
      }
      else
      {
          UIImagePickerController * imagePickerController = [[UIImagePickerController alloc]init];
          imagePickerController.sourceType = UIImagePickerControllerSourceTypeCamera;
          imagePickerController.delegate = self;
          imagePickerController.allowsEditing = NO;
          [self presentModalViewController:imagePickerController animated:YES];
      }
  }
  #pragma mark - UIImagePickerControllerDelegate
  - (void)imagePickerController:(UIImagePickerController *)picker didFinishPickingMediaWithInfo:(NSDictionary *)info
  {
      [picker dismissModalViewControllerAnimated:YES];
      UIImage * image = [info objectForKey:@"UIImagePickerControllerOriginalImage"];
      self.theImageView.image = image;
      hasPostImage = YES;
      _cancelButton.hidden = NO;

  }
(1) 发微博需要用到的API调用;如果只是发文字微博的话,是用到这个API:https://api.weibo.com/2/statuses/update.json;如果是发文字+图片微博的话,用到的是这个API:https://upload.api.weibo.com/2/statuses/upload.json。注意到二者的HTTP请求都是POST;而且请求参数中也要做一点出来,文字的话必须做URLencode,内容不超过140个汉字;图片的话,需要是binary类型的,而且仅支持JPEG 、GIF 、PNG格式,图片大小小于5M。
这部分数据请求的处理我用到了ASIHTTPRequest这个第三方类库。
处理的代码如下:
  //发布文字微博
  -(void) postWithText:(NSString*)text {
      NSURL *url = [NSURL URLWithString:WEIBO_UPDATE];
      ASIFormDataRequest *item = [[ASIFormDataRequest alloc] initWithURL:url];
      [item setPostValue:[InfoForSina returnAccessTokenString]    forKey:@"access_token"];
      [item setPostValue:text                                     forKey:@"status"];
      [item setCompletionBlock:^{

          self.theTextView.text = nil;
          [hud removeFromSuperview];
          MBProgressHUD *custuonHUD = [[MBProgressHUD alloc]initWithView:self.view];
          custuonHUD.customView = [[UIImageView alloc] initWithImage:[UIImage imageNamed:@"37x-Checkmark.png"]];
          custuonHUD.labelText = @"发微博成功!";
          custuonHUD.mode = MBProgressHUDModeCustomView;
          [self.view addSubview:custuonHUD];
          [custuonHUD show:YES];
          [custuonHUD hide:YES afterDelay:1];

      }];
      [item startAsynchronous];

  }
  //发布文字图片微博
  -(void)postWithText:(NSString *)text image:(UIImage*)image {
      NSURL *url = [NSURL URLWithString:WEIBO_UPLOAD];
      ASIFormDataRequest *item = [[ASIFormDataRequest alloc] initWithURL:url];

      [item setPostValue:[InfoForSina returnAccessTokenString]    forKey:@"access_token"];
      [item setPostValue:text                                     forKey:@"status"];
      [item addData:UIImagePNGRepresentation(image)               forKey:@"pic"];

      [item setCompletionBlock:^{

          self.theImageView.image = [UIImage imageNamed:@"noImage50x118.png"];
          self.theTextView.text = nil;
          [hud removeFromSuperview];
          _cancelButton.hidden = NO;
          MBProgressHUD *custuonHUD = [[MBProgressHUD alloc]initWithView:self.view];
          custuonHUD.customView = [[UIImageView alloc] initWithImage:[UIImage imageNamed:@"37x-Checkmark.png"]];
          custuonHUD.labelText = @"发微博成功!";
          custuonHUD.mode = MBProgressHUDModeCustomView;
          [self.view addSubview:custuonHUD];
          [custuonHUD show:YES];
          [custuonHUD hide:YES afterDelay:1];
      }];

      [item startAsynchronous];
  }
使用时需要#import "ASIFormDataRequest.h"
有两点需要说明的是:
1、前面已经说到文字内容需要URLencode,在这里我么并没有做什么处理,因为我们使用的这个第三方类库已经帮我们实现了;对于微博图片内容,必须转换成binary现实,我们是这样处理的:UIImagePNGRepresentation(image)
NSData * UIImagePNGRepresentation (
UIImage *image
);
Returns the data for the specified image in PNG format
2、在发送完成的block中我们对textview和imagview都做了处理,方便发送下一条微博;同时我添加了一个提示框提示发送成功的信息,在这个提示框中我使用了customView,也就是打钩的image。效果图如下。
好了,大概就这样说完了!

相关文章推荐
- iOS 新浪微博客户端Demo实践之(六) 微博评论列表页面和发评论
- iOS 新浪微博客户端Demo实践之(五) 粉丝列表页面
- iOS 新浪微博客户端Demo实践之(八) 添加图片放大,slide view和定位功能
- iOS 新浪微博客户端Demo实践之(七) 应用程序图标设置及总结
- iOS 新浪微博客户端Demo实践之(一)OAuth2.0认证
- iOS 新浪微博客户端Demo实践之(一)OAuth2.0认证
- iOS 新浪微博客户端Demo实践之(二) 授权页面
- iOS 新浪微博客户端Demo实践之(三)微博主页
- iOS开发实践:一个类微博客户端从启动到与用户交互的过程
- iOS SDK详解之UITabbar(仿新浪微博的Demo)
- 记:新浪微博iOS客户端开发的电话面试
- 新浪微博客户端(21)-获取当前微博未读数并提示用户
- 利用iOS API编写简单微博客户端全过程
- android开发我的新浪微博客户端-载入页面sqlite篇(1.2)
- 新浪微博客户端源代码-新浪微博OAuth2.0接口--回调地址未填而出现第三方调用错误解决方法
- iOS 网络编程实践--NSStream实现TCP Socket iPhone客户端
- 新浪微博客户端源代码-新浪微博OAuth2.0接口
- android开发我的新浪微博客户端-载入页面sqlite篇(1.2)
- iOS上的TCP-Socket长连接,Demo客户端
- iOS网络编程实践--NSStream实现TCP Socket iPhone客户端